Colosseum Maze of Epics (4e Quest)
| Work In Progress |
Colosseum Maze of Epics
Dare you go forth to realize your destiny, new adventurer?
The question has been posed before, of what makes true legends. There are those who band together, but also those who stand alone. Those who wish for the latter, not to share any power or glory, may seek this Colosseum in a gamble of glory and death. Beware, naïve traveler, for the ways of this place are fickle. Doors, once passed through, may close and never open again. There is no going back. Take your rests well or die to the many wounds you are sure to accrue as a result of this grueling maze. Either fall like so many have before you or rise to the challenge! Can you brave the hardships to face that void which threatens to devour your soul and world?
The Colosseum is a legendary structure in the Valia isles of Elysium. They are said to be home to the greatest heroes, as well as a collection of the Goddess of Victory's very own trial-building set of monsters, traps, and the like. As of recent, it has since fallen into mystery and vanished from our eyes. But it is said those who are shown to be worthy candidates may venture forth to claim their place in history. But things have changed. A dark force corrupts the arena and has twisted victor and loser alike into a trapped soul bound for eternity in battle. These are the new trials forged which stand in your way. Either win or join them in tormented eternity!
The Road to Greatness
You start off on your lonely journey and end up at some pub called the Leaky Urn. It doesn't really matter how you got there, as everything is about to change. There is an old hag who strikes up conversation. She seems to know your entire life's story already, and she says she knows of a way to quench your desire for power and adventure. She holds out her hand, bejeweled with a curious ring.
If you want to see what it is your destiny holds, take my hand, and we shall reveal what epic proportions the gods have in store.
You take her hand and find yourself suddenly transported onto a floating island in another space, the old hag gone. There are statues of great warriors before you, arranged to flank a walkway leading into what looks like a coliseum. There are calls for cheers and jeers to be heard from within. You hear a voice telling you to go forth and fight to reveal what epic destiny fate has in store for you...
Maze Entry (Levels 1-6)
At the gate, you encounter two guards meant to root out those unworthy of entering the maze. They declare, The ticket in is victory!
It is a pair of shuffling zombies (or something else level 0) with armor telling of former lost glory. It should not be a difficult battle, as they are largely uncoordinated and clunky. After beating them, you can go onward. Passing under the threshold, you enter what looks like a small garden before the main building that is the coliseum. It appears to be a top-heavy structure from this distance, like an upside-down wedding cake, shrouded with a dusting of mist and clouds at the base, and seemingly suspended from gravity.
Garden of Tears
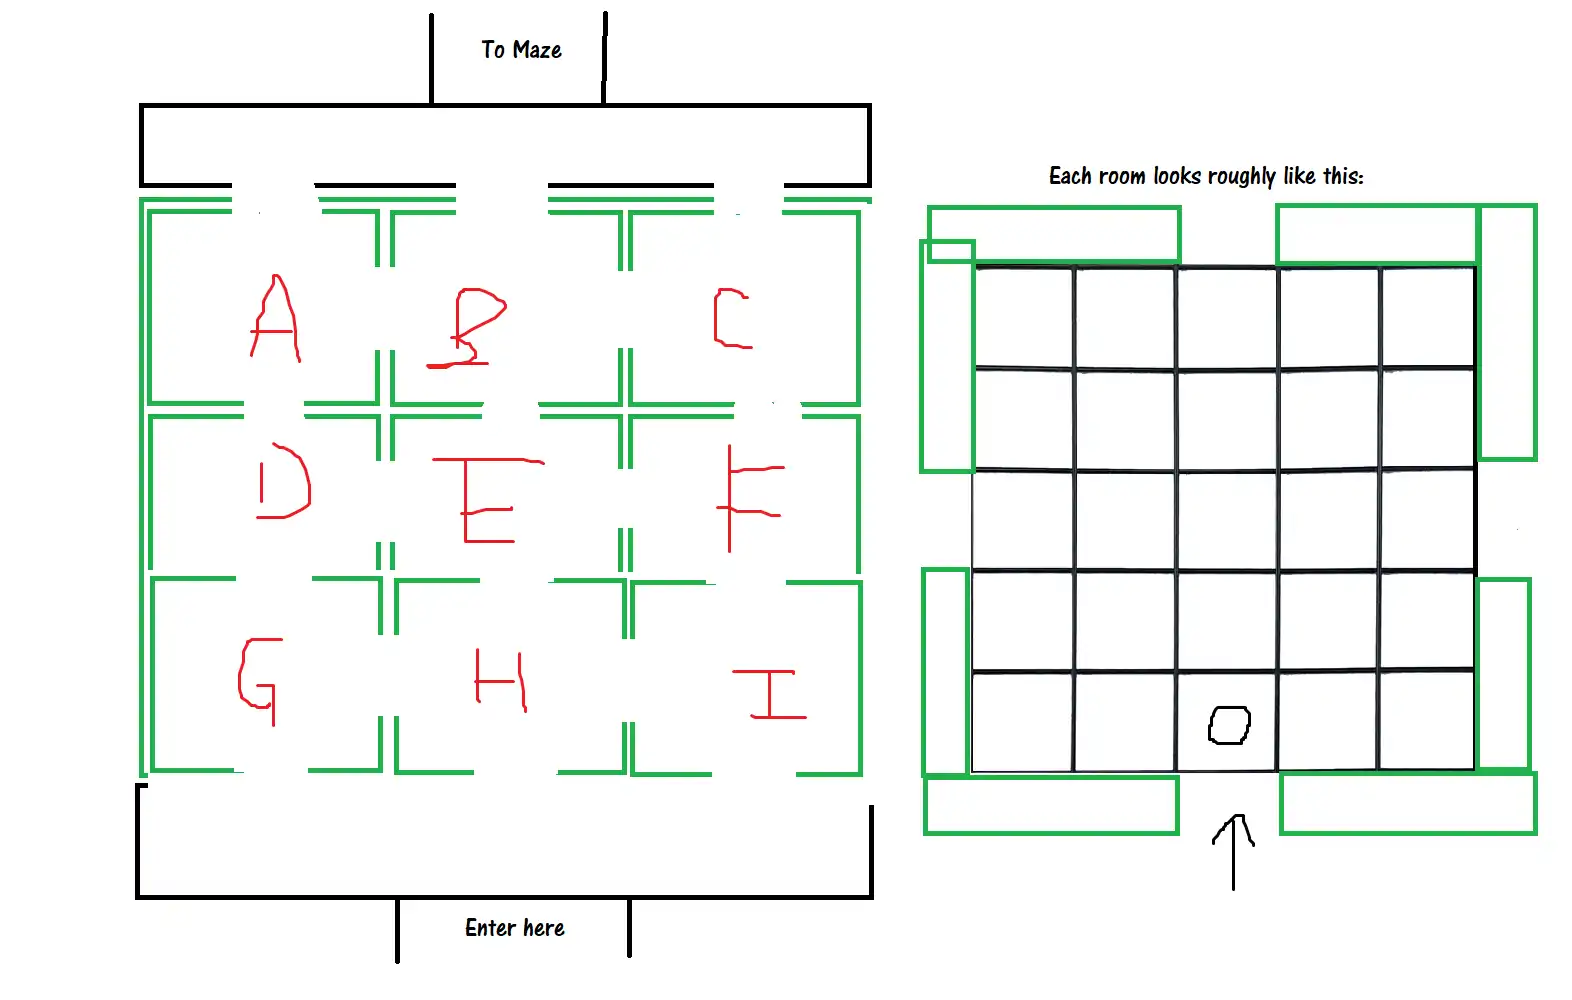
The garden sections are separated like a 3 x 3 grid, with each area being a separate space, protected with regenerating hedges. Upon entering the garden, you choose one of the three spaces on the lowest row to enter and go forward. After you have cleared its foes, you move on to the next row, choosing one of the spaces in the middle row, and so forth. After you make your way through the garden, you become level 2 and are standing before the entry to the coliseum.
Each room has the size of 5 x 5 squares.
- Room A: Two giant rats (MM 219)
- Room B: A kobold piker (DM364, 56)
- Room C: A lesser earth elemental (MM3, 81)
- Room D: Two goblin cutters (MM 136)
- Room E: A kobold skirmisher (MM 167)
- Room F: Two hive workers (MM2, 12)
- Room G: Two ankheg broodlings (MM2, 11)
- Room H: Two fire beetles (MM 30)
- Room I: Two maddened stallions waiting to stomp you to mush
- Tactics
Most of these creatures are feral, going after you like mad, without much regard for their own safety. The goblins and kobolds may seem odd, no longer being their usual cowardly self. They will risk anything to try and take you down, as they cannot run. Their eyes are fiery and maddened almost with bloodlust.
- Treasure
At the area near the entrance is a chest by two statues of crying waterbearers. Clean water leaks from the statue eyes, which you can drink. The chest opens to reveal a note saying To go back, one must go forward.
Inside the chest is a loaf of journey bread and a suit of level 1 magic light armor (PHB 230).
Maze Foyer
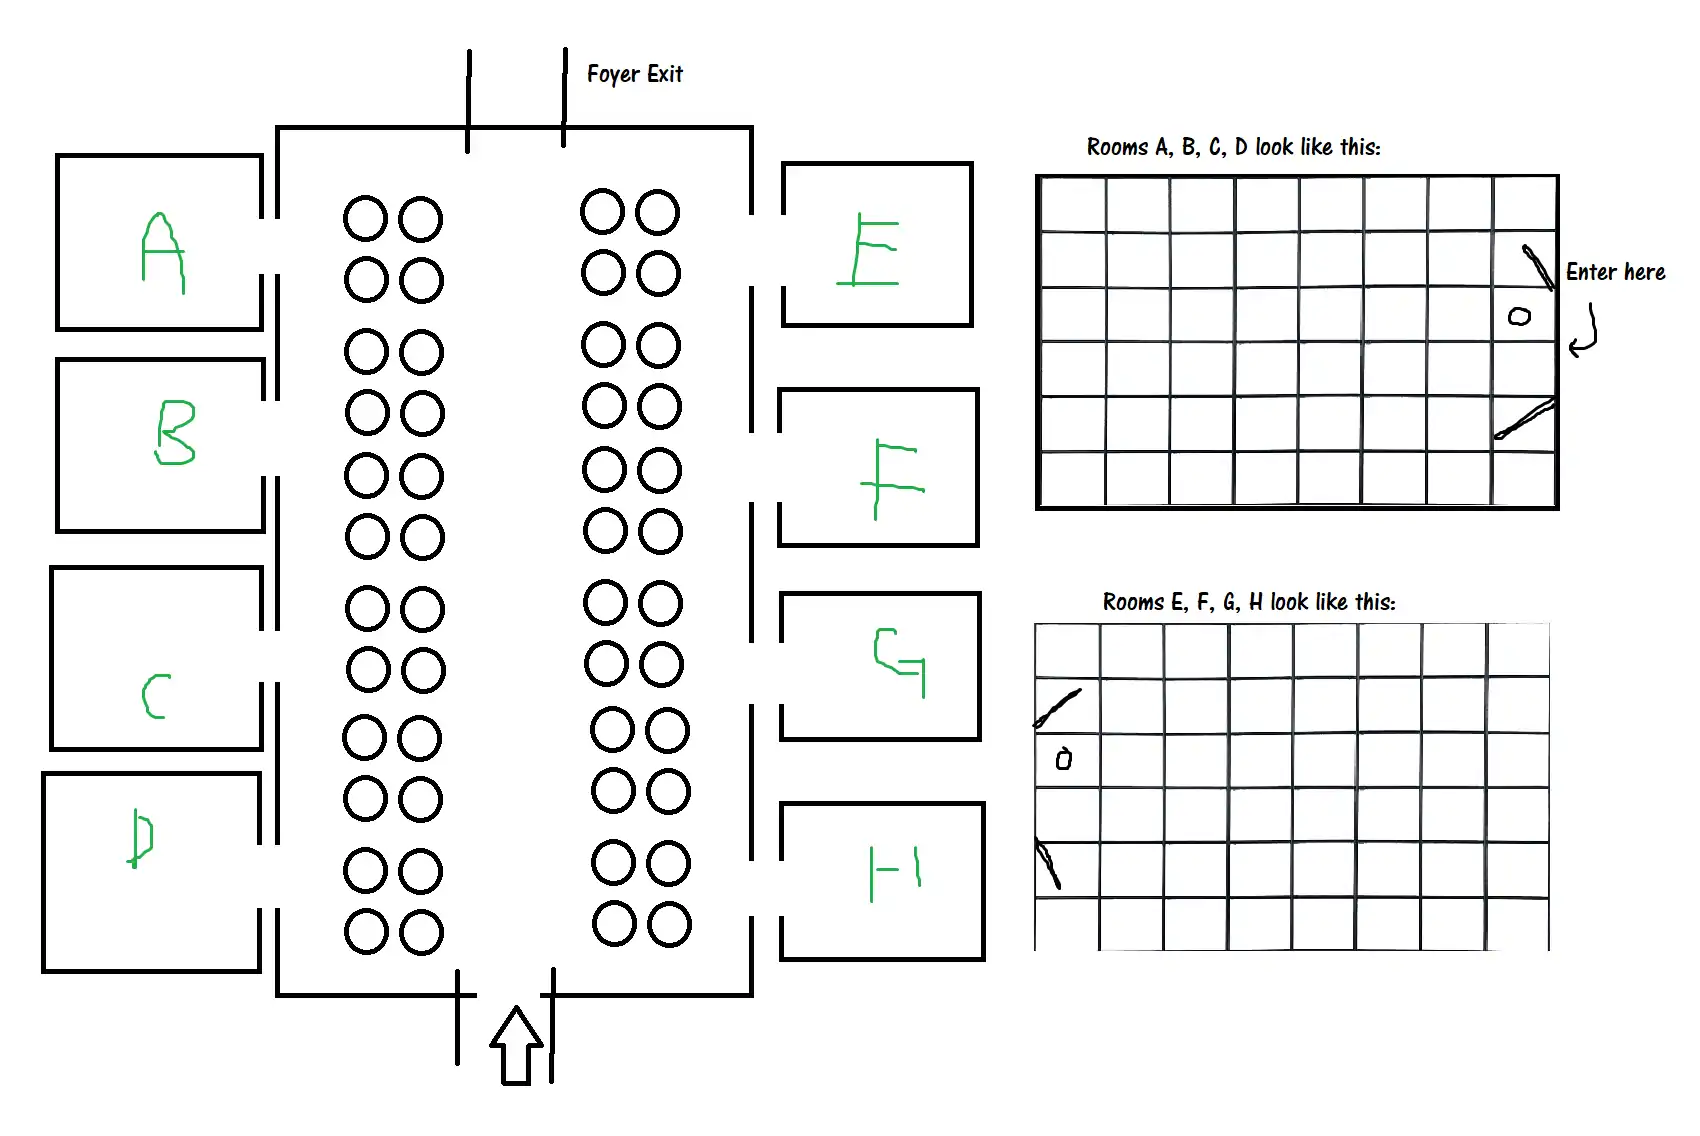
Upon entering the coliseum, you can tell this is no ordinary arena. For one thing, this is a big entry area with pillars and the like, and much of it seems rather current. This area is long and rectangular, with many doors on the side, behind rows of pillars. The side doors are all open, but the main one at the end of the foyer is closed. On the door is a lock mechanism that is indestructible, only opening when three of the side rooms have been cleared. Once you clear the necessary number of rooms, the other doors, opened or not, all disappear save for the main one, which leads you to the entry lounge. After beating all the required rooms, you become level 3.
Each of the rooms with an assigned letter has a size of 6 by 8 squares. Upon entering a room, the doors close and do not open again until the foes inside have been vanquished.
- Room A: One maw demon (MM3, 42)
- Room B: A guard drake (MM 90)
- Room C: Two Kruthik hatchlings (MM 170)
- Room D: One Hive warrior (MM2, 12)
- Room E: Two lesser air elementals (MM3, 80)
- Room F: One sporeback frog (MM3, 91) and a kobold minion (MM 167)
- Room G: Two dire rats (MM 219)
- Room H: An altered goblin skullcleaver
- Tactics
Like back in the garden, a lot of these creatures mainly cooperate only as far as to try and overwhelm you. The kobold minion can ride and control the sporeback frog. The goblin skullcleaver seems to have glazed eyes and mumbles gibberish like it's under some sort of spell as it tries to hack you to pieces. The coherent words you can glean are "valiance" and "death."
- Treasure
Upon clearing your last required room, the bodies of the monsters vanish and three items appear before you, shimmering and floating in the air. They are a level 3 armbow (DM364, 34), level 2 dwarven armor, and level 3 warsoul weapon (DM364, 34). You can only pick one of these items, after which the other two will vanish.
Entry Lounge
The ticketmaster comes to confront you before you may pass further. When you first enter the lounge, a shape like a dark cloud sweeps towards you. From it thunders a voice quoting what the first guards said: The ticket in is victory!!
Depending on the treasure you chose back in the foyer, the ticketmaster takes one of the following forms:
- Armbow: Two kobold vermin handlers (DM364, 58)
- Warsoul Weapon: A barghest savager (MM2, 20)
- Dwarven Armor: An ettercap fang guard
- Tactics
The ticketmaster's goal is to test you. The monstrous forms it takes matter little, as they are all bent on taking you down. The two vermin handlers are very tricky in their teamwork, with one going melee while the other maneuvers at a distance. Upon defeating that initial form, the ticketmaster's dissolves into two rat swarms to try and finish you off. When you finally finish off the entity for good, the shadows of the rat bodies burn and coalesce into a suit of fireburst armor. Two doors on the sides of the lounge then appear, one blue, and one green. You choose one door to advance and then the other door vanishes. Each room has a door into the next room after, being the preparation lounge.
- Green Door
Behind the green door is a small, bare room with a shady figure in chains. He reveals wares from within his coat, and sells a variety of arms, armor and various items. This is the coliseum shop, and as he appears throughout the coliseum, he presents you with progressively better gear. If you never seem to have enough gold, take advantage of selling and even bartering, as he is a rather capricious man willing to exchange valuables for certain exotics. He has all the items in the PHB and sells them for that price. However, he only has magic items as far as level 5 in this room.
- Lore
- If you press him for answers on the place, he will reveal you were chosen to come here by a goddess, who was the old woman from the pub. Pressing him further will result in little fruit as he just dumbly smiles with his missing teeth. You can learn that you were not the first here, and many of the creatures in this place were taken from their natural habitats to be exhibited, almost like animals in a zoo. A similar fate may await those who fail these trials...
- Blue Door
Behind the blue door is a small room with a chest. Inside the chest is a bag of holding along with 1500 gold pieces.
Preparation Lounge
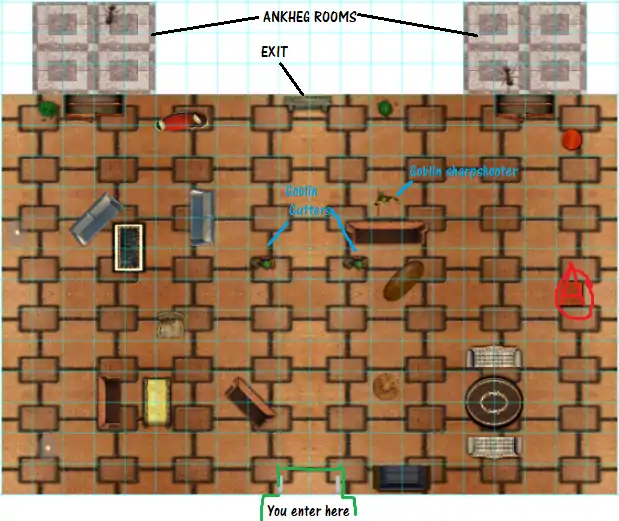
The preparation lounge is where a slight shootout happens. A goblin sharpshooter has teamed up here with two goblin cutters in the room to shoot you down and root you out. As the cutters roam after you, the sharpshooter takes advantage of the various scattered pieces of cover in the room. You can take advantage of it to cover from the sniping, but beware of the two prowling for your blood! At the other end of the room is three doors. If you try to enter them before defeating the goblins, only the two on the sides will open, and they only reveal an ankheg broodling each. These critters were being tamed by the goblins and so will also go after you along with the cutters. After you defeat the monsters, you become level 4 and the center door opens, leading to the Hall of Consideration.
- Secret
A successful investigation check against DC 13 will reveal the secret compartment on one of the pieces of furniture about the room, marked A. Inside the compartment is a small ruby about the size of an egg, worth 500 gp.
Hall of Consideration
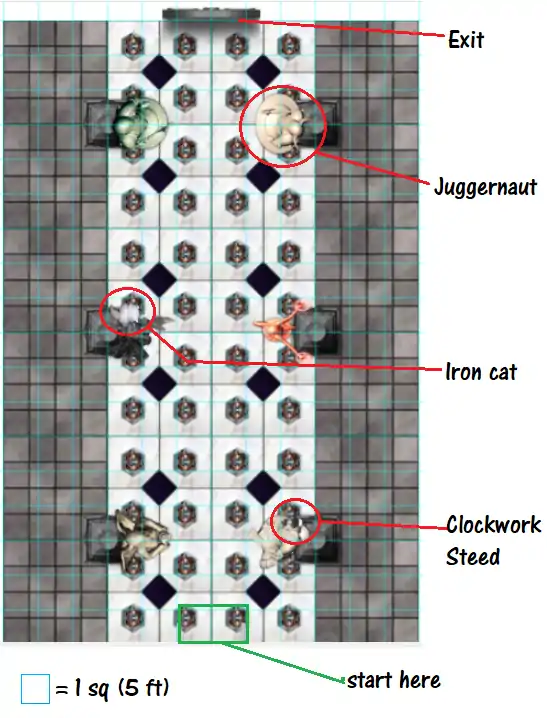
The door to the hall vanishes once you pass under its threshold. You enter a long room lined with heroic-looking statues, some with smaller statues perched on, and hear the echoing of a loud and deep voice about this place: Vie to join among these ranks of the hero kings.
At the end of the hall is another door. As you walk towards it, the eyes of the statues light up in progression with your pace. At the last statue, the voice erupts once more: ...Or end up rubble like the rest!
A level 3 juggernaut bursts from one of the statues and proceeds to smash up the room if necessary to defeat you. If it destroys all the other 5 statues in the hall, from the remains of broken bits will rise a raggamoffyn. It will join forces with the juggernaut to try and take you down. Whilst the raggamoffyn works on grabbing and dominating you, the juggernaut tries to cream you with its spiked body.
- Secret
The statues perched on the statues themselves are magical. There are only two and your survival may very well hinge upon reaching them either before the juggernaut summons the raggamoffyn, or after the malignants creatures join forces. One statue, when you touch it, summons a clockwork steed to your aid, and is completely obedient to you, willing to let you ride it. The other is an iron cat which is also obedient towards you. Once the threats to you have abated, they will turn back into still statues, with the magic having left them.
Once you have defeated the juggernaut, the door will open ahead whether you kill the raggamoffyn or not. Going through, you enter the trophy room.
Trophy Room
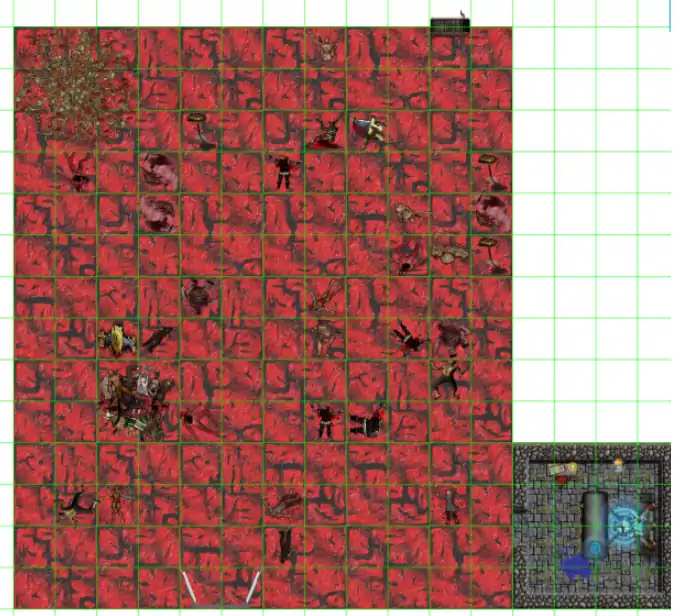
Upon entering the trophy room, you are greeted with the grotesque sight of severed heads and crucified bodies of losers in a reddish lit room. There are two doors here, one to the right of the room, and the other which goes ahead, through the room smelling of blood and littered with body parts. The room on the right has a rusty door which you can break open. It opens to reveal a sort of small laboratory with a lit torch to light it. The place is old and has only two items which you can find if you spend at least a minute snooping around. You find a potion of healing, as well as a bottle of alchemist fire:
| Alchemist Fire | Level 1 Uncommon |
| This flask contains a shiny blue liquid, and when thrown creates a burst of fire. | |
| Potion | |
| Power (Fire) ♦ 4e Item Usage::Consumable (4e Item Action Type::Standard Action) | |
| Make an attack: Close Blast 5, targeting each creature in Blast; Dexterity +3 Vs. Reflex; on a hit deal 3d6 + enhancement bonus fire damage | |
When you reach the midway of the room, one of the corpses is actually a scarecrow which will climb down from its stake and try to sneak up on you. It uses the layout of the room with the corpses as cover and tries to get you in its gaze to stun you. Rather than kill you at once, it wants to instead stop you from moving before tying you to a stake so it can kill you more slowly. It has an aversion to fire, and if you do not have spells to deal with it, you might want to use the torch in the other room or the alchemist fire. When you defeat it, you become level 5. The end of the entry exam is in sight and past the door in the front is the final hurdle before the real test.
Gate of Beginning
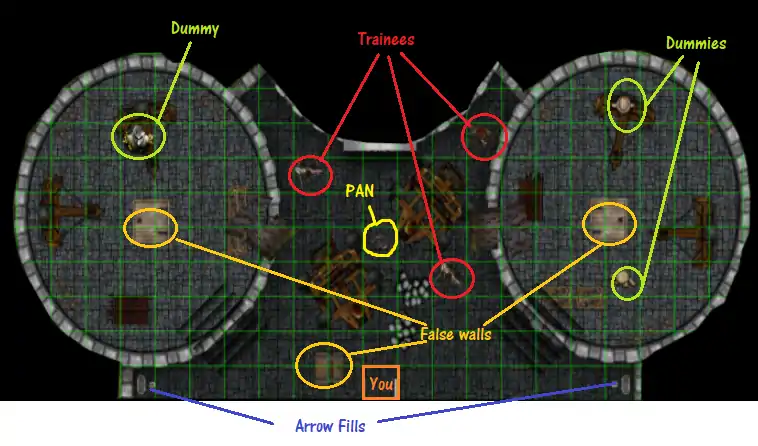
The door entering the main coliseum lies before you. Your final challenge before entry is here. In this room, there is a large door on the other side, with what seems to be bright light pouring out of it. It is a rather bare room. Pan, vetter of competitors, is a level 4 sasquatch stomper. He has three trainees with him: two spearmen and a crossbowman, with the stat block of the city watch. The room has a variety of tricks which you might want to use to turn the numbers to your advantage, as it is a training course with multiple mechanisms.
- Dummies can be used as cover.
- False Walls can be activated by pulling them down with a minor action.
- Arrow Fills have ammo for any ranged items you may need them for.
Pan will stand back and wait until you defeat his trainees before he will confront you himself. His own stench may be used against his trainees whilst he remains a bystander. When he gets serious, he will try to intimidate you with roar of fury. He shouts at you like a drill instructor and seems bent on whipping you into shape. After you defeat him, you become level 6 and can advance past the gate to the coliseum at last.
Maze Start (Levels 6-10)
You finally enter the maze! Lucky for you, the starting area is rather safe, and you see that weird salesman here again. This is your chance to shell out your earned monies and stock up on the items he has, as well as bargain off otherwise useless loot. He tells you he has a want for something, which you should keep your eye out for as you go on through future rooms, as he will pay an above-average price for it. It may be a basilisk fang or a wyrmscale, or even something like a rare flower. When you're done, three ways open up at the sides and front of the room, where you can advance forth. A hint of what's to come is etched into a line crossing above the three doors: What was once one is now three. When never whole again, victory is nigh impossible.
Straights' Room
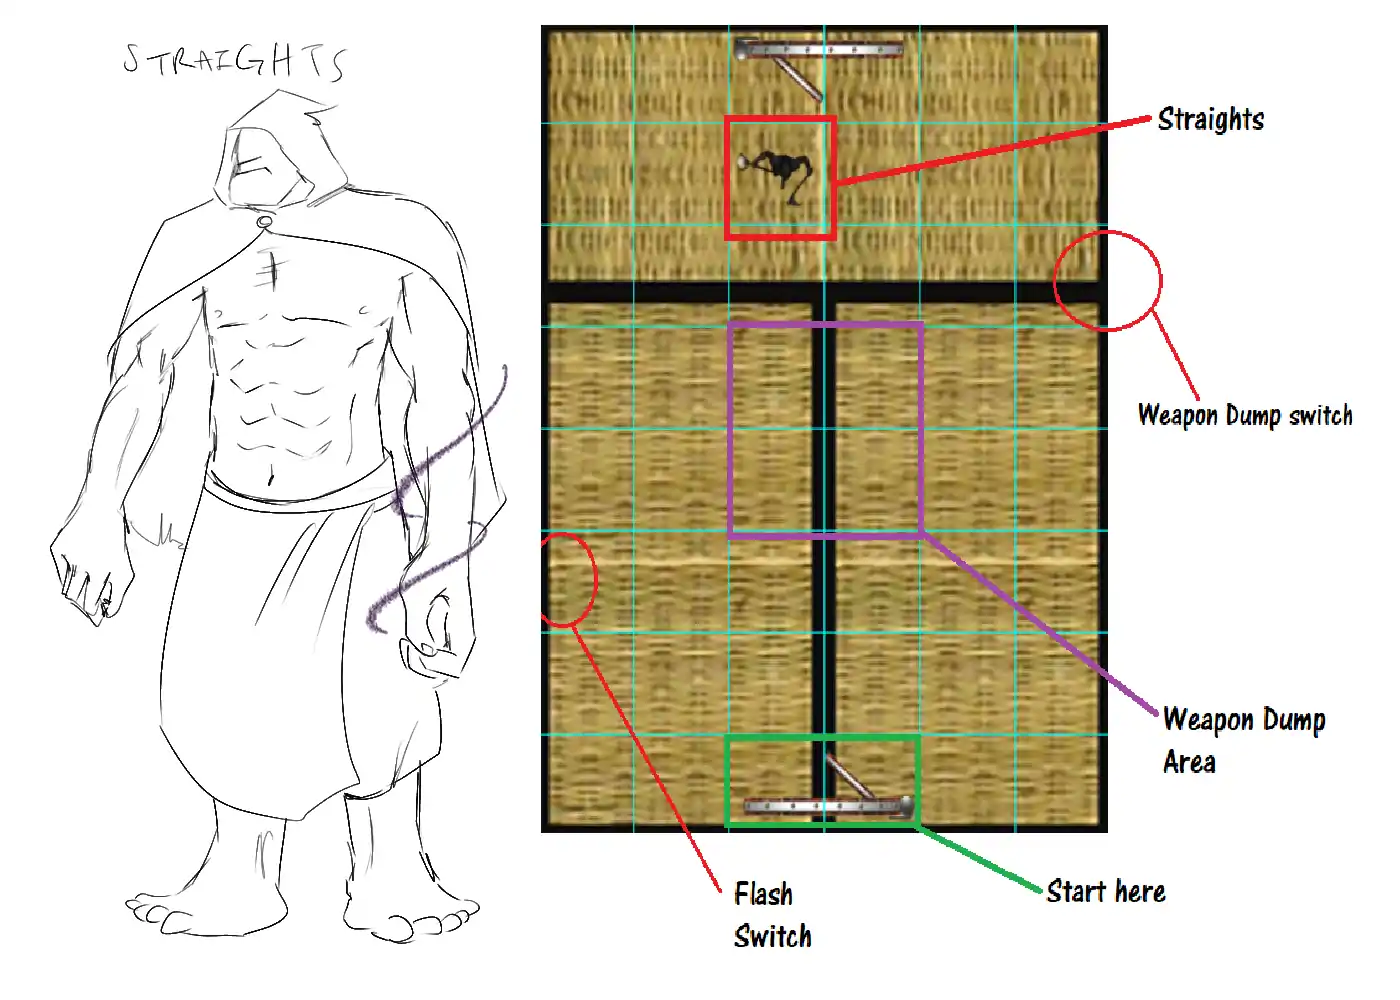
The middle room leads you to one of the guardian trio for the maze beginning. True to his name, Straights is a very direct and straightforward person. He wants you to beat him to advance. He hates any sort of trickery and so his room is very bare. He has the stats of a devourer initiate (DM371, 12), but lacks the foul stench in his equipment. He uses magic to cause decay. In terms of tactics, he relies on intimidation and his mastery of dark powers to weaken you before using his weapons. As a straightforward personality, he takes his losses with dignity.
- Secrets
Leftie and Righto, to play a joke on their oldest brother, have left a trick or two in the room, which you can find with a successful perception check against a DC of 15. Doing so discerns two panels under two tiles in the room by the walls. One triggers a magical flash in the room, which forces a Will save of DC13 to avoid being blinded from both the player and Straights. If blinded, the condition lasts until the end of the creature's next turn. The second tile drops a mess of weapons onto the area marked on the map . If a creature is under the dump, they take 1d8 bludgeoning, 1d8 slashing, and 1d8 piercing damage from the variety of arms dumped on them. The weapons are mainly mundane arms like halberds, longswords, glaives, maces, and some arrows, all which you can pluck out to use in a pinch, or hoard to sell. Discovering these secrets enrages Straights and makes him more likely to use his dagger.
Leftie's Room
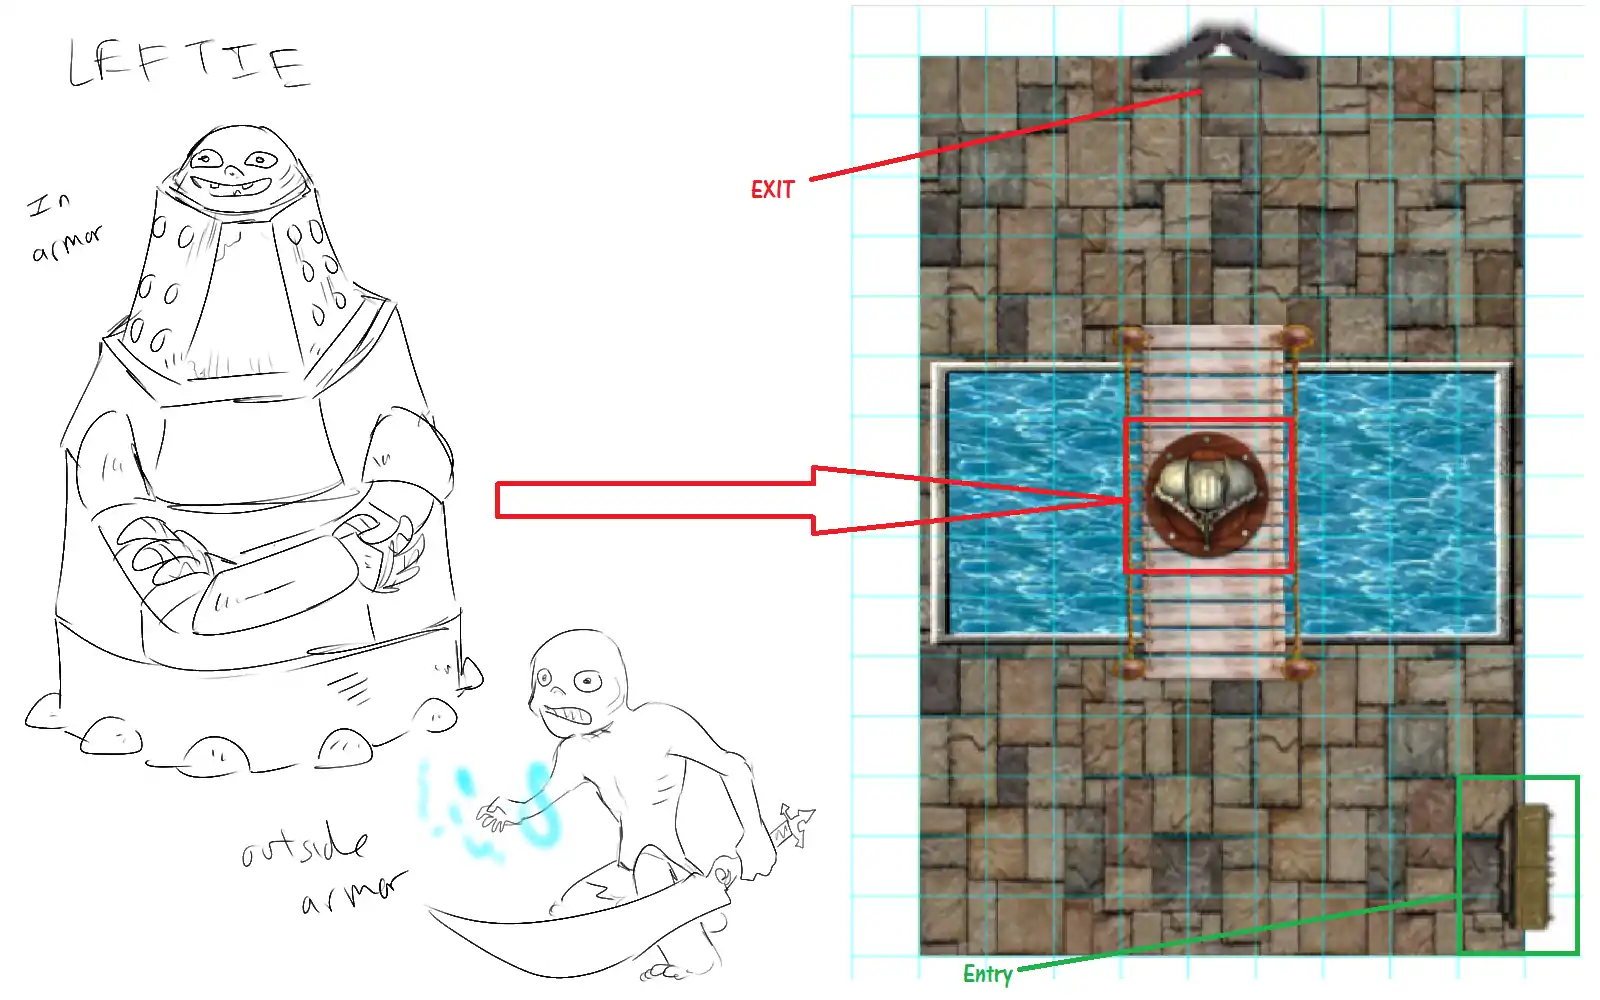
Leftie is a tricky one who never fights fair and isn't ashamed about it. When you enter his room, you appear on what seems to be the other side of a deep pool. Leftie is on the bridge across, in what looks like a heavy suit anchored to the bridge. Rather than have you beat him in a simple battle, he will propose that if you can move him off, you can advance. The water seems normal, with a level about 5 feet below the ledge. But it is in truth very deep and filled with water weirds which will savagely attack anyone who dips even a toe in.
- Secret
Being the underhanded sneak he is, Leftie cannot be moved by mundane means while in his armor. His armor also makes him virtually invulnerable to damage. Don't worry if you lack the magic to beat him though. His other treacherous brother, Righto, crafted the bridge to collapse, likely with the challenger on it rather than Leftie. A successful DC15 Perception check around your side of the room reveals the switch to collapse the bridge in the wall, which would send Leftie plummeting into the water to drown. Then you would just need a successful Athletics check of DC5 to jump over the fallen bridge to the other side and progress.
Beware, if Leftie notices you going for the switch, he will suspect something is up and get out of his armor to engage you directly. He is weaker than his brothers and utilizes the power of cold. He has the coldshield stat bloc.
Righto's Room
Righto is the vain and self-righteous one who uses underhanded tactics in secret. His room is a virtual maze with small slits where he snipes at you like a beholder. You yourself can utilize these as well if you can spot him well enough. Righto has the stat block of a dwarf bolter (MM 97). But he's not content to give you a win, and will set off a 20 foot deep pit trap under the both of you when defeat seems imminent. Avoid following him into close quarters to avoid the danger of the pit altogether. He will try to goad you otherwise to approach him, espousing his warriorship. At the end of the maze is the door out to Passage I.
Passage I
Regardless of whichever room you picked, you will end up in the same corridor out of the room. This path is straight and has no hidden mechanisms. Guarding the other end are the two brothers which you did not fight. So if you went to Righto's room, you will face Straights and Leftie for example. Regardless of whoever you face, they are really mad for you killing one of their brother. It turns out they were originally one entity known as Geryon who was a monster designed to test heroes. They will merge into an ettin thugMV119. You are slightly underleveled for this monstrosity, so prepare for a long haul. The key to surviving is in the fact that these brothers do not get along, as described in their tactics below:
- Ettin Brother's Tactics
Geryon had three heads which kept each other in check normally. With one missing, it is prone to rash acts. The two heads may constantly waste time bickering on their double actions initiative, and even go as far as hitting the other head and dealing themselves damage. The player can take advantage of this by playing the brothers against each other with successful deception and persuasion checks against a DC of 13.
After beating this giant, you advance to level 7 and can pass to the first level of the maze.
1st-Level Maze
The rest of the maze is relatively simple, or as simple as a maze can get. Here, it truly becomes a choose your own adventure style, as the turns you make lead you to different rooms. There are a total of 24 rooms in this maze. There is a staircase that will take you to the second layer, and it will only be revealed after you have completed at least 21 rooms. For every 7 rooms you complete, you gain one level, meaning that you should be level 10 by the end of this maze. For all the encounters on this floor, their tactics more or less are to kill you, as they are restrained within the confines of this maze as well. It is also the reason why they are not in any natural environment, as all the rooms are more or less bare and made of impenetrable stone. Each of the rooms is sealed initially, but if you enter and leave without defeating all the enemies within, they will be free to stalk the rest of the maze and commit mischief.
Use the following tables to determine the mobs for each room as appropriate for your level.
| d10 | Encounter | Loot |
|---|---|---|
| 1 | 1 shadowhunter bat and 1 fire batMM27 | No |
| 2 | 2 arbalestersMM2, p.143 | 12 Ammo for any ranged weapon |
| 3 | 1 bloodseeker and 1 spitting drakeMV83 | No |
| 4 | 2 elf noble guardsMV112 | Two longswords |
| 5 | 2 myconid guardsMM2,164 | No |
| 6 | 1 rage drakeMM92 and 6 ankheg broodlingsMM2,11 | No |
| 7 | 2 barghest savagersMM2,20 | 1 battleaxe |
| 8 | 1 goblin underbossMM138 | No |
| 9 | 1 ape temple guardianMM3,11 | 1 club |
| 10 | 2 skulk murderersMM3,177 | 4 shuriken and 1 shortsword |
| d10 | Encounter | Loot |
|---|---|---|
| 1 | 2 cavebearsMM29 | No |
| 2 | 1 gnome skulk and arcanistMM134 | A dagger and warpick, or hand crossbow |
| 3 | 2 bullywug mudlordsMM2,29 | 1 quarterstaff |
| 4 | 3 Abyssal ScavengersDM386,80 | No |
| 5 | 1 evistroMM54 | No |
| 6 | 2 poisonscale myrmidonsMM2,157 | A vial of poisonscale antivenom (ends the poisoned condition on a creature) |
| 7 | 1 krenshar blood slayerMM2, 155 and a maw demonMM3,42 | No |
| 8 | 1 bugbear wardancerMM2,130 and a goblin warriorMM137 | a flail |
| 9 | 1 human javelin dancerMM2,147 | A spear or two javelins |
| 10 | 1 chitine webcrafterMM3,33 | 10 feet of spider silk |
| d10 | Encounter | Loot |
|---|---|---|
| 1 | 2 storm shards MM2,34 | No |
| 2 | 1 human knife fighterMM2,147 | a pair of knifethrower's gloves AV136 |
| 3 | 1 grellMM144 | No |
| 4 | 2 cavern chokersMM42 | No |
| 5 | 1 darkmantle enveloperMM2,41 | No |
| 6 | 1 duergar theurge and guardMM2,92-3 | a warhammer and a crossbow with 10 bolts |
| 7 | 2 greenscale dartersDrac2,107 | a club, blowgun with 20 poisoned darts |
| 8 | 1 goblin underboss, 2 goblin cursepowerDrac2,88 | sacrificial knife, chainmail |
| 9 | 4 grey wolvesDrac2,89 | No |
| 10 | 1 goblin hexer, 5 goblin warriorsDrac2,90-1 | hexer rod, 5 javelins in sheaf, leather robes |
There are also 8 treasure rooms scattered about the maze. Below are the treasures which can be obtained on this maze level in addition to the loot which can be found on the monsters. A player is recommended to keep a wish list of items, mundane or magic throughout the game.
| Room | Treasure |
|---|---|
| 1 | Wealth or magic item equal to one level 7 treasure from player wish list |
| 2 | 1,000 platinum |
| 3 | A statue of a gold dragon made of astral fire (50,000gp) |
| 4 | loose pile of 90,000 gp |
| 5 | Scroll of Consult OraclePHB302 |
| 6 | Level 8 windsoul Ki focusPHB3,205 |
| 7 | Level 9 Orb of psionic recoveryPHB3,207 |
| 8 | Level 10 Staff of psicraftPHB3,211 |
The First Blood Tournament (Levels 10-13)
As you advance deeper in the maze, you see the walls become more Hellenic in design, with innumerable depictions of great warriors triumphing over monsters and evils. Exiting the maze beginning, you hear the sounds of people cheering and enter a large arena like that of a Roman theater. The way you came is suddenly shut. In the spectator stands are ghostly visions of cheering people. Before you is your first challenge in this tournament apparently, a duskur. She has scars of battle on her body and looks to you with weary hatred. This is not her first rodeo, and she tells you so, before apologizing and charging, initiating combat.
After you defeat her, if you do not kill her, the ground itself summons up spears which impale and drag her under. But before she goes, whether you kill her or not, she tells you that this warrior's paradise has become its own inescapable Hell. Your battle won, the crowd throws down prizes at you. In addition to the typical gold, there are also magical trinkets mixed in, like bags of holding, handy haversacks, food, and even drink. The way through which you came now is cleared and you are allowed to retreat. But you don't return to the maze beginning. Instead, you find yourself in the tournament locker room.
Preparatory Arsenal
There is no rest in this place, only ever more trials. Once you exit the arena, you enter a simple stone room with multiple sections to the left. There is a strong smell of sweat and sulfur here. Greeting you first is the shady chained salesman. He offers you business as before, but with an upgraded selection of items suitable for your level, as well as an expanded list of magic items up to level 14. Same as a certain seller from a certain videogame, he also has unlimited funds to trade with you for your valuables. Immediately after you finish your transactions, he tells you to beware even in a place like this lounge meant for refreshment. Then he suddenly vanishes. There is a sudden voice in the room announcing SHOWER!
and then sprays of blood pour and douse the room. The blood coagulates into a blood golem which comes barreling towards you. Due to the amount of blood sprayed in the room, the golem regenerates 2d6 hit points at the beginning of each of its turns. After you defeat it, the blood seemingly all turns to water and begins to drain away. When the water is gone, a set of old lockers appears in one of the conjoined rooms with 6 doors. Each one gives a different magic item(s). You can only open 1 door and take its contents before the locker vanishes.
| Room | Treasure |
|---|---|
| 1 | A belt with a jolt flask, goodnight tincture, herbal poultice and salve of slipperiness, all base level (AV28-9) |
| 2 | A level 10 warsheath armor (AV55) |
| 3 | A level 9 crusader's weapon (AV66) |
| 4 | A level 10 footpad's friend (AV69) |
| 5 | A suit of level 10 tactician's armor (AV54) |
| 6 | A level 10 staff of acid and flame (AV105) |
Once you have claimed your treasure, the loud voice booms once more. You are permitted an extended rest if you wish before your next battle. Whether you take the rest or not, four new doors appear and you must choose your next course of action. Each room leads to a new, harrowing task, merely an interval, however, before your next arena battle. You can choose any of the rooms to enter, and upon completion of it, you become level 11. Completing any of the rooms allows you to exit back to this arsenal room.
- Room of the Minions
- This room is actually a bunch of smaller rooms connected together by thinner hallways. Each room has one source of light, with other parts being near completely dark. This allows for the minion creatures inside to scurry around as they please and crowd to their desire. There are 10 creatures in this room. Upon killing all the creatures, the room lights up in its entirety.
- 3 Dark CreepersMM, p.49
- 1 Foulspawn GrueMM, p.112
- 2 Gnaw DemonsMM2, p.54
- 2 Stonefist HomunculiMM2, p.143
- 2 Lolthbound GoblinsMM2, p.131
- Room of Stalkers
- This room is a circular series of pathways through a cave-like system, with some water and darkness to allow for the lurkers within to take advantage of it. There are small rooms along the sides, providing just enough corners for enemies to hide and await ambushing you. Some walls are higher up, allowing for monsters to also hide with height.
- 1 Darkmantle EnveloperMM2, p.41
- 3 Cave Fisher AnglersMM3, p.28
- 2 Ghoul Flesh SeekersMM3, p.94
- 1 Assassin ImpDM365, p.44
- Note: Upon completion of this room, when you go to exit, you will see a heavy blade jammed into the door. To remove it, you must sacrifice any one magic item you possess. Upon dislodging the sword, it is revealed to be a deep wounding weaponDM386, p.29.
- Room of Rampage
- The room of rampage is a single, large room with three cages which release in succession with each you defeat. There are some obstacles in the room like rocks or empty crates. The brutish creatures thrown at you are simple and murderous.
- 1 Foulspawn HulkMM, p.113
- 1 Cyclops CrusherMM2, p.40
- 1 Rage DevilMM3, p.60
- Room of Battle
- This room is also a singular enclosure, but enemies spawn inside rather than being released from cages. This room is slightly larger, and with cube-like obstacles like bricks the size of a medium creature. The DM may choose 5 of the following encounters to throw at the player. These creatures spawn at random points of the room after each encounter.
- 3 Great ApeMM3, p.10
- 1 Craud King and 2 Craud ImpalersMM3, p.36-7
- 3 Hex KnightsMM3, p.38
- 1 Banshrae WarriorMM, p.25
- 1 BarbazuMM, p.60
- 5 Hobgoblin SoldiersMM, p.139
- 3 Duergar GuardMM2, p.92
- 1 Firbolg HunterMM2, p.107
- 1 Genasi StoneshieldMM2, p.117
The Second Show
After you complete your room of choice, the doors out to the arena reopen whilst all other ways out of the arsenal room close and vanish. Walking out back to the coliseum, you are now faced with your second victim. He is a slender, bestial form with great black wings; a black talon darkflier. His wings are tied with invisible chains which prevent him from flying above 60 squares altitude. He is very somber and resigned to his fate. For now, all that matters is his next victim, a ticket to survival. So he charges at you with his dark talons raised to kill.
After you defeat him, you become level 12. The ethereal crowd goes wild and a revitalizing rain of blood showers down. As it flows down, it turns into a golden sort of ichor. When you are doused in it, you feel refreshed, as if you have just finished an extended rest. The rain subsides and chants for blood resume. Now the booming voice returns. The true nature of the First Blood Tournament is one that is fast and dirty. You must now face five opponents in rapid succession. The goal is to get the first hit in, after which the one who got hit first takes a critical amount of damage, guaranteeing them a massive disadvantage in the following fight. Your opponents are as follows:
The fight sequence goes like this: Both creatures will first try to hit the other. Whoever gets hit first instantly has their hit points cut in half and they must engage in a death battle. People from the eaves may be the saving grace as they throw potions of healing into the ring, as well as other magical boons as the DM sees fit. After you have braved the slew of challenges, you rise to level 13. The doors ahead, opposite your initial entry, fling open and the crowd now points forward, goading you to continue.
Onward, challenger. To the glory this world has yet to witness.
Maze Body (Levels 13-20)
Now you begin to enter the deeper parts of the maze. The progression thus far was relatively flat. However, as you ascend levels, you realize there is little feeling of up or down. The coliseum was top-heavy, right? Then are you going up? The stairs certainly seemed to point so, but then you still get a sinking feeling sometimes.
First Portion
After that colosseum, you enter the meat and potatoes of the maze. The map becomes much bigger and there are enemies that roam the halls here. Among them are heroes of trials past as well as immortal monsters who were trapped here and driven mad. The following are the wardens and guards of the maze, moving about the ways and passages. They do not follow specific areas or paths (up to DM) so these are unplanned compared to previous encounters. When killed, they respawn after 24 hours pass. However, they appear with a light color palette and slightly transparent appearance, and no longer grant experience on defeat.
| Monster | Loot |
|---|---|
Hidden along the maze are also special rooms that facetiously appear to be relief points. Many of them occupy a particularly strong horror awaiting you. These are the maze masters. There are 10 in total and so you must defeat at least 5 of them before the exit to this maze level opens. Once you clear the 5 required, you advance one level. If you clear all 10, you gain an additional level.
| Monster | Loot |
|---|---|
Scarier yet are the mandatory checkpoints in the maze. There are three checkpoints that bottleneck the progression in the maze so you must pass them before progressing onward. Each one holds a particularly powerful monster and trial. They are the Hydra, Sphinx, and Abomination. You gain a level for clearing each of these rooms.
- Hydra's Ordeal
The hydra trialmaster is a fen hydraMM164
- Sphinx Room
The sphinx's room is one of majestic design, with motifs and pictures on the wall depicting strange and unknown scenes. The sphinxMM245 herself
- Feast of Abominations
You are by no means actually leveled enough to take down an abomination. You stumble into the room, filled with acolytesMM210 worshiping a blood fiendMM12 in reverence to Orcus.
Second Portion
- Ancient Keep
The Final Showdown
The empty hollow hunger awaits. In this small pocket of a world, the hope of a goddess sustains victory. But the Void ever encroaches. Your final fight before ascension is the Void Keeper. He is a being supposedly made of nothingness, a fragment or even aspect of Graghk, who fractured the world.
Death Loop Mechanic
As punishment for those who cannot achieve victory, their souls become mired here. This explains the many coherent creatures who you fight on the way. All fell prior and became trapped here, becoming another pawn of the maze to use against newcomers. If you die, your soul cannot pass on as normal. Instead, your dead character now becomes a creature that is controlled by the DM that patrols the spot you died in.
Back to Main Page → 4e Homebrew → Quests



.png.webp)
.png.webp)
.png.webp)