Wellington Mounted Rifles Regiment
The Wellington Mounted Rifles Regiment was a mounted infantry regiment from New Zealand, raised for service during the First World War. It was assigned to the New Zealand Mounted Rifles Brigade, part of the New Zealand Expeditionary Force.
| Wellington Mounted Rifles Regiment | |
|---|---|
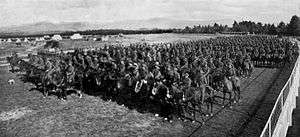 Wellington Mounted Rifles Regiment at Awapuni Racecourse 8 August 1914 | |
| Active | 8 August 1914 – 30 June 1919 |
| Country | New Zealand |
| Allegiance | |
| Branch | New Zealand Army |
| Role | Mounted Infantry |
| Size | Regiment |
| Part of | New Zealand Mounted Rifles Brigade 2nd Light Horse Brigade (ANZAC Mounted Division) |
| Nickname(s) | Well and Trulys Wellingtons Mounteds[1] |
| March | D'ye ken John Peel[2] |
| Engagements | First World War
|
| Commanders | |
| (1914–1917) | William Meldrum |
| (1917–1918) | James Whyte |
| (1918–1919) | Arthur Batchelor[nb 1] |
| Insignia | |
| Pugaree flash worn on the hatband | |
The regiment, with an establishment of twenty-six officers, 523 other ranks and 600 horses, was formed from three squadrons belonging to pre war Territorial Force regiments; the Queen Alexandra's 2nd (Wellington West Coast) Mounted Rifles, the 6th (Manawatu) Mounted Rifles and the 9th (Wellington East Coast) Mounted Rifles. It also included a small headquarters and, until 1916, a Maxim machine-gun section. The Maxim guns were withdrawn but the regiment's fire-power increased during the war, by the end of which each squadron had four Hotchkiss machine-guns, one per troop.
As mounted infantry, the regiment rode into battle on their horses, but were expected to dismount for battle, and then fight on foot. The regiment fought predominantly against the forces of the Ottoman Turkish Empire. In the Gallipoli Campaign between May and December 1915, they participated in the largest battle of that theatre at Chunuk Bair, and also in the fighting for Hill 60. Evacuated to Egypt, they then took part in the Sinai and Palestine Campaign from 1916 to 1918. The early battles there included those at Romani, Gaza and Beersheba. Later in the war they were part of the force that occupied the Jordan Valley, and took part in the raid on Amman and the raid on Es Salt. Their final war time operation was in connection with the capture of the Turkish Fourth Army. During the four years of war the regiment had 369 dead and 453 wounded, several of those wounded more than once. After the war, the regiment played a minor role in the Egyptian Revolution of 1919, before being disbanded in June 1919.
History
Formation
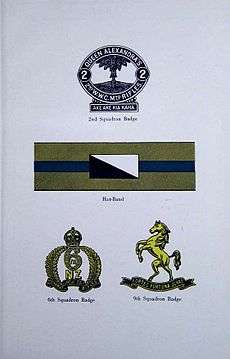
Raised on 8 August 1914 at the start of the First World War, the Wellington Mounted Rifles Regiment came from the region around Wellington on the North Island of New Zealand. It was commanded by Lieutenant-Colonel William Meldrum,[4][5] and comprised a headquarters, a machine-gun section, and three squadrons formed from Territorial Force regiments.[6] The New Zealand Territorial Force included a compulsory training system, and the four Military Districts were each required to supply a mounted regiment for the New Zealand Expeditionary Force. To meet that obligation the Territorial Force regiments each provided a squadron, which kept their own regimental badges and traditions.[7] The regiment's squadrons came from the Queen Alexandra's 2nd (Wellington West Coast) Mounted Rifles (2nd Squadron), the 6th (Manawatu) Mounted Rifles (6th Squadron) and the 9th (Wellington East Coast) Mounted Rifles (9th Squadron).[8] The establishment was fixed at twenty-six officers and 523 other ranks, who used 528 riding horses, seventy-four draught horses and six pack horses. Each squadron, of 158 men, had a field headquarters and four troops. The Machine-Gun Section, with two Maxim Guns, had one officer, twenty-six other ranks, twenty riding horses and sixteen draught horses.[4] Although the regiment used horses, they were not cavalry but mounted infantry, and expected to ride to the battlefield, dismount and then fight as traditional infantry.[5][9] Attached to, but not part of, the regiment were medical and veterinary officers, an artificer, three more other ranks and another eighteen horses.[4] The regiment was assigned to the New Zealand Mounted Rifles Brigade, serving alongside two other regiments, the Auckland Mounted Rifles and the Canterbury Mounted Rifles.[10][11]
Embarkation
The regiment conducted training until 24 September, when they received embarkation orders. Due to the fear of German warships being in the area, the wait for suitable escort ships delayed their departure until 15 October.[12] With a short stop at Hobart, on 28 October they arrived at Albany, and anchored waiting to be joined by the Australian contingent. The combined convoy sailed on 1 November and reached Colombo on 15 November. Two days later it sailed into the Red Sea and the Suez Canal.[13] They docked at Port Said on 2 December and Alexandria the next day. The regiment disembarked on 4 December and boarded a train for their camp in the Cairo suburb of Zeitoun.[2] There they started a training programme, using the desert for manoeuvres, during both day and night.[14]
In April 1915 the New Zealand and Australian forces, except the mounted troops, were sent to serve in the Gallipoli Campaign. Heavy casualties during the landings provided a need for reinforcements, so the regiment and other mounted troops, without their horses, were ordered to Gallipoli.[15]
Gallipoli
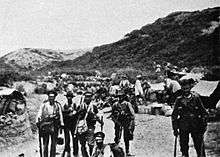
On 8 May 1915, the regiment, reduced to twenty-five officers and 453 other ranks (some men had to stay behind to look after the horses), with the remainder of the brigade, sailed for Gallipoli and landed three days later, under small arms fire, at ANZAC Cove, as part of the Australian and New Zealand Army Corps (ANZAC).[16]
They relieved elements of the Royal Naval Brigade, with the regiment taking over from the Nelson and Deal Battalions, on the right flank. One squadron occupied the front line, one squadron the support trench, and the third was the reserve. The regiment was on the left, the Auckland Mounted Rifles in the centre, and the Canterbury Mounted Rifles on the right.[17][18] They spent the next few days improving the fire trenches, constructing communications trenches, and enlarging tracks so men and guns could move forward quickly. This was done under Turkish machine-gun and rifle fire.[19][nb 2]
First combat
At midnight on 18 May the Turkish troops opened fire on the regiment until 03:30, then left their trenches and charged the mounted brigade, concentrating on the Auckland Mounted Rifles. The Turkish attackers were engaged by the regiment's machine-guns with enfilade fire and the attack petered out at dawn, leaving hundreds of Turkish dead. Both sides continued shooting at each other with artillery and small arms fire. At 13:25 General Alexander Godley, commanding that section of the beach-head, ordered the regiment to counter-attack the Turkish trenches at "The Nek". Their first trench was one hundred yards (91 m) across no man's land with no cover at all. The regiment prepared to obey the order, but arranged it so that no one squadron would be wiped out. The men were selected in equal proportion from all three squadrons and Captain William Hardham VC was chosen to command them. Brigadier-General Andrew Russell, commanding the brigade, contacted Godley to advise him of the circumstances of such an attack and Russell was told to "use his own judgement" so promptly called it off.[21][22]
The morning of 20 May started the same way, with Turkish artillery and small arms fire being directed at the regiment's trenches. This lasted until 16:30 when the firing ceased and white flags appeared above the Turkish trenches. The Turkish commander asked for an armistice, so that they could collect their dead and wounded lying in the open. But as it appeared they were using the time to bring forward reinforcements, repair defences and collect arms and ammunition from the dead, the armistice was turned down. Negotiations continued and a truce was agreed for 24 May between 07:30 and 17:00. The regiment sent out men to collect and bury Allied dead. The next day the 3rd Light Horse Brigade relieved the regiment, and they moved to a safer area in the rear. Even when "resting" in the rear, they were not safe as it was constantly shelled, and work details had to be provided to move supplies and construct better defences.[23]
Defence of No.3 Post
On 28 May the regiment had to man a position just captured by the Canterbury Mounted Rifles, called No.3 Post. The 6th Squadron was chosen and started improving the trenches on arrival. Daylight was at 03:30 and although having worked all night, they had made no real impression on the position and were exposed to Turkish fire all day. However, instead of abandoning the post, at 21:00 they were relieved by the 9th Squadron. An hour later Major Selwyn Chambers, commanding the 9th Squadron reported they were surrounded by about one thousand Turkish troops. At 23:35 communications with the 9th Squadron failed. The squadron were fighting off attacks, but could not stop Turkish troops reaching the edge of their trench and throwing hand grenades into their positions. A troop from the 2nd Squadron, sent as reinforcements, were unable to break through. So at midnight the remainder of the 2nd Squadron attempted to reach them, but instead had to dig in to defend themselves.[24] Even though outnumbered, both squadrons managed to hold out, providing covering fire for each other. At 03:30 another Turkish attempt to capture their trenches began, this time from the south. When Turkish troops got into the left side of the 2nd Squadron trench, Major James Elmslie led a troop in a counter-attack, clearing them out. At 06:30, by using signal flags, communications with regimental headquarters were re-established. Casualties were mounting and supplies of ammunition dwindling, and the defence was becoming untenable. The 6th Squadron managed to reach the 2nd Squadron's position, but in the face of heavy Turkish fire, were unable to advance any further. Around 12:00 Turkish troops got into the 9th Squadrons trenches, forcing one troop to withdraw. After Captain Spragg of 9th Squadron located an abandoned supply of British ammunition, the New Zealanders were able to return fire at will without having to conserve ammunition. Nevertheless, the Turkish force, now numbering about three thousand men, continued their attacks all day.[25]
At 19:00 Turkish troops captured the northern section of the 9th Squadron trench. With no chance of any relief during daylight, the commanding officer was informed that two squadrons from the Canterbury Mounted Rifles would try to relieve the 9th Squadron after 20:00.[26] By this time the 6th Squadron had fought their way round the southern slopes of the hill and got within one hundred yards (91 m) of the 9th Squadron's trench, but could make no further progress. As darkness approached Turkish fire reduced, and at 22:30 the Canterbury Mounted Rifles reached 9th Squadron and took over from them at 23:00. The 9th Squadron moved to the rear followed an hour later by the 2nd and 6th Squadrons. During the battle the squadrons were outnumbered and fighting at close quarters, but their casualties were rather light at nineteen dead and fifty-two wounded.[27]
Walker's Ridge
The regiment returned to the front on 7 June, relieving the 8th Light Horse Regiment on Walkers Ridge. The 2nd and 9th Squadrons manned the front trench, with the 6th Squadron in reserve.[28] Trench warfare, shelling and sniping continued all month but there was no major attack. The regiment spent their time rotating through the front and resting at the rear. On 1 July reinforcements of four officers and ninety-seven other ranks arrived. On 18 July the regiment returned to the front, relieving the Canterbury Mounted Rifles, each squadron with two troops forward and the other two in reserve. They remained there until 31 July when they were relieved by the 10th Light Horse Regiment. Returning to the rear, the regiment only had twenty-four officers and 338 other ranks, almost 200 men short of full establishment.[29]
Chunuk Bair
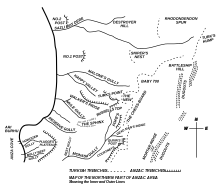
In August Godley planned a new offensive. The brigade was designated as the "Right Covering Force", and allocated several objectives including "No.3 Post", "Big Table Top" and "Destroyer Ridge". The regiment, supported by a Maori pioneer battalion, were given "Destroyer Ridge" and "Big Table Top" to capture. On 5 August the regiment moved to their starting position at "No.1 Post", the attack being planned for the following day. Two troops from 6th Squadron were to capture "Destroyer Ridge", and then clear the route to "Big Table Top", which the remainder of the regiment was to assault at 22:00.[30]
At 21:30 6 August the attack began; after covering around two hundred yards (180 m) the leading troops were discovered by a Turkish sentry. The 6th Squadron charged the trenches, killing the occupants, but it cost them two men dead and one wounded including the squadron commander. The rest of the squadron continued clearing the route for the regiment. Thick impenetrable bush, forced the regiment to move further east to continue. Scaling the north-eastern face of the hill, they reached the summit at 22:55, and attacked the Turks from the rear.[31] The regiment worked to secure the position from attack by the Turkish forces. Their total casualties for the operation were eight dead and nine wounded, but they had captured 158 prisoners, without firing a shot.[32] The next morning, 7 August, the 6th Squadron and Maoris rejoined the regiment, just as they came under heavy machine-gun and rifle fire.[33] The next day the regiment, along with the Auckland Mounted Rifles, the New Zealand Infantry Brigade and two British battalions, were combined as No.1 Column commanded by Brigadier-General Francis Johnston. The Column were to hold the ground already occupied and extend their lines to the south and east. Leaving the 9th Squadron defending "Big Table Top", the rest of the regiment, 173 all ranks, reported to Johnstone at "Chailak Dere", where they ordered to hold the position "to the last man" alongside the Otago Infantry Battalion. The regiment spent the night improving the crescent shaped position, on the rear slope of the hill. All during the following day, the attacking Turks, sky-lining themselves at the crest of the hill, became easy targets for the regiment, and were engaged with enfilade fire, from the left and right of the regiment's lines.[34]
At 16:00 the regiment was attacked in force, but the Turks withdrew after suffering heavy casualties. But the British attack elsewhere had failed, and some units had been forced to retire, leaving the regiment exposed. They fought off attacks throughout the night, until 05:00 the next morning. Then for two hours they were harassed with sniper fire and hand grenades. Meldrum asked the brigade for reinforcements and more ammunition. There were no reserves of ammunition available and the only reinforcements were forty men from the 6th Battalion Loyal Regiment (North Lancashire) who were sent to assist, but did not arrive until noon.[35] At 14:00 Meldrum reported he could now hold out until nightfall and at 22:30 they were relieved by the rest of the Loyal Regiment and the 5th Battalion Wiltshire Regiment. In the day's fighting the regiment, from a total of 173 all ranks, had lost forty-three dead and seventy-four wounded.[36][37]
Early on 10 August the survivors, less the 9th Squadron, moved into a camp at "No.1 Post". The 9th Squadron, now one hundred men strong, remained at the front defending "Table Top" and "Old No.3 Post". The next day at 19:30 the brigade moved back to man the inner defence line. The regiment, still without the 9th Squadron, occupied the "Camel's Hump" with twelve men, and "Destroyer Ridge" with twenty-five men, the remainder being held in reserve. They remained at the front until relieved on 23 August.[38]
Hill 60
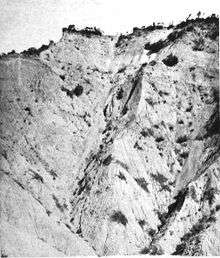
On 21 August the regiment moved back to "Big Table Top" for the pending assault on Hill 60. The attack, at 15:30, succeeded in capturing around two hundred yards (180 m) of Turkish trenches. Two days later, at 17:15, the regiment was relieved and rejoined the brigade at Kabak Kuyu, but at 19:30, five officers and 125 other ranks had to return to the front to defend the western slopes of Hill 60. The same day, three officers and seventy-seven other ranks arrived as reinforcements for the regiment.[39] On 25 August those men still at the front were relieved by the Canterbury Mounted Rifles and Otago Mounted Rifles, in preparation for a night assault on Hill 60 by the brigade. The assault was postponed for two days to rest the men. Although the brigade was responsible for the centre objective during the assault, it could only provide three hundred men, with another one hundred men coming from the Australian 18th Battalion. The regiment's contribution was five officers and 125 other ranks. The battle commenced with an hour-long artillery bombardment. The Auckland and Canterbury Mounted Rifles formed the first line of attack, the Wellington regiment and the Otago Mounted Rifles the second, and the Australians made up the third line. At 17:00 the attack began, and despite taking heavy casualties crossing no man's land, the first Turkish line was captured. The Wellington regiment and Otago Mounted Rifles continued on, took out a machine-gun post and captured the second Turkish trench, but sustained heavy casualties.[36][40][41] On the other flanks the supporting assaults had failed, leaving the regiment and the Otago Mounted Rifles isolated on a narrow front. The brigade therefore consolidated the ground already captured and moved forward their machine-guns to support the defence; the forward defensive line was only forty men. The regiment's casualties during the battle were fifty dead and fifty-nine wounded.[42] That night the remainder of the regiment moved into the front line. They fought off several counter-attacks, losing another man killed and eleven wounded.[43] On 29 August the regiment was relieved by the 163rd (Norfolk & Suffolk) Brigade, but remained in the reserve trenches for the next three days. Even there the number of casualties continued to increase, so that by 2 September there were only six officers and ninety-nine men left in the regiment. Despite this, they still had to supply five officers and thirty-nine other ranks to occupy a trench on "Cheshire Ridge".[44]
Evacuation
By 13 September the regiment's strength was four officers and eighty other ranks. All of them except fourteen machine-gunners were evacuated to the island of Lemnos. Of the original contingent who had landed in May only twenty-four men were still with the regiment. On 10 November reinforcements increased the regiment's total to nine officers and 363 other ranks, and they returned to Gallipoli,[45] reaching the front line at Hill 60 on 27 November. Lack of manpower meant they could not fully man their trenches, so a system was adopted where six men manned a post, with only two on duty during the day. At night all men were awake and also patrolled between posts and into no man's land.[46]
On 17 December, orders for the complete evacuation of the peninsula were issued. The regiment started leaving the next day, when six officers and 155 other ranks left for Lemnos before dawn. Those left behind had to make it appear that the trenches were fully occupied. At 21:30 two-thirds of the remainder were evacuated. Other smaller parties left the trenches between 01:40 and 02:05, when the last officer and eleven other ranks moved down to the beach and were evacuated.[47] The surviving 375 men of the regiment camped on Lemnos until transport was available to take them back to Egypt. Their involvement in the Gallipoli Campaign had cost the regiment a total of 640 casualties.[36]
Sinai
Katia
On 22 December the regiment left Lemnos; they disembarked at Alexandria four days later. On 27 December they arrived back at Zeitoun camp.[36] There they were reunited with their horses, and reinforcements arrived to bring the regiment back up to full establishment, plus another ten percent. At the same time the Machine-Gun Section was doubled from two to four guns. On 23 January 1916 the regiment were deployed in defence of the Suez Canal, reaching Serapeum on 29 January and Ferry Post Rail Head on 5 March where they took over from two infantry brigades.[48][49] Later that month the brigade was assigned to the newly formed ANZAC Mounted Division, alongside three Australian light horse brigades and a British Royal Horse Artillery (RHA) brigade.[50]
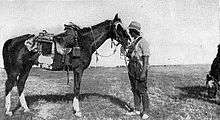
The regiment mixed defending the canal with further training, each man getting used to their arms and equipment. They carried 240 rounds of ammunition in two bandoleers, one around the horse's neck. The horses also carried saddle wallets containing clothing and a blanket or great coat, water, rations, cooking utensils, empty sandbags, and a rope for tethering the horse.[51] On 23 April they were ordered to move into the Sinai Desert to assist the 5th Mounted Brigade who were under attack.[52] Travelling thirty miles (48 km) overnight they reached Kantara at dawn and crossed the canal.[53] However the Turkish force had withdrawn, so the brigade established a chain of observation posts in the desert. The Wellingtons were near Hill 70, in the No.3 Section of the canal's defence zone.[53]
The regiment remained at Hill 70 until 12 May, when they moved twenty-six miles (42 km) north-east to Maler.[51] On arrival they established a line of observation posts and sent reconnaissance patrols further east into the desert.[54] Four days later the 2nd Squadron sent a troop on a reconnaissance to Sabhket El Bardawil. On 18 May the regiment occupied the Katia Oasis, and the next day sent a patrol to Ard sixteen miles (26 km) to the east. They gained their first sight of Turkish forces in the region, but they were too distant to engage.[55] On 29 May the regiment, along with the rest of the brigade, travelled thirty miles overnight to Salmana, and early next morning surprised the Turkish garrison. The main part of the assault was carried out by the Auckland Mounted Rifles. The water supply at Salmana was insufficient for a complete mounted brigade, so they had to return to Maler that night.[56] Between 21–23 June the regiment provided flank protection for the 1st Light Horse Brigade on a reconnaissance of Katia. Then, on their return to Maler, they were attached to the 2nd Light Horse Brigade,[57] who gave them the nickname "Well and Trulys".[58] In July the regiment lost its machine-gun section, which was transferred to the newly formed brigade Machine-Gun Squadron.[59] The Maxim guns were replaced by three Lewis guns, one per squadron.[60] The loss of the section also reduced the regiment's establishment to twenty-four officers and 499 other ranks.[61]
Romani
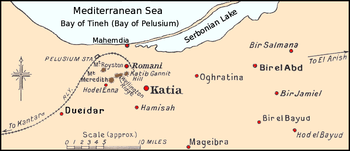
On 19 July, reconnaissance aircraft located a Turkish force in the desert moving west. The regiment and the 2nd Light Horse Brigade were ordered to establish a line of observation posts in their path. They were to send out patrols to locate them, but withdraw if attacked. If possible, they were to retire towards Romani, enticing the Turks to follow them.[62] At dawn on 20 July the regiment located the Turks digging trenches near Ogratina. Rifle fire was exchanged and some prisoners were captured. The prisoners revealed that the force comprised twelve battalions with artillery support, planning to attack Romani.[62]
Two days later, on 22 July, the regiment again encountered Turkish troops, this time at Sagia. Over the following days they were employed checking the Turkish positions and shadowing their line of march. On 28 July, the 2nd Squadron located a strong Turkish force at Umm Ugba two miles (3.2 km) north of Katia. Covered by artillery and machine-guns, two of the regiment's squadrons carried out a bayonet charge and captured the position. They lost two men dead and three wounded during the battle.[63][64]
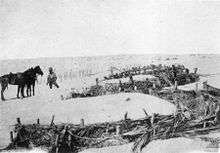
On 3 August, still with the 2nd Light Horse Brigade, the regiment returned to Katia. Forming the vanguard, they came under Turkish fire on their approach, and as Katia appeared to be held in strength by the Turks, the brigade set up a line of observation posts to monitor them until nightfall. They then retired to Maler, unknowingly being followed by the Turks. At 23:30 the 1st Light Horse Brigade reported movement to their front, and thirty minutes later shots were exchanged at Mount Meredith and Hod El Enna. The regiment had just settled down for the night and were ordered to stand to. At 02:15 4 August, fighting broke out along the front line and two hours later the 1st Light Horse Brigade carried out a fighting withdrawal. At dawn the regiment was the brigade reserve behind the 6th and 7th Light Horse Regiments. By 05:00 the Turkish force was outflanking both their defences and the ANZAC Mounted Division headquarters, which was co-located at the regiment's position. Two hours later they were ordered to gallop to the front line. Riding through rifle and machine-gun fire, they moved to the left and rear of the 6th and 7th Light Horse Regiments.[65][66] Once the regiment's position was established, the Australian regiments pulled back to form a line with them. As the Turks advanced and occupied the ridge line previously held by the light horse, they brought artillery and machine-gun fire down onto the division's rear areas. The situation appeared serious, and the regiment's clerks were ordered to burn all their papers.[67] Just before 10:00 reinforcements, consisting of a yeomanry regiment, two Scottish infantry companies and the New Zealand Mounted Rifles Brigade, arrived and began attacking the Turkish left. By 18:00 they had captured the position. The regiment's casualties during the day were twenty-four wounded.[63][68]
Orders were given for a counter-attack the next morning. The assault started at 04:00 on 5 August, and the regiment charged forward on foot with bayonets fixed. Ignoring the machine-gun and rifle fire they broke through the Turkish lines, capturing several hundred prisoners. Meldrum ordered their horses forward and they continued the attack on horseback. They stopped when they came under heavy artillery and machine-gun fire approaching Katia.[69] In the face of such fire they were unable to continue without more support, so dismounted and observed the Turkish positions. Gradually the rest of the division arrived and strengthened the regiment's line. At 09:00 Meldrum was asked by the artillery for assistance. Two batteries following behind the advance were being attacked by Turkish infantry. So Meldrum sent two of his squadrons to help, but the Turkish attackers vanished before they arrived. At 10:00 Meldrum had to take over as temporary commander of the 2nd Light Horse brigade, and Major Spragg became the temporary regimental commanding officer.[70] The next attack was timed for 14:30; the regiment would be part of the force assaulting Katia, on the front left, alongside the 6th Light Horse Regiment. Advancing through artillery and machine-gun fire until they were five hundred yards (460 m) from the Turkish lines, they halted and returned fire.[71] At one stage the regiment had to bend their line, when the unit to their left gave ground and the Turkish forces moved forward trying to outflank them. Heavy fire from the regiment broke that attack, and the counter-attacking Turks withdrew. By nightfall no further move forward was possible, and as the horses needed watering, the attack was called off. The regiment had fought all day, but their casualties were rather light; one officer and nine other ranks wounded, some mortally. They had captured one thousand prisoners.[63][72]
Abd
Having not slept for the last three days, the Wellingtons and the 1st and 2nd Light Horse Brigades were rested. Meanwhile, the remainder of the division continued the counter-attack against the Turkish rearguard. On 8 August the Turks were at Abd, and the 1st and 2nd Light Horse Brigades were ordered forward. Reaching Katia later that day, they were ordered to march through the night to take part in the assault at dawn the next morning. Setting out at 23:00, they were in position north-west of Ard by 05:00 on 9 August.[73] Half an hour later the Wellington regiment, in the vanguard, led the 2nd Light Horse Brigade on foot to capture a ridge of high ground half a mile (.8 km) from the Turkish main defence line. Once in position there, they came under constant artillery fire. Later the regiment again led the brigade to capture another ridge four hundred yards (370 m) to their left, with the 2nd Squadron advancing on the left and the 9th Squadron on the right, supported by the 6th Squadron in reserve. The attack, which was covered by the 7th Light Horse Regiment, advanced through machine-gun and rifle fire until the ridge was captured, but the New Zealanders then came under an intense artillery bombardment.[74] At 13:30 the Turks counter-attacked, reaching the 1st Light Horse Brigade who were alongside the Wellingtons, and the 3rd Light Horse Brigade on the other flank who were forced to retire. At 16:30 the division's situation appeared untenable; orders were issued to evacuate the wounded and for the whole line to retire, while remaining in contact with the Turks. By nightfall the regiment had returned to Oghratina. Their casualties were three dead and twenty-nine wounded.[63][75] The next day the regiment rested as the Turkish force withdrew. On 11 August they moved forward across the battleground; the only Turkish troops they encountered were engaged in burying their dead. The next day the Turkish force had withdrawn to Salmana.[76] On 27 August Meldrum resumed command of the regiment,[77] which then moved back to Kantara, with a strength of twenty-two officers and 407 other ranks.[63]
El Arish

While at Kantara leave was granted for all ranks in Port Said and Sidi Bishr during September. On 10 October, once more part of the New Zealand brigade, the regiment moved forward to Maler, and reached Geeila, twenty-five miles (40 km) further east, on 24 October. The next phase of the campaign was an advance of fifty miles (80 km) across the desert to El Arish. The regiment continued moving east, reaching Moseifig on 27 October, and a troop from the 9th Squadron located a good water supply at Gererat only fifteen miles (24 km) from El Arish. On 11 November, the regiment advanced another fourteen miles (23 km) east to Mustagidda, establishing outposts at Arnussi and Zoabitia.[78] Overnight 15/16 November the post at Arnussi was attacked by Turkish camel troops, which withdrew before dawn.[79] The Allied attack on El Arish began on 20 December, the New Zealand and 3rd Light Horse Brigades being chosen to carry out the final assault from the south, while the rest of the division cut off any retreat. By dawn the brigade was in sight of its objective, and the town was surrounded. They then discovered that the Turkish forces, aware of the advance, had evacuated the town three days earlier.[80]
Magdhaba
That night, 22/23 December, the advance continued towards Magdhaba. This village was surrounded on three sides by a wadi, and defended by several redoubts which were covered by artillery and machine-guns. At 05:00 the regiment dismounted four miles (6.4 km) to the north-east of the village.[81] The attack started just before 10:00. The regiment, positioned on the brigade's right, headed towards their objective, Redoubt No.5. They galloped across the open ground, through artillery and machine-gun fire, until they were 1,600 yards (1,500 m) from the Turkish lines, at which point they dismounted and continued on foot. Their Lewis Guns, supported by a section from the Machine-Gun Squadron, pinned down the Turkish defenders, while the assault continued.[82] By 11:00 the 6th and 9th Squadrons were only five hundred yards (460 m) from the objective when Harry Chauvel, who was in command of the ANZAC Mounted Division, asked the Desert Mounted Corps commander, Philip Chetwode, for permission to withdraw because he believed that no progress had been made. Chetwode instead ordered an all out assault.[83] In the meantime, the regiment continued the advance anyway, and at 15:55 they fixed bayonets and charged the redoubt, capturing some of the Turkish defenders. At 16:40 the 10th Light Horse Regiment carried out a mounted charge into the middle of the position, and all resistance ceased.[84] The battle had cost the regiment five dead.[63]
Palestine
Rafa
On 9 January 1917, around 01:00, the regiment crossed the Egyptian–Palestine border,[85][86] and continued northwards undetected until about 15:30, when Turkish observation posts set off flares to alert their troops of the Allied approach.[87] At 08:00 orders for the attack on Rafa were issued; the brigade was to form the right flank. At 09:35 the whole brigade galloped forward to a position two miles east-north-east of their objective.[88] The Auckland and Canterbury Mounted Rifles were to attack "C" Redoubt, while the Wellington Regiment was placed in reserve with a secondary task of providing protection against any attack on the brigade from the area of Khan Yunis. Already low on ammunition, once the assault began the regiment had to be resupplied with 24,000 rounds of machine-gun ammunition. At 13:00 two of the regiment's troops went forward to occupy a gap in the line between the New Zealand brigade's position and that of the Australian 1st Light Horse Brigade. Just before 14:00 one of the regiment's flank patrols, two miles north-east of Rafa, captured a Turkish officer and three Germans who, during questioning, claimed that the Rafa garrison consisted of 2,000 men, with four mountain artillery guns, and that the 160th Regiment was en route to reinforce the defenders.[89] Another patrol reported that two infantry battalions were heading to Rafa from Abu Khatli, while a third patrol reported that around 2,000 men, about four miles (6.4 km) away, were coming from Khan Younis. Then another Turkish force was seen approaching, about five miles (8.0 km) away, but too far away to make out any details. At 15:45 the brigade was ordered to attack again, and fifteen minutes later another of the regiment's patrols reported 500 Turkish troops approaching from the east.[90]
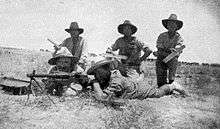
The approaching Turkish forces convinced Chetwode to call off the attack. But at 16:30, as the other brigades were retiring, the New Zealanders charged and captured their objective. This allowed them to bring enfilade fire onto the rest of the position. The rest of the division then resumed the attack and captured the village. By now the Turkish relief force was about two miles away to the north-east.[91] By 17:15 all the wounded had been evacuated and the covering patrols recalled. As there were no water supplies at Rafa, at 18:30 the brigade was ordered to withdraw back to Sheikh Zowaiid. Although not as heavily involved in the battle as other units, the regiment still had twelve men dead and eighteen wounded.[85][92]
Gaza
At 02.30 on 26 March, the regiment set out in thick fog for the assault on the town of Gaza. By 08:00 they had crossed the Wadi Ghuzze and reached Sheikh Abbas, confronted only by enemy aircraft and some Turkish camel patrols. Two hours later they were about three miles (4.8 km) to the east of Gaza, providing a guard force against any reinforcements that might approach from Hareira.[93] The British assault did not go according to plan, and at 14:00 the ANZAC Mounted Division was ordered to attack the town from the north. The regiment galloped forward together with the rest of the New Zealand brigade, and occupied Meshahera Ridge north-east of Gaza at 16:00. Dismounting, the regiment moved into Gaza, with the 6th Squadron leading, followed by the 2nd Squadron, and the 9th Squadron bringing up the rear.[94] At 16:25 they captured a Turkish field ambulance; four officers, 125 other ranks and twenty vehicles. Continuing the assault through artillery and small arms fire, the 2nd and 9th Squadrons reached a cactus hedge. Cutting through it with their bayonets, they engaged the Turkish defenders behind it in hand-to-hand fighting. Two troops then charged across a lagoon, about 18 inches (460 mm) deep, to capture a Turkish trench. To their right they sighted a Turkish artillery emplacement, and Meldrum ordered the position taken without delay. Two troops from the 2nd and one from the 9th Squadron carried out a bayonet charge and captured the guns intact.[95] Back in the regiment's centre they were held up by a strong Turkish defensive position at a cemetery. Instead of trying to attack the position, they held their line while the captured guns were recovered. The regiment was now some distance in front of the 2nd Light Horse Brigade to their left, and in danger of a flanking counter-attack. To assist the defence of their position, they turned one of the captured guns onto the Turkish strong points, the inexperienced gun crew sighting by peering down the barrel until they could see their target.[96]
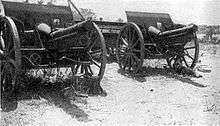
At 18:35, although Meldrum believed they could at least hold where they were, the regiment was ordered by Chetwode to withdraw. At 19:00 horse teams arrived to recover the guns, and at 19:45 they slowly retired back to the suburbs of Gaza. At 21:40 they rejoined the brigade and left the town. The next morning at 08:30 they arrived at Deir El Belah, where the division was now located. Casualties during the battle had again been rather light, at one dead and nineteen wounded. They had captured 197 prisoners, as well as the guns and field hospital.[85][97]
The regiment's involvement in the second attempt to capture Gaza began at 18:30 on 16 April. The brigade left Deir El Belah, marched through the night and at 04:30 the next morning were at a ford on the Wadi Ghuzze at Shellal. A Turkish machine-gun post covering the crossing was taken out, and soon after the regiment formed the vanguard on the advance to the Rafa–Beersheba road. By midday, despite being attacked by hostile aircraft, they had established a line of observation posts beside Im Siri. Turkish cavalry patrols were observed in the distance, but they did not attempt an attack on the regiment. By nightfall the brigade was recalled to Shellal, where they camped for the night. The next day was similar, again setting up posts observing Turkish movements, then returning to Shellal after dark. The main assault on Gaza was floundering, and the next day the ANZAC Mounted Division was ordered to assist the Imperial Mounted Division in attacking the Atawineh Redoubt, six miles (9.7 km) to the south-east of Gaza.[98] To get into position for the attack, the brigade marched through the night. Initially held in reserve, the Wellingtons were sent to assist the 5th Mounted Brigade in an attack on "Sausage Ridge", south of the Atawineh Redoubt. Getting into position at 11:30, Meldrum ordered the 6th Squadron to assault along the length of the ridge, with the help of fire support from the 9th Squadron and the Inverness Battery Royal Horse Artillery. The attack was also supported by the 3rd Squadron Auckland Mounted Rifles on the right of the 6th Squadron. At 12:30 the attack had progressed around half way up the ridge, at which point the Leicestershire and half of the Ayeshire Battery Royal Horse Artillery arrived to support the assault. They could not, however, prevent around six hundred Turkish reinforcements reaching the redoubt.[99]
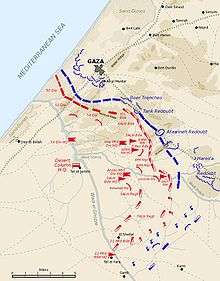
Doubtful of their ability to capture the redoubt alone, at 13:15 Meldrum asked for reinforcements; he was informed there were no more available. The Canterbury Mounted Rifles, advanced into a gap between the Wellingtons and the 5th Mounted Brigade, which eased the pressure. By 15:00 the superior Turkish numbers and their strong defences, forced Meldrum to commit his reserve, the 2nd Squadron and a section of the Machine-Gun Squadron. At the same time, the horses were moved further to the rear so that they would be out of artillery range. At 15:15 the regiment's right was counter-attacked by three or four hundred Turkish troops. Fifteen minutes later Meldrum again asked for reinforcements; he was again refused. Supported by their artillery, the regiment held out until 17:00, when the Turks retired, having suffered heavy losses. An hour later the regiment was ordered to withdraw at nightfall. The 2nd Squadron reported that they had gained a position which allowed them to assault the redoubt. Meldrum, aware that the redoubt would have to be abandoned even if they were successful, refused to allow the assault.[100] At 18:30 the Royal Horse Artillery withdrew. Then, confusingly, the regiment was ordered to remain where they were, until the yeomanry to their left had moved back. So it was not until 20:15 that the regiment left the front line. At 01:00 20 April the regiment reached the night camp at El Jemme. Their casualties during the battle amounted to one dead and twenty-three wounded. The same night, this second attempt to capture Gaza was called off.[85][101]
Wadi Ghuzee line
On 27 April Meldrum was promoted to brigadier-general and given command of the New Zealand brigade,[102] although he was temporarily replaced as commanding officer by Major Charles Dick. On 30 April the Wellington regiment returned to the front, manning a line of observation posts in the Weli Sheikh Nuran defence system. They were at the right of the British line, which stretched along the Wadi Ghuzze to the Mediterranean Sea, south of Gaza.[103] As well as manning the trenches, they carried out mounted patrols into no man's land. On 8 June it was their turn to return to the rear rest area at Marakeb, and Lieutenant-Colonel James Whyte assumed command of the regiment.[85][104] On 8 July, the 9th Squadron captured a Turkish outpost four miles (6.4 km) to the west of Beersheba, from which they could clearly see the village's defences. Ten days later the regiment assaulted what they believed was a strong Turkish position at Khalassa, but discovered the defenders had withdrawn before their approach.[105] On 19 July a Turkish force attacked across the Wadi Imleih towards Karm. The regiment moved forward to occupy a line of observation posts the next day, but again discovered that the Turks had withdrawn.[106] Over the next weeks the regiment carried out numerous patrols around Beersheba, checking on the Turkish defences and dispositions.[107] On 18 August they were sent to Marakeb to rest. Four weeks later, on 18 September, they returned to the front line at Fukhari.[108]
Beersheba
For the attack on Beersheba the New Zealand brigade was to move around the open Turkish left flank and assault the village from the east-north-east.[109] They moved to Esani, fifteen miles (24 km) to the south-east, on 24 October, then on the next day the Wellingtons established a seven miles (11 km) long observation line between two and three miles (4.8 km) south-west of Beersheba. On 28 October the regiment moved another eight miles (13 km) south-east to Khalassa, then the next day to Asluj, sixteen miles (26 km) to the south of Beersheba.[110]
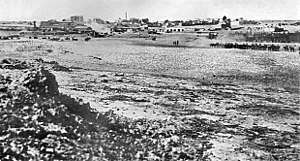
Over the night of 30/31 October the attack on Beersheba began; the regiment formed part of the vanguard with the 6th Light Horse Regiment. At 00:45, the 9th Squadron lead and the 2nd Squadron provided flank and rear protection as the Wellingtons left the main column to capture a Turkish position at Goz El Shegeib, eight miles (13 km) south-east of Beersheba. At 03:00 the position was secured – it was unoccupied – and the regiment remained there for instructions. Three hours later the 9th Squadron was attacked, from the north, by a squadron of Turkish cavalry. Supported by the 6th Squadron, they counter-attacked and forced the Turks to withdraw towards Beersheba. The regiment then moved to rejoin the brigade, which was now five miles (8.0 km) to the south-east of Beersheba. Continuing to move forward, at 08:00 they captured Salem Irgeig. The regiment now became the brigade reserve; the brigade assaulted the Saba Redoubt and captured it at 14:40. The 2nd Squadron was sent to reinforce the Auckland Mounted Rifles for their attack on Tel el Saba, which they captured at 15:00.[111] The rest of the regiment were not involved in the battle, and Beersheba was eventually captured with a mounted charge by the 4th Light Horse Brigade. The Wellingtons casualties during the battle amounted to one dead and five wounded.[85][112]
Holding their position overnight, at 07:00 the next morning the regiment advanced towards the crossing at El Likeyeh, seven miles (11 km) to the north of Beersheba. Two hours later, just short of the crossing, the 6th Squadron, leading the regiment, were engaged by around 100 Turkish cavalry and two machine-guns. The squadron, supported by the 9th Squadron, immediately counter-attacked, and captured the position. They then continued on to their objective, where they met up with the Imperial Camel Corps Brigade (ICCB) and held the crossing until nightfall, when they were relieved so that they could return and camp at the Saba Redoubt.[112] A shortage of water had affected all the division's operations, so on 2 November the brigade were moved eleven miles (18 km) east to Bir Imshash.[113]
Ras El Nagb
While the brigade was searching for water, the advance was running into problems. On 4 November the brigade was ordered to relieve the 5th Mounted Brigade at Ras El Nagb, thirteen miles (21 km) north-east of Beersheba. At 17:30 the Canterbury Mounted Rifles arrived, followed by the 6th Squadron of the Wellington Mounted Rilfes, who lined up to the left of the Canterbury regiment, facing towards Kheuwelfeh. Their opposition was estimated to be around two thousand men and three artillery batteries. At 03:00 on 3 November the Turks began their attack; five hours later the 9th Squadron relieved the 6th Squadron in the front line. Only two hours later the 6th had to move back into the line, to the west of Ras El Nagb, where they stopped a Turkish attack trying to outflank the position. At 13:30 the 2nd Squadron came under a heavy artillery bombardment and suffered several casualties. After this the Turks carried out a bayonet charge, getting to within two hundred yards (180 m) of the regiment's lines before, under heavy fire, they were forced to withdraw. The regiment managed to hold their position, by the weight of their fire power, until nightfall.[113] The next morning the regiment was relieved by the ICCB. The battle had cost them nine men wounded. Gaza was captured on 7 November, but the regiment remained around Ras El Nagb until the night of 9 November.[85][114]
Ayun Kara
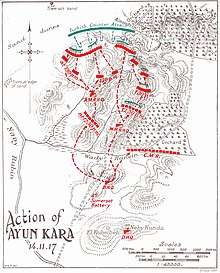
On 10 November the regiment returned to Beersheba, and the New Zealand brigade were ordered to move sixty miles (97 km) across the British front to the opposite flank.[115] Four days later, just after 11:00, the 6th Squadron assisted the Canterbury Mounted Rifles in capturing a Turkish post defending the Wadi Hanein. But they could then see Turkish troops gathering in a nearby orange grove, and more Turkish troops to the north.[116] When the rest of the brigade arrived Meldrum ordered an immediate attack. The regiment was to advance along the main road, with the Auckland Mounted Rifles on their left. The Somerset Battery Royal Horse Artillery and the Machine-Gun Squadron would provide fire support. The Canterbury Mounted Rifles would be the reserve. At 13:30, covered by artillery fire, the 9th Squadron started the assault. Their first target was a trench system at the top of the hill. Supported by covering fire from a 6th Squadron troop, they charged and captured the position, also capturing a Lewis Gun and a Turkish machine-gun. As the 2nd Squadron secured the position, the 9th Squadron continued forward for their secondary objective, which they charged and captured; here they captured two more machine-guns.[117] At 14:15 the Auckland Mounted Rifles sighted a strong Turkish force preparing for a counter-attack,[118] which began fifteen minutes later. Part of the assault came up against the left of the 9th Squadron, who fought off the attack with the support of five machine-guns. On the other flank the Auckland Mounted Rifles were under severe pressure and the regiment was ordered to assist them. Two troops from the 2nd Squadron mounted and galloped forward around 200 yards (180 m) across open ground. They then dismounted and charged a machine-gun post on the top of a knoll. Engaging the defenders in hand-to-hand combat, they captured the post and another machine-gun. From the knoll they were able to enfilade the Turkish troops attacking the Aucklanders, and forced them to retire.[119][120] It was now 16:00 and the 9th Squadron, taking advantage of the Turkish withdrawal, charged and occupied the Turkish position in front of them. The 6th Squadron, on the right, also moved forward to support them. This prompted a general Turkish retirement, and by dusk they had left the battlefield. The Allies evacuated their wounded and, expecting another attack at dawn, prepared their defences. At 23:00 an Australian squadron and a camel squadron arrived to support the brigade. The regiment's casualties during the battle were eleven dead and forty-six wounded. Against that they had captured thirty-four prisoners as well as seven machine-guns and other military supplies.[85][121]
River Auja
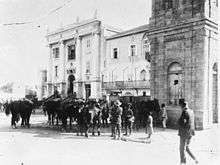
The next day, 15 November, the Turkish force had completely withdrawn. The brigade continued the advance north, stopping just beyond Richon-le-Zion. The next day, at 09:30, patrols from the regiment entered the port of Jaffa. The town's only inhabitants were the civilian population, the Turkish troops having evacuated the town beforehand. At 11:00 the regiment's commander, Whyte, took formal possession of the Government buildings, posting guards at the German and Austrian Consulates and the post office.[122][123]
Two days later, on 18 November, the regiment moved into a line of observation posts along the River Auja. The next day a troop from the 2nd Squadron were sent to locate crossing points across the river. They located a dam and a bridge to the north-east. Dismounting and approaching on foot, they had one man wounded, who was later taken prisoner. The following day the regiment was relieved by the other rest of the brigade, and moved to the rear, returning to the front line on 21 November.[124]
The brigade was ordered to mount an assault across the river at 13:00 on 24 November; the regiment's objective being Khirbet Hadrah.[125] First across were the Canterbury Mounted Rifles who crossed by a ford at the rivers mouth. Behind them the 6th and 9th Squadrons crossed and moved along the river bank to the bridge at Jerisheh, which they captured at 15:30, taking twenty-two prisoners. With the bridge secure, the regimental headquarters and the 2nd Squadron moved across to reinforce the attack, which then captured Khirbet Hadrah, capturing twenty-five prisoners and two machine-guns.[126]
With the crossing secured, the 161st (Essex) Brigade moved across the river to reinforce the defence. The Wellingtons established observation posts further to the north. The next morning the 2nd Squadron sent a patrol on a reconnaissance, which located a strong Turkish force approaching. By 05:30 this Turkish force were attacking the 2nd Squadron's posts. At 07:00 the rest of the regiment, still south of the river, moved to support the defenders at Kirbet Hadrah, where they came under an artillery bombardment. At the same time the 2nd Squadron was ordered to fall back to support the infantry at Sheikh Muannis. The Turks continued their assault, and at 08:15 had forced the infantry to withdraw south of the river.[127] Holding out until 09:30, the last unit to cross back over the river was the 2nd Squadron. In an attempt to keep possession of a crossing, the 6th and 9th Squadrons moved to cover the ford at the river mouth where they managed to stop the Turkish advance four hundred yards (370 m) short of the ford. That night the 161st Brigade took over all the defences, but the New Zealanders remained close by to support them. The regiment had twelve men wounded during the fighting. They remained in the area until 4 December, when the brigade left for Ibn Ibrak, to the south-east of Jaffa, relieving the ICCB in the front line.[85][128] On 11 December the regiment was attached to the 54th (East Anglian) Division at Beit Dejan as the army tactical reserve. Ten days later they were back with the New Zealand brigade, which was now north of the River Auja. The regiment encountered the Turkish rearguard at Ferrekhiyeh, but after locating the Turks' positions, the regiment was ordered back to Beit Dejan. Then they were ordered to move back to Sukereir, arriving on Christmas Day 1917.[129]
Jordan Valley
Jericho
On 9 February the regiment started thirty-five miles (56 km) across country to Bethlehem, and by 17 February they were camped north-east of Bethlehem around the Mar Elias Monastery and Ibn Obeid. The same day, Whyte was injured in an aeroplane crash and Major Spragg became the temporary commanding officer.[130] The next day, orders were issued for the capture of Jericho. The regiment were attached to the 60th (London) Division and had to move that night to be in position to begin the advance at 06:00 the next morning. They were tasked to be ready to intercept any retreating Turkish forces from El Muntar, which would be attacked by the infantry division.[131]
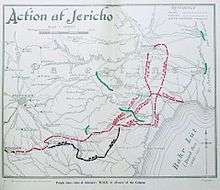
That evening, 18 February, the regiment moved out, but before long the width of the track forced them to dismount and lead their horses by hand in single file. At 22:30 the head of the column came under fire from Turkish cavalry. They forced the Turks to withdraw, and later surrounded and captured several prisoners, one being Ali Salem a well-known Turkish spy. Continuing at 06:00 they captured their first objective two miles to the east of Mar Saba. Spreading out to capture any retreating Turkish forces, they advanced north, under fire, and at 10:40 joined up with the 60th Division.[132] Mounted patrols were then sent out, one of which located a strong Turkish position. Located on the "Ancient Road" to Hill 306 and on to Hill 288, the Turkish positions were supported by five artillery pieces at Neba Musa.[133]
At 17:00 the regiment was released from their attachment to the 60th Division, and returned to the command of the New Zealand brigade, which was advancing along the Jordan Valley, joining them an hour later. Problems crossing the mountainous terrain postponed any attack until daylight. At 03:00 the brigade moved out again with the Wellingtons on the right, advancing towards Hill 306, the Canterbury Mounted Rifles on the left towards Hill 288 and the Auckland Mounted Rifles forming the reserve. The 6th Squadron attacked Hill 306 from the south and the 2nd Squadron from the south-west. At dawn they came up against a large group of Turks "in a fortress-like position on the top of a steep hill-face, bristling with machine guns, commanding the surrounding country".[133][134] With no artillery available, the squadrons were unable to advance with any speed, using only their small arms to support the assault. A gap appeared in the line between the regiment and the Canterbury Mounted Rifles, who had moved further north then had been intended. So the Auckland Mounted Rifles moved forward to assault Hill 288 instead. These galloped forward and captured Hill 288, forcing the Turks to withdraw, and the Wellingtons occupied Hill 306. Turkish artillery bombarded the hill, while their troops retired to the east.[135] Holding an observation line overnight, at 06:00 the next morning the brigade advanced towards Jericho leaving the 9th Squadron to capture Rijm El Bahr, including its stores and boats, on the Dead Sea. Jericho was captured the same day by the Australian 1st Light Horse Brigade. As a whole, the operation cost the Wellingtons one killed and four wounded.[133] On 22 February the regiment returned to Bethlehem along the Jericho–Jerusalem road, eventually returning to the Mar Elias Monastery. They met their commanding officer, Whyte, who had now recovered from his injuries. Three days later the brigade crossed back to the west, returning to Richon.[136][137]
Amman
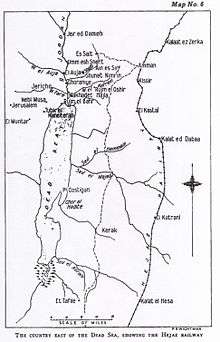
A raid on Amman was the next operation for the regiment. The ANZAC Mounted Division, the 60th (London) Division and the ICCB would all take part.[138] On 13 March the regiment started back to the Jordan Valley, through heavy rain. Orders for the raid were issued; the brigade would advance on mountain tracks via the village of Ain Es Sir, then to Amman.[139] The rains continued postponing the raid and it was not until 01:30 on 24 March that the brigade crossed the River Jordan, by pontoon bridge at Hajlah. At 09:30 the regiment, the Canterbury Mounted Rifles and the 181st (2/6th London) Brigade started clearing the area between the river and the foothills. At 11:25 they charged and captured three artillery pieces.[140] The brigade advance continued at 15:00, without the 6th Squadron which remained behind to assist the 181st Brigade in their assault on Es Salt.[140] Still negotiating the mountain track, it started to rain again at 18:00 and the brigade camped for the night; starting again next morning they reached Ain Es Sir just after midday. There they were forced to stop and wait for their supplies to catch up with them.[141]
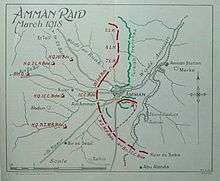
Early on 26 March the rest of the ANZAC Mounted Division arrived, and the ICCB that evening. To cut off Amman from reinforcements, one of the regiment's troops set out that night and destroyed a section of the Hedjaz rail line to the south of the town. They returned the next morning without loss. Orders were issued for the attack on the town; the brigade would assault from the south. The 2nd Squadron was to provide flank protection, located in the area four miles (6.4 km) south-east of Es Sir. The rest of the regiment, including the headquarters, the 9th Squadron, and half a section of the Machine-Gun Squadron, escorted a demolition party to destroy the railway station at Kissar, just under six miles (9.7 km) to the south of Amman.[142] En route the 9th Squadron located a train carrying around three hundred Turkish troops, stopped in a cutting. When they opened fire the train pulled out towards Kissar, where it ran into a squadron from the Auckland Mounted Rifles and one of the 9th Squadron's troops. Some of the Turks left the train to fight on foot, while the train continued on to Amman, leaving them behind. The regiment's men left the demolition party to be escorted by troops from the ICCB, and returned to the brigade outside Amman.[143][144]
On 28 March the brigade, reinforced by the 4th (ANZAC) Battalion ICCB, tried to capture Hill 3039 south-west of Amman. The attack failed and further attempts were postponed until after nightfall. The night assault began at 02:00; two troops of the 9th Squadron were involved in the second line to protect the left flank. The attack was successful and the brigade commenced improvements to the defences in order to withstand any counter-attack.[145] The Wellingtons dug in at the centre of the position, with the Aucklands on their right and the Canterburys on the left. The expected counter-attack started at 05:00 with an artillery bombardment.[146] As the Turkish troop approached the brigade lines, at 09:20 an order to withdraw was given. As the regiment, the Canterburys and the cameliers started to retire, it allowed the Turks to reach the crest of Hill 3039. It was then realised the order was mistaken, and the brigade officers rallied their man and charged back, forcing the Turks back down the hill.[147] Further Turkish counter-attacks continued throughout the day, and at 16:00 a troop from the 9th Squadron on the right flank, when the Turkish got close to their lines, had to do a counter-attack of their own. By now it was appreciated that the division could not achieve their objectives, and a withdrawal back towards the Jordan river was ordered.[148] By 22:30 the wounded had been evacuated and the regiment pulled back unopposed, reaching Ain Es Sir at 04:00 the next day. Turkish troops then closed on their position, but that evening the 6th Squadron rejoined the regiment.[149] A line of observation posts were then established to monitor the approaching Turks. The regiment made plans to hold them off until the division passed through the village, and then withdraw back across the river. At 03:45 on 1 April, the 2nd Squadron formed a skirmish line to the north of Ain Es Sir, the 9th Squadron another line to the south-east, while the 6th Squadron were the reserve. By 07:00 the brigade, bringing up the rear, reached the village. Once they had passed them the 6th Squadron joined the end of the line. At 07:45 the 2nd Squadron opened fire on Turkish troops coming from the north, while the 9th Squadron withdrew, followed soon after by the 2nd Squadron. As they entered the village, enemy troops in the hills opened fire on them. The squadron immediately counter-attacked, supported by two troops from the 9th Squadron. The remainder of the regiment stopped three miles (4.8 km) to the south, forming a defensive line.[150][151] The Turkish troops in the hills were soon dealt with by the 2nd Squadron, and as they withdrew, the regiment was able to provide covering fire. Finally, just after 20:00, they arrived back at Shunet Nimrin, and camped for the night. Their casualties during the raid were fourteen dead and eight wounded. The brigade recrossed the River Jordan at the Ghoraniyeh pontoon bridge on 2 April.[152][153]
Ghoraniyeh
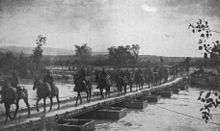
As the ANZAC Mounted Division pulled back to the west bank of the Jordan, the Wellingtons remained behind strengthening the defences at the Ghoraniyeh bridge-head.[154] On 18 April, the regiment, less the 6th Squadron, were part of a brigade force that advanced on the village of Shunet Nimrin. The operation was a deception to convince the Turks that further raids on Amman were imminent. The next day patrols from the regiment located a large Turkish force in the foothills around the village. The brigade positioned as if to attack them, then when they reinforced their position, the brigade withdrew. That night they crossed back over the river and camped outside Jericho. The regiment moved again on 23 April, to camp in the foothills to the south of Jericho.[154]
On 30 April the second raid across the Jordan began, their objective this time to capture Es Salt. This time a much larger force was involved, under command of the Desert Mounted Corps. The Wellingtons and the rest of the New Zealand brigade were part of the force assigned to attack the village of Shunet Nimrin. At 03:30 when the brigade crossed over the Ghoraniyeh pontoon, the regiment came under command of the 180th (2/5th London) Brigade, providing protection for their right flank as they advanced on the village. The difficult terrain and the strength of the Turkish defences hindered progress, and by dusk they were still some distance away from their objective. The next day the advance continued, but in the face of growing Turkish resistance, and with the arrival of Turkish reinforcements, they were in danger of being cut off and surrounded. So on 4 May the whole force withdrew back across the River Jordan, leaving the Wellingtons behind to protect the bridge-head.[155]
Many men were infected with malaria, and the regiment was periodically rotated away from the valley bottom to the western hills. Their first move back west was on the 16 May, when they moved to the brigade camp site near Talaat Ed Dumm, remaining there for the next thirteen days. On 30 May they moved to Solomon's Pools, to the south of Bethlehem. On 14 June the regiment returned to the front line at Ain Ed Duk, two miles north of Jericho. There they established observation posts to monitor Turkish activity, remaining until they were relieved on 30 June.[156]
Abu Tellul
On 9 July Major Charles Dick assumed temporary command of the regiment, while Whyte was on leave and the regiment was in the front line near Abu Tellul. On 13 July the neighbouring sector of the line, a salient defended by the Australian 1st Light Horse Brigade, came under a heavy artillery bombardment. Some rounds landed on the regiment's positions, causing casualties. At dawn on 14 July German soldiers attacked the light horse brigade. By 07:00 they had broken the Australian lines in the east, and the Wellingtons came under command of the light horse brigade to support their defence. Thirty minutes later the 9th Squadron advanced, on foot, along the Wadi Aujah, and occupied a position on the west of the salient just before the Germans' Turkish allies attacked. The 9th Squadron managed to hold their line, but because they were engaging a far larger force, the 6th Squadron moved forward on their left to support them. The two squadrons' lines were able to mutually support each other and engage the attacking Turks with a "withering fire".[157] Then the two squadrons and the light horse counter-attacked, forcing back their opposition and capturing 400 prisoners, sixty-one of them taken by the Wellingtons, along with a machine gun and a Bergman automatic rifle. The Turks continued to hold a position in the north until forced to withdraw by the New Zealanders. The regiment's casualties during the battle were four dead and nine wounded. They remained at the front until 19 July when they rotated back to Talaat Ed Dumm.[152][158]
Chaytor's Force
In August the brigade formed the divisional reserve located around Jericho. In September they moved forward to form the left (northern) flank of the Jordan Valley defences. At the same time, the brigade took command of the 1st and 2nd Battalions British West Indies Regiment and the 38th and 39th Battalions Royal Fusiliers, which were part of a larger deception force commanded by the divisional commander, Chaytor.[159][160] They were tasked with convincing the Turks that the next British attack would be from the Jordan Valley, while the forces were actually being realigned to attack in the west. The regiment was heavily involved in the deception, carrying out offensive patrolling, constructing dummy camps, and moving back and forwards behind the lines to give the impression of a much larger force than was actually present.[161]
The British attack in the west began on 19 September; the next day the New Zealand brigade started increasing pressure on the Turkish positions opposite them. The first breakthrough was made on 21 September, by the Auckland Mounted Rifles. At 18:30 the brigade was ordered to advance on Kherbet Fusail, with the objective of securing a position at Damieh.[162] By midnight the brigade had reached Kerbet Fusail, and the Wellingtons were ordered to seize El Makhruk and at the same time occupy the roads leading north and west. The 9th Squadron lead the regiment, and moved along the Wadi Farah towards El Makhruk. As they closed on the village they could hear vehicles moving along the road. Pressing forward they captured four hundred prisoners, including the commander and staff of the Turkish 53rd Division, seventy transport vehicles and a large quantity of supplies. Moving on, at 04:30 they reached and occupied the village.[163] The 2nd and 9th Squadrons remained at El Makhurk, while the 6th Squadron continued north-west for another two thousand yards (1,800 m) to occupy the neighbouring village of Tel El Mazar where they captured even more Turkish supplies and equipment.[152][164] On 23 September it was apparent that the Turkish Fourth Army was trying to withdraw north. The brigade was ordered to try and intercept them. The 6th Squadron, with a West Indies battalion, were left to guard the Damieh bridge, while the remainder of the brigade moved towards Es Salt, which they occupied at 16:20 the same day.[165]
The next day, 24 September, the brigade continued its advance by heading towards Suweileh, with the Wellingtons protecting the open flank. The next day the ANZAC mounted division was ordered to capture Amman. The Wellingtons provided the vanguard, and at 07:45, two miles north-west of Amman, the 9th Squadron, in the lead, was engaged by machine-gun and rifle fire and could see Turkish cavalry in the distance. At 08:10 the 2nd Squadron moved forward to support the 9th, but came under fire from two redoubts. They took cover and were able to bring enfilade fire onto the redoubts and also onto a force of Turkish reinforcements preparing a counter-attack. At 10:00 the 9th Squadron were relieved by the 2nd Australian Light Horse Brigade. Manoeuvring enabled the division to press forward, forcing the Turkish defenders to retire. At 11:30 the regiment, with the Canterbury Mounted Rifles, were ordered to assault Amman. Leaving the 2nd Squadron to deal with concealed machine-gun posts, the rest continued the attack. By 14:40 they had closed on Amman and the 9th Squadron had captured a hill in front of Stone Tower. At 15:00 the Canterbury Mounted Rifles galloped into the town and all resistance there ceased. The regiment pressed forward along the Wadi Amman and captured three artillery pieces. By 16:30 all Turkish positions had been taken, along with hundreds of prisoners.[166] That was the last battle of the campaign fought by the New Zealand Mounted Rifles Brigade. The regiment camped beside the town until 29 September, when they left for Ziza to assist the 2nd Light Horse Brigade, who had captured five thousand prisoners. On 1 October they set out to return to the Jordan Valley.[167]
Post war
The regiment's part in the war was now effectively over. On 4 October they camped to the north-west of Jericho for the next four days. They then moved back to their old camp at the Mar Elias monastery, and eventually reached Richon le Zion on 14 October.[168]
By January 1919, the regiment were still waiting to return home, and had begun education courses, continuation training and playing sports. This occupied them until March when a revolt broke out in Egypt, and the regiment drew its equipment back out of storage and headed for the Nile Delta. Posted to Quesna, all of the regiment's squadrons, except the 9th which went to Cairo, began policing the riots and trying to stop looting.[169] Once the rioting had been quelled, the regiment once again waited to return home. Their return finally began on 30 June 1919, when the majority of the brigade left the Suez Canal for New Zealand and the Wellington Mounted Rifles Regiment ceased to be a unit.[170][171]
Casualties
During its service 369 of the regiment's men died from all causes, either killed in action, died of wounds or of disease. Another 453 men were wounded, some more than once. More than half of the dead, 207 men, were killed during the seven months they fought in the static trench warfare of the Gallipoli Campaign; another 129 men were killed during their two years of more mobile warfare in the Sinai and Palestine Campaign. Gallipoli also accounted for more than half of the wounded, a total of 258 men compared to 195 men who were wounded in Sinai and Palestine.[172]
Many of the Gallipoli dead have no known grave. The Commonwealth War Graves Commission Chunuk Bair Cemetery, constructed on the site where the Turks buried Allied war dead after the evacuation, has 632 graves of which only ten men have been identified.[173] Similarly, the nearby Hill 60 Cemetery has another 788 graves, of which only seventy-six were identified.[174]
Honours
Several men of the regiment were recognised for their service by the British Empire awards system. The regiment's first commanding officer, Meldrum, was invested as a Companion of the Order of the Bath, a Companion of the Order of St Michael and St George and awarded the Distinguished Service Order (DSO).[175] His successor, Whyte, was also invested with a DSO, as well as a Bar as a second award.[176] Another four officers were also invested with a DSO, while seven officers were awarded a Military Cross, one was appointed an Officer of the Order of the British Empire, and another a Member of the Order of the British Empire. The regiment's other ranks were awarded five Distinguished Conduct Medals and twenty Military Medals, and there were fifty-nine Mentions in Despatches amongst all ranks, some men being mentioned more than once.[177]
References
- Footnotes
- These are only commanding officers. Several other men had temporary command during operations. The chronological list of commanders is: Lieutenant-Colonel William Meldrum from August 1914 – April 1917; Major Albert Samuel temporary commander between November to December 1915 and January to February 1916; Lieutenant-Colonel James Whyte temporary commander between February to March and November to December 1916, then commanding officer June 1917 to December 1918; Major C R Spragg temporary commander in August and November 1917, between December 1917 and January 1918 and in February 1918; Major J A Sommerville temporary commander between October and November 1916, July 1918, December 1918; Major C Dick temporary commander between April and June 1917, between July and September 1918; and Major A F Batchelor commanding officer between January and June 1919.[3]
- At the time of the First World War, the modern Turkish state did not exist; its territory was part of the Ottoman Empire. While the terms have distinct historical meanings, within many English-language sources the terms "Turkey" and "Ottoman Empire" are used synonymously, although academic sources differ in their approaches.[20] The sources used in this article predominantly use the term "Turkey".
- Citations
- Kinloch 2005, p.32
- Wilkie 1924, p.10
- Powles 1922, p.279
- Wilkie 1924, p.3
- "Wellington Mounted Rifles Regiment". New Zealand History. Retrieved 12 November 2013.
- "Auckland Mounted Rifles Regiment". New Zealand History. Retrieved 5 November 2013.
- Waite 1919, p.6
- Powles 1922, p.3
- Stack 2011, p.1883
- Kinloch 2005, p.4
- Gullet 1923, p.58
- Wilkie 1924, pp.3–7
- Wilkie 1924, pp.8–9
- Wilkie 1924, p.11
- Wilkie 1924, pp.12–13
- Wilkie 1924, pp.14–15
- Wilkie 1924, pp.15–18
- Nicol 1921, p.33
- Wilkie 1924, p.18
- Fewster, Basarin, Basarin 2003, pp.xi–xii
- Wilkie 1924, pp.21–23
- Nicol 1921, pp.42–43
- Wilkie 1924, pp.24–26
- Wilkie 1924, pp.27–29
- Wilkie 1924, pp.29–31
- Wilkie 1924, p.31
- Wilkie 1924, pp.32–33
- Wilkie 1924, pp.36–37
- Wilkie 1924, pp.37–39
- Wilkie 1924, pp.40–45
- Wilkie 1924, pp.45–46
- Wilkie 1924, p.48
- Wilkie 1924, p.50
- Wilkie 1924, pp.51–55
- Wilkie 1924, p.55
- "1915-Wellington Mounted Rifles Regiment timeline". New Zealand History. Retrieved 13 November 2013.
- Wilkie 1924, pp.55–57
- Wilkie 1924, pp.59–60
- Wilkie 1924, p.61
- Wilkie 1924, p.62
- Nicol 1921, pp.81–82
- Wilkie 1924, pp.63–64
- Wilkie 1924, pp.65–66
- Wilkie 1924, p.67
- Wilkie 1924, p.68
- Wilkie 1924, pp.69–70
- Wilkie 1924, p.72
- Wilkie 1924, pp.77–80
- Nicol 1921, p.96
- Gullet 1923, p.57
- Wilkie 1924, p.85
- Nicol 1921, p.99
- Wilkie 1924, p.83
- Wilkie 1924, p.86
- Wilkie 1924, p.87
- Wilkie 1924, p.89
- Nicol 1921, p.108
- Wilkie 1924, pp.89–90
- Luxford 1923, pp.178–179
- Gullett 1923, p.120
- Powles 1922, p.6
- Wilkie 1924, p.92
- "1916 – Wellington Mounted Rifles Regiment timeline". New Zealand History. Retrieved 17 November 2013.
- Wilkie 1924, p.93
- Wilkie 1924, p.95
- Gullet 1923, p.148
- Wikie 1924, p.96
- Wilkie 1924, p.97
- Wilkie 1924, p.98
- Wilkie 1924, p.99
- Wilkie 1924, p.100
- Wilkie 1924, p.101
- Wilkie 1924, p.102
- Wilkie 1924, p.103
- Wilkie 1924, pp.103–105
- Wilkie 1924, p.105
- Wilkie 1924, p.108
- Wilkie 1924, pp.109–110
- Wilkie 1924, p.111
- Wilkie 1924, p.112
- Wilkie 1924, pp.113–114
- Wilkie 1924, p.115
- Wilkie 1924, p.116
- Wilkie 1924, pp.117–118
- "1917 – Wellington Mounted Rifles Regiment timeline". New Zealand History. Retrieved 18 November 2013.
- Wilkie 1924, p.122
- Wilkie 1924, p.123
- Wilkie 1924, p.124
- Wilkie 1924, pp.124–126
- Wilkie 1924, p.127
- Wilkie 1924, p.128
- Wilkei 1924, p.129
- Wlkie 1924, p.134
- Wilkie 1924, pp.135–136
- Wilkie 1924, p.136
- Wilkie 1924, p.137
- Wilkie 1924, p.139
- Wilkie 1924, p.143
- Wilkie 1924, p.144
- Wilkie 1924, pp.145–146
- Wilkie 1924, p.147
- Nicol 1921, p.144
- Wilie 1924, p.148
- Wilkie 1924, p.149
- Wilkie 1924, p.151
- Wilkie 1924, p.152
- Wlkie 1924, p.153
- Wilkie 1924, p.154
- Wilkie 1924, p.157
- Wilkie 1924, pp.159–160
- Wilkie 1924, p.161
- Wilkie 1924, p.162
- Wilkie 1924, p.163
- Wilkie 1924, pp.164–165
- Nicol 1921, p.160
- Wilkie 1924, p.167
- Wilkie 1924, p.168
- Nicol 1921, p.163
- Nicol 1921, p.164
- Wilkie 1924, p.169
- Wilkie 1924, p.170
- Wilkie 1924, p.172
- Nicol 1921, p.167
- Wilkie 1924, p.173
- Nicol 1921, p.168
- Wilkie 1924, p.174
- Wilkie 1924, p.175
- Wilkie 1924, pp.176–177
- Wilkie 1924, pp.178–179
- Wilkie 1924, pp.180–181
- Wilkie 1924, p.182
- Wilkie 1924, p.183
- Wilkie 1924, p.184
- Nicol 1921, p.181
- Nicol 1921, pp.182–183
- Wilkie 1924, pp.186–187
- Nicol 1921, p.185
- Nicol 1921, p.189
- Wilkie 1924, pp.189–190
- Wilkie 1924, p.193
- Wilkie 1924, p.194
- Wilkie 1924, p.195
- Wilkie 1924, p.196
- Nicol 1921, p.198
- Wilkie 1924, pp.197–198
- Wilkie 1924, p.201
- Wilkie 1924, p.202
- Wilkie 1924, p.203
- Wilkie 1924, p.204
- Wilkie 1924, p.205
- Nicol 1921, pp.208–209
- "1918 – Wellington Mounted Rifles Regiment timeline". New Zealand History. Retrieved 23 November 2013.
- Wilkie 1924, pp.206–207
- Wilkie 1924, p.208
- Wilkie 1924, pp.210–211
- Wilkie 1924, pp.212–213
- Wilkie 1924, pp.214–215
- Wilkie 1924, pp.215–216
- Wilkie 1924, p.218
- General Edmund Allenby (4 February 1922). "Supplement to the London Gazette, 4 February, 1920" (PDF). The London Gazette. Retrieved 24 November 2013.
- Wilkie 1924, p.219
- Wilkie 1924, p.222
- Wilkie 1924, p.224
- Wilkie 1924, p.225
- Wilkie 1924, pp.226–227
- Wilkie 1924, pp.228–230
- Wilkie 1924, p.231
- Wilkie 1924, pp.231–234
- Wilkie 1924, p.238
- "1919 – Wellington Mounted Rifles Regiment timeline". New Zealand History. Retrieved 24 November 2013.
- Wilkie 1924, p.240
- Wilkie 1924, pp.244–259
- "Chunuk Bair (New Zealand) Memorial". Commonwealth War Graves Commission. Retrieved 26 November 2013.
- "Hill 60 Cemetery". Commonwealth War Graves Commission. Retrieved 26 November 2013.
- "Meldrum, William". Te Ara. Retrieved 22 November 2013.
- "New Years Honours Military". Auckland Weekly News. 10 January 1918. Retrieved 23 November 2013.
- Wilkie 1924, pp.242–243
- Bibliography
- Fewster, Kevin; Basarin, Vecihi; Basarin, Hatice Hurmuz (2003). Gallipoli: The Turkish Story. Crows Nest, New South Wales: Allen and Unwin. ISBN 1-74114-045-5.
- Gullett, Henry Somer (1923). The Australian Imperial Force in Sinai and Palestine, 1914–1918. Official History of Australia in the War of 1914–1918. Volume VII. Sydney: Angus and Robertson. OCLC 59863829.
- Kinoch, Terry (2005). Echoes of Gallipoli: In the Words of New Zealand's Mounted Riflemen. Wollombi: Exisle Publishing. ISBN 0-908988-60-5.
- Luxford, J H (1923). With the Machine Gunners in France and Palestine. Auckland: Whitcombe and Tombs. ISBN 1-84342-677-3.
- Nicol, C.G. (1921). The Story of Two Campaigns: Official War History of the Auckland Mounted Rifles Regiment, 1914–1919. Auckland: Wilson and Horton. ISBN 1-84734-341-4.
- Powles, C. Guy; A. Wilkie (1922). The New Zealanders in Sinai and Palestine. Official History New Zealand's Effort in the Great War. Volume III. Auckland: Whitcombe & Tombs. OCLC 2959465.
- Stack, Wayne (2011). The New Zealand Expeditionary Force in World War I. Men-at-arms series. Volume 473. Oxford: Osprey Publishing. ISBN 1-84908-888-8.
- Waite, Fred (1919). The New Zealanders at Gallipoli. Christchurch: Whitcombe and Tombs. ISBN 1-4077-9591-0.
- Wilkie, A. H. (1924). Official War History of the Wellington Mounted Rifles Regiment, 1914–1919. Auckland: Whitcombe and Tombs. ISBN 978-1-84342-796-4.