I ANZAC Corps
The I ANZAC Corps (First Anzac Corps) was a combined Australian and New Zealand army corps that served during World War I.
| I ANZAC Corps | |
|---|---|
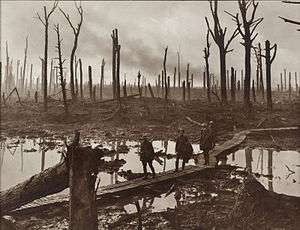
 Gunners from the Australian 4th Division during Third Battle of Ypres October 1917 | |
| Active | 1916–1917 |
| Country | Australia New Zealand |
| Allegiance | British Empire |
| Type | Corps |
| Size | 3 infantry divisions and support elements |
| Part of | British Second Army (1916) British Fifth Army (1916–1917) |
| Engagements | World War I |
| Commanders | |
| Notable commanders | Sir William Birdwood |
It was formed in Egypt in February 1916 as part of the reorganisation and expansion of the Australian Imperial Force and the New Zealand Expeditionary Force (NZEF) following the evacuation of Gallipoli in December 1915. Along with the II ANZAC Corps, it replaced the original Australian and New Zealand Army Corps (ANZAC). The corps initially participated in the defence of the Suez Canal before being transferred to the Western Front in France and Belgium in late March 1916. Later in 1916 the New Zealand Division was removed from I ANZAC's order of battle, swapping with II ANZAC's Australian 4th Division.
In November 1917, I ANZAC ceased to exist when the Australian infantry divisions in France were grouped together as the Australian Corps and the New Zealand Division, then part of II ANZAC Corps, was allocated to a British corps.
History
Formation
Following the evacuation of Gallipoli in December 1915, the Australian and New Zealand forces in Egypt underwent a period of reorganisation and expansion. It was decided to expand the AIF from two infantry divisions to four (later five), while the New Zealand elements of the New Zealand and Australian Division would be split and expanded to form a full division known as the New Zealand Division.[1] The five Australian and one New Zealand infantry divisions were then organised into two corps sized units, known as I ANZAC Corps and II ANZAC Corps.[2][3]
I ANZAC Corps was initially commanded by Lieutenant General Alexander Godley and comprised the three "veteran" ANZAC divisions—the Australian 1st and 2nd Divisions and the newly formed New Zealand Division.[2] The corps' divisions were initially manning the defences east of the Suez Canal against the anticipated Turkish invasion of Egypt. The large scale losses suffered by the French at Verdun, however, highlighted the need for more Allied troops in France and shortly after the battle it was decided to transfer the Australian and New Zealand infantry divisions to France.[4] On 13 March 1916, under the command of Lieutenant General Sir William Birdwood—the original commander of the ANZAC—the corps began the process of embarking for France.[4][5]
Western Front
In France the I ANZAC Corps was attached to the British Second Army, and initially positioned in a relatively quiet sector south of Ypres in order to gain experience of trench warfare. The corps went into the line south of Armentières, taking over from the British III Corps which was moving to the British Fourth Army in preparation for the Somme Offensive. The Australian 2nd Division was the first to move on to the line, taking up its position in the trenches on 9 April 1916.[6]
On 5 May I ANZAC experienced its first combat on the Western Front when the Germans launched a raid on the 20th Battalion's positions following an artillery barrage, resulting in 100 casualties, and some men and equipment being captured.[7] On 30 May, the 11th Battalion's position was also heavily shelled.[7] Throughout June, I ANZAC carried out a number of trench raids on the German positions in their sector. In the period between 20–30 June the corps carried out 10 such raids, and suffered 773 casualties.[7]
.jpg)
In mid-July 1916, with the Somme Offensive faltering, the British commander-in-chief, General Douglas Haig, required fresh divisions to continue the advance. The corps was moved to General Hubert Gough's Fifth Army and directed to capture Pozières.[8] By this time the II ANZAC Corps had started to arrive in France from Egypt under the command of General Godley. As Godley was also the commander of the New Zealand Expeditionary Force, it was decided that the New Zealand Division would be more appropriately located under his command so it swapped with the Australian 4th Division in time for the move to the Somme.[9]
Pozières had been attacked unsuccessfully four times prior, however on 23 July 1916 the 1st Division managed to capture the village after making an advance of 1,000 yards.[10] Following this success the Germans began a heavy artillery bombardment of the Australian positions and having suffered 5,286 casualties,[11] the 1st Division was relieved by the 2nd Division two days later.[12] As the area surrounding the village was still in German hands, plans were made for further attacks.[12] 1st Division's assault had been successful largely because of good staff work and preparation, however, the divisional commander, Major General Harold Walker, had also refused to be pressured by Gough into attacking before he was ready. The 2nd Division's commander, Major General James Gordon Legge, however, did not and in the end he ordered an attack on 29 July without having carried out adequate planning.[12] As a result, the attack failed with a loss of 3,500 casualties[11] and 2nd Division were forced to try again on 4–5 August. This subsequent attack proved more successful, however, over the course of the two attacks the division suffered 6,800 casualties.[12]
Following the fighting around Pozières, all three divisions of I ANZAC took part in the Battle of Mouquet Farm, which took place between 10 August and 3 September 1916.[13] Due to the formation of a salient in the Allied lines, the area surrounding the farm, across which the Australians had to advance, was under the observation of German artillery spotters and as a result of heavy barrages I ANZAC suffered heavily during the battle, with 6,300 casualties,[14] 4,649 of which were suffered by the 4th Division alone.[11] As a result of these losses, the corps was withdrawn to a quiet sector during September and October 1916, before returning to the Somme in November.[14] A bitter winter set in shortly after, however, effectively ending major operations on the Western Front for 1916.[14]
Throughout the end of 1916 and the beginning of 1917, I ANZAC was confined to defensive duties, however, in the spring they began a series of patrols along the front, during which it was discovered that the Germans were withdrawing to the Hindenburg Line. On 17 March, the 2nd Division was involved in the advance towards Bapaume.[14][15] Following this, elements of the corps took part in the fighting around Bullecourt during April and May and Messines in June in support of II ANZAC[16][Note 1] before the corps as a whole was committed to the fighting around Ypres as part of the Fifth Army in September 1917.[17]
On 16 September 1917, six weeks after the fighting at Ypres had begun, the 1st and 2nd Divisions took up position at Glencorse Wood under the cover of darkness.[17] Four days later the Australian divisions were part of a renewed Allied offensive. Advancing side-by-side, they formed the centre of the attack in what has since become known as the Battle of Menin Road. The battle proved a success, albeit a costly one as the Australians suffered approximately 5,000 casualties.[17] On 26 September the 4th and 5th Divisions, which had been attached to I ANZAC for the fighting around Polygon Wood[15] carried out a successful attack in which they managed to capture both Polygon Wood and parts of Zonnebeke.[17]

Later, on 4 October both I ANZAC and II ANZAC were involved in an attack on the Broodseinde ridge, with the four ANZAC divisions—1st, 2nd in I ANZAC and 3rd and New Zealand in II ANZAC[15]—serving in the line alongside each other for the first time.[17] After suffering from a heavy German artillery attack, I ANZAC launched an attack to capture pillboxes that dominated the ridge. As the Australian divisions left their trenches they were confronted by a force of Germans in no man's land who were carrying out an attack of their own. The two sides clashed with each other on open ground before the Germans were forced to retreat to the ridgeline. Further fighting ensued and afterwards I ANZAC managed to capture most of the German pillboxes on the crest of the ridgeline,[18] but were stopped short of their secondary objective by defensive fire from German positions nearby. In all I ANZAC suffered approximately 4,500 casualties.[19]
As a result of these successes the Allied high command felt that a breakthrough might finally be possible.[20] Heavy rain, however, turned the ground to mud and further offensive actions resulted in heavy casualties for limited gains. By early November I ANZAC Corps was withdrawn from the line around Ypres.[20]
Disbandment
In November 1917, the five Australian infantry divisions in France were grouped together as part of the Australian Corps and I and II ANZAC Corps ceased to exist.[21][22]
Order of battle
While the composition of I ANZAC Corps changed a number of times[9][15][Note 2] with divisions being attached and detached as required for involvement in a particular campaign, the following order of battle is included for illustrative purposes. It is correct per the corps' arrival in France in 1916. Also at divisional level there were various support units including artillery field batteries and trench mortars, pioneer battalions and engineer field companies, machine gun companies and field ambulances.[23]
Sources:[2][24]
Corps Commander: Lieutenant General Sir William Birdwood
| New Zealand Division | Major-General Andrew Hamilton Russell | |
| 1st New Zealand Brigade | 2nd New Zealand Brigade | 3rd New Zealand Rifle Brigade |
| 1st Auckland Battalion | 2nd Auckland Battalion | 1st Battalion, NZ Rifle Brigade |
| 1st Canterbury Battalion | 2nd Canterbury Battalion | 2nd Battalion, NZ Rifle Brigade |
| 1st Otago Battalion | 2nd Otago Battalion | 3rd Battalion, NZ Rifle Brigade |
| 1st Wellington Battalion | 2nd Wellington Battalion | 4th Battalion, NZ Rifle Brigade |
| Pioneers | New Zealand Pioneer Battalion | |
Notes
- Footnotes
- The 4th Division was detached from I ANZAC for this battle.
- At various times over the course of 1916 I ANZAC consisted of between one and four divisions, being various combinations of the 1st, 2nd, 4th, 5th and NZ Divisions attached at various times.
- Citations
- Grey 2008, pp. 99–100.
- Odgers 1994, p. 86.
- "The ANZAC Acronym". Australian War Memorial. Retrieved 27 July 2009.
- Odgers 1994, p. 87.
- Grey 2008, p. 100.
- Odgers 1994, p. 88.
- Odgers 1994, p. 89.
- Odgers 1994, p. 92.
- Chappell, P.B. "Battles and Engagements: France and Flanders 1916". The Regimental Warpath 1914–1918. www.ordersofbattle.darkscape.net. Archived from the original on 19 July 2011. Retrieved 4 August 2009.
- Sheffield 2003, p. 94.
- Grey 2008, p. 103.
- Sheffield 2003, p. 95.
- Odgers 1994, p. 93.
- Odgers 1994, p. 94.
- Chappell, P.B. "Battles and Engagements: France and Flanders 1917". The Regimental Warpath 1914–1918. www.ordersofbattle.darkscape.net. Archived from the original on 19 July 2011. Retrieved 4 August 2009.
- Grey 2008, pp. 104–105.
- Odgers 1994, p. 99.
- Odgers 1994, pp. 99–100.
- Prior and Wilson 1996, p. 136.
- Odgers 1994, p. 100.
- Odgers 1994, p. 116.
- Grey 2008, p. 107.
- Grey 2008, pp. 100–101.
- Sheffield 2003, pp. 178–179.
References
- Fleming, Robert (2012). The Australian Army in World War I (1st ed.). Botley, Oxford: Osprey Publishing. ISBN 184908632X.
- Grey, Jeffrey (2008). A Military History of Australia (3rd ed.). Melbourne, Victoria: Cambridge University Press. ISBN 978-0-521-69791-0.
- Odgers, George (1994). Diggers: The Australian Army, Navy and Air Force in Eleven Wars. 1. Sydney, New South Wales: Lansdowne. ISBN 978-1863023870.
- Prior, Robin; Wilson, Trevor (1996). Passchendaele: The Untold Story. New Haven, Connecticut: Yale University Press. ISBN 0-300-06692-9.
- Sheffield, Gary (2003). The Somme. London: Cassell. ISBN 0-304-35704-9.
External links

