Bonampak
Bonampak (known anciently as Ak'e or, in its immediate area as Usiij Witz, 'Vulture Hill')[1] is an ancient Maya archaeological site in the Mexican state of Chiapas. The site is approximately 30 km (19 mi) south of the larger site of Yaxchilan, under which Bonampak was a dependency, and the border with Guatemala. While the site is not overly impressive in terms of spatial or architectural size (American archaeologist, epigrapher, and Mayanist scholar Sylvanus Morley once stated that Bonampak was fourth-rate in terms of size and political importance),[2] it is well known for the murals located within the three roomed Structure 1 (The Temple of the Murals). The construction of the site's structures dates to the Late Classic period (c. AD 580 to 800). In addition to being among the best-preserved Maya murals, the Bonampak murals are noteworthy for debunking early assumptions that the Maya were a peaceful culture of mystics (a position long-held and argued for by the well-known early Mesoamerican archaeologist, ethnohistorian and epigrapher from the Carnegie Institute of Washington, Sir John Eric Sidney Thompson),[3] as the murals clearly depict war and human sacrifice.
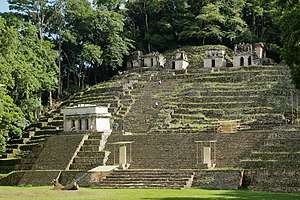
The site, lying close to a tributary of the Usumacinta River, was first seen by non-Mayans in 1946. Precisely who was first is a matter of speculation, but it was either by two American travelers, Herman Charles (Carlos) Frey and John Bourne, or photographer/explorer Giles Healey. The Americans were led to the ruins by the local Lacandon Maya who still visited the site to pray in the ancient temples. Giles Healey was the first to be shown the huge paintings covering the walls of one of the structure's three rooms. The paintings show the story of a single battle and its victorious outcome.[4]
Excavations
From 1993 to 1997, the Mexican National Institute of Anthropology and History (INAH) excavated at Bonampak, discovering 27 burials.
History of the polity
Bird Jaguar in the early 5th century fought against K'inich Tatb'u Skull I in Yaxchilan, and lost his freedom.[5] Other nobles were captured in a later war against Knot-eye Jaguar I.[6] In 514, Knot-eye Jaguar I was himself taken captive (by Ruler C of Piedras Negras),[6][7] giving Bonampak some respite; but after 526, his successor K'inich Tatb'u Skull II attacked Bonampak again and captured more lords.[8]
Bonampak by 600 CE had become a satellite of Yaxchilan. In that time, the ajaw of Yaxchilan installed Yajaw Chan Muwaan I as lord in Bonampak. Subsequent ajawob reconstructed the site to orient toward the metropolis. C. 790 CE, Yaxchilan's king Shield Jaguar III oversaw the installation of Chan Muwaan II, and hired Yaxchilano artisans to commemorate it in "Structure I"'s murals. Bonampak collapsed with Yaxchilan in the 9th century.[9]
Temple of the Murals
Structure 1:
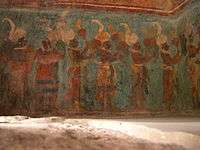
Structure 1 at Bonampak, built at the end of the eighth century A.D. (officially dedicated on November 11, 791 A.D.), measures 16 meters long, four meters deep, and seven meters tall, and is constructed atop a T-shaped platform.[10] Although there is no evidence to support the claim, some speculate that it may have also had a roofcomb, such as can be seen on Structure 33 at nearby Yaxchilan. Structurally symmetrical, balanced and stable, it is composed of three separate rooms, which contain murals that narrate the events surrounding the accession to the throne by Chooj, son of Bonampak ruler Yajaw Chaan Muwan, and grandson of Aj Sak Teles. Although there has been some disagreement as to the temporal sequence of events, it is generally agreed that the narrative should be viewed in chronological order, beginning in Room 1 (scene of tribute, dressing, dance, mummery and musical performance); then on to Room 2 (scene of violent conflict, and a display in which a human cull is presented, tortured and killed in the company of the highest members of court and upper echelons of the victorious force); and, finally, to Room 3 (scene of a dance, with observers, and ritual bloodletting).[1] In total, there are some 281 human figures represented within the three rooms, many with captions (approximately 1/3 of the figures are named, while another 10 percent of the figures have blank captions, and slightly more than half have no caption at all).[10] A few theories as to why some captions were left blank include deaths or political realignment, an interruption of the murals related to the ostensible Lowland Maya collapse during the period of Structure 1's creation, and the possibility that it became politically impolite to name certain figures.[10] The planning and execution of the Bonampak murals points to a large team of specialists, and not to one solitary genius. This team would have included plasterers, pigment preparers, and possibly calligraphers, in addition to the painters and planners whose artistic conception is most visible on the walls.[10]
The exterior of Structure 1, although poorly preserved, was once richly painted in bright hues of Maya blue, blue-green, red, and yellow. Indeed, almost everything would have been covered in paint, as even the floors in each room were painted black. Only the top surfaces of the interior benches appear to have been left unpainted.[10] In addition to the various colors applied, there were further artistic elements on the facade of Structure 1. Just below the binder molding, there are remnants of a single band of some eighty glyphs that wrapped around the building, and broad vertical bands of red, interchanged with areas of unpainted white stucco. Essentially, the artists at Bonampak framed the lower course of the exterior of Structure 1 as if it were a Maya vase; more specifically, this was done in the codex-style vases of the Petén, and not mirroring those of the Usumacinta region where Bonampak is located.[10] Above each room there is a small niche housing a seated figure—likely representations of a ruling lord.[11] Between these niches there were two larger stucco scenes, only one of which has survived the ravages of time. Hinting at what is depicted within on the murals, the image depicts a figure in a forward stride toward a captive on his knees before him, his hair being gripped firmly by his vanquisher. On the east and west sides of the building, the upper course featured additional seated figures within niches set atop long-snouted god heads—these still have some remnants of red paint visible.[10] Finally, the doorway to each room features a carved lintel of a warrior subduing a captive. Lintel 1 (Room 1) depicts Yajaw Chaan Muwan, ruler of Bonampak, capturing an enemy on January 12, A.D. 787 (Longcount date: 9.17.16.3.12, 8 Eb 10 K’umk’u); Lintel 2 (Room 2) likely shows the overlord from Yaxchilan, Shield Jaguar IV, on January 4, A.D. 787 (Longcount date: 9.17.16.3.8, 4 Lamat 6 K’umk’u); and Lintel 3 (Room 3) displays Aj Sak Teles, probably on July 25, A.D. 780 (Longcount date: 9.17.9.11.14, 3 Ix 2 Yax).[1] It is worth noting that the height of each doorway is only roughly 5’ 7” (1.75 meters), and around 3 feet wide. Thus, it is clear that no Maya noble in full regalia would have ever entered these rooms without a bow of deferential respect.[11]
In 1996, a team from Yale University led by professor Mary Miller began The Bonampak Documentation Project, which included making an even more detailed study, photographic record, and reproductions of the murals. These reproductions, completed by artists Heather Hurst and Leonard Ashby, bring to life many details, thanks to infrared photographs, that can no longer be seen with the naked eye. Most saliently, the images captured many glyphs that were previously unknown, lost either to natural erosion, or due to the many failed attempts at preservation, some of which did far more damage than conservation. For a more detailed description about The Bonampak Documentation Project, and a thorough discussion on the murals, see Mary Miller and Claudia Brittenham's 2013 seminal work on the subject titled, The Spectacle of the Late Maya Court: Reflections on the Murals of Bonampak.
*Note: The numbered human figures (HF) mentioned below can be found in the aforementioned publication on page 73, in addition to excellent large foldouts in the back of the book.
Room 1:
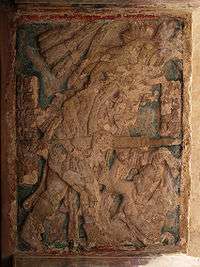
This is the scene of a regal event: the acknowledgement, in front of the court and visiting dignitaries, by the Bonampak ruler, Yajaw Chaan Muwan, of his son's right to rule.[12] There are 77 human figures in this first room fulfilling various functions within the narrative. Some of the actors that capture immediate attention are the elegantly costumed figures on the lower register of the south wall (HF's 62, 63, and 64). The large, feathered back racks, in addition to the various jaguar, quetzal and serpent elements in their costumes, underscore the importance of these figures. These are the three ch’oks (young heirs). It was at first thought that the central figure (HF 63) was the ruler of Bonampak, Yajaw Chaan Muwan. However, further readings of the accompanying glyphs show this figure to be the future ruler, Chooj, who is in between his two brothers: Bird Balam and Aj Balam.[12] With heels raised, all three brothers are in the middle of a ritual dance. To the viewer's left of HF 62, beginning on the south wall and leading to the east wall, there are several figures playing instruments (rattles, drums, and turtle shells) and singing, which fill this room with celebratory music. To the viewer's right of the three ch’oks, leading to the west wall, there are eight sajals (regional governors). Of particular note is HF 71, standing in a familiar pose to smokers of today, as he, too, embraces a long, thin cigarette, expressing some combination of calm, lack of interest and boredom.[10] Behind him, HF's 73 and 74, as well as HF's 52 and 54 on the east wall work together, holding parasols that frame the Initial Series Text right above them on the middle register. These are the only quotation marks in all of the Pre-Columbian New World.[10] On the lower register of the north wall, still more musicians (HF's 43 and 44) blast their trumpets, while other performers (HF's 45-50) wear various costumes, including that of a crocodile (HF 48).
Of all the images of visiting messengers, nobles and dancers held within the upper register, a few individuals, and one recently discovered detail in particular, stand out. Conspicuously placed upon a raised platform on the upper register of the south wall, just above two holes where wooden beams had once ran through to help support the structure, stands a lone figure (HF 16) presenting a child (HF 15) to the lords. At first, many thought that this child was the young heir; however, as noted previously, the central dancing figure below (HF 63) was the heir to the throne at Bonampak. Yet, even without having decoded the glyphs next to the three festive brothers, one notices a couple of peculiarities. Firstly, the young figure is actually wearing face paint and garments that are suggestive of a girl, perhaps a wife for the future ruler.[10] Secondly, no one is looking at the child, not even the individual holding her. In fact, he is glancing over his left shoulder into the upper register of the west wall at the figure (HF 19) sitting upon an elevated throne. This seated figure is likely Yajaw Chaan Muwan, ruler of Bonampak. It is important to mention here that the caption above this individual, like so many captions in Structure 1, was left blank. Therefore, the identification of HF 19 as Yajaw Chaan Muwan is deduced rather than known unequivocally based on a name glyph. Beneath the throne, one can view five bundles, albeit with some difficulty. It was not until Professor Mary Miller's aforementioned Bonampak Documentation Project that scholars finally knew what these bundles contained. After analyzing infrared images of this scene, glyphs for “5 pi kakaw” were revealed. “Kakaw” was the classic Maya term for the cacao bean, and Harvard University professor David Stuart has suggested that the “pi” glyph represents units of 8,000 beans. Therefore, if this is so, it appears that there has been a tribute payment to Yajaw Chaan Muwan of 40,000 cacao beans, which is a considerable sum of wealth.[13] Finally, in the vault across the whole scene in Room 1, the faces of the Sun God are shown as it moves across the sky. On the east wall, a large crocodilian, representing the vault of the sky, carries the myriad avatars of the Sun God upon its back.[12]
Room 2:
This is the scene of what has been referred to as the greatest battle scene in all of Maya art. Room 2 is the largest of the three, which alludes to its greater importance.[14] It also contains more human figures than either Room 1 or Room 2, with 139 of them. The south wall, which is the first that is viewed upon entering, along with the east and the west walls, depict warriors in the heat of battle. Bodies are intertwined on both the lower and the upper registers. Trumpets blast as the battle rages on (HF 7). As one begins to focus more and more on the individuals, a couple of artistic elements and their symbolic meanings become clear. The ancient Maya believed that to be left-handed was a sign of femininity and weakness, thus the warriors who are shown as defeated—including already being stripped nude, with the victors gripping them by the hair—or those in the process of being defeated, are depicted as being left-handed (e.g., HF's 61 and 67). Some are even illustrated with two left hands.[15] To contrast this sharply, several victors are given two right hands, doubling their strength and masculinity. In addition to left-handedness, the losers are also all wearing some element of a bird—or, at least those that are still in their battle costumes, and have not yet been stripped of them. This is also indicative of defeat. The victors, on the other hand, all wear costumes with feline elements—specifically, the jaguar. Therefore, it is of no surprise to see the main character on the upper register of the south wall, Yajaw Chan Muwaan (HF 55), firmly gripping a jaguar skin-covered spear in his right hand while donning a large, extravagant jaguar headdress—which may contain a water-lily scroll—and wearing a jaguar jerkin and jaguar boots.[11] Although it is clear that the events surrounding the ascension to the thrown of Chooj depicted in Structure 1 are narrating actual events, it is equally clear that Bonampak's version of the actual events is more propagandistic in nature. The aforementioned outfits of the losers underscore this fact. That is, no one intending to win would enter battle wearing costumes related to defeat, nor would all of the warriors of the losing side be left-handed. Professor Mary Miller describes the battle scene of Room 2 as an “...official historical portraiture, not by any means a photographic glimpse of Maya warfare.”[11] Above the chaotic battle, the south vault depicts three individuals within ancestor centipede cartouches. Between them are two bound captives.[10] As one turns to view the north wall, the viewer is greeted by the sequel to the battle: torture and sacrifice of the captives taken in battle.
To view the north wall, a visitor would have sat on the south bench above bound captives, as though becoming a part of the scene. The north wall is one of pain and suffering. Nude and almost nude captives (only wearing a loin cloth) are depicted in deep agony, as some of them are in the process of getting their fingernails ripped off, or have already undergone this torture and bleed from their wounds (HF's 101-109). HF 101 may have even had his teeth removed, while HF 106 has already expired, and HF 120 is only a severed head. Yajaw Chan Muwaan is the main figure here, too, wearing only a slightly different variant of his battle costume from the south wall. He stands stately over his captives, while several warriors and nobles observe the ritual, including his wife (HF 97). In the vault, directly above this scene, are four cartouches representing various celestial imagery.
Note: During a radar survey of Structure 1 in 2010, archaeologists discovered a tomb beneath Room 2. It is small and relatively simple. It contained the body of one man between the ages of 35 and 42. It was a complete skeleton, minus the cranium, which scientists believe is simply due to natural erosion, and not evidence of beheading. The skeleton was accompanied by jade earrings, a jade necklace and bracelets, a spondylus shell pendant, two polychrome plates, an alabaster vase with a hole in the base, and a stone knife. The last two items—perforated vase and a stone knife—lead some to believe that this individual was one of the sacrifice victims depicted in Room 2. Other theories include him being a wounded warrior, or a possible relative of Yajaw Chan Muwaan, as his jewelry matched that of the nobles depicted in Room 1.[16] It is clear that this tomb was part of the original construction of Structure 1 and was not, therefore, created at a later date.
Room 3:
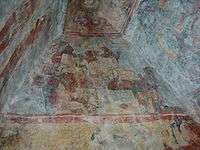
This is the scene of ritual celebration for victory in battle, including bloodletting by nobles, and contains 65 human figures. As with Rooms 1 and 2, the south wall is the first to be viewed. What captures one's attention immediately are the three elaborately dressed individuals in the upper register (HF's 16, 21, and 24) wearing tall, green, quetzal-feathered headdress and dancers wings.[12] These are the same brothers from Room 1, with the young heir, Chooj, in the center (HF 21). Each brother holds a bloody femur bone that has been modified into a ritual ax.[12] Right below Chooj is another figure (HF 22) on his knees; he is also holding an ax in his right hand and another object in his left. Here is another instance where the Bonampak Documentation Project was able to decipher that which is not able to be seen by the naked eye—in this instance, the paint had been completely eroded in this area. However, the infrared images revealed that what HF 22 had in his left hand was none other than the still beating heart of the sacrificial victim below (HF 19), who is being dragged down the pyramid steps by two attendants (HF's 18 and 20).
Covering almost the entire bottom register of the south and west walls are seven more elaborately costumed characters (HF's 13, 15, 17, 26, 26, 27 and 28) with similar headdresses to those of the brothers above them. They are depicted with one heel raised and arms stretched out, as if captured right before a spinning dance, perhaps to imitate the flight of the quetzal. Above the entire south wall scene, set among a background of yellow —the first appearance of a color not representing reality[11]— is a supernatural entity with square eyes, and a single frontal, pointed tooth. It lacks pupils and a real nose; behind it emerge two serpent-like supernatural entities that expel additional entities.[11] The upper register of the west wall contains a musical procession with masked performers, carrying a dwarf (HF 42) who is lifted into the yellow background of the vault, demonstrating his connection to the supernatural world. The upper register of the east wall shows the noble women of Bonampak (HF's 2, 5 and 6) holding stingray spines to their tongues in a bloodletting ritual. Meanwhile, a large man (HF 7) offers bloodletting supplies to the women on the throne. Of note is the fact that these individuals also seem to appear previously—HF 7 in Room 2 on the middle of the east wall; the others in Room 1 on the west wall throne scene.[10] Above them, surrounded by yellow, another supernatural entity appears to spew blood. Turning to the north wall, one can see an almost identical supernatural in the vault as that of the south wall vault. Below, 10 ebeets (lords) dressed in white mantles engage in conversation, while nine more seated individuals below also gesticulate as they talk to one another, perhaps commenting on the performance taking place on the south wall in front of them.[10] Finally, on the bottom register, more musicians raise their instruments skyward as part of the procession on the west wall. Room 3 engulfs the viewer in the celebration.
Professor Mary Miller wrote, "Perhaps no single artifact from the ancient New World offers as complex a view of Prehispanic society as do the Bonampak paintings. No other work features so many Maya engaged in the life of the court and rendered in such great detail, making the Bonampak murals an unparalleled resource for understanding ancient society."
Monuments
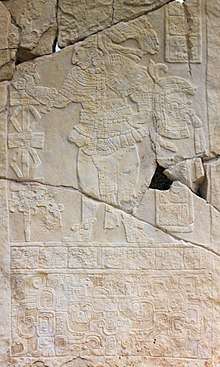
Stele 1
It is located in the central part of the Great Plaza, it represents the moment of the height of Chan Muwan II, the importance of the character is reflected in the way it is represented and in the difficulty to elaborate the monument, that is, in a huge slab of stone of little thickness without suffering any fracture. With its almost 6 meters high it is one of the highest in the Mayan world. Chan Muwan II is standing and carrying a ceremonial cane, the styling of the pupil gives him a greater strength to his look; in the lower part of the stele is observed the monster of the earth from which the faces of the young god of corn emerge. A band of glyphs under the feet of the ruler refers to his genealogy, while in another vertical band the emblem glyph of the city can be observed.
Stele 2
It is located on a low terrace right in the center of the Acropolis and next to Stela 3, it shows Chan Muwan II richly dressed in the company of two women, in front of him her mother Lady Shield Skull and behind him his wife the Lady Green Rabbit of Yaxchilán who wear a huipil. The scene revolves around the ritual of self-sacrifice, performed by the ruler who carries in his right hand a bag with copal from which the face of the bat god is seen and assisted by his mother, who carries the stingray spines to perform the piercing while his wife holds the basket with the strips of paper ready to receive the blood drops of the ruler, which will later be incinerated in honor of their deities.
Stele 3
It represents a scene in which Chan Muwan II is standing in front of a second person squatting and in a position of submission wearing paper ear-rings, symbol of the captives.
See also
Notes
- Houston, Stephen (2012). "The Good Prince: Transition, Texting and Moral Narrative in the Murals of Bonampak, Chiapas, Mexico". Cambridge Archaeological Journal. 22 (2): 153–175. doi:10.1017/s0959774312000212.
- Lynch, James (1964). "The Bonampak Murals". Art Journal. 24: 23. doi:10.2307/774743. JSTOR 774743.
- Roberts, David (July 2005). "Secrets of the Maya: Deciphering Tikal". The Smithsonian. The Smithsonian.
- Coe, Michael D. (1999). The Maya (Sixth ed.). California: Thames & Hudson. pp. 125–129. ISBN 0-500-28066-5.
- Martin & Grube 2000, p.119.
- Martin & Grube 2000, p.120.
- Sharer & Traxler 2006, p. 422
- Martin & Grube 2000, p.121.
- David Stuart: "Orienting Bonampak", http://decipherment.wordpress.com/2009/04/30/orienting-bonampak/, April 30, 2009
- Miller, Mary; Brittenham, Claudia (2013). The Spectacle of the Late Maya Court: Reflections on the Murals of Bonampak. Austin, Texas: University of Texas Press.
- Miller, Mary (1986). The Murals of Bonampak. Princeton, New Jersey: Princeton University Press.
- Calvin, J (2013). "Bonampak Murals" (PDF).
- Miller, Mary (1997). "Imaging Maya Art". Archaeology.
- Miller, Mary (2002). "The Willfulness of Art: The Case of Bonampak". RES: Anthropology and Aesthetics. 42: 8–23. doi:10.1086/RESv42n1ms20167568.
- Palka, J. (2002). "Left/Right Symbolism and the Body in Ancient Maya Iconography and Culture". Latin American Antiquity. 13 (4): 419. doi:10.2307/972224. JSTOR 972224.
- Roach, John (2010). "Headless Man's Tomb Found Under Maya Torture Mural". National Geographic. National Geographic.
Publications
Sotomayor, Arturo. Dos Sepulcros en Bonampak. Juarez, Mexico: Ediciones Libreria del Prado. [1949]
Staines, Leticia. Coord. De la Fuente, Beatriz. Dir. La pintura mural prehispánica en México II. Área maya. Tomo I. Bonampak. Catálogo Tomo II. Bonampak. Estudios Instituto de Investigaciones Estéticas, UNAM. México. 1998
External links
| Wikimedia Commons has media related to Bonampak. |
- LIFE Magazine Nov. 21, 1949 - article about Bonampak
- Proyecto La pintura mural prehispánica en México, UNAM
- Yale Bonampak Documentation Project
- Bonampak Murals on ancientmexico.com - Good large photographs of the originals
- Mesoamerican Photo Archives by David R. Hixson - more good photos (click on the first link for Bonampak)
