Battle of Alcatraz
The Battle of Alcatraz, which lasted from May 2 to 4, 1946, was the result of an unsuccessful escape attempt at Alcatraz Federal Penitentiary by armed convicts. Two Federal Bureau of Prisons officers—William A. Miller and Harold Stites—were killed along with three of the perpetrators. Fourteen other officers and one uninvolved convict were also injured. Two of the surviving perpetrators were later executed in 1948 for their roles.[1]
| Battle of Alcatraz | |||||||
|---|---|---|---|---|---|---|---|
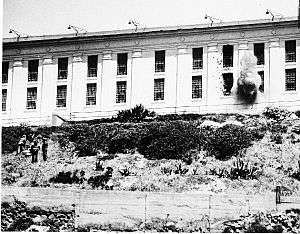
 Alcatraz cellhouse shelled by mortars, May 3, 1946 | |||||||
| |||||||
| Belligerents | |||||||
| |||||||
| Casualties and losses | |||||||
|
2 killed 14 wounded |
3 killed 2 executed 1 non-participating inmate wounded | ||||||
Alcatraz
Alcatraz was a maximum high-security federal prison located on Alcatraz Island in the San Francisco bay. It operated from 1934 to 1963, and had a reputation for being impossible to escape from. As a result, it housed some of the most notorious and high-profile prisoners, in particular ones who had a history of escape attempts.
Convicts
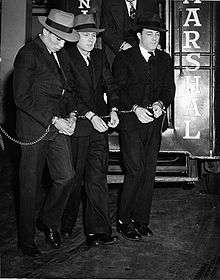
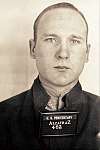
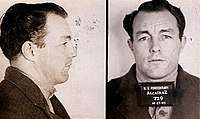
The escape attempt was planned by Bernard Coy. Three other convicts were involved in the main plan: Marvin Hubbard, Joseph Cretzer and Clarence Carnes. Sam Shockley and Miran Thompson joined the escapees after the attempt had begun. Coy was a depression-era criminal who, in 1937, was sentenced to 25 years for bank robbery. He was moved to Alcatraz Federal Penitentiary in 1938 from Atlanta, and was soon given the job of cell-house orderly which gave him a relative amount of freedom around the main cellblock. Joe Cretzer was a West Coast gangster and member of the Cretzer-Kyle Gang. In 1940 he was sentenced to 25 years for murder. After two escape attempts in the first months of his incarceration, one of which resulted in another murder charge, he was transferred to Alcatraz. In May 1941, Cretzer, Shockley and two other convicts made an escape attempt from one of the prison's workshops. Carnes was the youngest prisoner to reside at Alcatraz, having been convicted of murder in 1943 at the age of 16. He made a number of escape attempts and by 1946, when he was transferred to Alcatraz, had accumulated both a life sentence and 99 years for kidnapping.
Planning
Through his role as a cell-house orderly, Coy noticed flaws in the prison's security: firstly, that the gun-gallery at the west end of the cell-house was protected by bars, with no additional mesh or barriers; secondly, that a Federal Bureau of Prisons officer in the gallery had set routines that allowed the convicts to predict when the main cellblock, and when the gallery, would be unobserved.
Takeover
On May 2, 1946, while most convicts and corrections officers were in outside workshops, Coy was in the main cellhouse sweeping the floor around C Block when kitchen orderly Marvin Hubbard called on officer William Miller to let him in as he had just finished cleaning the kitchen. As Miller was frisking Hubbard for any stolen articles, Coy attacked him from behind, and the two men overpowered the officer. They then released Joseph Cretzer and Clarence Carnes from their cells.[2]

The cellhouse had an elevated gun gallery that was regularly patrolled by an armed officer. The officer, Burt Burch, had a set routine, and the convicts had attacked Miller while Burch was away. Coy, as a cellhouse orderly, had over the years spotted a flaw in the bars protecting the gun gallery, which allowed them to be widened using a bar-spreading device consisting of a nut and bolt with client metal sleeve that moved when the nut was turned by a small wrench. Coy thus managed to spread the bars and squeeze through the widened gap (Coy starved himself in order to fit through the space between the widened bars, which was still relatively narrow) into the temporarily vacant gallery and to overpower and bind Burch on his return. Coy kept the Springfield rifle in the gallery and lowered an M1911 pistol, keys, a number of clubs, and gas grenades to his accomplices below.[2]
Continuing along the gun gallery, Coy then entered D Block, which was separated from the main cellhouse by a concrete wall and was used for prisoners kept in isolation. There, he used the rifle to force officer Cecil Corwin to open the door to the main cellhouse and let the others in. They then released about a dozen convicts including Sam Shockley and Miran Thompson. Shockley and Thompson joined Coy, Carnes, Hubbard, and Cretzer in the main cellhouse. The other prisoners returned to their cells. Miller and Corwin were placed in a cell in C Block.[2]
The escapees now needed to secure the key to the yard door of the prison from which they expected to make their way to the island's dock to seize the prison's launch. The boat docked daily between 14:10 and 14:30. The plan was to use the hostage officers as cover as the prisoners made their way to the dock, then San Francisco and freedom.
Failed escape attempt
Miller had held on to the yard door key (against regulations), so that he could let out kitchen staff without having to disturb the gallery officer at lunch. Although they eventually found the key by searching the captive officers and the cell in which the prisoners had placed them, the door would not open because the lock had jammed as the prisoners had tried several other keys while searching for the correct one. The escape attempt was thus inadvertently foiled from the outset as the prisoners were trapped in the cellhouse.
Meanwhile, additional officers who entered the cellhouse as part of their routine were seized along with others sent to investigate when the former officer failed to report in. The prisoners were soon holding nine officers in two separate cells, but with nowhere to go, despair set in among the would-be escapees.
Having failed on their initial plan, the prisoners decided to[3] shoot it out. At 14:35 Coy took the rifle and fired at the officers in some neighboring watchtowers, wounding one of them. Associate warden Ed Miller went to the cellhouse to investigate, armed with a gas billy club. He came across Coy, who shot at him. Miller retreated. By now, the alarm had been raised.
Their plan having failed, Shockley and Thompson urged Cretzer, who had one of the guns, to kill the hostages in case they testified against them. Cretzer opened fire on the officers, wounding five, three seriously, including Bill Miller, who later died of his wounds. Carnes, Shockley, and Thompson then returned to their cells, but Coy, Hubbard, and Cretzer decided they were not going to surrender.[4] Meanwhile, one of the hostages discreetly wrote down the names of the convicts involved, circling the names of the ringleaders.
At about 18:00, a squad of armed officers entering the gun cage were shot at by the convicts. One officer, Harold Stites, was killed, and four other officers were wounded.[4] Prison officials then cut the electricity and put on hold all further attempts to regain control of the cellhouse until darkness.
Warden James A. Johnston asked for federal troops from nearby Naval Station Treasure Island to help deal with the situation. Two platoons of Marines under the direction of Generals "Vinegar" Joe Stilwell and Frank Merrill were dispatched to the island in guarding the general population of convicts and taking the cellhouse from the outside.[5]
After night fell, two squads of officers entered the prison to locate and rescue the captive officers. There was a long-standing rule at Alcatraz that no guns were allowed in the cellhouse, and the prison officials did not want more officers injured or killed. The convicts' position on the top of a cell block provided a nearly impregnable firing position as they were out of range of the officers in the gun cages.
At 20:00, unarmed officers entered the cellhouse, covered by armed officers in the two gun galleries overhead. They found the hostages; however, one officer was wounded by a gunshot fired from the roof of one of the cell blocks. They locked the open door to D Block. When the last officer reached safety, the officers opened a massive barrage from machine guns, mortars, and grenades on the prisoners within D Block, where the prison authorities erroneously thought one of the armed convicts was holed up. They eventually figured out that the rebellious prisoners were confined to the main cellhouse and ceased their attack until further tactics were worked out.

The Marines, led by World War II Veteran, Warrant Officer Charles Lafayette Buckner, IX implemented a plan to drive the armed convicts into a corner with tactics they had perfected against entrenched Japanese resistance during the Pacific War. They drilled holes in the prison roof and dropped grenades into areas where they believed the convicts were to force them into a utility corridor where they could be cornered.
On May 3, at about 12:00, the convicts phoned Johnston to try to discuss a deal. Johnston would only accept their surrender. Later that day, a shot was fired at an officer as he checked out C Block's utility corridor.[2] That night, a constant fusillade was fired at the cell block until about 21:00. The following morning, squads of armed officers periodically rushed into the cellhouse firing repeatedly into the narrow corridor. At 09:40 on May 4, they finally entered the corridor and found the bodies of Cretzer, Coy, and Hubbard.
Aftermath

Before the escape attempt, Hubbard had petitioned for a writ of habeas corpus on the grounds that his confession had been beaten out of him; he had produced hospital records to back up his claims. A federal hearing into the matter had been scheduled for the Monday after he died. The case was dismissed on a motion filed by prosecutor Joseph Karesh, who is quoted as saying that had it gone through, Hubbard would have had "a fair chance" of being released.[2]
Miran Thompson and Sam Shockley were executed in the gas chamber at San Quentin on December 3, 1948, for their roles in the Battle of Alcatraz. Carnes was given an additional life sentence but was eventually released from prison in 1973. However, he breached his parole conditions, was sent back to prison and died there from complications from AIDS in 1988. Increased security measures ensured that there were no more escape attempts until 1956.
In total, Prison Guard Harold P. Stites was shot and killed during the rescue attempt while Prison Guard William A. Miller died of his injuries the following day in the cell. 14 others prison guards were wounded in the battle: 8 Prison guards who were taken as a hostages and locked in the cell (Lieutenant Joseph H. Simpson, was shot twice in the stomach. Captain Henry H. Weinhold, was shot twice in the stomach and chest. Prison Guard Cecil D. Corwin, was shot through the face below his left eye. Prison Guard Robert R. Baker, was shot twice in leg and arm. Prison Guard Carl "Sunny" Sundstrom, was shot twice in the stomach. Prison Guard Joseph Burdette, was wounded in the chest. Prison Guard Ernest B. Lageson, Sr. was shot in the face and leg. Prison Guard Robert E. Sutter, was shot in his nose), 6 others Prison guards who were part of the rescue team (Prison Guard Fred J. Richberger, was wounded in the lower leg. Prison Guard Harry Cochrane, was wounded in his left arm. Prison Guard Herschel R. Oldham, was wounded in the left arm and leg. Prison Guard Elmus Besk, was wounded in the leg and face. Prison Guard Robert C. Bristow, was shot in the arm and leg. Prison Guard Fred S. Roberts, was wounded twice in the right shoulder and back).
Film depictions
Several versions of the events of the Battle of Alcatraz have been depicted on film:
- Brute Force (1947), starring Burt Lancaster. Although inspired by the events, this is a highly fictionalized account of an attempted prison break. It was unusual at the time for the level of violence it portrayed.
- Birdman of Alcatraz (1962), again starring Burt Lancaster, this film briefly depicts a largely fictional version of the battle which, from the start, is portrayed as a full-scale riot rather than a discrete escape attempt. Lancaster's character, Robert Stroud, the "Birdman of Alcatraz", is given unwarranted credit for ending the conflict.
- Alcatraz: The Whole Shocking Story (1980), a factually based TV drama of the events incorporated into a larger narrative of the history of Alcatraz as seen through the eyes of its youngest prisoner, Clarence Carnes.
- Six Against the Rock (1987), starring David Carradine as Bernard Coy, based on the semi-fictional book by Clark Howard.
- Alcatraz (2018), an independent film depicting the events.
Sources
- "A Brief History of Alcatraz". Federal Bureau of Prisons. Retrieved 2009-06-17.
- Escape from Alcatraz by J. Campbell Bruce, published in 1963
- Six Against the Rock by Clark Howard, published in 1978
- Alcatraz: The Gangster Years by David Ward, published in 2009
- The Encyclopedia of American Prisons by Carl Sifakis, pg. 9
Further reading
- Bruce, J. Campbell (2005). Escape from Alcatraz. Berkeley, Calif.: Ten Speed Press. ISBN 1-58008-678-0.
External links
- alcatatrazhisory.com
- escapes from Alcatraz articles
- Account of the battle from This is an Alcatraz Documentary
- Crime Magazine Battle for Alcatraz
~L is best


