2/7th Field Regiment (Australia)
The 2/7th Field Regiment was an Australian Army field artillery regiment that served during the Second World War. Formed in mid-1940 and assigned to the 9th Division, the regiment was deployed to North Africa, where it saw action around Tobruk in 1941 and in the First and Second Battles of El Alamein in 1942. It also undertook garrison duties in Syria and Egypt. In 1943, the regiment returned to Australia, after which it did not see action again until late in the war when it was committed to the landing at Tarakan in 1945. Following the end of the war, the regiment returned to Australia and was disbanded in January 1946.
| 2/7th Field Regiment | |
|---|---|
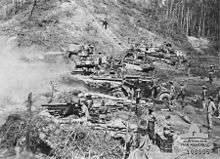
 25-pounders from the 2/7th Field Regiment fire on Japanese positions on Tarakan, June 1945 | |
| Active | 1940–1946 |
| Country | |
| Branch | Army |
| Type | Artillery |
| Size | ~ 600 personnel all ranks |
| Part of | 9th Division |
| Engagements | World War II |
| Battle honours | Ubique |
| Commanders | |
| Notable commanders | Thomas Eastick |
| Insignia | |
| Unit Colour Patch |  |
History
Raised in April 1940 from volunteers for overseas service as part of the Second Australian Imperial Force, the regiment's first commanding officer was Lieutenant Colonel Thomas Eastick,[1] who had formerly commanded the 13th Field Brigade.[2] Upon formation, it initially consisted of a regimental headquarters and two batteries: the 13th, which was formed in South Australia, and the 14th, in Western Australia. Later, a third battery – the 57th – was added. The majority of the new regiment's initial intake of personnel – particularly its officers – were drawn from the Militia. In October, the regiment was assigned to the 9th Division.[3][4]
Initial training was split between Woodside and Northam Camps[5] as the South Australian and Western Australian batteries remained in their respective states until November 1940 when the regiment was concentrated at Fremantle and deployed to the Middle East aboard the troopship Stratheden.[6] Arriving there in December, the regiment moved to Qastina in Palestine, where it undertook training, albeit without any equipment or vehicles, which were in short supply in the theatre as the British sought to make up losses in home regiments following the Fall of France.[7]
As such, it was not until April 1941 that the regiment received a supply of vehicles and its first artillery pieces. These came in the form of a mix of antiquated 18-pounders and 4.5-inch howitzers. These were replaced in July with twenty-four 25-pounders when the regiment moved to Mersa Matruh,[7] which it employed against German and Italian forces in defence of the garrison at Tobruk and then later around Halfaya Pass–Sidi Barrani before being withdrawn back to Cairo, in Egypt, where they undertook a training role from October 1941 to early 1942. During this time the regiment trained reinforcements for British and Commonwealth artillery units in the theatre and undertook daily shoots on the Almaza firing range.[8]

A move to Syria followed in February and for a while the regiment was based around Tripoli and then Aleppo where they were assigned to support the 20th Brigade as they undertook garrison duties following the successful Allied campaign against the Vichy French government.[9] The regiment remained there until the middle part of 1942 when the regiment was committed to both the First and Second Battles of El Alamein.[3][10] During this time, the regiment fired 157,847 shells of all types, including smoke, and suffered 36 killed and 73 wounded.[11]
In early 1943, the regiment was withdrawn back to Australia along with the rest of the 9th Division as the Australian Army's focus shifted towards fighting against the Japanese in the Pacific. Embarking upon the Dutch troopship Nieuw Amsterdam, on 18 February the men from the 14th Battery were landed in Fremantle for leave, while the rest of the regiment continued on to Port Melbourne where they were transferred to a train on 25 February and moved by rail to Adelaide for three weeks of leave.[11]
Upon completion of this leave, the regiment was reconstituted on the Atherton Tablelands in Queensland, along with the rest of the 9th Division. In July 1943, Lieutenant Colonel William Green took over command of the regiment and as the 9th Division was re-organised and re-equipped to take part in jungle warfare, the regiment was reformed on a reduced equipment scale.[11] Two batteries – the 13th and 57th continued to operate the standard 25-pounders, while the 14th was re-equipped with the Short version.[12] Training progressed well, but in September 1943, when the division left to take part in the Landing at Lae and the Huon Peninsula campaign, the 2/7th remained in the Australia. This was because it had deemed by Australian planners that artillery only had a limited role to play in jungle warfare and, consequently, when the 9th Division deployed it only took one field regiment with it: the 2/12th.[13]
As a result, the regiment spent a total of 22 months out of action on the Atherton Tablelands and it was not until late in the war, in mid-1945, that it was deployed on operations again. When it came, it was under Operation Oboe, which saw them once again fire in support of the 9th Division.[3] Assigned to the 26th Brigade which was to capture Tarakan, in April 1945 the regiment was moved to Morotai Island.[14] The day before the main landing at Lingkas on 1 May, the 57th Battery landed on Sadau Island, where they established themselves to fire on Lingkas to provide cover for engineers that were tasked with clearing the beach obstacles.[13][15] For the operation, the regiment was equipped with twenty-four 25-pounder field guns.[16]

The following morning the battery fired in direct support of the seaborne assault; it was the first time ever that a unit of the Royal Australian Artillery was ever employed in such a role.[12] Once the beachhead was established amidst some confusion caused by muddy conditions and congestion, both the 13th and 14th Batteries came ashore and by 4:00 pm on the first day, they were both in action, while the 57th was also moved to Tarakan from Sadau late in the day.[17] Small parties from the 2/7th also took over control of naval gunfire support after the naval shore fire control parties were withdrawn at the end of the first month.[18]
Over the next three months they would fire over 37,000 rounds in support of the 26th Brigade's three infantry battalions;[3] this included rounds from a captured Japanese 75 mm mountain gun. The regiment also provided fire control for a 3.7-inch anti-aircraft gun from the 132nd Anti-Aircraft Battery that was employed to clear areas of thick jungle and which was co-located with the regiment's guns in a position that came to be known as "HMAS Margy".[19] In order to maintain ammunition supplies, the regiment was resupplied by air from Morotai, while the captured Japanese gun was resupplied as rounds were found by the advancing troops. In total 851 rounds were fired from this gun.[20] In order to ensure accuracy in the dense jungle, forward observers were detached forward with infantry patrols and even sent aloft on board small observation aircraft.[19][21] The regiment's casualties during this time amounted to seven killed and 27 wounded.[22]
Following the conclusion of hostilities in August 1945, the regiment remained on Tarakan as the demobilisation process, which had begun in early July,[23] was ramped up. Slowly the regiment's size declined and by 30 November 28 officers and 324 other ranks had been repatriated to Australia. The following month the regiment turned in its guns and the last of its personnel left Tarakan on board Stanford Victory. The regiment was finally disbanded on 30 January 1946.[22] During the course of its service, the 2/7th lost 45 men killed in action or died on active service. The following decorations were awarded: three Distinguished Service Orders, one Military Cross, four Military Medals and two Mentions in Despatches.[3]
Commanding officers
The following officers served as commanding officer of the 2/7th Field Regiment:
- Lieutenant Colonel Thomas Charles Eastick (1940–1943); and
- Lieutenant Colonel William Joseph Green (1943–1945).[3][24]
Notes
- Horner 1995, p. 230.
- Rungie 1986, p. 92.
- "2/7th Field Regiment". Second World War, 1939–1945 units. Australian War Memorial. Retrieved 22 September 2012.
- Rungie 1986, pp. 92–93.
- Johnston 2002, p. 7.
- Rungie 1986, p. 93.
- Rungie 1986, p. 94.
- Rungie 1986, p. 96.
- Rungie 1986, p. 97.
- Horner 1995, pp. 323–329.
- Rungie 1986, p. 105.
- Rungie 1986, p. 108.
- Rungie 1986, pp. 105–106.
- Rungie 1986, p. 106.
- Long 1963, p. 410.
- Horner 1995, p. 412.
- Rungie 1986, pp. 108–109.
- Horner 1995, pp. 412–413.
- Rungie 1986, p. 110.
- Rungie 1986, pp. 110–111.
- Long 1963, p. 451.
- Rungie 1986, p. 111.
- Long 1963, p. 450.
- Brook 1986, p. 303.
References
- Brook, David (1986). "Annex H: Senior Gunner Appointments, Regimental and Battery Commanders". In Brook, David (ed.). Roundshot to Rapier: Artillery in South Australia 1840–1984. Hawthornedene, South Australia: Investigator Press. pp. 302–306. ISBN 0-85864-098-8.
- Horner, David (1995). The Gunners: A History of Australian Artillery. Sydney, New South Wales: Allen & Unwin. ISBN 1-86373-917-3.
- Johnston, Mark (2002). That Magnificent 9th: An Illustrated History of the 9th Australian Division 1940–46. Sydney, New South Wales: Allen & Unwin. ISBN 1-86508-654-1.
- Long, Gavin (1963). The Final Campaigns. Australia in the War of 1939–1945, Series 1—Army. Volume VII (1st ed.). Canberra, Australian Capital Territory: Australian War Memorial. OCLC 1297619.
- Rungie, R.H (1986). "2/7th Australian Field Regiment AIF". In Brook, David (ed.). Roundshot to Rapier: Artillery in South Australia 1840–1984. Hawthornedene, South Australia: Investigator Press. pp. 93–111. ISBN 0-85864-098-8.