6

I made an upgrade of a VPS hosted on OVH, specifically from VPS CLOUD 1 to VPS CLOUD 2 that have 25gb more of previous solution (50gb total).

On this VPS is installed CentOS 7.2.1511

There is the result of df -HT

[root@srv ~]# df -HT
File system    Tipo      Dim. Usati Dispon. Uso% Montato su
/dev/vda1      xfs        27G   12G     16G  42% /
devtmpfs       devtmpfs  2,1G     0    2,1G   0% /dev
tmpfs          tmpfs     2,1G     0    2,1G   0% /dev/shm
tmpfs          tmpfs     2,1G   18M    2,1G   1% /run
tmpfs          tmpfs     2,1G     0    2,1G   0% /sys/fs/cgroup
tmpfs          tmpfs     405M     0    405M   0% /run/user/0

There is the result of fdisk -l | grep Disk

[root@srv ~]# fdisk -l | grep Disk
Disk /dev/vda: 53.7 GB, 53687091200 bytes, 104857600 sectors
Disk label type: dos

Other disk infos:

[root@srv ~]# fdisk -l /dev/vda

Disk /dev/vda: 53.7 GB, 53687091200 bytes, 104857600 sectors
Units = sectors of 1 * 512 = 512 bytes
Sector size (logical/physical): 512 bytes / 512 bytes
I/O size (minimum/optimal): 512 bytes / 512 bytes
Disk label type: dos
Identificativo disco: 0x000af71d

Dispositivo Boot      Start         End      Blocks   Id  System
/dev/vda1   *        2048    52428799    26213376   83  Linux

I've tried this:

[root@srv ~]# xfs_growfs /dev/vda1 -D 53.7G
meta-data=/dev/vda1              isize=256    agcount=13, agsize=524224 blks
         =                       sectsz=512   attr=2, projid32bit=1
         =                       crc=0        finobt=0
data     =                       bsize=4096   blocks=6553344, imaxpct=25
         =                       sunit=0      swidth=0 blks
naming   =version 2              bsize=4096   ascii-ci=0 ftype=0
log      =internal               bsize=4096   blocks=2560, version=2
         =                       sectsz=512   sunit=0 blks, lazy-count=1
realtime =none                   extsz=4096   blocks=0, rtextents=0
data size 53 too small, old size is 6553344

And this:

[root@srv ~]# xfs_growfs -d /dev/vda1 
meta-data=/dev/vda1              isize=256    agcount=13, agsize=524224 blks
         =                       sectsz=512   attr=2, projid32bit=1
         =                       crc=0        finobt=0 spinodes=0
data     =                       bsize=4096   blocks=6553344, imaxpct=25
         =                       sunit=0      swidth=0 blks
naming   =version 2              bsize=4096   ascii-ci=0 ftype=0
log      =internal               bsize=4096   blocks=2560, version=2
         =                       sectsz=512   sunit=0 blks, lazy-count=1
realtime =none                   extsz=4096   blocks=0, rtextents=0
data size unchanged, skipping

Obviously without success.

[UPDATE]
The output with pr command on parted:

Modello: Device a blocchi Virtio (virtblk)
Disco /dev/vda: 53,7GB
Dimensione del settore (logica/fisica): 512B/512B
Tabella delle partizioni: msdos
Flag del disco: 

Numero  Inizio  Fine    Dimensione  Tipo     File system  Flag
 1      1049kB  26,8GB  26,8GB      primary  xfs          avvio
 2      26,8GB  53,7GB  26,8GB      primary  xfs

How can I expand the available disk space without destroy data? Reboot server isn't a problem.
marsaldev
  • 121
  • 1
  • 7
  • Please can you show the output of `fdisk -l /dev/vda` you will need to change the size of the partition and then resize the filesystem – Tim Fletcher Sep 22 '16 at 10:41
  • Here you are @TimFletcher – marsaldev Sep 22 '16 at 10:45
  • Personally, I spent 3 days trying to do this, reading dozens of tutorials and installing a half dozen tools. CentOS 7 uses XFS, and I tried all the XFS-compatible tools and none of them worked. If you figure it out, let me know, but I am giving up. I don't have more time to waste on this. I used fdisk as a last resort after trying dozens of methods, because fdisk seems like an ugly solution to me, and the result was my server would not reboot and I couldn't recover it in "rescue mode." – PJ Brunet Dec 06 '16 at 18:27
  • 1
    @PJBrunet I'm sorry, but I didn't tried because on the vps there is a production site. If I'll destroy something it's a really pain in the ass... – marsaldev Dec 06 '16 at 18:54
  • I usually leave / on the disk (/etc, /bin, /boot stay together) and create a LVM structure for /usr, /home, /var, /lib. This way you could just create a new PV on the new space and use lv tools to add space to any needed mount point. – ThoriumBR Dec 12 '17 at 12:16

7 Answers7

8

xfs_growfs -d /dev/vda1

Capital -D grows to specified size in filesystem blocks, and it doesn't understand 'G'. As such it assumed you wanted 53 filesystem blocks, which failed.

Lower case -d grows to maximum size.

If you want specific size, you should calculate it in the blocks, e.g. from fdisk output the maximum size is 26213376. Then -D 26213376 will also grow it to the maximum from 6553344 blocks that you have now.

Andrey Sapegin
  • 1,191
  • 2
  • 11
  • 27
mzhaase
  • 3,778
  • 2
  • 19
  • 32
  • As I've asked to Tim, this will destroy data or partition? It's safe? – marsaldev Feb 07 '17 at 13:04
  • It's safe and will not destroy data, I've also never set an option, by default `xfs_growfs` will grow to the maximum size. – Jacob Evans Feb 07 '17 at 13:23
  • @sarcom I would propose trying to create a similar VPN with a hoster that allows hourly pricing. Then, create a similar situation and test. It would only cost a couple cents. – mzhaase Feb 09 '17 at 11:22
  • I've just tried, without success. This is the response: `data size unchanged, skipping`. I guess that @Tim Fletcher was right, I need to resize the partition first... But it's really dangerous... – marsaldev Feb 09 '17 at 13:20
2

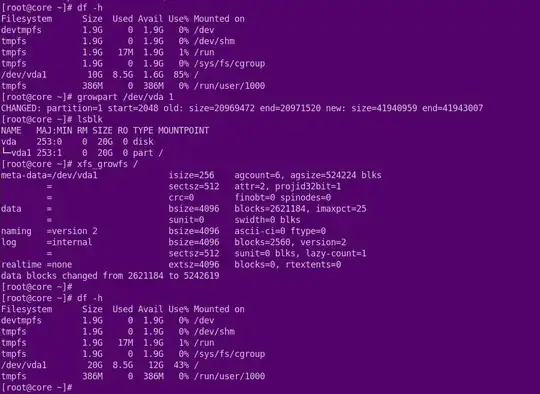
XFS file system resize in OVH is really easy to do. You do not have to use rescue mode. Just use the growpart and xfs_grow commands.

See how I resize the root partition from 10GB to 20GB

enter image description here

Kladizkov
  • 61
  • 1
  • 3
2

Here is the step-by-step working solution I've just tested upgrading from OVH VPS 2016 SSD 1 (10GB) to OVH VPS 2016 SSD 2 (20GB) with partition grow to the maximum new size.

The environment is with CentOS 7 with its default XFS filesystem.

After resizing the new partition is bootable with all the data in place.

Step 0. Upgrade to a higher VPS Plan

Perform the upgrade at OVH Dashboard.

Can't be in Rescue Mode while performing the upgrade.

Step 1. Boot into rescue mode

root@rescue-pro:~# lsblk
NAME   MAJ:MIN RM SIZE RO TYPE MOUNTPOINT
vda    254:0    0  10G  0 disk 
└─vda1 254:1    0  10G  0 part /
vdb    254:16   0  20G  0 disk 
└─vdb1 254:17   0  10G  0 part /mnt/vdb1

The above shows that vdb has 20GB after the upgrade, and the original partition vdb1 has 10GB mounted at /mnt/vdb1

Step 2. Install tools to be used

root@rescue-pro:/# apt-get update

root@rescue-pro:/# apt-get install xfsprogs

root@rescue-pro:/# apt-get install parted

The rescue mode doesn't come with tools, xfs_growfs to grow the XFS filesystem.

Will be using parted to resize the underlying partition to new size before we can grow the filesystem.

Step 3. Resizing the underlying partition

root@rescue-pro:~# umount /mnt/vdb1

Will need to unmount the partition before we can apply changes.

root@rescue-pro:~# lsblk
NAME   MAJ:MIN RM SIZE RO TYPE MOUNTPOINT
vda    254:0    0  10G  0 disk 
└─vda1 254:1    0  10G  0 part /
vdb    254:16   0  20G  0 disk 
└─vdb1 254:17   0  10G  0 part 

Verify it's been unmounted.

root@rescue-pro:~# parted

At this point the rescue device vda is selected, we need to switch to the device we'll be working on.

(parted) select /dev/vdb
Using /dev/vdb

(parted) print
Model: Virtio Block Device (virtblk)
Disk /dev/vdb: 21.5GB
Sector size (logical/physical): 512B/512B
Partition Table: msdos

Number  Start   End     Size    Type     File system  Flags
 1      1049kB  10.7GB  10.7GB  primary  xfs          boot

(parted) unit s

Switch the display unit to sector

(parted) print
Model: Virtio Block Device (virtblk)
Disk /dev/vdb: 41943040s
Sector size (logical/physical): 512B/512B
Partition Table: msdos

Number  Start  End        Size       Type     File system  Flags
 1      2048s  20971519s  20969472s  primary  xfs          boot

(parted) rm 1

The above will REMOVE the existing partition.

This is the part I'm most hesitated to perform.

After lots of research and confirmation that it won't destroy the data, we'll get everything back.

(parted) mkpart
Partition type? primary
File system type? xfs
Start? 2048s
End? 100%

The above will recreate the partition with maximum size of the drive space allocation.

Answer the questions accordingly from the print result above.

2048s is the start sector, that's why we switch unit to sector, make sure it's the same as the print result above.

(parted) print
Model: Virtio Block Device (virtblk)
Disk /dev/vdb: 41943040s
Sector size (logical/physical): 512B/512B
Partition Table: msdos

Number  Start  End        Size       Type     File system  Flags
 1      2048s  41943039s  41940992s  primary  xfs

Verify the new partition table.

Note that the boot flag is missing.

(parted) set 1 boot on

(parted) print
Model: Virtio Block Device (virtblk)
Disk /dev/vdb: 41943040s
Sector size (logical/physical): 512B/512B
Partition Table: msdos

Number  Start  End        Size       Type     File system  Flags
 1      2048s  41943039s  41940992s  primary  xfs          boot

Set the boot flag and print the partition table out again to verify.

(parted) quit

Quit and apply all the changes.

You'll see the following note that you can ignore, as the partition number is the same after resizing.

Information: You may need to update /etc/fstab.

Step 4. Verify Resized Partition

root@rescue-pro:~# lsblk
NAME   MAJ:MIN RM SIZE RO TYPE MOUNTPOINT
vda    254:0    0  10G  0 disk 
└─vda1 254:1    0  10G  0 part /
vdb    254:16   0  20G  0 disk 
└─vdb1 254:17   0  20G  0 part 

Now we can see vdb1 is at the full size 20GB

Mount the partition back and check disk space.

root@rescue-pro:~# mount /dev/vdb1 /mnt/vdb1

root@rescue-pro:~# df -h
Filesystem      Size  Used Avail Use% Mounted on
rootfs          9.9G  608M  8.8G   7% /
udev             10M     0   10M   0% /dev
tmpfs           388M  144K  388M   1% /run
/dev/vda1       9.9G  608M  8.8G   7% /
tmpfs           5.0M     0  5.0M   0% /run/lock
tmpfs           775M     0  775M   0% /run/shm
/dev/vdb1        10G  2.1G  8.0G  21% /mnt/vdb1

We can see that the mounted partition is back, all the data is in place, but the size is still 10GB

Step 5. GROW THE XFS PARTITION

root@rescue-pro:~# xfs_growfs -d /mnt/vdb1
meta-data=/dev/vdb1              isize=256    agcount=6, agsize=524224 blks
         =                       sectsz=512   attr=2
data     =                       bsize=4096   blocks=2621184, imaxpct=25
         =                       sunit=0      swidth=0 blks
naming   =version 2              bsize=4096   ascii-ci=0
log      =internal               bsize=4096   blocks=2560, version=2
         =                       sectsz=512   sunit=0 blks, lazy-count=1
realtime =none                   extsz=4096   blocks=0, rtextents=0
data blocks changed from 2621184 to 5242624

The above command grow the /mnt/vdb1 to the maximum size available.

Use the mount point instead of the block device.

root@rescue-pro:~# df -h
Filesystem      Size  Used Avail Use% Mounted on
rootfs          9.9G  608M  8.8G   7% /
udev             10M     0   10M   0% /dev
tmpfs           388M  144K  388M   1% /run
/dev/vda1       9.9G  608M  8.8G   7% /
tmpfs           5.0M     0  5.0M   0% /run/lock
tmpfs           775M     0  775M   0% /run/shm
/dev/vdb1        20G  2.1G   18G  11% /mnt/vdb1

Check the disk space again, and we can see now /mnt/vdb1 has successfully grown to 20GB

Step 6. Final step - reboot and exit rescue mode

shutdown -h now

Go back to the OVH Dashboard and use Reboot VPS to exit the rescue mode.

After booting back to normal VPS environment.

[root@vps]# df -h
Filesystem      Size  Used Avail Use% Mounted on
/dev/vda1        20G  2.1G   18G  11% /
devtmpfs        1.9G     0  1.9G   0% /dev
tmpfs           1.9G     0  1.9G   0% /dev/shm
tmpfs           1.9G   17M  1.9G   1% /run
tmpfs           1.9G     0  1.9G   0% /sys/fs/cgroup
tmpfs           386M     0  386M   0% /run/user/0

[root@vps]# lsblk
NAME   MAJ:MIN RM SIZE RO TYPE MOUNTPOINT
vda    253:0    0  20G  0 disk 
└─vda1 253:1    0  20G  0 part /

Verify the above showing that the root partition has been successfully resized to full 20GB

I find that there's no complete documentation about how to perform this root partition resizing after upgrading your OVH VPS.

XFS filesystem is what's making it tricky.

Hope this step-by-step notes will help anyone facing the same issue.

KDX
  • 213
  • 1
  • 11
  • Be aware that all of this can be done online; it is not necessary to use rescue mode (though it might be necessary to reboot; fdisk/parted will tell you if this is the case). – Michael Hampton Feb 23 '17 at 16:57
  • 1
    @MichaelHampton The root partition is frequently resistant to resizing while mounted. Rescue mode allows dismounted access to all partitions. Plus, with some tweaks on steps 3 and 5, this answer applies even to LVM setups and multiple different file systems. The part that worries me is removing the partition. I'd feel better if this used a resize command. – Jeter-work Feb 23 '17 at 19:42
  • @Xalorous Really? I've not seen a root partition "resistant to resizing while mounted" in a long time, if ever. At least, not to being expanded as in the question. When does this happen? Under what conditions? – Michael Hampton Feb 23 '17 at 19:43
  • I saw it with ext4 fs on LVM partitions under Oracle Linux 6.5 (binary compatible with RHEL/CentOS/SL 6.5). I could not expand the root partition (partition or file system, one of them) with the root partition mounted. Went in with boot disk, rescue mode, resized partition, grew the file system, viola, easy peasy. I think the reason is that the OS is actively running on that partition. – Jeter-work Feb 23 '17 at 20:10
  • The answer was what it worked for me. I didn't get a second chance to try without getting into the rescue mode. I never tried the resize method. If other steps can be skipped or make better, leave the comments so others can give it a try. I can confirm my procedure works 100% for me in the scenario and situation mentioned at the beginning. – KDX Feb 23 '17 at 23:23
  • Parted does require the filesystem to be unmounted before resizing: `resizepart 1 -1s` -> `Error: Partition /dev/vda1 is being used. You must unmount it before you modify it with Parted.` – EpicVoyage Jul 16 '19 at 13:38
1

After search and with help of your answers finally I find the way (more or less).

1. Create a new partition
Give an fdisk on the virtual disk

~$ fdisk /dev/vda
Welcome to fdisk (util-linux 2.23.2).

Changes will remain in memory only, until you decide to write them.
Be careful before using the write command.

Comando (m per richiamare la guida): n

Now give the n command

Partition type:
   p   primary (1 primary, 0 extended, 3 free)
   e   extended
Select (default p): p

Now choose p to create a new primary partition.

Numero della partizione (2-4, default 2): <enter>
Primo sector (52428800-104857599, predefinito 52428800): <enter>
Utilizzo del valore predefinito 52428800
Last sector, +sectors or +size{K,M,G} (52428800-104857599, predefinito 104857599): <enter>

Check infos before hit enter, and check that the first sector is the next of the last sector of the first partition. In my case the last sector of vda1 is 52428799, so the next is 52428800.

Comando (m per richiamare la guida): w
La tabella delle partizioni è stata alterata!

Chiamata di ioctl() per rileggere la tabella delle partizioni.

WARNING: Re-reading the partition table failed with error 16: Dispositivo o risorsa occupata.
The kernel still uses the old table. The new table will be used at
the next reboot or after you run partprobe(8) or kpartx(8)
Sincronizzazione dei dischi in corso.

Type w to write your partitions to the disk. The reboot is not needed as you can also rescan for those partitions using partprobe. Run the following to scan for the newly created partition.

~$ partprobe -s

After of that we have to grow the partition, but the xfs_growfs still fails. :(

marsaldev
  • 121
  • 1
  • 7
1

I am using Debian but the tools used are really common to most Linux distributions so should work exactly the same on CentOS.

I've upgraded a OVH VPS SSD 1 (10GB) to OVH VPS SSD 2 (20GB) with a root filesystem using ext3. The upgrade can be done online, safely and in a matter of seconds.

Once you have purchased the upgrade the VPS will reboot. There is no change on the filesystem yet.

user@vps2:~$ df -h
Filesystem      Size  Used Avail Use% Mounted on
udev            1.9G     0  1.9G   0% /dev
tmpfs           387M  5.3M  381M   2% /run
/dev/vda1       9.9G  7.5G  2.0G  80% /
tmpfs           1.9G     0  1.9G   0% /dev/shm
tmpfs           5.0M     0  5.0M   0% /run/lock
tmpfs           1.9G     0  1.9G   0% /sys/fs/cgroup
tmpfs           387M     0  387M   0% /run/user/1001

But parted will show you that the underlying disk has, indeed, been upgraded.

user@vps2:~$ sudo parted /dev/vda
GNU Parted 3.2
Using /dev/vda
Welcome to GNU Parted! Type 'help' to view a list of commands.
(parted) pr
Model: Virtio Block Device (virtblk)
Disk /dev/vda: 21.5GB
Sector size (logical/physical): 512B/512B
Partition Table: msdos
Disk Flags:

Number  Start   End     Size    Type     File system  Flags
 1      1049kB  10.7GB  10.7GB  primary  ext3         boot

I change to sector units and perform a resize of the partition.

(parted) unit s
(parted) resizepart
Partition number? 1
Warning: Partition /dev/vda1 is being used. Are you sure you want to continue?
Yes/No? Yes
End?  [20971519s]? -1s
(parted) pr
Model: Virtio Block Device (virtblk)
Disk /dev/vda: 41943040s
Sector size (logical/physical): 512B/512B
Partition Table: msdos
Disk Flags:

Number  Start  End        Size       Type     File system  Flags
 1      2048s  41943039s  41940992s  primary  ext3         boot

(parted) quit
Information: You may need to update /etc/fstab.

The partition is now resized. Next, I need to resize the filesystem.

user@vps2:~$ sudo resize2fs -p /dev/vda1
resize2fs 1.43.4 (31-Jan-2017)
Filesystem at /dev/vda1 is mounted on /; on-line resizing required
old_desc_blocks = 1, new_desc_blocks = 2
The filesystem on /dev/vda1 is now 5242624 (4k) blocks long.

In case of a XFS filesystem the resize command would be:

sudo xfs_growfs /

Et voila!, job done.

user@vps2:~$ df -h
Filesystem      Size  Used Avail Use% Mounted on
udev            1.9G     0  1.9G   0% /dev
tmpfs           387M  5.3M  381M   2% /run
/dev/vda1        20G  7.5G   12G  40% /
tmpfs           1.9G     0  1.9G   0% /dev/shm
tmpfs           5.0M     0  5.0M   0% /run/lock
tmpfs           1.9G     0  1.9G   0% /sys/fs/cgroup
tmpfs           387M     0  387M   0% /run/user/1001
sargue
  • 156
  • 7
0

Simplest way to update HD with OVH server (you are advised to back you server before doing this)

Here the HD was 20G and was upgraded to 40GB but I have done this procedure with 10G > 20G with no data loss or downtime

below is step by step all commands with their output

Check your HD path

[root@ovh ~]# df -h
Filesystem      Size  Used Avail Use% Mounted on
/dev/vda1        20G   16G  2,8G  86% /
tmpfs           3,8G     0  3,8G   0% /dev/shm

Start fdisk with that path

[root@ovh ~]# sudo fdisk /dev/vda

WARNING: DOS-compatible mode is deprecated. It's strongly recommended to
         switch off the mode (command 'c') and change display units to
         sectors (command 'u').

Command (m for help): 

See partitions with p command and NOTE DOWN the start cylinder (here 3)

p

Disk /dev/vda: 42.9 GB, 42949672960 bytes
16 heads, 63 sectors/track, 83220 cylinders
Units = cylinders of 1008 * 512 = 516096 bytes
Sector size (logical/physical): 512 bytes / 512 bytes
I/O size (minimum/optimal): 512 bytes / 512 bytes
Disk identifier: 0x000574cf

   Device Boot      Start         End      Blocks   Id  System
/dev/vda1   *           3       41611    20970496   83  Linux

Command (m for help): 

Delete partition with d command and create partition with n and then choose p and 1 and put in the cylinders noted above 3

d
Selected partition 1
Command (m for help): n
Command action
   e   extended
   p   primary partition (1-4)
p
Partition number (1-4): 1
First cylinder (1-83220, default 1): 3
Last cylinder, +cylinders or +size{K,M,G} (1-83220, default 83220): 
Using default value 83220

Now you can write to disk with w or q (quit without saving)

Command (m for help): w

The partition table has been altered!

Calling ioctl() to re-read partition table.

WARNING: Re-reading the partition table failed with error 16: Device or resource busy.
The kernel still uses the old table. The new table will be used at
the next reboot or after you run partprobe(8) or kpartx(8)
Syncing disks.

Ask for reboot and exit the machine

[root@ovh ~]# reboot && exit

In a 1-2 minute ssh in the machine and check the size is tille the same as before

[root@ovh ~]# df -h
Filesystem      Size  Used Avail Use% Mounted on
/dev/vda1        20G   16G  2,8G  86% /
tmpfs           3,8G     0  3,8G   0% /dev/shm

You have to use resize2fs to resize it

[root@ovh ~]# resize2fs /dev/vda1
resize2fs 1.41.12 (17-May-2010)
Filesystem at /dev/vda1 is mounted on /; on-line resizing required
old desc_blocks = 2, new_desc_blocks = 3
Performing an on-line resize of /dev/vda1 to 10485504 (4k) blocks.
The filesystem on /dev/vda1 is now 10485504 blocks long.

Now the size should be OK

[root@ovh ~]# df -h
Filesystem      Size  Used Avail Use% Mounted on
/dev/vda1        40G   16G   22G  43% /
tmpfs           3,8G     0  3,8G   0% /dev/shm  

NOTE1:

if you invoke sudo fdisk -u /dev/vda it will show you sectors instead of cylinders

NOTE2:

if you try to reconnect and you can't you might have put in the wrong number of start cylinders you have to Reboot in rescue mode and use this guide https://docs.ovh.com/ie/en/public-cloud/put_an_instance_in_rescue_mode/

if your partition is not mounting you have to invoke the fdisk from previous steps with the correct cylinders this time

GiorgosK
  • 211
  • 3
  • 5
-1

You will need to resize the partition on the device vda, there are lots of ways to do this but I would use either fdisk or sfdisk.

For fdisk start up fdisk thus:

fdisk /dev/vda

then delete the first partition (d), create a new partition (n) and just accept the defaults by pressing return, you will need to mark the partition as active too by pressing a.

If you have a fairly modern version of sfdisk you can programmatically resize the partition to fill the disk with this command

echo ", +" | sfdisk -N 1 /dev/vda

Next step is to tell the OS about the new size of the disk, either via a reboot or with partprobe command which is part of the parted package.

partprobe /dev/vda

Finally you will need to resize the filesystem on the device which you have already got the command for, but for completeness is below. Note you don't need to include -D unless you want to use less than the entire device.

xfs_growfs /dev/vda1
Tim Fletcher
  • 390
  • 1
  • 5
  • 1
    This operation will destroy the data? – marsaldev Sep 22 '16 at 10:58
  • No all you are doing is removing the information about the layout of the partition and recreating it. Because you only have a single partition this is easy to do. It is always good to have a backup before this sort of work as changing filesystems can rarely cause problems. – Tim Fletcher Sep 22 '16 at 11:02
  • I'm on OVH with the same question and situation, with CentOS 7 too. Then you try to reboot--the VPS is toast. Maybe fdisk is not compatible with OVH's use of KVM? I don't know. I tried using fdisk as per your suggestion, and others suggestions, for example to subtract -1 from the last sector, set the filesystem to "Linux" etc. OVH's "rescue mode" did not help me recover. I wasted an entire day on this. In my opinion, the bottom line is, if you need to resize your disk, don't use OVH--use some other VPS provider that offers this as a service. I would list examples, but I want to be impartial. – PJ Brunet Dec 06 '16 at 18:07
  • Are you marking the partition as active? – Tim Fletcher Dec 06 '16 at 18:17
  • Also, I am sorry to downvote, becaue I have a feeling your answer might work for other CentOS users, but for OVH this did not work for me and I want to save other people from hours of trouble. Also, maybe this will encourage OVH to upgrade its offerings. If I remember correctly, OVH's leading competition did not offer "disk resize" at first either. I could get into more analysis and compare/contrast various VPS providers, but you would have to message me privately. – PJ Brunet Dec 06 '16 at 18:18
  • @TimFletcher yes, I tried every possible combination of the fdisk options by going back into recovery mode about 12 times. – PJ Brunet Dec 06 '16 at 18:20
  • The only other suggestion would be to use the programmatic resize with sfdisk, you may need to add the option --force to sfdisk – Tim Fletcher Dec 06 '16 at 18:23
  • OVH even recommends the same method here: https://www.ovh.co.uk/g1865.increase_the_size_of_an_additional_disk – Tim Fletcher Dec 06 '16 at 18:26
  • The partition table has been altered! Calling ioctl() to re-read partition table. WARNING: Re-reading the partition table failed with error 22: Invalid argument. The kernel still uses the old table. The new table will be used at the next reboot or after you run partprobe(8) or kpartx(8) Syncing disks. ---And neither partprobe or kpartx are available in recovery mode ;-) Regardless, I tried various reboot options, it would take me hours to explain everything I tried. – PJ Brunet Dec 06 '16 at 18:33
  • @TimFletcher OVH's "additional disk" option is totally different from the "upgrade" question he asked. Apparently you're not familiar with OVH's offerings, which are very confusing :-D Needless to say, I canceled my "additional disk" subscription a few days ago and "upgraded" because I didn't want a separate disk. Unfortunately, upgrading does not get you more disk space. I think you have to "reinstall my VPS" which is what I'm about to do now. – PJ Brunet Dec 06 '16 at 18:37
  • @PJBrunet as explained partprode is used to tell a live system to reread its partition table. I still think that you have missed setting the active flag on the partition which is preventing booting. The sfdisk command will resize and retain the correct flags without you needing to take any additional steps. – Tim Fletcher Dec 06 '16 at 18:40
  • @TimFletcher trust me, I set it to be "active" 12 times and followed far more detailed instructions than you provided, cross referencing various how-tos, I spent all day yesterday in fdisk. I also tried cfdisk (which OVH recommends.) – PJ Brunet Dec 06 '16 at 18:42
  • 3
    I find it very odd that ovh have a vps platform so unusual that standard commands used by thousands of professional administrators on millions of systems lead to a unbootable system – Tim Fletcher Dec 06 '16 at 18:52
  • More and more companies do that in order to offer you their payed 'support'. – Overmind Feb 07 '17 at 11:55