Introduction

  1. VSSrxJUUs4psx1gh
    VSSrxJUUs4psx1gh
    RBmpCSIHZoRWbCPA
    14CaMwUUGvvsnG11
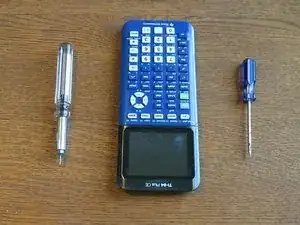
    • Remove the slide cover.

    • Turn the calculator so the screen faces down.

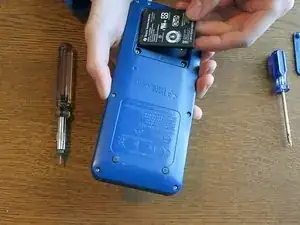
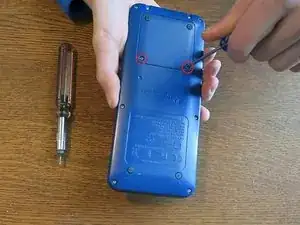
    • Take the Phillips #0 screwdriver and remove the battery cover.

    • Remove the battery. (You may need to use the spudger)

    • Warning: your calculator's RAM will be cleared!

    • Information stored in the Archive will be safe.

  2. m56NGZGoJShVgsC4
    m56NGZGoJShVgsC4
    CYlQZIEc2fwYwYnS
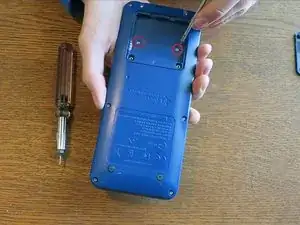
    • Use the Phillips #00 screwdriver to remove the screws underneath the battery.

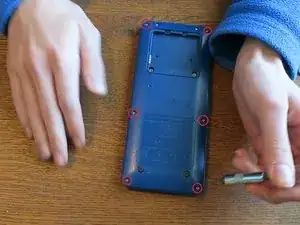
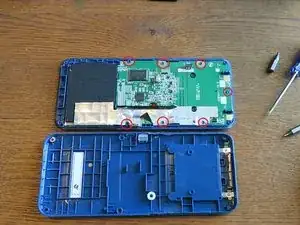
    • Use the T6 screwdriver to remove the 6 screws on the edges of the calculator.

  3. s3LARLTGFaURhoOC
    s3LARLTGFaURhoOC
    cFWfZIQWlYfDRugh
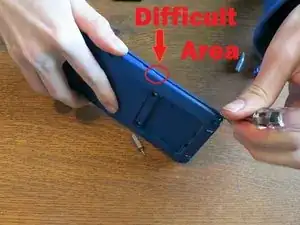
    • Use a spudger to separate the top shell from the bottom one by prying the crease all around the calculator.

    • The screen bezel separates easiest.

    • You do NOT need to worry about keeping one side face down. The buttons will not fall out.

    • The middle part is very difficult to separate! You will need to use a lot of force.

    • You do NOT need to worry about tearing any cables.

    Don’t go too hard around the middle, I accidentally broke one of the tube connectors that hold the thing together, and now it has some flex.

    Taylor Clark -

  4. ctfTyu2daafI6RmA
    ctfTyu2daafI6RmA
    KNxL5gHpQcWEENRC
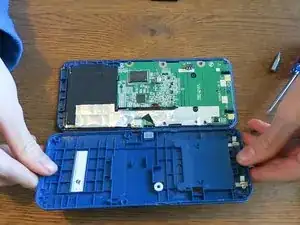
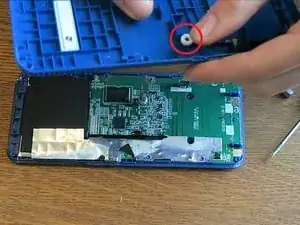
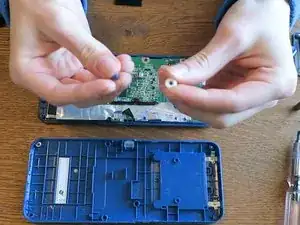
    • With the back shell off, you can now access the Reset button.

    • Take off the white and black rubber to access the hard plastic part.

    • These are two separate pieces.

  5. CYaZ3SOZKr52fkkt
    CYaZ3SOZKr52fkkt
    EYKCkKMuHgtKHwET
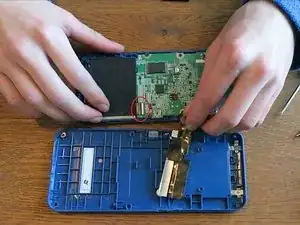
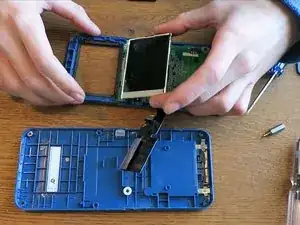
    • Gently bend back the Aluminum shield. You will not be able to take all of it off since it is partially glued on.

    • There is some shielding wrapped around the LCD.

    • If you need to access the LCD, you can pick it up and bend it back.

    • Be careful not to rip the tan ribbon cable. (Which is removable)

    • Follow this guide to safely disconnect the ribbon cable from the ZIF connector: Recognizing & Disconnecting Cable Connectors

    • With the LCD out, you can now easily pop out the transparent, plastic cover that's connected to the shell. This allows you to replace the glue if it's weak.

    If my keys are sticky and I want to clean it. Exactly what do I have to do?

    Paul Petrovich -

  6. 5bNBxpK6DAn1BAsD
    5bNBxpK6DAn1BAsD
    YPacYXWeMPvCkZaA
    Iop6yd4lnmLhl34I
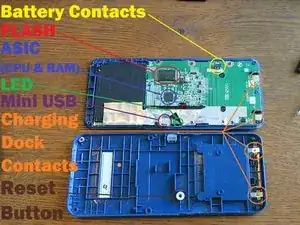
    • Here are high resolution images of the front of the PCB and back of the PCB.

    • Here you can see all the components of the Motherboard. Unfortunately, all the components on the PCB (except the LCD ribbon cable) are all soldered onto the motherboard.

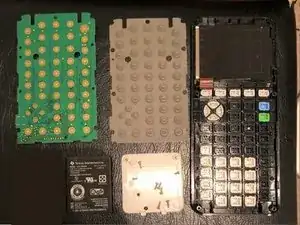
    • Unfortunately, to access the buttons underneath the motherboard you will need to break the melted bits on the PCB because it is heat-melted to the shell.

    • Be sure to keep the buttons facing down otherwise they may fall out.

    • Once the PCB is removed, you can now remove the grey membrane to reveal the buttons.

    • I thought I'd give this an unofficial repairability score. I give it a 4. The battery is trivial to replace. The shell is (mostly) easy to remove, the LCD screen, LCD plastic cover, and the Reset button can be replaced. However, you can not upgrade anything, nor easily replace the FLASH, ASIC, USB, LED, keypad buttons and battery contacts.

TheLastMillennial

Member since: 18/07/18

3139 Reputation

29 comments

This brings up a memory of mine. When I was in the 5th grade, they had just released the TI-89. In school we were asked to buy the TI-83 Plus. I remember fondly buying the TI-89 by accident not realizing it was actually a different model entirely (it has a built-in computer algebra system among other things). I had always enjoyed technology and figuring how things worked so I read the entire manual and tore the calculator up seeing all the specs. Of course when it came to testing time, we were only permitted to using the TI-83 Plus. Using the TI-89 was basically cheating, but I had no idea how to use the TI-83, and they actually checked that you were using a compliant calculator. I found that I could transplant the entire guts on the TI-89 into the TI-83 Plus. I didn’t matter that none of the buttons were the same. I had memorized every function in the calculator. No worries, I only used the functions permitted. I was a good student after all.

ranron -

Are you sure it was the 83 Plus you transferred the internals to or was it the 84 Plus? The 84 Plus uses the same shell design as the 89 and I've never heard of fitting the 89’s internals into an 83 Plus! That's not saying it's impossible though, cool story!

TheLastMillennial -

just for exploring all this you should have passed the test!

boddeke -

Does anyone know where to get replacement parts? other forums have said to just buy another calculator but the 200$ price tag is not very encouraging.

Evan Kaba -

@evankaba Well the goal is to buy a cheap, broken calculator not a brand new one. Unfortunately it’s quite difficult to find a broken TI 84 Plus CE. It’s also very difficult to find replacement parts since TI sources many parts directly from manufacturers. Could you share what’s wrong with your calculator and which part you need? I might be able to help you out.

TheLastMillennial -

@thelastmill The problem is a cracked body. I have the black color of the ce and I wanted to see if finding one with a body that was intact and swaping it would be a good idea.

Evan Kaba -

Sadly, even if you got a different color, a body swap isn't easy. There's heat melted and glued parts that are difficult if not impossible to put back. Your best bet is to try and glue it back together, or try and use the warranty to get a new calculator. :/

TheLastMillennial -

I know you can get some replacement parts from Texas Instruments here: Texas Instruments Education Technology Store. As for anything past batteries, charging cables, cases, and rubber feet, I'm not aware of anywhere to simply purchase them (unless you want to go to eBay in hopes of something).

Birby Tom -

Hey! I want to replace the mini USB port for my calc. I have experience soldering and with this kind of stuff, unfortunately I cannot really see the mini USB and I want to make sure I get the right part. Can we get in contact?

Forest G -

@forestguzman That’s not really an easy project. Perhaps there’s something wrong elsewhere in the calculator that’s easier to fix. Can you please tell me exactly what’s wrong with your calculator? Have you tried looking at TI-84 Plus CE Recovery Techniques. ?

For a project like that I’d suggest making a topic on a calculator forum like Cemetech.net or tiplanet.org since there are many people with more knowledge on that than I have.
TheLastMillennial -

The calculator won't turn on, the light on the side doesn't even turn on, and nothing is wrong with the cables, I tried too, and different chargers. Then I tried to remove the back cover to check if it's the battery, but when I pulled the screws, the screws came off the cover, like they are completely jammed. This calculator is a lot of work :’)

Forest G -

Oh no! What do you mean by “ when I pulled the screws, the screws came off the cover, like they are completely jammed”? Are you saying the screws on the battery compartment fell out? If so, that’s not normal. They should stay on the battery compartment.

Do you have any idea why your calculator could have suddenly died like this? How long have you had it? It’s possible it could just be defective.

I know you said it wouldn’t turn on, but perhaps you could try connecting your calculator to power then trying TI-84 Plus CE Recovery Techniques. ?

TheLastMillennial -

Have a Cracked LCD screen is the a way to get a replacement screen to change it out.

Nathan Alex -

You can’t buy replacement parts for either one without finding a donor calculator somewhere. If it’s just the screen protector that’s damaged then you can just pull it off since it’s only held on by weak glue. If your LCD is cracked then you’ll need to find another TI 84 Plus CE and swap the LCDs. Fortunately all displays are compatible with all hardware revisions so it doesn’t matter which one you get (just make sure you do NOT get a TI 84 Plus CSE since it does NOT have the same LCD).

TheLastMillennial -

How do remove the pcb i’m new to this sorry

Adriel Salce -

Very nice tutorial, just bought one for $30 with two non-functional buttons and this will be handy. Hopefully, it’s just juice on the keypad :)

Vadim -

How did you break the melted bits on the PCB and after doing so, were you able to re-assemble without problem? The reason I ask is that everything on mine works fine except the ON keypad button. I can turn on the calculator in 3 ways: 1. Remove and reinsert the battery. 2. Press the tiny reset button in the back. 3. Plug in the charging cable while connected to a charger. When it’s on, I can’t turn it off. Pressing 2nd - ON does nothing. If I leave it alone, it will power off, but pressing the ON button does nothing and I have to use one of the 3 methods above to turn it back on. I’ve tried everything in the TI-84 Plus CE Recovery Techniques including reinstalling the OS, but the problem is exactly the same which leads me to believe it’s a hardware problem.

Bob Cassidy -

The screen is very very Dim - I tried the second button and up arrow and nothing happens. I can just barely see that it will turn on but that’s about it. Is this calculator pretty much worthless or is there something that I can do about that??

happycampe -

This is the TI-84 plus CE In the description above and I have replaced it with a couple batteries that were brand new and it still has that same situation.

happycampe -

@vanmeterb The TI-84 Plus CE only has 1 rechargeable battery. Look at the text at top of your calculator above the screen and let me know exactly what it says. Knowing what calculator you have will help me understand what’s going on.

TheLastMillennial -

Thanks for the teardown. I needed to remove my PCB to fix stuck keys. To get at the melted bits, I used a Dremel with a small tip and just filed them down with that. It was a bit unwieldy so I got a few scratches on the surrounding areas of the PCB, but it seems they’re not essential and the calculator still works just fine.

Without a Dremel, I wonder if the plastic is soft enough to just cut it away with a sharp knife? I did that to some extent before reassembly to get the deformation from Dremeling off of the posts, worked well enough.

celestori -

I had a sticky key problem. This tear down really helped me out because I was worried about breaking the calculator. 5 years strong and because of this breakdown hopefully 5 more years!

m.ohammedhijaz -

How did you get to the keys? I can't get the board out and I am very worried about breaking it

Maxwell Smith -

I have a TI-84 Plus CE that wont turn on. The shielding is missing, could that be the problem? the led turn green when I plug it in, and everything else on it seems totally normal and fine.

Shua Manory -

The lack of a shield makes me suspect it has been disassembled before. Could you please tell me the date code on the back of the calculator? It will look something like L-0519M. This will help me identify whether it's a problematic model or not. You could try a new battery, but if it's a problematic model that may not work.

TheLastMillennial -

does anyone know where to find a new lcd screen for one of these?

Alex V.O. -

Unfortunately you can't buy units. You have to salvage screens from other calculators.

TheLastMillennial -

Got bored in class and took my calculator apart. Saw some chips i didn't recognize and research brought me here. Kinda crazy to think that a device this fundamentally basic costs over $100.

David Allen -

@evankaba I do have a TI-84 PLUS CE that is a mint green color. It works however the screen is needs replaced. You could swap your screen in it or the casing. I realize I am years late to this lol but if you are still looking for a solution you can contact me shesafighter76@gmail.com

Heather Lewis -