Introduction

Use this guide to replace the battery in your Samsung Galaxy S9.

Opening the Samsung Galaxy S9 will damage the waterproof seals on the device. If you do not replace the adhesive seals, your phone will function normally, but will lose its water protection.

Before disassembling your phone, discharge the battery below 25%. If your battery is swollen, do not heat your phone. Swollen batteries can be very dangerous, so wear eye protection and exercise due caution, or take it to a professional if you're not sure how to proceed.

You’ll need replacement adhesive to reattach components when reassembling the device.

  1. 1kgTQZdMscAZ2YrZ
    • Before you begin, switch off your phone.

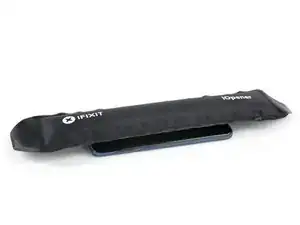
    • Apply a heated iOpener to a long edge of the phone to loosen the adhesive beneath the rear glass. Apply the iOpener for at least two minutes.

    • You might need to reheat and reapply the iOpener several times during the removal procedure to get the adhesive warm enough to cut. Follow the iOpener instructions to avoid overheating.

    • The adhesive of the Samsung Galaxy S9 is very strong. A hair dryer, heat gun, or hot plate may also be used if you aren't able to open the device with the iOpener. Be careful not to overheat the phone—the AMOLED display and internal battery are both susceptible to heat damage.

    Nightmare. Impossible to get the back off so far. Being trying using the iOpener with hair dryer for last 1hr. No chance.

    Chris Bunney -

    You’re right Chris. I’ve tried on 3 separate occasions now and haven’t been able to budge that back. All that has happened is the pick has taken a piece out of the glass back leaving a rough edge now.

    grahamcatto -

    it was not easy but doable.

    Clinton Stark -

    It’s difficult, but the trick I did to get it was to wrap the hot iOpener around a bottom corner, apply the suction cup, then I covered the opener and phone with a paper plate, better insulating the area. Then I set my blow dryer to high heat and low velocity and heated the area under the plate for about a minute. Right after turning off the blower, I took off the plate and pulled the suction cup with a cutter at hand. You’ll hear a bit of a cracking/popping noise when the adhesive is starting to give, just apply a little more force and push the cutter at the seam. This method worked great for me, so good luck and just keep at it — you’ve got this!

    Nicholas Weger -

    I used nearly boiling water in a storage zip bag on the phone for 10 minutes. I can’t really recommend this method, but thankfully the bag did not leak - an iOpener is probably a much better way to go. Regardless, the bag covered the entire back of the phone, and the phone was too hot to hold, but I still could not get the glass to budge with the suction cup after struggling with it for about an hour and multiple reheats. I ended up epoxying a 2”x2” square of PVC board to the bottom of the cover and built a relatively complex fixture that pulled on the PVC with the turn of a screw while it held down the frame by the edges. After heating the edges up again It did lift the glass enough to get a pick underneath it, but it cracked the glass and it was a pain to slide a pick around the edge while the glass was cracking all the way around. Once I finally got all the glass off, I spent the next 30 minutes (which is what this entire process is supposed to take… what a joke!) cleaning the adhesive off the phone.

    drbenton815 -

    Heavy Duty Heat Gun from popular discount tool store for the win!

    Jesse Meyer -

    Well, it is not obvious how to do this. I have no iOpener, but a heat cushion for remedy hurting muscles and sometimes a backpain. It is filled with grain of some kind and it is to be heated in a microwave oven for about 3 minutes. After that I enveloped this cushion round the phone and brewed myself a cup of tea. After ten miutes the phone was warm (almost hot) and I was able to press the tip of a small (very small) knife above the charging port into the connection between the phone body and the backplate. A very small opening emerged slowly (this is the critical point in this process) and I was able to start using the iFixit opening picks. It became obvious to me that the opening picks are too blunt to achive this with them. But after starting carefully with the (very small and very sharp) knife, everything went straight forward. Thou I had to give the phone a second heatpush with my heat cushion before the backplate came loose.

    borutberg -

    I used my 3D printer heat bed and heated it to 90 Celcius to succeed.

    gahute -

    It took about 3 minutes on my 90 C printbed to get the first pick in. If the suction cup gives up before the adhesive does, try using some Isopropyl alcohol to clean the back of the phone, and it should stick better. Also, don't apply heat to the screen, just in case that wasn't clear.

    Evan Newman -

    Used a corn bag (usually used for sore muscles) and incased the phone. It was hot to the touch, but it did the trick. Also needed a knife to have a small enough edge to start prying the back off and get the adhesive to finally pop.

    Laurie Hallberg -

    Don't Forget Step 0! Turn the phone Off and remove the SIM card tray. just to be safe, I'd recommend making a full backup of your phone onto a micro SD card in case the worst should happen. also, make sure anyone who needs to contact you knows you aren't currently available at your phone number.

    Evan Newman -

    We went for a hairdryer. Put it on hot, low blow and put the head right up to the corner. Took maybe 5 minutes per corner!

    Robert Tomohamat -

    Removing the back wasn't too difficult on my phone: several rounds of heating with the iOpener, applying gentle pressure with the suction cup, and eventually a corner lifted up without much force and I could easily slide a pick in. From there it was very straightforward and I had no trouble sliding the picks around and removing the back. The battery removal was much harder in comparison (especially as the iOpener burst when reheating in the microwave for the battery, despite following the time instructions).

    Less eWaste -

  2. UMheV4mJ1oAUmBxF
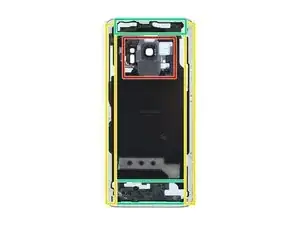
    • In the following steps, you'll be cutting through the adhesive securing the back cover.

    • The adhesive in the inside of the back cover is laid out as seen in the image.

    • You'll be slicing through the adhesive in the areas shown:

    • Thick portions of adhesive

    • Thin areas of adhesive

    • Avoid prying or slicing in this area, to protect the fingerprint sensor flex cable.

    I ran into a chunk of adhesive that was in the red zone right next to where the connector was. Be careful, cut slow, I managed to make it through my working my way through things that felt like foam.

    Matthew Speltz -

  3. cYTOtfNNpFicUNlr
    cYTOtfNNpFicUNlr
    cxj3bIrA5VLxR3uN
    NgOWRk2QjBVTiMGG
    • If the phone's rear glass is cracked, the suction cup may not stick. Try lifting it with strong tape, or superglue the suction cup in place and allow it to cure so you can proceed.

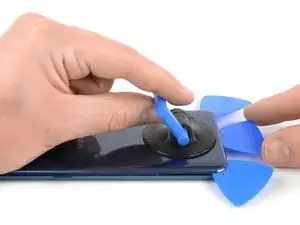
    • Press a suction cup onto the back cover.

    • Lift the back cover's bottom edge with your suction cup, opening a slight gap between the back cover and the frame.

    • This may require a significant amount of force, but you only need to open a very slight gap with the suction cup to insert your tool. If you have trouble, apply more heat to further soften the adhesive, and try again. The adhesive cools very fast, so you may need to heat it repeatedly.

    • Insert an opening pick in the gap you created and slide it to the bottom right corner.

    • Insert a second opening pick and slide it to the bottom left corner.

    • Insert a third opening pick to prevent the adhesive from resealing during the rest of the removal procedure.

    The manufacturer obviously doesn't want owners to replace the battery, or they would have a simple method like they did in the past !!! They would rather have you throw it away and replace the phone !!!!

    johnbriand3 -

    Well. I guess so!

    I was so looking forward to doing this.

    What a shame this type of manufacturing occurs!

    😭

    From a do it yourself person.

    357CLOUDY Black Feather -

  4. BXtfQ1LDUf5NLGK4
    BXtfQ1LDUf5NLGK4
    OpVg1UG1kJBVEC2s
    • While inserting only the tip of the opening pick, slide it from the bottom left corner along the side to the top.

    • Slide the pick around the top corner and leave it there to prevent the adhesive from resealing.

  5. ohPPeyjgwHpkhFTo
    ohPPeyjgwHpkhFTo
    rrs2QwQFtbnUXIep
    XqbwCYYfTJdsJTJt
    • Slide the opening pick from the bottom right corner along the side to the top.

    • Apply more heat if the adhesive becomes hard to cut. During the removal process, the back cover is under tension all the time and is likely to break if the adhesive isn't softened enough.

    • Slide the opening pick around the corner and cut the remaining adhesive at the top of the phone.

    • Don't open the phone all the way yet. The fragile fingerprint sensor cable still connects the back cover to the motherboard.

  6. xRgwe3MhSpuWPPfR
    xRgwe3MhSpuWPPfR
    RscxILw5ESaJgFSd
    • Carefully lift the side of the rear glass where the volume button is located.

    • Use the edge of a spudger to pry up and disconnect the fingerprint sensor flex cable.

  7. yqSZnkHjRsyOvxQu
    • Remove the rear glass.

    • When reassembling follow this guide to replace the adhesive and reinstall the rear glass.

    • In case you want to replace your rear glass follow this guide to transfer the rear camera bezel including the fingerprint.

  8. Vvo2YZwFECCXcjMS
    • Remove the eight 4 mm Phillips #00 screws.

    I think the #000 fits better!

    Robin Vasdev -

    The second and fourth screws on the bottom row are a little shorter at 2mm ( I measure the others as 3mm). Worth some care to put the screws back in the same holes as they came from. (SM-G960U)

    Will Smart -

    Hi Will,

    thank you for mentioning! On our model the “SM-G960XU” all screws have the same length (4 mm). However this might differ between different models and is definitely something to keep an eye on during repairs.

    Dominik Schnabelrauch -

  9. BUAsmJfkKIXGByvX
    BUAsmJfkKIXGByvX
    DQeMTAsidxQDQUEf
    • Insert an opening pick under the right side of the plastic cover containing the NFC antenna and charging coil.

    • Twist or pry to release the plastic clips securing the cover.

  10. 4o161mSFdXjKHMTc
    4o161mSFdXjKHMTc
    JuCCOj4P44srPYH1
    • Insert an opening pick under the left side of the plastic cover.

    • Twist or pry to release the plastic clips securing the cover.

  11. UdvIKepRpT5jbDR1
    • Remove the plastic cover containing the NFC antenna and charging coil.

  12. dkvKU3YuwKLleNEo
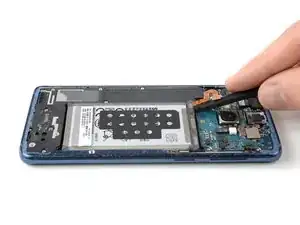
    • Use the flat end of a spudger to pry up and disconnect the battery flex cable.

  13. LK1AGiNsDgB6E2Op
    LK1AGiNsDgB6E2Op
    Vy5dYmAEf1vlDGvD
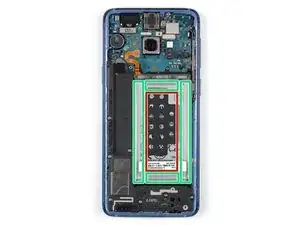
    • Use an iOpener to loosen the adhesive beneath the battery. Apply the iOpener for at least two minutes.

    • In the following step, only apply the spudger in the areas marked in green, which is where the battery adhesive is located.

    • Avoid this area. There's a gap in the mid-frame right below the battery, and you can accidentally damage the display through it.

    I really struggled with this step. The iOpener provided burst when heating up for this stage, so I ended up using 75°C water in a small-but-strong ziplock bag (I first tried hot water from the tap, but that wasn't warm enough). Not ideal, but I had no other option available. Samsung had used a lot of glue under the battery, and it's not something you want to force with a spudger. I did get there eventually, but it was pretty unpleasant trying to avoid puncturing a potentially explosive battery.

    I did not replace the glue when installing the new battery; it seems pretty well held in place without glue, and there's no way I want to go through that process again.

    Less eWaste -

  14. tYpkTWkBR6gIfJ2g
    tYpkTWkBR6gIfJ2g
    eMcleb2ramBmLSSg
    • In case you have trouble to pry up the battery the adhesive may not be loose enough. You can apply some isopropyl alcohol under each corner of the battery and allow it to penetrate for several minutes to help weaken the adhesive.

    • Try your best not to deform the battery during the following removal process. Soft-shell lithium-ion batteries can leak dangerous chemicals, catch fire, or even explode if damaged. Do not use excessive force or pry at the battery with metal tools.

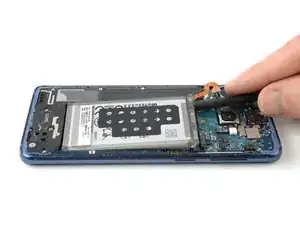
    • Insert the flat end of a spudger at the top left corner of the battery where the flex cable is located and start to pry it up.

    • Work your way down the left side of the battery and loosen the adhesive with the spudger.

  15. OawyTUmk3cRgqqWf
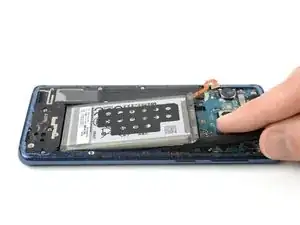
    • Insert the spudger at the top right corner of the battery and pry it up.

  16. CR62uDVTLPWaC5Qs
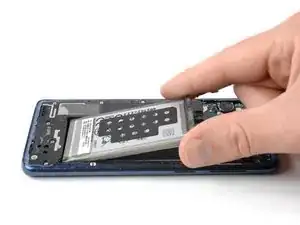
    • Remove the battery.

    • Do not reuse the battery after it has been removed, as doing so is a potential safety hazard. Replace it with a new battery.

    • To install a new battery and adhesive, follow this guide.

    I highly recommend just using some double-sided tape to re-attach the new battery. The old one was a complete pain in the butt to remove. the battery adhesive is almost as annoying as the rear glass adhesive.

    Evan Newman -

    I also struggled with this, and I recommend just not using anything at all but just putting the new battery in and closing it all back up. The tolerances in construction are very fine, and there's no way that battery is moving anywhere once the NFC coil and back are replaced. (Would be good to know if I'm missing something here, though?)

    (As annoying as all the stupid glue was, you have to admire Samsung's build quality here -- it's a very well-made phone inside, and there's not a fraction of a mm to spare.)

    Less eWaste -

    The instructions are good and then it works. The fact that there are lots of adhesive panels in the set is of course perfect for assembling. I'm now curious to see how long the battery will last and charge it according to the instructions. I managed to get the back cover off easily with a lot of heat.

    A well thought-out set - battery with the kit.

    Thanks
    Marc

    Marc Rudolph -

Conclusion

To reassemble your device, follow these instructions in reverse order.

If possible, turn on your phone and test your repair before installing new adhesive and resealing the phone.

For optimal performance, calibrate your newly installed battery after completing this guide.

Take your e-waste to an R2 or e-Stewards certified recycler.

Repair didn’t go as planned? Check out our Answers community for troubleshooting help.

Dominik Schnabelrauch

Member since: 23/11/16

201132 Reputation

22 comments

An exceptionally useful, and dare I add - well-written - fixit.

Doug Davis -

Merci ifixit.

Mais je n ais pas compris la deconnection du NFC, es une nappe. Je ne comprends pas.

Di Da -

Bonjour @Di Da, vous trouverez la partie qui parle de la démontage du coque / de la cache en plastique qui abrite l'antenne NFC et la bobine de recharge dans les étapes 9 à 11. Au fait, la cache en plastique et la nappe sont UNE pièce ensemble, on ne peut pas les séparer et dès que vous démontez la cache, la nappe va elle aussi sortir automatiquement. Elle n’est lié que par quelques contacts, vous n’avez pas besoin de déconnecter ceux-ci, ils se séparent automatiquement quand vous retirez la coque.

Sandra Hiller -

Wenn nach Abschluss der Reparatur der Fingerabdrucksensor nicht funktioniert muss man in den Restore Modus des Handy gehen.

Dazu das Smartphone an den Lader hängen und das Gerät ausschalten.

Dannach die Bixby + Power + Lauter Taste gedrückt halten bis das Samsung Logo erscheint.

In dem Menü den Punkt “Wipe Cache Partition” auswählen mit Lauter / Leiser und mit Power die Auswahl bestätigen.

Die Auswahl nochmal mit Yes bestätigen und warten bis das Gerät die Cache Partition gelöscht hat und das Gerät neu starten.

Dannach sollte der Fingerabdrucksensor wie gewohnt funktionieren.

Sebastian Coenen -

Why does the guide stop? How am I supposed to use the adhesive??

Mitchell steindler -

Hi Mitchell,

the last step offers a guide to install an adhesive. Hope that helps. Otherwise, all our guides are “re-assemble in reverse order”.

Tobias Isakeit -

For what parts? There’s multiple sets of adhesive on this device, and I would personally recommend applying the adhesive the same way that it was applied on the original battery.

Kaleb White -

You can attach it to the battery or where the batter is placed and your done and just work backwards after .

Charlie S -

I’ve bought a replacement battery for my S9 to do this but it hasn’t come with any adhesive. Which one(s) do I need any where can I buy it?

danreilly -

Hi danreilly,

in case you don’t want to buy custom cut adhesive for this, you can use regular double sided adhesive tape.

Dominik Schnabelrauch -

Guide was definitely helpful. Having some tips or comments for assembly would be helpful particularly for reattaching the fingerprint sensor. A magnifying lens for the tiny pin connections is recommended.

Kurt D -

Amazing description.

...think I better leave it for the pro's

Thank you!

Chris Newman -

Why did the cell phone company's make it so hard to replace a battery...let me guess...so you have to buy a new phone instead of swapping out a battery like the old cell phones

jasonbutts2332 -

Schön und gut, dass man das Handy in ein paar Minuten auf bekommt. Nur wird hier leider nicht erwähnt, dass es Stunden dauert, die alten Klebereste zu entfernen.

Dominik Schmies -

Hi, das mit dem Kleber entfernen ist tatsächlich etwas aufwändiger. Allerdings weisen wir in Schritt 7 (Rückabdeckung) und Schritt 16 (Akku) darauf hin (separater guide). Dieser Guide hier ist mit einer Dauer von bis zu 2h angegeben. Je nach Gründlichkeit der reparierenden Person und Alter des Klebstoffs kann es auch etwas länger dauern. Ich hoffe du warst dennoch erfolgreich und es hat dir nicht zu sehr deine Zeitplanung durcheinander gebracht.

Tobias Isakeit -

Hi David,
please see the link in the first step. It’ll lead you to the guide for how to prepare an iOpener.
Yes, you can heat it in a water bath.

Tobias Isakeit -

there NEEDS top be some sort of instructions for applying the precut adhesive per the individual product, NOT just a basic overview that covers multiple devices....., at the very least, some pictures actually showing what direction, orientation, etc. it is very easy to mess it up. having the instructions basically end at the disassembly is not ok. it is very frustrating. I did end up getting my S9 reassembled after placing the adhesive around the camera backwards, thankfully I caught the issue before final assembly. Besides the lack of instructions on assembly, the tools worked flawlessly and disassembly was a breeze! Time will tell how the new battery holds up! Thanks for making quality products!

Matt Kiefer -

Hi.

The difficult part of this tear down is removing the back cover with the IOpener. I used a heat gun instead of the IOpener. I had to use a opening tool which is a very thin metal to pry open the back lid. I then was able to remove the back cover with ease. I used a heat gun to remove the battery. Another time consuming part was removing the old adhesive from the back cover. Mark the top and bottom of the rear cover (Inside)with a white marker pen so that you know where exactly to place the new adhesive. I used alcohol to clean the areas prior to placing the new adhesive.

You are going to need a second pair of hands to help place the adhesive that goes around the phone. Other than that, a piece of cake. It took me 2 hours to complete the battery replacement. Remember to power the phone up before putting the rear cover back on just in case the battery cable did not seated correctly.

Hope this comment helps.

rordaj -

All went well for me, but I didn't replace either set of adhesives (battery or back panel). I figure the battery will be fine without it, and the old adhesive on the back panel was more than enough to re-adhere. With the phone in a case anyway, it's perfectly fine. The trade-off for being able to more easily replace the battery again is losing waterproofing, but I've never dropped a phone in water and don't plan to start now. And I doubt the very generic battery supplied in this kit (without any manufacturing date) will last a year.

I don't know how unusual my phone was, but I'm surprised at the number of reports of back panel breakages. Once the back is warm enough, all the resistance of the glue disappears and you don't need to apply much force through the suction cup at all. Just have patience, keep warming the edges, and although it takes a long time you'll instantly feel it when you get there.

Less eWaste -

Das Guide hat sehr beim Akku Austausch geholfen vorallem mit dem Kit (Schraubenzieher, iOpener und mehr) machte es den Austausch einwandfrei.

Danke.

Max K. -