Introduction

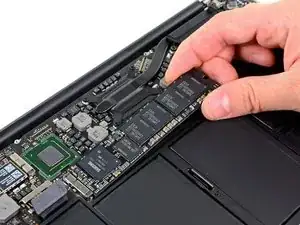
Use this guide to upgrade or replace the solid-state drive in a MacBook Air 11” Mid 2012. This MacBook Air uses a proprietary storage drive connector, and is therefore not compatible with common M.2 drives without the use of an adapter.

Before you perform this repair, if at all possible, back up your existing SSD. Then, either familiarize yourself with internet recovery or create a bootable external drive so you’ll be ready to install macOS onto your new drive and migrate your data to the new SSD.

Finally, we strongly recommend installing macOS 10.13 High Sierra (or a later macOS) before replacing the original SSD from your MacBook Air. Most new SSDs require updated storage drivers not found in versions of macOS prior to High Sierra.

  1. 2uMPhxrYSdfxumSQ
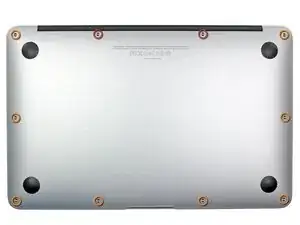
    • Shut down and close your computer. Lay it on a soft surface top-side down.

    • Remove the following ten screws:

    • Two 8 mm 5-point Pentalobe screws

    • Eight 2.5 mm 5-point Pentalobe screws

    • The special screwdriver needed to remove the 5-point Pentalobe screws can be found here.

    When you say:

    Remove the following ten screws:

    Two 8 mm 5-point Pentalobe screws

    Eight 2.5 mm 5-point Pentalobe screws

    Do the 8mm & 2.5mm dimensions refer to the LENGTH of those screws, or the size of the pentalobe? That is, are there other sizes of pentalobe drivers like there are for hex, phillips and torx? When only one dimension is provided, it is usually the socket/driver size, not the screw length, maybe since the length cannot be seen when the screw is installed.

    Can I suggest that you clarify your instructions so folks are confident they are only in need of _one_ pentalobe driver?

    Nerdily yours,

    Larry (whose iPhone 4S can now get through a day without 6 recharges thanks to ifixit.com ;-)

    larryleveen -

    The 8mm and 2.5mm are the length of the screws. One pentalobe P5 screwdriver suffices for all the screws (P5 is implicitly the size of the pentalobe screw heads).

    Michael Welham -

    I sourced all the parts from ifixit, plus a magnetic project mat which I found to be very useful for organising the teardown and reassembly.

    Allen -

    The magnetic mat is

    GERARD SZAREK -

    Keep the 2.5mm tiny screws away from the MagSafe connector as they will be attracted and sucked in to the magnet.

    Frank O'Carroll -

    A tip an old bench tech taught me that has saved me many times: I put clear “Scotch” tape over the case screws as they became “free”. The tape kept them in place while I lifted the lid off, cleaned it etc.

    Michael Mee -

    Thank you for a really smart tip! I will be using that countless more times!

    Lilljedahl -

    I’m confused about internet recovery and installing MacOS. Is all of this done before placing in the new ssd card or after. I don’t have any files that I would like to safe/transfer, is all of this necessary, if I don’t do it before placing new ssd, will I still be able to instal/upgrade macOS afterwards.

    It’s an old Mac and now it won’t start or charge, I know I will have to replace battery and put new battery first and turn on Mac before doing the ssd stuff. Since it won’t effing start.

    I’m really clueless about backing up old ssd, since I don’t need any files, besides MacOS(software) ,and is that related to the ssd?

    AMG -

    The answer to your question: You need to insert your SSD into the computer before internet recovery. If you start the recovery before inserting SSD, it won’t affect the setup, you won’t damage anything. But your SSD will not be detected (as there isn’t one inserted.)

    Also, a little tip: If you bought a used SSD, go into Disk Utility and format the drive with the highest security level to permanently remove all of the previous files.

    Also a FYI: Internet Recovery will load up Mac OS X 10.9.5 Mavericks, so I would recommend making a recovery drive from a Big Sur (or desired version) through another Mac, and a USB. You can visit this support doc: https://support.apple.com/en-us/HT201372

    Hope this helps! -Dan

    danielwen -

    I got a macbook air with a damaged and swollen battery. I could remove all screws, except one 2,5 mm screw. I’m afraid it got damaged while attempting to remove it, I have no grip with the P5 pentalobe screwdriver. How can I proceed?

    Robert Hermans -

    Hi Robert!

    Try some techniques found in this stripped screw removal guide. Good luck!

    Arthur Shi -

    Hello I have a macbook air they are say they do not have parts for my laptop macbook air 11 inches 2013 mid need to replace battery which one to buy

    vensilver -

    Hello! This is the part you want—maybe we’re not able to ship it to you if you’re out of the United States. The battery in your MacBook Air should be the same for all 11” between mid-2011 to early-2015.

    Arthur Shi -

    The smaller screws went in more easily when I put back all the screws along the hinge edge first.

    Rachel Slatkin -

  2. yuZ5Ls2UHZLyfewD
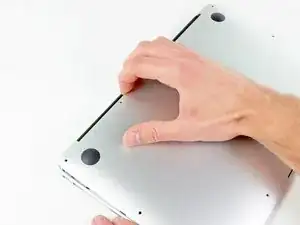
    • Wedge your fingers between the display and the lower case and pull upward to pop the lower case off the Air.

  3. 2Yhu2S2byWGirNAZ
    2Yhu2S2byWGirNAZ
    HUXFqkCjXQfptLGH
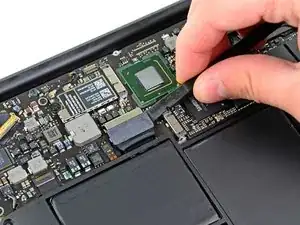
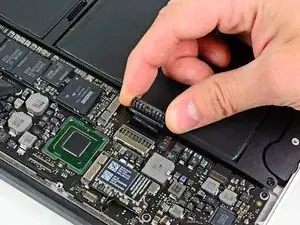
    • In this step you will disconnect the battery to help avoid shorting out any components during service.

    • Use the flat end of a spudger to pry both short sides of the battery connector upward to disconnect it from its socket on the logic board.

    • Bend the battery cable slightly away from the logic board so the connector will not accidentally contact its socket.

    My macbook air's configuration (Mid-2011 core i5) has a different battery connector. It slides into a receptacle on the logic board. If your battery connector does not look like the one pictured, use the pointy end of a spudger to depress the small indentation in the middle of the battery connector cable terminal, and pull aft to release the clasp mechanism.

    Ethan Cross -

    Maybe your battery connector doesn't match the picture because these instructions are for the mid-2012 model and yours is mid-2011.

    colleenthompson -

  4. wrQlCGAifjnbAu1U
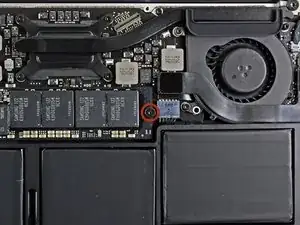
    • Remove the single 2.9 mm T5 Torx screw securing the SSD to the logic board.

  5. ymYTajCuEgHm321r
    ymYTajCuEgHm321r
    TbYt3QotVUOLGrA6
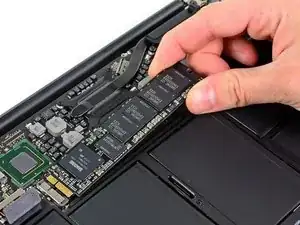
    • Use a spudger to help lift the free end of the SSD just enough to grab it with your other hand.

    • Do not lift the end of the SSD excessively.

    • Pull the drive straight out of its socket and remove it from the logic board.

    • When reinstalling the SSD, be sure it is properly seated before reinstalling its retaining screw.

    When you've completed all these steps to replace your SSD, don't despair if the MacBook Air shows a flashing folder with a question mark when you first power up the MacBook Air.

    - Power off the machine, then keep the option key (= Alt key) pressed down, power on the machine again, and keep the option key pressed down until a prompt appears.

    - If you've set a firmware password, then type it in at the prompt

    - You should now be prompted for a hard drive to boot from. Select "EFI Boot"

    - The MacBook Air should now boot to a window showing "OS X Utilities"

    - Click on the  at the top left, then select "Startup Disk..."

    - Select your SDD/Hard drive, and restart.

    Michael Welham -

    When replacing the SSD, be careful about the connector orientation. Replacement boards look almost the same if they are upside-down. Note that the connector is not reversible - there is a notch that will only line up if the board is right-side up. If it doesn't seem to line up, flip the board over.

    shamino -

    can i ask some links for some ssd’s that are compatible with that macbook model ?

    giannismistil -

    Hi I completed steps above, but the MacBook Air 2012 doesn’t seem to read the drive, on reboot I get a flashing folder, and upon clicking Control R on reboot it goes to internet recovery mode and then can’t find the drive on disk utility. Any help would be much appreciated! Thanks, Devin

    Devin Patrick Hughes -

    if you’re using an M2 adaptor, be mindful to check the compatibility with the other end. In my specific case my adaptor was only compatible with M2 Sata and not with M2 NVMe.

    Andres Urena -

    This was a confusing upgrade. Sintech M.2 NGFF SSD fo 2010-2011 MacBook Air was used, yet it’s got a graphic in the sales content that claims it works with ‘M’ key only (NVMe, AHCI), so NOT SATA. Yet in the answered questions on Amazon the sales tech claims you MUST use SATA drive. I bought 2 NVMe SSD’s and found that the first USB adapter board was unstable with both. So, bought another adapter board that supported SATA and NVMe (RIITOP M.2 SSD to USB 3.1 adapter that claimed to be compatible with ‘M’ and ‘B+M’ SATA SSD’s) and a SATA SSD (Silicon Power A55 M.2 SATA III). The NVMe drives couldn’t be seen by the MacBook Air, but the SATA drive worked (Restore didn’t work, but SuperDuper! does fine). Physical install is as shown.

    Robert Sutherland -

Conclusion

To reassemble your device, follow these instructions in reverse order.

Andrew Optimus Goldheart

Member since: 17/10/09

502341 Reputation

3 comments

Excellent instructions. Very easy to do. I used this screwdriver to remove the screws from the bottom of the case: https://www.amazon.com/gp/product/B00N1R...

and I used the Pentalobe-6 from this set to remove the screw holding in the OEM SSD:

https://www.amazon.com/gp/product/B01FE2...

After removing the stock drive, I installed a Samsung M.2 EVO 850 512Gb drive. It is working quite well. I used this adapter so that the M.2 drive fit in my 2012 Macbook Air:

https://www.amazon.com/gp/product/B01NH2...

feinberj -

How do we reinstall MacOS?

Philippe Morin -

I am 10 years old I fixed the mac I did this even the Geek squad couldn’t do it and now it works! without your guide.

admin free -