Introduction

My MX Vertical developed a phantom double-click on the left mouse button after about a year of use. Out of warranty and out of patience, I tore it apart to see if I could replace the switches. To my surprise, the mouse was a relative dream to take apart and service!

The mouse shipped with OMRON D2FC-F-7N(10M) switches installed. You can find direct replacements for these on many online retailers, but I opted to replace them with OMRON D2FC-F-K(50M) switches instead. You can probably choose a different type of switch if you want, as long as it shares the D2F’s form factor. That’s an exercise left to the reader!

This guide does require soldering, but thankfully it’s all through-hole on some relatively large parts. The hardest part of the job is holding the board steady while soldering the switches’ first contact.

    • Turn off the mouse before beginning disassembly.

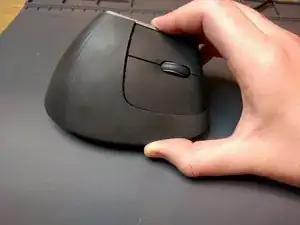
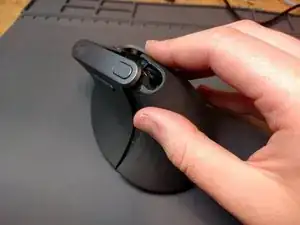
    • Flip the mouse over so the sensor and power switch are facing you.

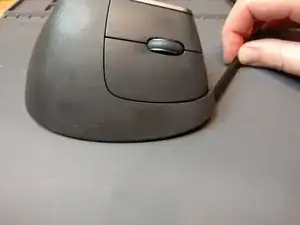
    • Insert a plastic spudger between each slider and the plastic mouse base. Pry the adhesive slider off of the base to reveal the screw wells.

    • A careful amount of heat applied directly to the slider before removal can help ensure they are reusable.

    • The mouse sliders will likely be unusable after removing them, they will need to be replaced.

    More details about step 1 can be found here : Logitech MX Vertical Feet Replacement

    Guillaume Felix -

  1. DUEDBiiWZrUr3fYv
    DUEDBiiWZrUr3fYv
    Gb2QdS4hsaQoLOWO
    iDyXFRC3oiCagOq4
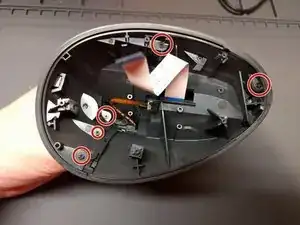
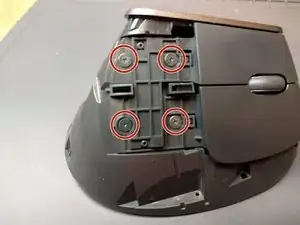
    • Remove the five Phillips screws from the bottom of the mouse.

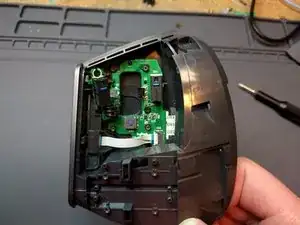
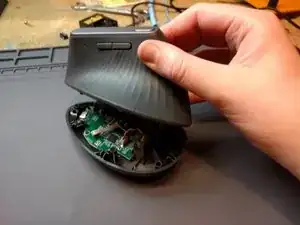
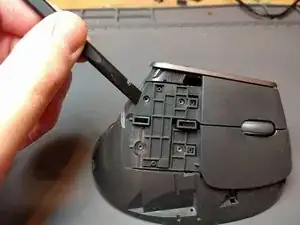
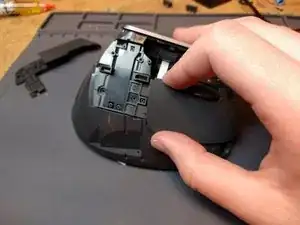
    • Flip the mouse over, holding both the base and the top to avoid it falling apart.

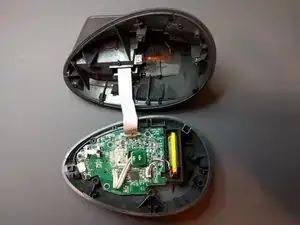
    • Lift the top of the mouse straight up and away from the base. Once it is clear from the screw wells, rotate the top to lay it on its primary button side.

    • A ribbon cable holds these pieces of the mouse together -- be careful during this step to avoid damaging it!

  2. sIeXpaWgihHqjPfU
    sIeXpaWgihHqjPfU
    vPRA62dqS6H3iXMW
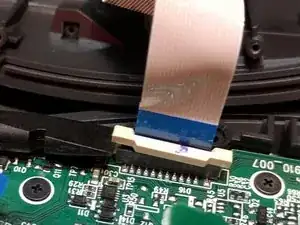
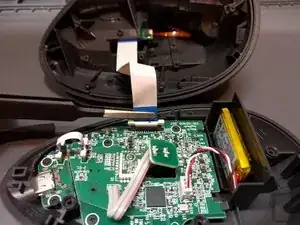
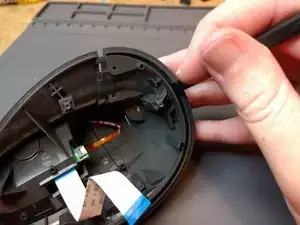
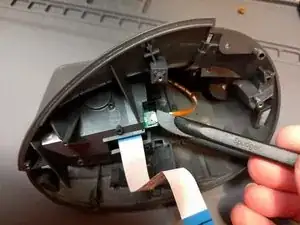
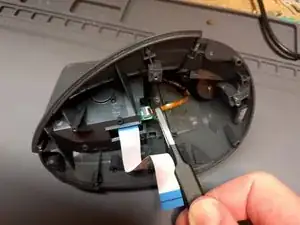
    • Use a plastic spudger to lift both sides of the ribbon cable lock on the base of the mouse.

    • Lift the ribbon cable straight out of its socket on the base.

  3. tAkdV1WyAKPomMmZ
    • Flip the top of the mouse over to view its interior.

    • Remove the five Philips screws holding the top grippy facade to the top. There is no need to remove the screw nearest the DPI switching button located on the top of the mouse.

  4. RxSNEb63pTDl3PJT
    RxSNEb63pTDl3PJT
    NXsWZN1QgcrcmGGk
    r6iJEBeVsfcDcGwT
    • Flip the top of the mouse over so it is in the orientation it would be during normal use. Turn the top of the mouse so the main buttons and wheel are facing you.

    • Insert a plastic spudger into the seam in the grippy facade at the front of the mouse, nearest the right side of the buttons. It should snap out of place.

    • Apply pressure to the bottom edge of the facade under the middle of the mouse buttons. It should snap further out of place.

    • Flip the top of the mouse over so the main buttons and mouse wheel are facing the work surface.

    • Insert a plastic spudger into the seam between the grippy facade and the plastic base of the mouse at its right side. The facade should almost completely snap out of place.

  5. OotaabwFCWK5EX3N
    • Flip the top of the mouse over so it is in the orientation it would be during normal operation. Turn it so the main buttons and wheel are facing away from you.

    • Grab the grippy facade near the DPI switcher button and wiggle it left and right while pulling it away from the top of the mouse.

    If you are having trouble getting the grippy facade off, run your spudger along the bottom edge again and find the point where it still feels tightly attached. Gently, carefully lever into the edge at that point with your spudger to release whatever tab is still holding firmly.

    Idgy -

  6. ykcqkQCxETLSrvFu
    ykcqkQCxETLSrvFu
    vSbMUyMfv1eLY5Me
    ZyeldJmJg4SGRYh5
    • Turn the top of the mouse so the main buttons and wheel are facing you.

    • Remove the four wide Phillips screws holding the mouse buttons to the top chassis.

    • Insert a plastic spudger between the left side of the left mouse button and the chassis. Gently pry the button to free it. It should pop off, but may require a light push to the right to fully separate.

    • Grab the right mouse button to the left of the mouse wheel. Pull it to the left and away from the chassis.

  7. pRpT23CVwf4sRKUr
    pRpT23CVwf4sRKUr
    QGFuCMwxANT3XmEF
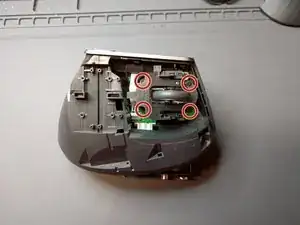
    • Remove the four Phillips screws holding the mouse wheel assembly to the top chassis.

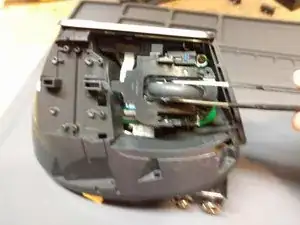
    • Grab the mouse assembly by the wheel or the plastic and pull it directly away from the chassis.

    • The mouse wheel is able to freely pivot 180º from its plastic assembly. Be careful to hold this assembly together as you turn it to set it down.

  8. 5MQDotAwJsinC2AY
    5MQDotAwJsinC2AY
    UCPeNVENhwQP4mAT
    • Use a plastic spudger to pivot the lock on the ribbon cable connector for the DPI switcher button.

    • Lift the ribbon cable out of its connector.

  9. HZhQPQGObmetkIRY
    HZhQPQGObmetkIRY
    DWC4RDleWmhinCdY
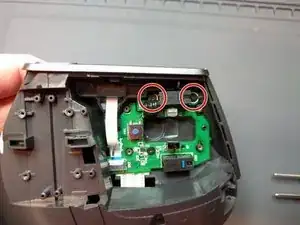
    • Remove the two Phillips screws securing the left click microswitch board to the top chassis.

    • Gently pull out and pivot the board so it is free from the chassis.

    • This small board is still attached to the main top chassis motherboard. Don't move the small board any more than is necessary to dislodge it from its plastic holders.

  10. wXDEZiZIdaAQVgJx
    • Remove the single Phillips screw holding the top chassis motherboard to the top chassis.

  11. LpO3V3xUYcbUF3Iq
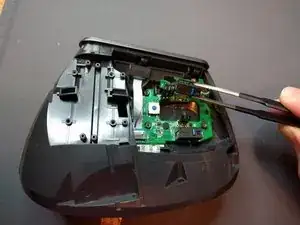
    • Use a plastic spudger to pivot the lock on the ribbon cable connector for the navigation button assembly, then lift the ribbon cable out of the connector.

  12. ZfodnNFm4a31ZQXp
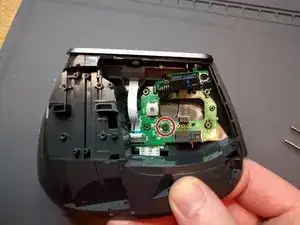
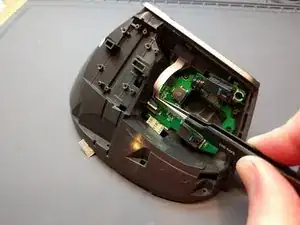
    • Grab the top chassis motherboard by the right click microswitch. Pull it toward you to free it from its pegs in the chassis, then lift it directly up and out of the top chassis.

    • The top chassis motherboard still has its main ribbon cable attached. Be careful to lift it directly out of the chassis without shearing the cable.

  13. TTZ2Ck1hCv5ApkXP
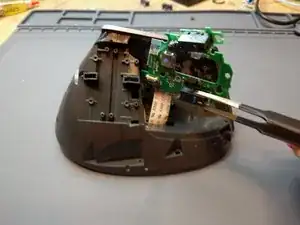
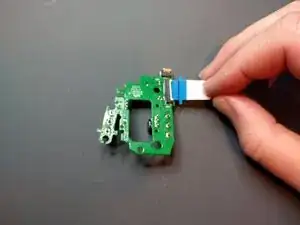
    • Use a plastic spudger to pivot the lock on the ribbon cable connector, then remove the ribbon cable from the connector.

  14. 22HmRXsZLesWMNID
    • Apologies for not having more detailed images... I don't have a good setup for photography while using both hands.

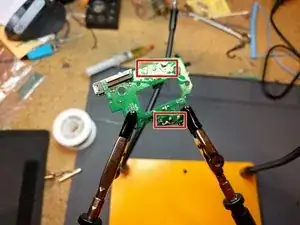
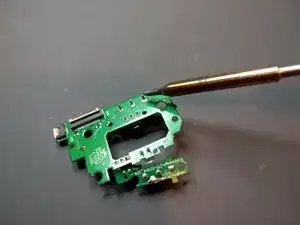
    • Add some new solder to each of the three terminals on one microswitch.

    • While pulling the microswitch away from the board, heat its three terminals. The switch should come free.

    • If you have trouble with this method, you may have better luck by removing as much solder as possible using solder wick and a solder sucker before pulling the microswitch away. However you do it, all three terminals will need to be warm enough to melt their solder at the same time.

    • Clean the terminals of any excess solder using a solder sucker and solder braid. The holes in the board should be clearly visible, it should be easy to insert your new switches.

    • Double check to make sure each solder pad on the bottom of the circuit board has continuity to the trace surrounding its corresponding hole on the top of the circuit board in case you separated them while extracting the old switch.

    • Repeat these steps for the other microswitch.

  15. qnJEjSEoulGQHG5l
    • Insert the switch contacts through the holes in the board.

    • Mind the switch's orientation! The actuator will go toward the right of the motherboard in this image.

    • Solder one switch contact to the board while pressing the switch into the board. Allow the switch to cool.

    • Ensure the switch is flush with the board, otherwise the mouse buttons will not click correctly. But also do not put excessive pressure on the plastic.

    • Solder the remaining contacts to the board, allowing the switch to cool each time.

Conclusion

To reassemble your device, follow steps 1-14 in reverse order.

Dalton D

Member since: 08/12/17

2453 Reputation

41 comments

Thanks! This is perfect.

Sébastien Dolard -

Super guide with details, done step by step, picture by picture, my MX Vertical working great now :) THANK YOU !!!!!

Chris mmhk -

Thanks for this guide !!!

Regarding Logitech quality: it’s a shame that such an expensive mouse (paid 100€ !) has only “normal” micro switches (10M)

I’ve also replaced the switches by a 50M variant (OMRON D2FC-F-7N(50M))

Michael Katzenberger -

Woah 100 bucks sounds like a theft. I had it for 35€ on Amazon on nov 2019.

Andrea Collet -

Great work on the guide. My mouse wouldn’t drag reliably anymore, all better now!

I wouldn’t classify this as difficult btw, medium maybe but everything is fairly easy to open.

Just one thing for anyone attempting:

-The first, big ribbon cable to the big mainboard is slide-to-unlock

-All other ribbon cables on the top half are tilt-to-unlock (lever style).

I didn’t look/read carefully and broke the latch on one of them trying to slide it…

Laurens Corijn -

Thank you! The original switches didn’t survive even a year of my work in Blender. I was considering just sending the mouse back since I had still a year of warranty on it but they would just replace the switches with another 10M or worse just throw away the mouse and send me a new one. Now I can continue using this mouse with my new 50M switches and have a good feeling from repairing it by myself. :)

Petr Křivonožka -

Super guide, thanks for putting it out there. I installed the Kailh GM 4.0 Micro Switch(60M) successfully and have to say I absolutely love the way they feel. Also, a little heat on the sliders before removal enabled me to reuse them without issue. Finally, I was a bit reckless in separating the old switches from the circuit board and found I had separated the trace from the solder pad on the opposite side of the board after putting it back together. It’s worth checking continuity on both sides of the board before soldering the new switches on. In my case I just used a single tiny strand of copper to reconnect them successfully.

arri -

This was really helpful, thank you!

I was able to reuse the bottom sliders. They were super sticky and I had no issues reapplying them and they aren’t peeling up. That may not be the case for everyone, but I would recommend that you try reusing them first and just order new ones after you verify you actually need them.

Also, the sliders are made up of 2 thin pieces stuck together. So to keep them in good shape for reuse, just make sure when you start peeling them off that you are peeling off the layer actually stuck to the mouse and not just the outer layer.

Todd -

This guide helped me do my first repair involving soldering things. Seriously, thank you so much. My left mouse click has been replaced with a nice Huano Blue switch and it’s no longer dropping clicks.

Donn -

I was ready to replace the mouse when I saw this guide. As I didn’t have a spare switch, I just sprayed contact cleaner inside the switch. It’s working like new now. It could be 2 things wrong with the switch: The plunger is sticky or the contacts are dirty. In any case, the cleaner solved the problem. Note: I believe that in most cases, the faulty switch would be the left button. An alternate solution if you don’t have a spare switch would be to swap switches. Note 2: I ran out of contact cleaner and used car brake cleaner.

Bert -

Thanks a lot! I was having trouble after using the mouse for about 2 years - I noticed that when clicking and dragging to select text, for example, it would mistakenly register that I stopped pressing and started again, losing the selction - very annoying. I followed your guide and replaced the switches with Kailh GM 2.0’s!

Artur Becker -

Thanks from 2022! Works like a charm, but removing the microswitch is a bit challenging without right tools.

Marcin -

Thanks for guide !!

One recommendation that I have is not to remove sliders but to take exacto knife and cut out screw holes. It saves you of mess of removing sliders and reinstalling them and also makes it easier to do repairs in the future.

Dragisa Jankovic -

Thank you! Awesome guide! This saved my from buying a new MX Vertical and now I've got 50M switches.

Those little cables sure a pain to lock back in. And I expected removing the switches would be difficult; but, solderwick worked pretty well to remove most all the solder.

Dan S -

Fantastic guide! Replaced my mouse with two Omron 50M, still took me 2 hours >_< ******

The most difficult step IMO was 5 and 6 because the closure just did not come off because of the strange shape.

One more thing notable was those 3 ribbon cable connector, especially 2 smaller ones, extremely difficult to install them back due to tiny size.

And allow me to say congrats to Logitech, you just build a mouse with no intention of repair, NOT AT ALL. Will NEVER buy your products again.

Neverends 4 -

Thank you for the guide! It's very difficult to desolder the Microswitches btw, the boards on which they are mounted are so small, that you definitely need a third hand.

Andrea Collet -

Thank you so much! Worked like a charm, this was my first ifixit thing (bought the Mako kit) and it went smoothly until I hit the de-soldering part. That took me a lot of tries to get right, but I got it in the end and I'm so happy I can continue to use my mouse. I've had 3 MX Verticals that the switches broke in after about a year!

Thomas Moon Kang -

Thanks a lot for the very detailed guide!

I successfully replaced both switches with Kailh GM 4.0s on my MX Vertical yesterday without any hiccup.

They're a bit noisier than I expected, but the feeling is better than the stock Omrons, so I'd say it's both a repair and an upgrade :).

Victor -

This is very difficult!!! Took me around 2.5 hours. Desoldering is the hardest part. Much easier if there is someone to help holding the board/microswitches.
Reconnecting the ribbons is also quite challenging, except for the big one.
But in the end I'm happy I followed this tutorial, I have a perfectly working mouse again and I'm not creating a lot of unnecessary electronic trash.
Thank you!

Eduardo Simioni -

The quide for the reassembly was really well documented.

For me unfortunelty while trying to unsolder the swiches the pad came off.

Used a very small wire to make a new connection point on the PCB. (Used a microsope for it).

Also used the 50M click version for the switches.

Works great now :)

Björn Koke -

Amazing guide, this did not miss a single detail and the instructions make the breakdown simple and easy to do without breaking anything. The 50m switches have a much crisper/snappier feel and were only $4 more, definitely recommend.

For those with limited desoldering tools or needing to make it easier to get the old switches out:

- Before desoldering, clip the excess metal on the three prongs underneath the switch (I used a flush wire cutter to get as close to the base as possible). This allows the switch to work its way out of the board more easily. I had a hard time heating all 3 pads at once, this method allowed me to heat two at a time and gradually work the switch out in a couple of passes.

- Once removed, use a pin punch or similar thin cylindrical tool to clear out any excess solder.

The only downside I saw here was that clipping the prongs created some small metal fragments. Regardless, it let me get this job done with no braid / solder removal tool.

Ryan -

Great instructions! Absolutely perfect! Very detailed pictures and tips that all helped. Thank you very much for your time!!!!!!!! I'm lazy so I did the button replacement on step 12.

Thank you again!

Aaron ALAI -

Thank you for the instructions. I followed them and was able to complete with no issues.

Helping hands are a must desoldering. A good solder sucker and solder wick are very useful. Be patient with desoldering if you don't do it much. It takes some time to remove these guys.

mouseclub.co has a great selection of switches and their customer service was awesome. I grabbed some Kailh GM 80M switches that I've been very happy with so far.

Dan Beard -

Any tips for a good silent (or at least much quieter) switch?

Aleš Grm -

Thanks for the easy to follow guide! This was extraordinarily helpful for completing this project. I used Black Kailh GM 8.0 Mouse Switches and bought them from here: https://a.co/d/2EXlibz for $6.23 for a 4-pack. Also, because more information is better than less. Here is a great guide that discusses the difference between Kailh 8.0 switches and Japanese Omron switches: https://www.xbitlabs.com/kailh-8-vs-japa... For my preference I went with the Kailh because I don't trust that I won't get a bait-and-switch on the Omron Japanese vs Chinese switches when buying on Amazon.

Mitchell M -

As an amateur who owns a solder and occasionally fixes some stuff, I've just successfully replaced my left button microswitch solving the issue where click & hold operations like drag or select were becoming more and more difficult. My MX Vertical has been my primary mouse for 4 years and apparently, the microswitch reached its end of life.

I heated the slider pads and managed to reuse them successfully. Watch out - they come in two layers - the slider pad itself and a glue layer. I used an empty waxpaper used to hold stickers.

Unfortunately, I broke the white motherboard ribbon clip in the process (one of its latches broke off), so I applied superglue to hold it in place as I had no other option, which might kick me in the future, though. This is because I did not know this type before.

Due to lack of equipment, I used a 1mm drill to clear out the solder of the holes after removing the original microswitch.

Other than that, I followed this really nice and accurate guide without any problems. Thank you very much!

Jiří Polcar -

That guide was great, I used it to replace my left-click switch, which wasn't working anymore. However, I thought it would be a good idea to also preventively replace the right-click switch at the same time ( I replace the 10M switches with 50M switches as well).

now my left-click is working again (yay!) but my right-click isn't working anymore. does anyone has an idea what I might have done wrong? I'm pretty sure I followed all the steps closely. Might I have damaged somthing while soldering?

I also asked this as a question in the forum (with pictures)

Zaps06 -

Terrific guide! Thank you so much for this! I was successful with it and so a little bit of e-waste could be saved for the health of our earth. Instead of the original microswitch having a life of 10M clicks, I soldered replacements with a life of 60M clicks. Although only the left mouse button was affected, I took the opportunity to replace the right mouse button as well.

If you are looking for a German dealer, have also a look at eBay. I found suitable microswitches and mouse gliders (which I didn't buy, as I could reuse the old gliders).

Seven -

Thank you. It is fixed

Mickaël -

Thank you! This saved a otherwhise perfectly good device from trash!
I used 99,9% Isopropanol to remove the sliders (got that stuff for cleaning my 3D printer) and was able to reuse them as well :)

Meister Eder -

Thanks, worked perfectly!

Be careful to not bend the pcb while remowing the switches if you are using a spuger etc to pry the switches. The material seems to be really soft when it is warm.

Sami Nieminen -

Thanks for the guide! Very straightforward process. Took me somewhere between 45-60 minutes to complete. The hardest steps were loosening the grippy facade from the back of the chassis and desoldering the old microswitches.

I ended up using Kailh GM 4.0 switches as replacements based on a recommendation from the reddit thread that led me here. They're nice and clicky.

Also, I found I could simply press the adhesive sliders back into place at the end. To remove them, I used the very thin spudger shown in the photo for Step 9 to slowly and carefully release each slider and adhesive from the chassis underside, making sure the adhesive remained attached to the slider, and being careful not to touch the adhesive with my fingers or get it stuck to anything else. That seems to have done the trick, as I've had no problems with the reapplied sliders so far!

Nick -

We tried this process but had no luck. We messed with something on the contacts with the copper lanes, as neither of the replaced switches worked. We substituted a copper lane of the left switch with a cable, managed to get it to work, but wasn't possible to do the same with the right one, so I just bought another mx vertical, this time with 2 year extended warranty. That amounts to a total of 5 years (3 by law plus 2). Prevously it was just 2 by law and the two mouses I bought at similar times started failing concidentally just after those 2 years. Ironically, my old G400s still works like a charm. Was thinking to ditch the brand entirely, but there doesn't seem to exist any ohter comparable vertical mouse from other brands.

Igor Okina Mujika -

Coolest gide to fix that. Thanks for all!

Rodrigo Cuervo -

Followed this guide to replace my switches. They work great. Shame the included ones only lasted ~1.5 years!

Michael Flagg -

thank you! mouse repaired with great pleasure!

imopen -

Thank you very much for creating this post, i found it useful

Prafull Kumar -

Thanks a lot for a great guide! As always - disassembling in a gentle way is the biggest challenge. Messed up the lower adhesive layer of the smallest slider a bit but managed to restore it to a usable condition by help of tweezers with sharp tips. Hopefully the newly installed 60M-rated switches will serve for longer.

Armands Valdmanis -

Absolutely great guide. Thank you so much.

My issue was that while sliding stuff on the screen, the mouse would occasionally "drop" files or windows in the wrong place (and pick something else up !). Very annoying indeed.

Bad surprise regarding the Logitech brand which is otherwise stellar in all products I bought.

I only changed the left microswitch, so now 2 different sounds for the buttons :-). As Michael above, a D2FC-F-K(50M) (2 for 3€ straight from China).

I used a pump to remove the soldering material, as I did not fancy pulling on the switch while heating. It went very well.

For those who hesitate, don't !

Edouard Rossignol -

I also had the problem that the mouse would not drag anymore (left click) and this fixed it. Approx. 1h to desolder one switch using a pump and a few minutes to resolder it.

Luis -

I found this Welding-Free Hot-Swappable MX Vertical motherboard on AliExpress. There is also one where no soldering is required to swap out the switches. Any idea if this sort of replacement actually works?

Kucu -