Introduction

Use this guide to reapply thermal paste on a laptop.

This is a general guide—the exact procedure for your laptop will differ from these instructions—but the process should be the same. To reapply thermal paste in a phone, follow this guide.

Thermal paste is an essential part of our devices, responsible for conducting heat away from the processor and into the heat sink, keeping our devices cool and happy. Reassembling a laptop, tablet, phone, or PC without reapplying thermal paste will cause the processor to overheat, possibly resulting in permanent damage.

Remember: follow general electrostatic discharge (ESD) safety procedures when disassembling your device.

  1. SccWuYOY5MOV3SuK
    • Completely power off and unplug your laptop before you start.

    • Close the display and flip the entire laptop upside-down.

  2. NVfFYyWnMm4i2qFF
    NVfFYyWnMm4i2qFF
    PABBpqBu33GcceWs
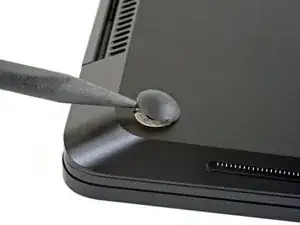
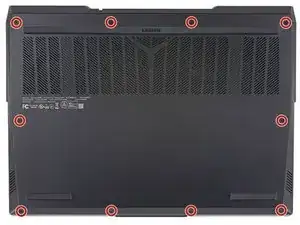
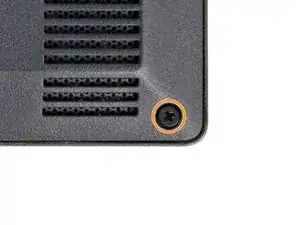
    • If your laptop has hidden screws underneath rubber feet, use the tip of a spudger or an opening pick to remove them.

    • If any feet are adhered, it might help to lightly heat them with an iOpener or a hair dryer to soften the adhesive underneath.

  3. mvvEuW4FpoZsM2n6
    mvvEuW4FpoZsM2n6
    LIj4OhrKLeLkEsfM
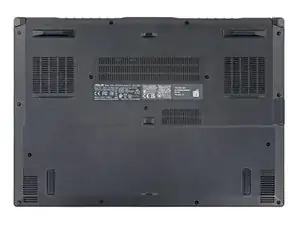
    • Use a screwdriver to remove the screws that secure the back cover.

    • Every laptop is different, and the types of fasteners used will vary.

    • Use the most snug-fitting screwdriver or bit size for your laptop.

    • A screwdriver or bit that's either too small or too big can strip the heads of screws. To extract a stripped screw, follow this guide.

    • Throughout this repair, keep track of each screw and make sure it goes back exactly where it came from to avoid damaging your laptop.

  4. cTfCvlCiPZZB41Jy
    cTfCvlCiPZZB41Jy
    KfuLX4ZXJ5EXaYQV
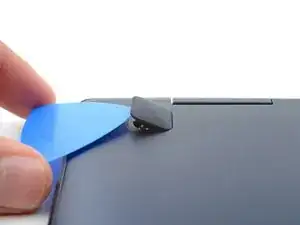
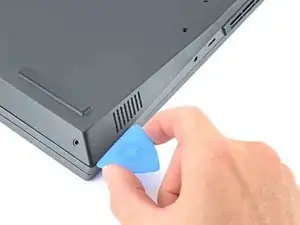
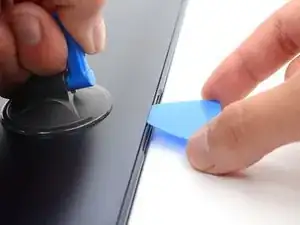
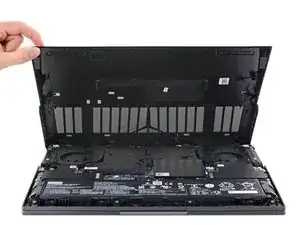
    • Use the flat end of a spudger or an opening pick to pry up the back cover.

    • On laptops with extra tight back covers, a suction handle is a useful tool to help create a gap big enough to insert an opening pick.

    • Work your way around the whole perimeter of the laptop, twisting your tool as you go to unclip the back cover.

    • Most laptops use plastic clips in conjunction with screws to keep the back cover secured in place.

  5. INpFUJpYgEIyM2Ot
    INpFUJpYgEIyM2Ot
    EZRYMEXNkd4FkKqv
    • Once all of the clips have been disengaged, lift the back cover up and away from the laptop to remove it.

    • Lift slowly and carefully, checking that no cables are attached to the back cover before you fully remove it.

  6. LTvWsHTSOcfMoLwY
    LTvWsHTSOcfMoLwY
    Hki3hYMBVSKpe6Vg
    KBUqATElr1ouiprg
    • Don't skip this step. Disconnecting your laptop's battery is a vital safety step before any repair.

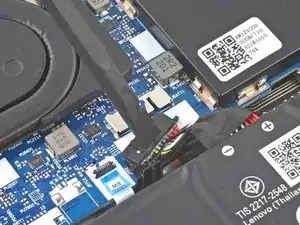
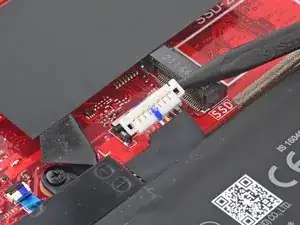
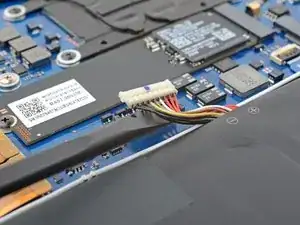
    • Use the tip of a spudger or your finger to disconnect your laptop's battery.

    • All battery connectors are different. Some slot into place, some press and snap into place. Some have locking mechanisms, and some have pull-tabs.

    • If it's unclear how to safely disconnect your battery, consult your laptop's manual.

  7. LhtQOuXDvYWrueXB
    LhtQOuXDvYWrueXB
    DUeLOUQMxLyqJCSv
    n24ByNr34BeRKQwG
    • Some laptop heat sinks and fans connect as one assembly, and some have separate fans.

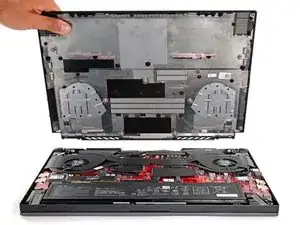
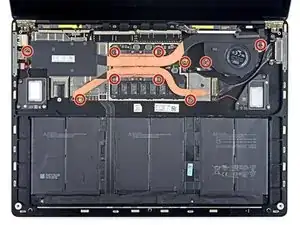
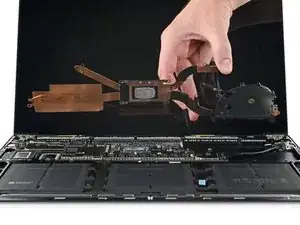
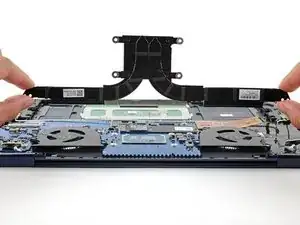
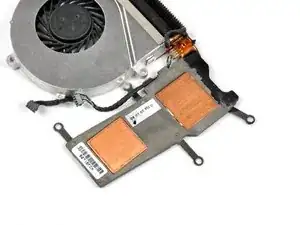
    • Disconnect, unscrew, and remove any fans that sit atop your laptop's heatsink.

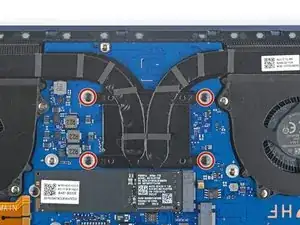
    • Use a screwdriver to remove the screws securing the heatsink to the chassis.

    • During reassembly:

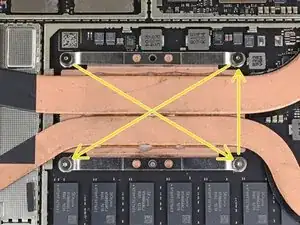
    • Tighten the heat sink screws around the CPU or GPU in an "X" pattern.

  8. ehnlhK1VeatA5fYY
    ehnlhK1VeatA5fYY
    GHXacAvgsMMuAIpZ
    • Lift the heat sink away from the motherboard to remove it.

    • If the heat sink feels stuck, check for heat pipes caught underneath case overhangs, screws you forgot to remove, or stickers or tape.

    • The existing thermal paste may still be tacky. It might help to gently wiggle the heat sink side-to-side to separate it from the thermal paste holding it down.

    • Don't pull on the heatsink too hard; the heat pipes may be susceptible to bending or creasing.

  9. oHx3rVDRrDsHgVxW
    oHx3rVDRrDsHgVxW
    OCuoPd6aupcgJegc
    • Before applying new thermal paste, you must first remove any old thermal paste and leftover residue from both the processor surface and the heat sink.

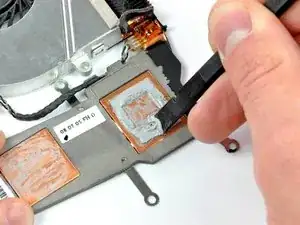
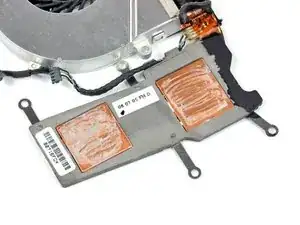
    • Use the flat end of a spudger to scrape as much solidified thermal paste off of the heat sink as possible.

    • Scrape gently. Avoid gouging or poking the copper contact surface.

  10. IfVnH2JmRBVncbm6
    IfVnH2JmRBVncbm6
    bF1nAJLXeoMEWFPn
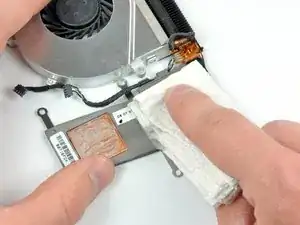
    • Use a coffee filter or a lint-free cloth and a couple drops of isopropyl alcohol (a.k.a. IPA, >90% concentration) to clean the remaining thermal paste residue off the thermal contact surface of your heat sink.

    • Alternatively, you can use a dedicated cleaning agent such as Arctic's ArctiClean or isopropyl alcohol swaps or wipes.

    • Once the surface is mostly clean, use another, fresh piece of coffee filter or lint-free cloth with more IPA to further remove any oils or extra residue.

    • Avoid touching the heat sink's contact surface once it's clean. Small dust particles or even oils from a fingerprint can reduce the effectiveness of the thermal paste application.

    • Allow the heat sink to dry completely.

  11. vXluLMBBxi6Tteqq
    • Don't use any metal objects or tools for this step, as they could mar the fragile, exposed processor.

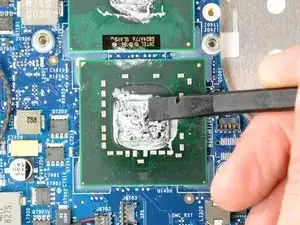
    • Use the flat end of a plastic spudger or the edge of an old credit card to remove any large chunks of solidified thermal paste from the surface of the processor.

    • Don't use excess force here—you don't want to gouge the surface.

    • Be careful working near any small soldered components on the motherboard surrounding the chip.

  12. xlcOBG1f3REAnUVA
    xlcOBG1f3REAnUVA
    A2hZGXxTy4xBICPC
    4JOowhDtCiICi3DG
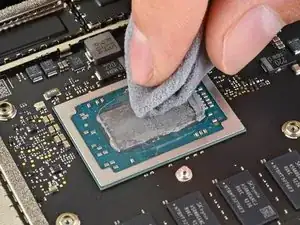
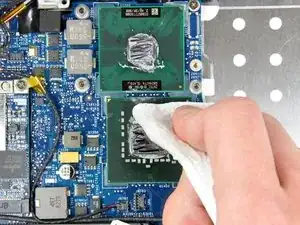
    • Like with the heat sink, use a coffee filter or a lint-free cloth and a couple drops of >90% isopropyl alcohol to clean the remaining thermal paste residue off the processor surface.

    • You can alternatively use a dedicated cleaning agent such as Arctic's ArctiClean or isopropyl alcohol swaps or wipes for the processor as well.

    • Once the surface is mostly clean, use another, fresh piece of coffee filter or lint-free cloth with more IPA to further remove any oils or extra residue.

    • Avoid touching the processor during this procedure. Small dust particles or oils from fingerprints can reduce the effectiveness of the thermal paste application or otherwise harm your chip.

    • Allow the processor to dry completely.

  13. CD1iYiuBwLmKqkaA
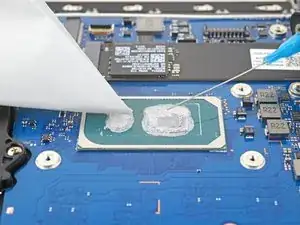
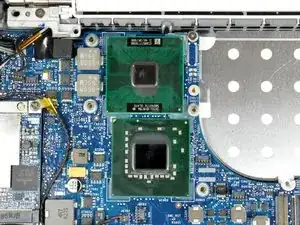
    • Use your tube of thermal paste to apply a small drop to the middle of the processor die, about the size of a grain of rice.

    • The mounting pressure from reinstalling the heat sink will usually adequately spread the thermal paste out, but some applications recommend manually spreading the thermal paste. Follow this guide for how to do that.

    • If you accidentally get a little bit of thermal paste on the green PCB surface surrounding the processor die, don't worry! It won't cause any problems.

    • You don't need to apply any thermal paste to the heat sink—only the processor.

    • The processor is now ready for the heat sink to be reinstalled.

    • Return to Step 8 and follow the instructions in reverse order to reassemble your laptop.

Conclusion

To reassemble your device, follow these instructions in reverse order.

Take your e-waste to an R2 or e-Stewards certified recycler.

Repair didn’t go as planned? Try some basic troubleshooting, or ask our answers community for help.

Carsten Frauenheim

Member since: 10/03/20

110978 Reputation

3 comments

i cant unscrew the screws in my heatsink and accidentally loose them i dont want to put pressure the board i might break it any way to fix and unscrew them??

Shiraiki -

muss ich die Capacitors und den Vram auch repasten wenn ich die / den Heatsink entferne?
finde keine klare antwort im internet dazu

Alibi -

Alibi, ich verwende Online-Übersetzung, daher ist mein Deutsch möglicherweise nicht das Beste. In den meisten Anwendungen verwenden diese Komponenten Wärmeleitpads anstelle von Wärmeleitpaste. Wenn sie gerissen oder gerissen sind, müssen sie beim erneuten Einfügen möglicherweise auch ersetzt werden, wenn Sie die ursprüngliche Dicke erreichen können.

Carsten Frauenheim -