Introduction

This is a prerequisite-only guide! This guide is part of another procedure and is not meant to be used alone.

  1. 1ktaJWZciivZZEBB
    1ktaJWZciivZZEBB
    ZGrRFiNn42nPecSX
    • Allow your battery to drain below 25% before starting this repair. A charged battery may catch fire if damaged.

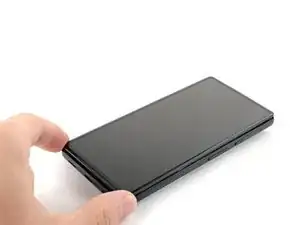
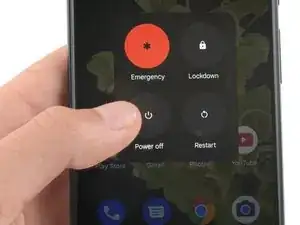
    • Fully power off your phone and unplug any cables.

  2. Ddj6QlmyySZgoW6a
    Ddj6QlmyySZgoW6a
    hUPVuKPNoCOJIqv2
    UhmIq1ec1LqlbRRu
    • Before starting your repair, take note of the following:

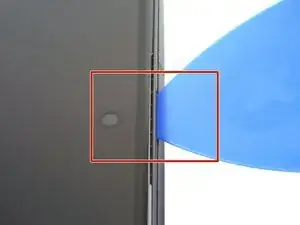
    • Screen seam: This seam separates the screen from the rest of the phone. Do not pry at this seam.

    • Bezel seam: This is where the plastic bezel designed to protect the screen meets the frame. It's held in place by plastic clips. This is where you should pry.

  3. B4XmlLPKYSnV1PtM
    B4XmlLPKYSnV1PtM
    S4TQyeCDn3EskMeA
    OkUlPCHPR5ZCuiZ3
    • The next three steps demonstrate the Anti-Clamp, a tool we designed to make the opening procedure easier. If you aren't using the Anti-Clamp, skip down three steps for an alternate method.

    • For complete instructions on how to use the Anti-Clamp, check out this guide.

    • If your screen is cracked, cover it with a layer of clear packing tape to help the suction cup adhere.

    • Pull the blue handle backwards to unlock the Anti-Clamp's arms.

    • Slide the arms over the right edge of your phone.

    • Position the suction cups near the middle of the right edge of the phone—one on the front, and one on the back.

    • Squeeze the cups together to apply suction.

    • If you find that the surface of your phone is too slippery for the Anti-Clamp to hold onto, you can use tape to create a grippier surface.

  4. avKhQOBuYNinwNTv
    avKhQOBuYNinwNTv
    OBC6ev4OGvLn5k3k
    dDP2GHbKtZABXswZ
    • Pull the blue handle forward to lock the arms.

    • Turn the handle clockwise 360 degrees or until the cups start to stretch.

    • Make sure the suction cups remain aligned with each other. If they begin to slip out of alignment, loosen the suction cups slightly and realign the arms.

  5. ZOEgPTBuGCxVuDoi
    ZOEgPTBuGCxVuDoi
    XfTtNr3mYArPBsxZ
    • Heat an iOpener and thread it through the arms of the Anti-Clamp so it lays on the right edge of the phone.

    • You can also use a hair dryer or heat gun—but extreme heat can damage the display and/or internal battery, so proceed with care.

    • Wait one minute to give the adhesive a chance to release and present an opening gap.

    • Insert an opening pick under the screen frame when the Anti-Clamp creates a large enough gap.

    • If the Anti-Clamp doesn't create a sufficient gap, apply more heat to the area and rotate the handle clockwise half a turn.

    • Don't crank more than a half a turn at a time, and wait one minute between turns. Let the Anti-Clamp and time do the work for you.

    • Skip the next two steps.

  6. XBVUE1Uv6VUMgXwN
    • Heat an iOpener and apply it to the right edge of the screen for two minutes.

    • A hair dryer, heat gun, or hot plate may also be used, but be careful not to overheat the phone—the display and internal battery are both susceptible to heat damage.

    What's a good temperature to set to hotplate to for a repair like this?

    David -

    I used a hair dryer to heat up the adhesive. Unfortunatly the IOpener did not work for me. Even with the hair dryer, it was quiet difficult to soften the adhesive. It might have been due to the phone beeing only a few months old.

    It was quiet difficult to seperate the screen, but it eventuelly worked. I feel like it took the heat a while to move through the cover and heat up all of the adhesive. After almost giving up, I tried again after a few minutes without heating it again and it suddenly worked. So keep that in mind.

    LetsTryThisNext -

    Agree with LetsTryThisNext's comment -- it takes a while for the adhesive to loosen. Expect to be at it for 20, 30 minutes -- with the iOpener not working (for me either), re-microwaving the iOpener, then hair dryer, then suction cup not sticking, etc. Good idea to give it a few minutes between each heating attempt.

    Steve -

    The iOpener worked for me - once I got the expectation right that it was going to take a while.
    Went through about 5-6 cycles of:
    * Heating for 40 seconds (1100W microwave); applying to phone for 2 minutes; heating for 30 seconds; applying to phone for 2 minutes; allow to cool for 10 minutes

    Could probably have done with one more cycle to get glue even more sticky TBH but when it lifted it was obvious.

    Karl Laird -

    Took me 3 heat cycles with the iOpener. Basically I did 30 seconds in 1000W microwave and left to heat adhesive for 5 mins, then after stuggling to get the pick in for a few minutes, I did 10 seconds microwave then a couple of mins warming adhesive and a couple of mins failing to get the pick in. Then on 3rd attempt after anothe 10mseconds in the microwave, i got in easily. Seems like the adhesive really takes a while to melt. I also improved my technique with the suction cup which seemed to help lift the screen. Once you are in it is easy to release the remaining clips.

    Mark -

    Hair dryer on high for about 10 seconds did the trick. Had to blowdry it about 3 times. iOpener did not get hot enough

    Leon -

    iOpener did not work for me as well. The hairdryer approach, as Leon mentioned, worked for me, too. I used the Jimmy tool to get access for the picks.

    Alex -

    I started with a single edge razor blade and made 1-2 inch cuts to the bezel seam, then applied the opener with a hair dryer on low about 6 inches away. After no more than 2-3 minutes I applied the suction cup, and used a combination of the straight edge razor and picks to open the screen. It was very easy.

    SteveDK -

  7. XDaaq12ecnEIq4yD
    XDaaq12ecnEIq4yD
    alGoFZ4wLLdAvZAw
    BRy5TKDEcKNO3UDD
    • Apply a suction cup to the screen, as close to the center of the right edge as possible.

    • Pull up on the suction cup with strong, steady force to create a gap between the bezel and the frame.

    • Insert an opening pick into the gap.

    • Depending on the age of your phone, this may be difficult. If you're having trouble, apply more heat to the edge and try again.

    • If your display is badly cracked, covering it with a layer of clear packing tape may allow the suction cup to adhere. Alternatively, very strong tape may be used instead of the suction cup. If all else fails, you can superglue the suction cup to the broken screen.

    Would be helpful to have alternative solutions offered here for those with shattered screens, since suction cups don't work.

    Paul York -

    Hi Paul.

    Thank you for your comment! I have updated the step to provide an alternative solution for shattered screens.

    Alex Diaz-Kokaisl -

    Would just like to note that in my particular case even tape or super glue did not work, due to the screen being shattered right along the spot where you need to place the suction cup. I ended up resorting to inserting a razor blade into the seam to open it just enough to insert the pick.

    mkirwin -

    I'm in the same boat as mkirwin no amount of pulling with the suction cup worked, I had to use a razor blade to get the seam separated enough to insert a pick. Maybe I didn't heat up the adhesive enough but that stuff is super strong

    Tanner Davis -

    If your suction cup is not working properly: Heat it up a little bit and it will have a lot more suction.

    LetsTryThisNext -

    Ditto, needed to use a razor blade to get it started. Thank you mkirwin & Tanner D for posting that tip here.

    Steve -

    I'm having trouble pulling on the suction cup, keeping the phone down and inserting the pick all at the same time. The suction doesn't hold unless I use my other hand to keep the phone down, but then I can't use the pick. Is there a way Im supposed to keep the phone locked down?

    Jemay A Fassom -

    Would something like this suffice in lieu of a razor blade?

    I, too, cannot a gap with the suction cups.

    https://www.amazon.com/JerryRigEverythin...

    badlydrawnface -

    After hours of not getting any movement at all, I ended up putting a hot pack (like for a sore back) under the phone and the iOpener on top, on the right side, and that was enough to get through this step...

    Jessie -

    This is really misleading, the iOpener doesn't work very well to heat it up, I've spent hours on this, and the tabs are definitely not enough to get it started on their own.

    Stuck -

    Same as the above comments, got nowhere with the opener + pick, had to jam a razor blade in first, and then used picks.

    Lee -

  8. aKADaMwDF1Su2ytM
    aKADaMwDF1Su2ytM
    ojCAATkuclM4RkHa
    CNQEOHFpaOTP5Nlf
    • While still applying suction, pivot the pick upwards to a steep angle.

    • Carefully push the pick in while prying to reposition the opening pick into the bezel seam.

    • Only insert the pick up to 3.5 mm to avoid damaging the internals.

    Unfortunatly my plectrums I got with the pro tool kit bent way too easy to open up this first crack between screen and housing. But the reason might have been, that the adhesive was not soft enough yet

    LetsTryThisNext -

    I gave up with the suction cup. My screen was too cracked. Instead, after applying heat to loosen the glue, I used a very tiny flat head precision screwdriver to prise the screen open. Not recommended as it leaves a tiny scratch, but saves a lot of hassle. See also https://www.youtube.com/watch?v=vxdaaTd7....

    Robert Baker -

  9. fm3oG32vJ2EEBhuc
    fm3oG32vJ2EEBhuc
    gBarY33TTTBZCBZS
    T1RrWIEZYKqCKLue
    • Slide the pick along the right edge to release the plastic clips securing the bezel to the frame.

    • Position the pick at the top-right edge before moving to the next step.

  10. dfU45x4Vk5SuSwn1
    dfU45x4Vk5SuSwn1
    GEBiXPOdSYHlB2oP
    QbSiwkPDRt5wPR2F
    • Rotate the opening pick around the top-right corner of the phone to release the clips.

    • Leave the opening pick in the top-right corner to prevent the clips from re-locking.

    • Only insert the pick up to 4 mm to avoid damaging the internals.

  11. MsjU6gcvUNhlBLuU
    MsjU6gcvUNhlBLuU
    LUT1jGbhZPrJ4FFO
    FL2DT6sQmAqd2TjO
    • Insert a new opening pick into the gap you just created.

    • Slide the pick along the top edge to release the clips.

    • When slicing around the front camera, only insert the pick up to 3 mm to avoid damaging the lens.

  12. NkLX4XJsx4UEFs6e
    NkLX4XJsx4UEFs6e
    yHuNMCvi4SaACvqa
    odm622mGQ4Njy6KU
    • Rotate the opening pick around the top-left corner of the phone to release the clips.

    • Leave the opening pick in the top-left corner to prevent the clips from re-locking.

    I found that using the side of the pick instead of the point made it easier to keep from over-inserting the pick and it provided more area to keep the glass separated from the frame. It was also easier to slide it around the edges this way. Still had to use the point to get under the frame initially.

    mark schneider -

  13. NLdAYs426UBCVRRt
    NLdAYs426UBCVRRt
    LKjkWexcYPlXuaoI
    rOTvEBRGLhXVPsqb
    • Insert a new opening pick into the gap you just created.

    • Slide the pick along the left edge to release the clips.

    • Only insert the pick up to 3 mm to avoid damaging the internals.

    • Repeat the rotating and sliding procedure for the remaining edge.

    • At this point, the screen should be separated from the frame. If there's still resistance around the edges of the screen, use an opening pick to release any remaining clips.

  14. K4nbDrlDYXZWeYaD
    K4nbDrlDYXZWeYaD
    6thrOjZMdkmIPSey
    LNBsKTiIt5oiS4Td
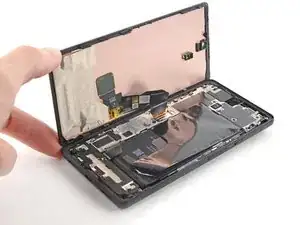
    • Don't try to remove the screen all the way yet. It's still connected to the frame by a flex cable.

    • Lift the right edge of the screen up and towards the left side of the device, like opening a book.

    • Rest the screen upside down and parallel to the frame before continuing.

    • Don't twist the screen or move it too far away from the frame to avoid damaging the flex cable.

  15. 4aDiGqShEoknkpOW
    4aDiGqShEoknkpOW
    OAULhXU5sTSSnHiC
    nUiacYiY3BDiH12K
    • The display cable bracket is secured with metal clips.

    • Use tweezers to bend the bottom side of the bracket upwards, releasing the metal clip.

    • Remove the display cable bracket.

    • During reassembly, insert the top side of the bracket first before pressing down the other side. Failure to do so could result in sparks and logic board damage.

    Does anyone know what happens if I lost the metal clip to secure the display cable?

    Emmanuel Medina Morales -

    Hi Emmanuel.

    Oh no! Unfortunately, this clip is pretty important for securing your screen's press connector, and we don't sell it separately. You should be fine as long as you don't drop your phone...but you may be able to tape it down with some masking tape as a rough fix. Another alternative would be to find a destroyed Pixel 6a and scavenge the clip.

    Alex Diaz-Kokaisl -

    I'm confused about the instructions and the pictures. The pictures imply that the clip should be bent, but the text may describe the method that I applied:

    I inserted tweezers at the left side of the clip (there where the springy part snaps under a metal tab). By carefully placing each 'tweeze' of the tweezer on both sides of the tab, it is possible to gently pushing the springy part to the right, and then it releases without having to deform that entire bracket.

    After re-reading the instructions, that may be what is implied, but if one were to look at only the pictures it could suggest something different.

    Hugo van Galen -

    Yes I did Hugo's method and it worked well. Using tweezers I directly pried the springy part from under the metal tab.

    Joe Rayner -

    Similar to above, struggled to pry this off based on the description+photos, needed to consult a separate video and a bit of trial and error to eventually release it.

    Lee -

    If you look right at the bottom end of the bracket there's a couple sets of holes right next to the screw. If you insert each end of the tweezers into those holes and tilt the tweezers the bracket pops right out.

    Danielle Cerisier -

  16. yeTt2M2MLgLnruM2
    yeTt2M2MLgLnruM2
    KJOLElfVnkARMy2c
    VbPvu4SwZAYmGtW2
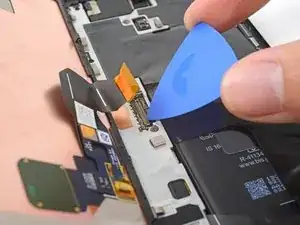
    • Be very careful performing this step, as you risk damaging tiny components around the press connector.

    • Insert the tip of an opening pick under the bottom right edge of the display cable press connector, right above the nearby screw hole.

    • Pry up and disconnect the display cable press connector.

    • To re-attach press connectors like this one, carefully align and press down on one side until it clicks into place, then repeat on the other side. Do not press down on the middle. If the connector is misaligned, the pins can bend, causing permanent damage.

    be incredibly careful when removing and installing the cable, the many tiny components along the edge and under the tab are incredibly fragile. This is one of, if not, the most important step.

    Jeffrey Leon -

    At this step I had some trouble to reattach the connector. When I pushed down one side the other would pop up again. I solved the issue by carefully pressing down both sides with the tweezers.

    LetsTryThisNext -

    silly me totally forgot to reattach "The display cable bracket is secured with metal clips." soooooo maybe tell silly people like me to do that at the end lol. phone will work, but i feel if i drop it the cable may disconnect.... oh well

    Aleksander Szadurski (Max209) -

    Don't put the ribbon back in until you have cleaned the old adhesive off and installed the new adhesive!

    Wesley Shippey -

    I'm struggling with the reattachment. I think I've got it and then when I try to test the screen I'm getting nothing. Even tried to attach my old cracked one and nothings happening.

    Does this mean I've damaged something?

    Jamie B -

    Obviously the most critical step.
    When reassembling 2 things helped me:
    1/ You can actually let the new screen rest on the phone at a 90+ degrees angle (thanks to the small plastic edges on the screen) , which leaves you both hand free

    2/ You can gently unfold the display cable to make it more flexible

    Paul Jacques -

    During reattachment, make sure you fully plug in the cable. I tested as indicated by turning on the screen and all seemed good. Closed down the screen and then realised it was not reacting to touch... Was very worried but reopening it, turns out I hadn't fully plugged in the screen connector. All good now

    Adrien C_v__l_es -

  17. Pp5D6dNHPClDTgX6
    Pp5D6dNHPClDTgX6
    UIGvqI1dpPneopCI
    • Use tweezers to peel back the silver tape connecting the midframe and the top speaker.

    • Don't completely remove the tape. You only need to remove the bridge between the midframe and the top speaker.

  18. RGhKyOC2BcnnTsS6
    RGhKyOC2BcnnTsS6
    nmbIWj5VWMAj1aMv
    cSqbQflEpcJRbubk
    • Use tweezers to peel back the tape covering the two screws on both sides of the USB-C port.

  19. cQUu5NsvkH1XcSuT
    cQUu5NsvkH1XcSuT
    XUW6GVJv3XYTkCgA
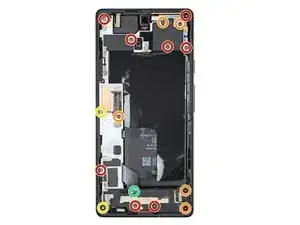
    • Use a T3 Torx screwdriver to remove the 16 screws securing the midframe to the frame:

    • Eight 4.3 mm screws

    • Five 2.9 mm screws

    • Two 4.9 mm screws

    • One 4.6 mm screw

    I have eight 4.3mm screws and five 2.9mm screws.

    M Ma -

  20. k3SHiercjOpogMdB
    k3SHiercjOpogMdB
    nryLe1woWtmWVx2q
    • Insert a spudger between the top of the midframe and the frame, near the front camera.

    • Pry up with the spudger to release the top of the midframe from its clips.

  21. kgqba6dsG4cQ5nDH
    kgqba6dsG4cQ5nDH
    vWADQTBob21B32ZE
    • Insert a spudger between the bottom left of the midframe and the frame.

    • Pry up with the spudger to release the bottom of the midframe from its clips.

  22. VDZmNYI4wJDsBcQY
    VDZmNYI4wJDsBcQY
    qOsjJjHnhtQWCT3L
    • Remove the midframe.

    • You may feel a bit of resistance. This is normal since the midframe is slightly bonded to the heat sink with thermal paste.

    • During reassembly, this is a good point to power on your phone and test all functions before sealing it up. Be sure to power your phone back down completely before you continue working.

  23. IMIotWuoChrJTOHx
    IMIotWuoChrJTOHx
    xSlLYvU4f4LxN6nk
    RdiDld36jwFheLqL
    • Use the flat end of a spudger to scrape off the thermal paste.

    • Clean any remaining thermal paste with isopropyl alcohol and either a coffee filter or a lint-free cloth.

    • Repeat the cleaning process for the thermal paste on the midframe.

    • During reassembly, follow this guide for reapplying thermal paste to your device.

  24. enrNjRO3kLQTsFh6
    enrNjRO3kLQTsFh6
    gbBWXIS4jWiwMbpN
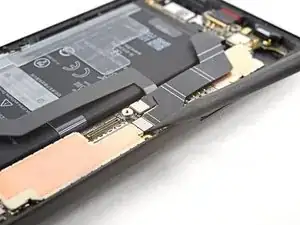
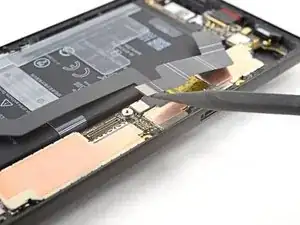
    • Use a spudger to pry up and disconnect the battery's press connector.

Conclusion

Compare your new replacement part to the original part—you may need to transfer remaining components or remove adhesive backings from the new part before you install it.

To reassemble your device, follow these instructions in reverse order.

Repair didn’t go as planned? Try some basic troubleshooting, or ask our Google Pixel 6a Answers community for help.
Alex Diaz-Kokaisl

Member since: 16/01/22

117875 Reputation

0 comments