Boer Commando
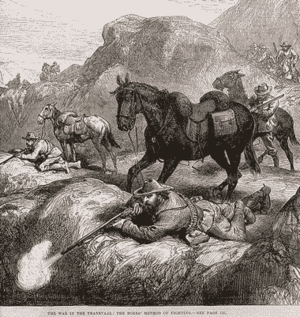
The Boer commandos or "Kommandos" were volunteer military units of guerilla militia organized by the Boer people of South Africa. The term came into English usage during the Second Boer War of 1899-1902.
| Kommando | |
|---|---|
| Active | 1850s–1902 |
| Country | |
| Branch | Militia |
| Type | Guerilla fighter, Military volunteer |
| Engagements | Boer Wars, Xhosa Wars |
History

In 1658, war erupted between the Dutch settlers at Cape Colony and the Khoi-khoi. In order to protect the settlement, all able bodied men were conscripted. After the conclusion of this war, all men in the colony were liable for military service and were expected to be ready on short notice.
By 1700, the size of the colony had increased immensely and it was divided into districts. The small military garrison stationed at the Castle de Goede Hoop could not be counted on to react swiftly in the border districts, therefore the commando system was expanded and formalized. Each district had a Kommandant who was charged with calling up all burghers in times of need. In 1795, with the First British Occupation and again in 1806 with the Second British Occupation, the commandos were called up to defend the Cape Colony. At the Battle of Blaauwberg (6 January 1806), the Swellendam Commando held the British off long enough for the rest of the Batavian army to retreat to safety.
Under British rule, the Cape Colony continued to use the commando system in its frontier wars, in addition to regular British imperial troops. Boer commandos fought alongside Fengu, British settlers, Khoi-khoi and other ethnic groups in units which were often mixed. Light, mobile commandos were undeniably better-suited than the slow-moving columns of imperial troops, for warfare in the rough frontier mountains. However, tensions often arose in the Cape's government over the relative merits and control of these two parallel military systems.[1]
During the Great Trek, this system was used and remained in use in the Boer republics. Both republics issued commando laws, making commando service mandatory in times of need for all male citizens between the ages of 16 and 60. During the Anglo-Boer War (1899–1902) the Boer commando formed the backbone of the Boer forces.
After the declaration of peace in 1902, the commandos were disbanded. They did re-form themselves in clandestine "shooting clubs". In 1912, the commandos were re-formed as an Active Citizen Force in the Union Defence Force. This system was in operation until 2005, when all commandos were disbanded again.
Structure


Each commando was attached to a town, after which it was named (e.g. Bloemfontein Commando). Each town was responsible for a district, divided into wards. The commando was commanded by a kommandant and each ward by a veldkornet or field cornet (equivalent of a senior NCO rank)
The veldkornet was responsible not only for calling up the burghers, but also for policing his ward, collecting taxes, issuing firearms and other materiel in times of war. Theoretically, a ward was divided into corporalships. A corporalship was usually made up of about 20 burghers. Sometimes entire families (fathers, sons, uncles, cousins) filled a corporalship.
The veldkornet was responsible to the kommandant, who in turn was responsible to a general. In theory, a general was responsible for four commandos. He in turn was responsible to the commander-in-chief of the republic. In the Transvaal, the C-in-C was called the Commandant-General and in the Free State the Hoofdkommandant (Chief Commandant). The C-in-C was responsible to the president.
Other auxiliary ranks were created in war time, such as vleiskorporaal ("meat corporal"), responsible for issuing rations.
The commando was made up of volunteers, all officers were appointed by the members of the commando, and not by the government. This gave a chance for some commanders to appear, such as General Koos de la Rey and General C. R. de Wet, but also had the disadvantage of sometimes putting inept commanders in charge. Discipline was also a problem, as there was no real way of enforcing it.
The various Boer republics did not all have the same command structure.[2]
Weaponry
Before the Second Boer War, the republics' most popular rifle was the .450 Westley Richards, a falling-block, single-action, breech-loading model, with accuracy up to 600 yards. Some were marked "Made Specially For Z.A.R.".[3] These were similar to the Martini-Henry Mark II rifles used by British troops.[4][5] A book about the war (J. Lehmann's The First Boer War, 1972) offered this comment about the Boers' rifle: "Employing chiefly the very fine breech-loading Westley Richards - calibre 45; paper cartridge; percussion-cap replaced on the nipple manually - they made it exceedingly dangerous for the British to expose themselves on the skyline". [6]
.jpg)
For the Anglo-Boereoorlog ("Anglo-Boer War"), Paul Kruger, President of the South African Republic, re-equipped the army, importing 37,000 of the latest Mauser Model 1895 rifles[7] and some 40 to 50 million rounds of 7x57 ammunition.[8] The Model 1895 was also known as "Boer Model" Mauser [9] and was marked “O.V.S” (Oranje Vrij Staat) just above the serial number.[10] This German-made rifle had a firing range exceeding 2,000 yards. Experienced shooters could achieve excellent long-range accuracy.[11] Some commandos used the Martini-Henry Mark III, since thousands of these had also been purchased; the drawback was the large puff of white smoke after firing which gave away the shooter's position.[12][13]
Roughly 7,000 Guedes 1885 rifles were also purchased a few years earlier and these were used during the hostilities. [14]
Others used captured British rifles such as the "long" Lee-Metford and the Enfield, as confirmed by photographs from the era. [15][16] When the ammunition for the Mausers ran out,[17] the Boers relied primarily on the captured Lee-Metfords.[18][19]
Regardless of the rifle, few of the commando used bayonets.[20][21]

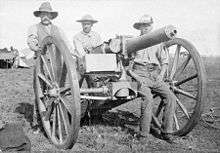
The best modern European artillery was also purchased. By October 1899 the Transvaal State Artillery had 73 heavy guns, including four 155 mm Creusot fortress guns[22] and 25 of the 37 mm Maxim Nordenfeldt guns.[23] The Boers' Maxim, larger than the Maxim model used by the British,[24] was a large caliber, belt-fed, water-cooled "auto cannon" that fired explosive rounds (smokeless ammunition) at 450 rounds per minute; it became known as the "Pom Pom".[25]
Other weapons in use included:
- Mauser C96 pistol
- Colt Single Action Army revolver
- Remington Model 1875 revolver
- Remington Rolling Block rifle
- Winchester rifle
- Vetterli rifle
- Krag–Jørgensen rifle
- Kropatschek rifle
List of Boer Commando units
The following Boer commandos existed in the Orange Free State and Transvaal:[26]
Orange Free State
- Bethlehem
- Bethulie
- Bloemfontein
- Boshof
- Bothaville
- Brandfort
- Caledon River
- Edenburg
- Fauresmith
- Ficksburg
- Frankfort
- Harrismith
- Heilbron
- Hoopstad
- Jacobsdal
- Kroonstad
- Ladybrand
- Lindley
- Parys
- Philippolis
- Rouxville
- Senekal
- Smithfield
- Thaba Nchu
- Ventersburg
- Vrede
- Vredefort
- Wepener
- Winburg
Transvaal
- Amsterdam
- Bethal
- Bloemhof
- Boksburg
- Carolina
- Christiana
- Elandsfontein
- Elands River
- Ermelo
- Fordsburg
- Germiston
- Heidelberg
- Jeppestown
- Johannesburg
- Klerksdorp
- Krugersdorp
- Lichtenburg
- Lydenburg
- Marico
- Middelburg
- Piet Retief
- Potchefstroom
- Pretoria
- Rustenburg
- Standerton
- Swaziland
- Utrecht
- Vryheid
- Wakkerstroom
- Waterberg
- Wolmaransstad
- Zoutpansberg
- Zwartruggens
See also
| Wikimedia Commons has media related to Boer military personnel of the Second Boer War. |
References and notes
- RD staff (1996). Xhosa Wars. Reader's Digest Family Encyclopedia of World History. The Reader's Digest Association.
- Angloboerwar website Archived 2009-07-26 at the Wayback Machine
- https://www.labuschagne.info/small-arms.htm, Small Arms of the Boer War
- http://samilitaryhistory.org/vol052fm.html, Firearms and Firepower First War of Independence, 1880-1881
- https://www.bbc.co.uk/history/british/victorians/boer_wars_01.shtml, Boer Wars
- http://samilitaryhistory.org/vol052fm.html, Firearms and Firepower First War of Independence, 1880-1881
- https://www.americanrifleman.org/articles/2016/6/1/the-guns-of-the-boer-commandos/, The Guns of the Boer Commandos
- Bester 1994, p. ; Wessels 2000, p. 80.
- Cite web|url=http://www.shootingtimes.com/long-guns/longgun_reviews_st_boermodel_201007/%7Ctitle=The Model 1893/95 "Boer Model" Mauser|website=Shooting Times|language=en-US|access-date=2016-03-18}}
- https://www.shootingtimes.com/editorial/longgun_reviews_st_boermodel_201007/99362, The Model 1893/95 "Boer Model" Mauser
- https://books.google.ca/books?id=kWuuAAAAQBAJ&pg=PA93&dq=second+boer+war++weapons+artillery+commandos++Mauser%5D&hl=en&sa=X&ved=0ahUKEwji-aKNwqHkAhVrUt8KHbJuAf84ChDoAQhIMAU#v=onepage&q=second%20boer%20war%20%20weapons%20artillery%20commandos%20%20Mauser%5D&f=false, The Rocky Road to the Great War: The Evolution of Trench Warfare to 1914, page 93
- https://www.tactical-life.com/firearms/second-boer-war-rifles/, 6 Rifles Used by the Afrikaners During the Second Boer War
- https://books.google.ca/books?id=WfovAQAAIAAJ&q=second+boer+war++weapons+artillery+commandos++Mauser%5D&dq=second+boer+war++weapons+artillery+commandos++Mauser%5D&hl=en&sa=X&ved=0ahUKEwjM68WbvqHkAhVtZN8KHVyuA4oQ6AEITzAG, Life on Commando during the Anglo-Boer War 1899-1902, page 81
- https://www.tactical-life.com/firearms/second-boer-war-rifles/, 6 Rifles Used by the Afrikaners During the Second Boer War
- https://www.americanrifleman.org/articles/2016/6/1/the-guns-of-the-boer-commandos/, The Guns of the Boer Commandos
- https://www.bbc.co.uk/history/british/victorians/boer_wars_01.shtml, The Boer Wars - Second Boer War
- https://www.americanrifleman.org/articles/2016/6/1/the-guns-of-the-boer-commandos/, The Guns of the Boer Commandos
- https://books.google.ca/books?id=0dlBAAAAYAAJ&q=first+boer+war++weapons+artillery+burghers+Westley+Richards,&dq=first+boer+war++weapons+artillery+burghers+Westley+Richards,&hl=en&sa=X&ved=0ahUKEwicq568u6HkAhWhl-AKHQEvBn4Q6AEINTAC, Five Hundred Years: A History of South Africa, page 330
- https://books.google.ca/books?id=xbKdCwAAQBAJ&pg=PA38&dq=second+boer+war++weapons+artillery+commandos++Mauser%5D&hl=en&sa=X&ved=0ahUKEwjM68WbvqHkAhVtZN8KHVyuA4oQ6AEINDAC#v=onepage&q=second%20boer%20war%20%20weapons%20artillery%20commandos%20%20Mauser%5D&f=false, Mauser Military Rifles, page 39
- https://books.google.ca/books?id=CVy4AQAAQBAJ&pg=PT98&dq=boer+war+did+not+use+bayonets+commando&hl=en&sa=X&ved=0ahUKEwja4sXzuKPkAhXLZd8KHexDCLsQ6AEIPjAD#v=onepage&q=boer%20war%20did%20not%20use%20bayonets%20commando&f=false, The Boer War: Direction, Experience and Image
- https://books.google.ca/books?id=xbKdCwAAQBAJ&pg=PA38&dq=boer+war+did+not+use+bayonets+boer+commando&hl=en&sa=X&ved=0ahUKEwiOga2yuaPkAhXGq1kKHTs3B7oQ6AEIKjAA#v=onepage&q=boer%20war%20did%20not%20use%20bayonets%20boer%20commando&f=false, Mauser Military Rifles, page 37
- https://books.google.ca/books?id=cgMwAQAAIAAJ&q=second+boer+war++weapons+artillery+commandos++Mauser+Martini+Henry&dq=second+boer+war++weapons+artillery+commandos++Mauser+Martini+Henry&hl=en&sa=X&ved=0ahUKEwjq_aWbw6HkAhUmmeAKHbB2CQYQ6AEIUDAG, From Belmont to Bloemfontein: the western campaign of the Anglo-Boer War, page 22
- Wessels 2000, p. 80
- https://books.google.ca/books?id=cNnSDFv7J1IC&pg=PA56&dq=second+boer+war+Boer%27s+++Maxim-Nordenfelt&hl=en&sa=X&ved=0ahUKEwjq97LgyqHkAhVmm-AKHdf4DcUQ6AEIMzAB#v=onepage&q=second%20boer%20war%20Boer's%20%20%20Maxim-Nordenfelt&f=false, Doing Canada Proud: The Second Boer War and the Battle of Paardeberg, page 56
- http://www.smallarmsreview.com/display.article.cfm?idarticles=2490, SOUTH AFRICA’S NATIONAL MUSEUM OF MILITARY HISTORY
- Hall, Darrell (1999). The Hall Handbook of the Anglo-Boer War, 1899-1902. Pietermaritzburg: University of Natal Press. pp. 13–17. ISBN 9780869809495.