94th Heavy Anti-Aircraft Regiment, Royal Artillery
94th Heavy Anti-Aircraft Regiment, Royal Artillery, was a Scottish air defence unit of Britain's Territorial Army (TA) formed around Edinburgh during the period of international tension leading up to the outbreak of World War II. It defended Eastern Scotland during the early part of the war and then served in the North African Campaign. The regiment continued in the postwar TA until amalgamated in 1955
| 94th Heavy Anti-Aircraft Regiment, RA 494th (City of Edinburgh) Heavy Anti-Aircraft Regiment, RA | |
|---|---|
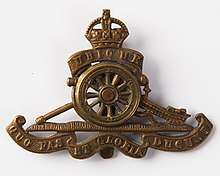
 Cap Badge of the Royal Artillery (pre-1953) | |
| Active | 1 April 1939–1 January 1954 |
| Country | |
| Branch | |
| Role | Air defence |
| Size | Regiment |
| Part of | 36 (Scottish) AA Brigade 12 AA Brigade 62 AA Brigade |
| Garrison/HQ | Edinburgh |
| Engagements | Operation Crusader Battle of Gazala North African Campaign |
| Commanders | |
| Notable commanders | Lt-Col Sir Eric Hutchison, 2nd Bart |
Origin
The Territorial Army was rapidly expanded following the Munich Crisis, particularly the Anti-Aircraft (AA) branch of the Royal Artillery (RA). 94th Anti-Aircraft Regiment, RA was among the new units raised in the Spring of 1939. It was based on an existing battery (228 (Edinburgh) AA Bty) commanded by Major Sir Eric Hutchison, 2nd Baronet of Hardiston, drawn from 71st (Forth) AA Regiment in Dunfermline. The new Regimental Headquarters (RHQ) was formed at Turnhouse, and two additional batteries were raised: 291 AA Bty at Turnhouse and 292 AA Bty at Musselburgh. It was mainly recruited from men working in banks, insurance, law and other professions in the city of Edinburgh. The new regiment formed part of 36 (Scottish) AA Brigade in AA Command's 3rd AA Division, defending Eastern Scotland.[1][2][3][4][5]
World War II
Mobilisation and Phoney War

In June 1939, as the international situation worsened, a partial mobilisation of AA Command's TA units was begun in a process known as 'couverture', whereby each unit did a month's tour of duty in rotation to man selected AA gun and searchlight positions. On 24 August, ahead of the declaration of war, AA Command was fully mobilised at its war stations.[6][7] 94th AA Regiment and its three batteries accordingly mobilised at Edinburgh under the command of Lieutenant-Colonel Hutchison.[8]
There was little action for AA Command during the period of the Phoney War, which allowed it to continue building up its strength and equipment, for which 3rd AA Division was given a high priority.[9] 228 AA Battery of 94th AA Rgt was one of the few units to see any action. The battery was deployed to defend Aberdeen, and at 13.50 on 7 March 1940 a Heinkel He 111 of the Luftwaffe was spotted by the Royal Air Force (RAF). The gunners calculated the height of the intruder as 18,000 feet (5,500 m), climbing to 24,000 feet (7,300 m), which was beyond the Fuze range of their guns, but they passed the information to the RAF, which 'scrambled' some Spitfires. The fighters flew out over the guns while the gunners continued to track the target, calculating that the gun time-of-flight to the Heinkel was 28 seconds. While the fighters flew out to sea to gain height, the battery fired three salvoes of rounds at fuze settings of 22, 28 and 30 seconds to direct them to the target. Although the Heinkel took avoiding action, the fighters shot it down at a height of 26,000 feet (7,900 m). This was a novel application of the use of 'pointer' rounds developed for AA-fighter cooperation during World War I.[10]
On 1 June 1940, all RA units equipped with the older 3-inch or newer 3.7-inch and 4.5-inch guns were designated as Heavy AA (HAA) regiments to distinguish them from the new Light AA (LAA) regiments appearing in the order of battle.[1][11]
Although there were some night raids on Scottish cities, the main action in the Battle of Britain and the subsequent Blitz was over Southern England and there were few chances of action for the Scottish AA defences in 1940.[12][13]
Western Desert
In January 1941 the regiment left AA Command and became part of the War Office Reserve to mobilise for overseas service. In March it was joined by its own Signal Section, but 228 HAA Bty became independent. In May, 228 HAA Bty embarked for Gibraltar where it joined a newly-formed 13th HAA Rgt.[1][14][15][16][17][18]
94th HAA Regiment also sailed in May 1941, arriving in Egypt on 13 June 1941, equipped with 3.7-inch HAA guns.[8] The absent 228 Bty was replaced on 23 July by 261 Bty from 84th (Middlesex, London Transport) HAA Rgt, from Arnos Grove in North London, which had been operating independently.[1][7] Shortly afterwards the regiment moved up to join 12 AA Brigade with the Western Desert Force (WDF). This brigade was responsible for AA defence of the port of Mersa Matruh and several landing grounds (LGs), and air raids took place almost nightly.[19][20]
In September 1941 the WDF made a small advance to Halfaya Pass and 12 AA Bde moved up to Sidi Barrani to protect nearby LGs. Eighth Army was now formed to take over from the WDF while the Desert Air Force (DAF) took over the air units. In October 12 AA Bde was also given responsibility for protecting the railway that was being extended across the desert.[19]
Operation Crusader

Eighth Army's new offensive into Libya (Operation Crusader) began on 18 November and 12 AA Bde advanced to the Libyan–Egyptian frontier. General Erwin Rommel's counter-attack caused confusion, with retreating units driving through the LGs and both Eighth Army and 12 AA Bde's HQs. Eighth Army then attacked again, capturing Sidi Rezegh and the LGs around Gambut on 23 November, which 12 AA Bde moved up to defend. Small-scale air raids were opposed by AA guns and fighters in cooperation and damage was negligible.[19][20]
In December the brigade moved forward to Antelat, which suffered a damaging air raid in mid-January, although three of the 10+ attacking fighter-bombers were shot down.. Because of heavy rain, the RAF decided to evacuate Antelat and concentrate at Msus. Brigade HQ was just pulling out when Rommel launched his counter-offensive on 20 January, and the HQ convoy came under shellfire; two troops of 261 (London Transport) HAA Bty on the airfield were unable to move their guns in the mud and were captured. Rommel kept advancing, so the retreat continued. As 12 AA Bde fell back from the advanced LGs in a series of defensive deployments, its guns joined the garrisons of the 'boxes' that formed the British Gazala Line[19][20]
Battle of Gazala
The Battle of Gazala began on 26 May, and Rommel's Axis forces quickly broke into the British position, though the boxes held out, with 3.7-inch HAA guns firing in ground support. Eventually, Eighth Army was forced to evacuate the boxes and retreat towards Egypt, slipping away during the night of 17 June.[19][21]
During the long retreat to the El Alamein position, 12 AA Bde under Brigadier Percy Calvert-Jones fell back in a series of rearguard actions at LGs, in the course of which it concentrated a sizeable body of AA units and some motorised infantry. Eighth Army seized upon this collection to act as a blocking force, reinforcing it with additional infantry. 'Calforce' held defensive positions at 10 LGs, providing its own artillery support from AA guns sited for ground tasks. It also developed dummy LGs, complete with fake AA positions. Calforce remained in position during the First Battle of El Alamein and was not withdrawn from the front line until later in September.[19][22][23]
Alamein to Tunis
After 12 AA Bde was withdrawn from its front line commitments, it reorganised for the planned offensive (the Second Battle of El Alamein). 94th HAA Regiment continued as part of the brigade, comprising RHQ, 291 and 292 Btys with 16 x 3.7-inch guns, and the regimental workshop of the Royal Electrical and Mechanical Engineers (REME). The reformed 261 (LT) HAA Bty was further back with 69th (Royal Warwickshire Regiment) HAA Rgt in 2 AA Bde.[24][25][26]
12 AA Brigade's role once again was to move up behind Eighth Army's advance and defend the DAF's LGs as they came into use, with batteries working under the command of the DAF tactical wing to which they were allocated. The 11-day battle to break through the Axis lines opened on 23 October, and after the break-out the airfields at Gambut and El Adem were quickly secured, 12 AA Bde's units following close behind. The brigade developed an efficient system of providing rolling support for the DAF's tactical wings as they made long shifts forwards to maintain contact with the advancing army. This involved the RAF, Royal Engineers (RE) airfield construction teams, and local ground defence units as well as the AA units; all were represented in the joint reconnaissance parties that followed closely behind the leading battalions. They selected new sites for landing strips or renovated old ones, maintaining radio contact through RAF or RA channels with the main body so that movement orders could be passed to the following AA batteries. Movement was usually by 'leap frogging' from previously occupied LGs, though sometimes an AA battery was waiting in a hidden concentration area ready to move forward. RAF transport aircraft flew ground staff, equipment and battery staffs to the new locations. Within a few hours the AA positions were manned and the fighter squadrons would arrive. 12 AA Brigade had 20–30 separate convoys moving on any given day, and by November it was providing cover for six RAF wings and one US Army Air Force (USAAF) Group, and also manning dummy airstrips, compete with flare-paths, aircraft, flash simulators and people. As the advance progressed the retreating Germans took greater pains to make abandoned LGs unusable; at one field near 'Marble Arch', 2000 mines had to be lifted by the RA/RE/RAF teams.[19][27]
12 AA Brigade followed Eighth Army all the way to Tripoli, which fell on 23 January 1943. 2 AA Brigade followed up behind to protect the Lines of Communication, taking over responsibility for 94th HAA Rgt, which was left to defend Tripoli. By now 261 (LT) HAA Bty had rejoined the regiment, bringing it back to a strength of 24 guns.[27]
Disbandment
94th HAA Regiment took no part in the Sicilian or Italian campaigns: it remained in North Africa under Middle East Forces protecting the bases. By 1944 the air threat in the Mediterranean had diminished and the AA units' manpower was urgently required for other tasks. The Middle East AA Group began to be run down, and 94th HAA Rgt was placed in suspended animation on 26 July 1944.[1][2][7][28][29]
Postwar

When the TA was reconstituted in 1947 the regiment was reformed at Edinburgh, initially as 494 (Mixed) Heavy AA Regiment (City of Edinburgh). ('Mixed' indicated that members of the Women's Royal Army Corps were integrated into the unit). It formed part of 62 AA Brigade (the former 36 (Scottish) AA Bde).[1][2][30][31][32][33][34][35]
On 1 January 1954 the regiment was amalgamated with 471 (Mixed) HAA Rgt (Forth) – the former 71 (Forth) HAA Rgt that had supplied the initial battery for its formation in 1939. 494 Regiment provided R (City of Edinburgh) Battery in the combined unit. The following year AA Command was disbanded and there were wholescale reorganisations among AA units of the TA. R (City of Edinburgh) Bty was split from 471 HAA Rgt to join with a number of LAA units in the Lothians to form 432 LAA Rgt. A further round of amalgamations in 1961 saw 432 LAA Rgt transferred to the Royal Engineers.[2][30][31][36][37][38]
Notes
- Frederick, pp. 755–6, 778.
- Litchfield, p. 300.
- Monthly Army List.
- AA Command 3 September 1939 at Patriot Files.
- Routledge, Table LX, p. 378.
- Routledge, pp. 65–6, 371.
- 94 HAA Rgt at RA 39–45.
- Farndale, p. 168.
- Routledge, pp. 372–4.
- Farndale, p. 24.
- Litchfield.
- Collier, Chapter X.
- Collier, Appendix XXX.
- Order of Battle of the Field Force in the United Kingdom, Part 3: Royal Artillery, 26 December 1940, with amendments, The National Archives (TNA), Kew, files WO 212/4 and WO 33/2365.
- Order of Battle of the Field Force in the United Kingdom, Part 3: Royal Artillery (Non-Divisional Units), 25 March 1941, with amendments, TNA file WO 212/5.
- Routledge, p. 202, Table XXXIV, p. 212.
- Joslen, p. 552.
- Farndale, p. 201.
- 'The History of HQ 12 AA Brigade 1939–1945', TNA file WO 204/7254.
- Routledge, pp. 135–6.
- Routledge, p. 137.
- Routledge, pp. 139–40.
- Joslen, pp. 162–3.
- Joslen, p. 566.
- Routledge, Table XXIII, p. 161.
- 'Eighth Army – Order of Battle 5 October 1942', TNA file WO 201/693.
- Routledge, pp. 155–8; Table XXIV, pp. 162–3.
- Joslen, p. 485.
- Routledge, pp. 160–1.
- Frederick, pp. 1017–8.
- 474–519 Rgts RA at British Army 1945 on.
- Farndale, Annex M.
- Litchfield, Appendix 5.
- Routledge, Table LXXIV, p. 441.
- Watson, TA 1947.
- Frederick, p. 1013.
- Litchfield, pp. 283–4.
- 414–443 Rgts RA at British Army 1945 on.
References
- Basil Collier, History of the Second World War, United Kingdom Military Series: The Defence of the United Kingdom, London: HM Stationery Office, 1957.
- Gen Sir Martin Farndale, History of the Royal Regiment of Artillery: The Years of Defeat: Europe and North Africa, 1939–1941, Woolwich: Royal Artillery Institution, 1988/London: Brasseys, 1996, ISBN 1-85753-080-2.
- J.B.M. Frederick, Lineage Book of British Land Forces 1660–1978, Vol II, Wakefield, Microform Academic, 1984, ISBN 1-85117-009-X.
- Lt-Col H.F. Joslen, Orders of Battle, United Kingdom and Colonial Formations and Units in the Second World War, 1939–1945, London: HM Stationery Office, 1960/Uckfield: Naval & Military Press, 2003, ISBN 1-843424-74-6.
- Norman E.H. Litchfield, The Territorial Artillery 1908–1988 (Their Lineage, Uniforms and Badges), Nottingham: Sherwood Press, 1992, ISBN 0-9508205-2-0.
- Brig N.W. Routledge, History of the Royal Regiment of Artillery: Anti-Aircraft Artillery 1914–55, London: Royal Artillery Institution/Brassey's, 1994, ISBN 1-85753-099-3