23

Enlarging an EC2 instance is easy like a breath (for instance, create an AMI, launch an instance from it and then change the storage size).

But reducing it becomes more difficult. I’d like to reduce an Amazon Web Services (AWS) EC2 instance Elastic Block Store (EBS) root volume size. There are a couples of old high level procedures on the net. The more detailed version I found is a one year old answer on a StackOverflow question: how to can i reduce my ebs volume capacity, steps have a pretty high level:

Create a new EBS volume that is the desired size (e.g. /dev/xvdg)

Launch an instance, and attach both EBS volumes to it

Check the file system (of the original root volume): (e.g.) e2fsck -f /dev/xvda1

Maximally shrink the original root volume: (e.g. ext2/3/4) resize2fs -M -p /dev/xvda1

Copy the data over with dd:

  • Choose a chunk size (I like 16MB)

  • Calculate the number of chunks (using the number of blocks from the resize2fs output): blocks*4/(chunk_size_in_mb*1024) - round up a bit for safety

  • Copy the data: (e.g.) dd if=/dev/xvda1 ibs=16M of=/dev/xvdg obs=16M count=80

Resize the filesystem on the new (smaller) EBS volume: (e.g.) resize2fs -p /dev/xvdg

Check the file system (of the original root volume): (e.g.) e2fsck -f /dev/xvdg

Detach your new EBS root volume, and attach it to your original instance

I’m unable to find a detailed step by step “how to” solution.

My EBS root volume is attached to a HVM Ubuntu instance.

Any help would be really appreciated.

herve
  • 330
  • 1
  • 2
  • 5

6 Answers6

16

None of the other solutions will work if the volume is used as a root (bootable) device.

The newly created disk is missing the boot partition, so it would need to have GRUB installed and some flags set up correctly before an instance can use it as a root volume.

My (as of today, working) solution for shrinking a root volume is:

Background: We have an instance A, whose root volume we want to shrink. Let's call this volume VA. We want to shrink VA from 30GB to let's say 10GB

  1. Create a new ec2 instance, B, with the same OS as the instance A. Also kernels must match so upgrade or downgrade as needed. As storage, pick a volume that's the same type as VA, but with a size of 10GB. (or whatever your target size is). So now we have an instance B which uses this new volume (let's call it VB) as a root volume.
  2. Once the new instance (B) is running. Stop it and detach it's root volume (VB).

NOTE: The following steps are mostly taken from @bill 's solution:

  1. Stop the instance you want to resize (A).

  2. Create a snapshot of the volume VA and then create a "General Purpose SSD" volume from that snapshot. This volume we'll call it VASNAP.

  3. Spin a new instance with amazon Linux, we'll call this instance C. We will just use this instance to copy the contents of VASNAP to VB. We could probably also use instance A to do these steps, but I prefer to do it in an independent machine.

  4. Attach the following volumes to instance C. /dev/xvdf for VB. /dev/xvdg for VASNAP.

  5. Reboot instance C.

  6. Log onto instance C via SSH.

  7. Create these new directories:

mkdir /source /target

  1. Format VB's main partition with an ext4 filesystem:

mkfs.ext4 /dev/xvdf1

If you get no errors, proceed to Step 11. Otherwise, if you do not have /dev/xvdf1, you need to create the partition by doing the following i-vii:

i) If /dev/xvdf1 does not exist for whatever reason, you need to create it. First enter:

sudo fdisk /dev/xvdf.

ii) Wipe disk by entering: wipefs

iii) Create a new partition by entering: n

iv) Enter p to create primary partition

v) Keep pressing enter to continue with default settings.

vi) When it asks for a command again, enter w to write changes and quit.

vii) Verify you have the /dev/xvdf1 partition by doing: lsblk

You should see something like:

NAME    MAJ:MIN RM  SIZE RO TYPE MOUNTPOINT
xvda    202:0    0  250G  0 disk
└─xvda1 202:1    0  250G  0 part
xvdf    202:80   0   80G  0 disk
└─xvdf1 202:81   0   80G  0 part 
xvdg    202:96   0  250G  0 disk
└─xvdg1 202:97   0  250G  0 part

Now proceed to Step 11.

  1. Mount it to this directory:

mount -t ext4 /dev/xvdf1 /target

  1. This is very important, the file system needs an e2label for Linux to recognize it and boot it, use "e2label /dev/xvda1" on an active instance to see what it should be, in this case the label is: "/"

e2label /dev/xvdf1 /

  1. Mount VASNAP on /source:

mount -t ext4 /dev/xvdg1 /source

  1. Copy the contents:

rsync -vaxSHAX /source/ /target

Note: there is no "/" following "/target". Also, there may be a few errors about symlinks and attrs, but the resize was still successful

  1. Umount VB:

umount /target

  1. Back in AWS Console: Dettach VB from instance C, and also dettach VA from A.

  2. Attach the new sized volume (VB) to the instance as: "/dev/xvda"

  3. Boot instance A, now it's root device is 10GB :)

  4. Delete both instances B and C, and also all volumes but VB, which is now instance A's root volume.

GTXBxaKgCANmT9D9
  • 395
  • 1
  • 6
  • 15
Ruben Serrate
  • 289
  • 2
  • 10
7

In AWS Console:

  1. Stop the instance you want to resize

  2. Create a snapshot of the active volume and then create a "General Purpose SSD" volume from that snapshot.

  3. Create another "General Purpose SSD" volume to the size you want.

  4. Attach these 3 volumes to the instance as:

    • /dev/sda1 for the active volume.
    • /dev/xvdf for the volume that is the target size.
    • /dev/xvdg for the volume made from the snapshot of the active volume.
  5. Start the instance.

  6. Log onto the new instance via SSH.

  7. create these new directories:

mkdir /source /target

  1. create an ext4 filesystem on new volume:

mkfs.ext4 /dev/xvdf

  1. mount it to this directory:

mount -t ext4 /dev/xvdf /target

  1. This is very important, the file system needs an e2label for linux to recognize it and boot it, use "e2label /dev/xvda1" on an active instance to see what it should be, in this case the label is: "/"

e2label /dev/xvdf /

  1. mount the volume created from the snapshot:

mount -t ext4 /dev/xvdg /source

  1. Copy the contents:

rsync -ax /source/ /target

Note: there is no "/" following "/target". Also, there may be a few errors about symlinks and attrs, but the resize was still successful

  1. Umount the file systems:

umount /target
umount /source

  1. Back in AWS Console: Stop the instance, and detach all the volumes.

  2. Attach the new sized volume to the instance as: "/dev/sda1"

  3. Start the instance, and it should boot up.

STEP 10 IS IMPORTANT: Label the new volume with "e2label" as mentioned above, or the instance will appear to boot in aws but wont pass the connection check.

Gene
  • 3,633
  • 19
  • 39
bill
  • 87
  • 1
  • 3
  • 11
    I have ran through these steps several times (Ubuntu 14.04) and every time I attach the new volume, the instance just stops. Any one else experiencing this issue? This is racking my brain! – thiesdiggity Oct 23 '15 at 06:12
  • 2
    You are not the only one. I have tried this and other solutions and like your good self, my instance just shuts down as well. – blairmeister Dec 08 '16 at 15:29
  • 2
    @blairmeister I had the same issue, but managed to get it to work! Have a look at my answer below if you're still stucked :) – Ruben Serrate Mar 06 '17 at 15:10
  • my e2label is cloudimg-rootfs...following all these steps I can confirm on Ubuntu 14.04 doesn't work – NineCattoRules Apr 19 '17 at 09:40
  • I have faced with: no bootable device error. Please see (https://stackoverflow.com/q/46057532/2402577) @bill. – alper Sep 07 '17 at 15:53
  • 2
    I'm downvoting this answer as it doesn't cover enough use cases for a volume (like as a boot volume) to protect users from inadvertent damage. – Jesse Adelman Oct 24 '17 at 16:08
3

1. Create a new ebs volume and attach it to the instance.

Create a new EBS volume. For example, if you originally had 20G, and you want to shirnk it to 8G, then create a new 8G EBS volume,be sure to be in the same availability zone. Attach it to the instance which you need to shrink the root partition of.

2. Partition, format, and synchronize files on the newly created ebs volume.

(1. Check the partition situation

We first use the command sudo parted -l to check the partition information of original volume:

[root@ip-172-31-16-92 conf.d]# sudo parted -l
Model: NVMe Device (nvme)
Disk /dev/nvme0n1: 20G
Sector size (logical/physical): 512B/512B
Partition Table: gpt
Disk Flags: 

Number  Start   End     Size    File system  Name  Flags
 1      1049kB  2097kB  1049kB               bbp   bios_grub
 2      2097kB  20480MB  24G  xfs          root

It can be seen that this 20G root device volume is parted into two partitions, one is named bbp and the other is root. There is no file system in ​​bbp partition, but there is a flag named bios_grub,which shows that this system is booted by grub.Also, It shows that the root volume is partitioned using gpt. As for what is bios_grub, it is actually the BIOS boot partition. The reference is as follows:

https://en.wikipedia.org/wiki/BIOS_boot_partition https://www.cnblogs.com/f-ck-need-u/p/7084627.html

This is about 1MB, and there is a partition called root that we need to focus on. This partition stores all the files of the original system. So, the idea of ​​backup is that to transfer files from this partition to another smaller partition on the new ebs volume.

(2 Use parted to partition and format the new ebs volume.

Use lsblk to list the block:

NAME        MAJ:MIN RM SIZE RO TYPE MOUNTPOINT
nvme0n1     259:0    0   20G  0 disk 
├─nvme0n1p1 259:1    0   1M  0 part 
└─nvme0n1p2 259:2    0   20G  0 part /
nvme1n1     270:0    0   8G  0 disk 

The new ebs volume is the device nvme1n1, and we need to partition it.

~# parted /dev/nvme1n1
GNU Parted 3.2 
Using /dev/xvdg 
Welcome to GNU Parted! Type 'help' to view a list of commands.
(parted) mklabel gpt  #Using the gpt layout would take up the first 1024 sectors 
(parted) mkpart bbp 1MB 2MB # Since the first 1024 sectors are used, the start address here is 1024kb or 1MB, and bbp is the partition name, that is, BIOS boot partition, which needs to take up 1MB, so the end address is 2MB
(parted) set 1 bios_grub on #Set partition 1 as BIOS boot partition

(parted) mkpart root xfs 2MB 100% #allocate the remaining space (2MB to 100%) to the root partition.


After partitioning, use lsblk again, we can see

NAME        MAJ:MIN RM SIZE RO TYPE MOUNTPOINT
nvme0n1     259:0    0   20G  0 disk 
├─nvme0n1p1 259:1    0   1M  0 part 
└─nvme0n1p2 259:2    0   20G  0 part /
nvme1n1     270:0    0   8G  0 disk 
├─nvme1n1p1 270:1    0   1M  0 part 
└─nvme1n1p2 270:2    0   8G  0 part /

You can see that there are two more partitions, nvme1n1p1 and nvme1n1p2, where nvme1n1p2 is our new root partition. Use the following command to format the partition:

mkfs.xfs /dev/nvme1n1p2

After formatting, we need to mount the partition, for example, we mount it to /mnt/myroot.

mkdir -p /mnt/myroot
mount /dev/nvme1n1p2 /mnt/myroot
(3 Use rsync to transfer the all content to the corresponding root partition of the new volume.
sudo rsync -axv / /mnt/myroot/ 

Note that the above -x parameter is very important, because it is to back up the root directory of the current instance, So if you don't add this parameter, it will back up /mnt/myroot itself to /mnt/myroot and fall into an endless loop.(–exclude parameter is also ok) The rsync command is different from the cp command. The cp command will overwrite, while the rsync is a synchronous incremental backup. It would save a lot of time. Take a coffee and Wait to complete the synchronization.

3.Replace the uuid in the corresponding file.

Because the volume has changed,So the uuid of volume is also changed. We beed to replace the uuid in the boot files. The following two files need to be modified:

/boot/grub2/grub.cfg #or /boot/grub/grub.cfg
/etc/fstab

So what needs to be changed? First, you need to list the uuid of the relevant volume through blkid:

[root@ip-172-31-16-92 boot]# sudo blkid
/dev/nvme0n1p2: LABEL="/" UUID="add39d87-732e-4e76-9ad7-40a00dbb04e5" TYPE="xfs" PARTLABEL="Linux" PARTUUID="47de1259-f7c2-470b-b49b-5e054f378a95"
/dev/nvme1n1p2: UUID="566a022f-4cda-4a8a-8319-29344c538da9" TYPE="xfs" PARTLABEL="root" PARTUUID="581a7135-b164-4e9a-8ac4-a8a17db65bef"
/dev/nvme0n1: PTUUID="33e98a7e-ccdf-4af7-8a35-da18e704cdd4" PTTYPE="gpt"
/dev/nvme0n1p1: PARTLABEL="BIOS Boot Partition" PARTUUID="430fb5f4-e6d9-4c53-b89f-117c8989b982"
/dev/nvme1n1: PTUUID="0dc70bf8-b8a8-405c-93e1-71c3b8a887c7" PTTYPE="gpt"
/dev/nvme1n1p1: PARTLABEL="bbp" PARTUUID="82075e65-ae7c-4a90-90a1-ea1a82a52f93"

You can see that the uuid of the root partition of the old large EBS volume is add39d87-732e-4e76-9ad7-40a00dbb04e5, and the uuid of the new small EBS volume is 566a022f-4cda-4a8a-8319-29344c538da9. Use the sed command to replace it:

sed 's/add39d87-732e-4e76-9ad7-40a00dbb04e5/566a022f-4cda-4a8a-8319-29344c538da9/g' /boot/grub2/grub.cfg
sed 's/add39d87-732e-4e76-9ad7-40a00dbb04e5/566a022f-4cda-4a8a-8319-29344c538da9/g' /etc/fstab

Of course, you could also try to manually generate grub files using grub-install (In some systems are grub2-install) here just for convenience.

4.Detach two volumes then re-attach the new small volume.

Then use umount to unmount the new ebs volume:

umount /mnt/myroot/ 

If it prompts that target is busy. You can use fuser -mv /mnt/myroot to see which process is working in it. What I found is bash, which means that you have to exit this directory in bash. Use cd to return to the home directory and enter the command above again to umount.

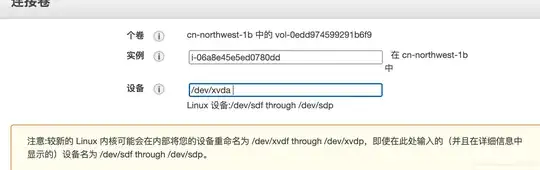
Then detach both two volumed(Stop the instance first, of course) ,and re-attach the new volume as the root device by filling in the device name here./dev/xvda as shown below

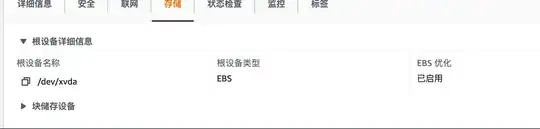
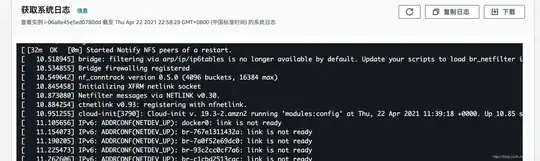
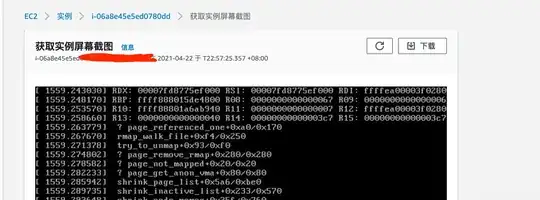
Then start the instance.If the ssh is failed, you can use the following methods to debug:

1. get system log

2.get screenshot

Reference:

1.https://docs.aws.amazon.com/AWSEC2/latest/UserGuide/TroubleshootingInstances.html#InitialSteps

2.https://www.daniloaz.com/en/partitioning-and-resizing-the-ebs-root-volume-of-an-aws-ec2-instance/

3.https://medium.com/@m.yunan.helmy/decrease-the-size-of-ebs-volume-in-your-ec2-instance-ea326e951bce

傅继晗
  • 141
  • 3
2

The following steps worked for me

Step 1. Create snapshot of root ebs volume and create new volume from snapshot (let's call this volume-copy)

Step 2. Create new instance with ebs root volume with desired size. (let's call this volume-resized) This ebs volume will have the correct partition for booting. (Creating a new ebs volume from scratch didn't work for me)

Step 3. Attach volume-resize and volume-copy to an instance.

Step 4. Format volume-resize.

sudo fdisk -l
    sudo mkfs -t ext4 /dev/xvdf1

Note: ensure partition volume is entered /dev/xvdf1 not /dev/xvdf

Step 5. Mount volume-resize and volume-copy mkdir /mnt/copy mkdir /mnt/resize

sudo mount /dev/xvdh1 /mnt/copy
sudo mount /dev/xvdf1 /mnt/resize

Step 6. Copy files

rsync -ax /mnt/copy/ /mnt/resize

Step 7. Ensure e2label is same as root volume

sudo E2label /dev/xvdh1 > cloudimg-rootfs
sudo E2label /dev/xvdf1 cloudimg-rootfs

Step 8. Update grub.conf on volume-copy to match new volume udid

Search and replace uudid in /boot/grub/grub.cfg

ubuntu@server:~/mnt$ sudo blkid
/dev/xvdh1: LABEL="cloudimg-rootfs" UUID="1d61c588-f8fc-47c9-bdf5-07ae1a00e9a3" TYPE="ext4"
/dev/xvdf1: LABEL="cloudimg-rootfs" UUID="78786e15-f45d-46f9-8524-ae04402d1116" TYPE="ext4"

Step 9. Unmount volumes

Step 10. Attach new resized ebs volume to instance /dev/sda1

Matt
  • 2,711
  • 1
  • 13
  • 20
DrewJaja
  • 21
  • 1
  • 1
    Combining @ruben serrate answer with the grub UUID update is what worked for me. – Jonathan Maim May 15 '17 at 09:35
  • Small note as I just wasted some time: Running `blkid` without `sudo` returns cached results without validating them. So it will look like the UUID hasn't changed. – Akhil Nair Aug 30 '18 at 13:46
1

The article below is a good and straightforward tutorial on how to decrease the size of EBS volume. It has an easy to follow step-by-step guide and screenshots.

Decrease the size of EBS volume in your EC2 instance

RHPT
  • 141
  • 1
  • 4
0

Here's an alternate approach;

Attach and mount the old EBS volume on a running EC2 instance. If you are wanting to copy a boot volume, it's best to do it on a different instance, with the old volume mounted as data, not with the volume being used as a live system.

Create a new EBS volume of the desired size.

Attach the new volume to the instance and (carefully) format a new filesystem on it (e.g., using mkfs). Mount it.

Copy the old filesystem content from the old volume to the new volume:

rsync -vaxSHAX /oldvol/ /newvol/

Unmount the new volume and detach it from the instance.

If you were copying the root filesystem, then:

Create an EBS snapshot of the new volume.

Register the snapshot as a new AMI.

Eric Hammond
  • 10,901
  • 34
  • 56