So, after a while I have stumbled upon some search terms that helped me find my way this completing this task myself. In the end I found that it is near impossible to go straight to an OpenVZ container but I did manage to transfer over to a KVM Virtual Machine on Proxmox. Here are the steps I took (make sure to read everything before starting it yourself):
Create Image of Physical machines partition
- Back up your partition. In the next section the entire hard drive will be wiped.
- Create a Clonezilla Live USB/CD. Instructions and downloads can be found here. Keep a copy of the ISO for step 11.
- Use GParted or equivalent software to shrink the partition you want to move to into a virtual machine. I left about 5GB extra. If your partition contains important information, make sure you have backed up.
- Shutdown main system and reboot into the Clonezilla Live USB/CD
- Follow the instructions under the
Save Image heading on this page to create an image of your partition using the saveparts options in the Select mode menu. Make sure you save your partition image to an external drive. Enable all the pre and post image checks to make sure the process was successful.
Install Proxmox VE
- Make sure you have a copy of everything on the hard drive. The installation of Proxmox will remove everything on the hard drive you install it to.
- Download the Proxmox VE iso from here and burn it to a CD/USB.
- Remove all external drives.
- Boot into the Proxmox VE installation and follow the prompts. Note which drives will be wiped after accepting the EULA.
- Once completed navigate the the address presented at the log on screen (should be a HTTPS link). This is the Proxmox web UI.
Creating the Virtual Machine
- On the left hand side: open all lists, click on
local; click Content on the upper-central tabs; click upload; click select file and navigate to the Clonezilla Live ISO you downloaded in step 2; click upload and wait for it to finish.
- Click
Create VM in the top left of the screen. Keep all the setting the same except:
- Give it a name
- Select an OS which matches the OS in your saved partition (mine was Linux 3.X/2.6 Kernel (I26))
- Click the
ISO Image drop down box and select the Clonezilla Live ISO you just uploaded
- Change the disk size to be greater than the size of your saved partition
- You may want to change CPU and Memory setting but it is not mandatory and they can be changed later.
- Confirm the creation of the VM by clicking finish on the
final page.
- Follow the steps here to assign a USB port to this Virtual Machine so it can access your external storage. You can run the commands featured on the linked page by either logging in on the physical machine or by clicking the node then clicking console.
Recovering your partition into the Virtual Machine
- Re-attach your external storage to the USB port you mapped in step 14.
- Boot the Virtual Machine by clicking
start in the top right corner.
- Attach to the Virtual Machine by clicking
console in the top right corner.
- Follow the steps under the
Restoring the Image heading on this page to restore the partition. Make sure to use the restoreparts option under the Select mode menu. Note: at step 13 in the linked tutorial Clonezilla will fail as there is no partition on /dev/sda. When this happens:
- Hit enter to start a new terminal session
- Run
fdisk /dev/sda
- Type
n and hit enter to create a new partition
- Accept all the defaults by hitting enter
- Once completed type
w and hit enter to write the changes to the disk
- Finally run
exit to exit the terminal session and hand back to Clonezilla
- A new partition (sda1) should appear in the menu now
- Once Clonezilla has completed select the option to Power off.
Make the partition bootable
- Navigate back to
/etc/pve/qemu-server/<VM_ID>.conf and remove the usb0 entry.
- In the Proxmox web UI: click on the Virtual Machine; click
Options; click on Boot Order; click edit; change the order to CD-ROM then Disk 'ide0'.
- Download the Super Grub2 ISO from here and you the same process as in step 11 to upload it to Proxmox.
- Now click on the Virtual Machine; click on
Hardware; click on the CD\DVD Drive entry; click Remove; click add then CD/DVD Drive; under the Storage option click on local; under the ISO Image option click the Super Grub2 ISO; finally click create.
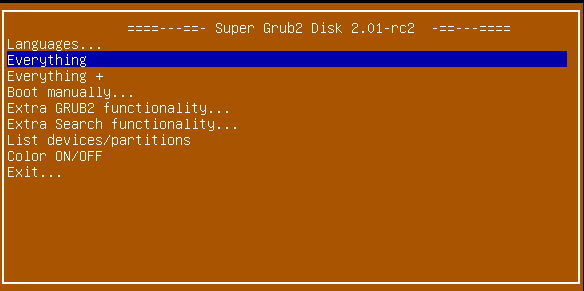
- Now start the Virtual Machine again and open an attached console. You should now see a screen that looks like this.
- Select
Everything then select the OS you want to boot (in my case it was Ubuntu). If your OS is not there, find out more advanced features of Super Grub2 here.
- Once booted you need to install a boot loader to
/dev/sda. In my case I installed Grub2 by running sudo grub-install /dev/sda.
- Now shutdown the Virtual Machine and go back to the Proxmox web UI.
- Now click on the Virtual Machine; click on
Hardware; click on the CD\DVD Drive entry; click Remove.
- You can now start your Virtual Machine and your partition will automatically boot
If you encountered an issue along the way leave you can leave a comment but I would probably recommend you create a post here on ServerFault instead and link this question in. That way someone more qualified than I am can help you out. If there is anything unclear in my steps just leave a comment and I will try and clear it up. I hope this tutorial helps :)
JamesStewy