This short description was caused me to understand and clarify the subject for me.
Application Pool Identity Accounts
Worker processes in IIS 6.0 and in IIS 7 run as Network Service by default. Network Service is a built-in Windows identity. It doesn't require a password and has only user privileges; that is, it is relatively low-privileged. Running as a low-privileged account is a good security practice because then a software bug can't be used by a malicious user to take over the whole system.
However, a problem arose over time as more and more Windows system services started to run as Network Service. This is because services running as Network Service can tamper with other services that run under the same identity. Because IIS worker processes run third-party code by default (Classic ASP, ASP.NET, PHP code), it was time to isolate IIS worker processes from other Windows system services and run IIS worker processes under unique identities. The Windows operating system provides a feature called "virtual accounts" that allows IIS to create a unique identity for each of its application pools. Click here for more information about Virtual Accounts.
Configuring IIS Application Pool Identities
If you are running IIS 7.5 on Windows Server 2008 R2, or a later version of IIS, you don't have to do anything to use the new identity. For every application pool you create, the Identity property of the new application pool is set to ApplicationPoolIdentity by default. The IIS Admin Process (WAS) will create a virtual account with the name of the new application pool and run the application pool's worker processes under this account by default.
To use this virtual account when running IIS 7.0 on Windows Server
2008, you have to change the Identity property of an application pool
that you create to ApplicationPoolIdentity. Here is how:
- Open the IIS Management Console (INETMGR.MSC).
- Open the Application Pools node underneath the machine node. Select
the application pool you want to change to run under an automatically generated application pool identity.
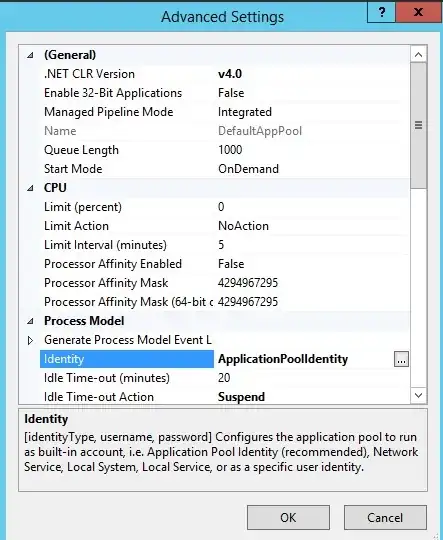
- Right-click the application pool and select Advanced Settings...

- Select the Identity list item and click the ellipsis (the button
with the three dots).
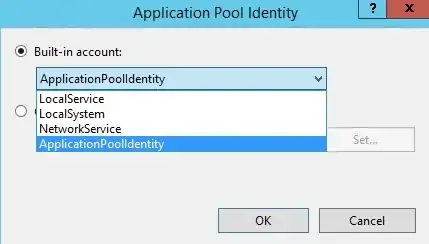
- The following dialog appears:

- Select the Built-in account button, and then select the identity
type ApplicationPoolIdentity from the combo box.
To do the same step by using the command-line, you can call the 'appcmd' command-line tool the following way:
%windir%\system32\inetsrv\appcmd.exe set AppPool <your AppPool> -processModel.identityType:ApplicationPoolIdentity
The full document can be read at: Application Pool Identities

