Introduction

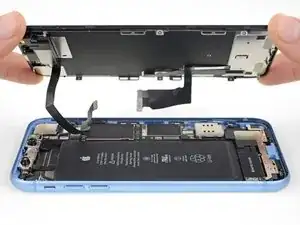
Prereq-only for detaching the display assembly.

  1. Pm3XuCwO4BcYdoNT
    Pm3XuCwO4BcYdoNT
    dbH2ibTJKmdNSytC
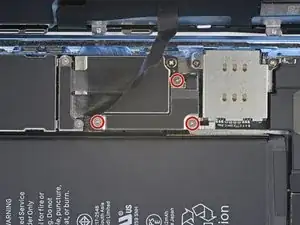
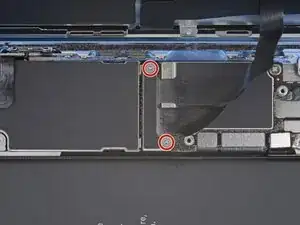
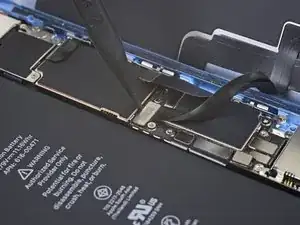
    • Remove three 1.2 mm Y000 screws securing the battery connector cover bracket.

    • Remove the bracket.

    • Throughout this repair, keep track of each screw and make sure it goes back exactly where it came from to avoid damaging your iPhone.

    • During reassembly, this is a good point to power on your iPhone and test all functions before you seal the display in place. Be sure to power your iPhone back down completely before you continue working.

    Definitely make sure all three lobes of your tool are aligned before use (it’s a little harder to tell with this style of bit) and apply even and adequate pressure to ensure it grabs as you spin the driver to prevent disfiguring the lobes/slot of the screw head.

    Unfortunately my Y000 tool was perhaps not the best fit (tolerance a bit off) in these screws and I ended up stripping out the heads of all three of these. I started to panic but after I sanded the tip of my Y000 bit down a little with super fine grit (1000CW-C) sand paper to flatten the domed tip (visible with macro lens) and give it a bit more bite I was able to remove and reinstall without issue—in fact I had to remove and install them twice since I forgot my adhesive tape during reassembly, so the screws survived and the sanded bit worked.

    Erica -

    +1 to above comment. I bought a cheap kit from Amazon and the Y000 screw driver is not good for this job. I’m concerned that I may have disfigured the heads and i type this comment in the midst of my fix :D Be gentle and assess if you can remove at least one screw with your driver before rummaging through all three and other similar screws holding display connector as well.

    Shan Potti -

    Update to above comment. I got hold of a Y0.8 screw driver bit (lucky to find an ORIA screw driver kit in my office) and it works like wonders :) Now back to work…

    Shan Potti -

  2. wTxgGtY4ALPOaL6M
    wTxgGtY4ALPOaL6M
    oLrG4CKHkHQWnl5b
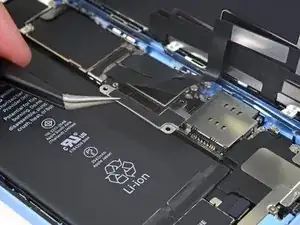
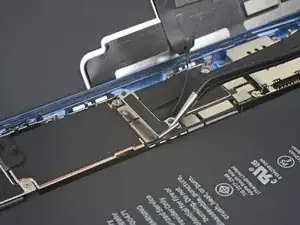
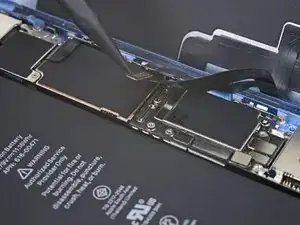
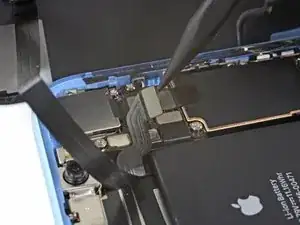
    • Use the point of a spudger to pry the battery connector straight up out of its socket.

    • Try not to damage the black silicone seal surrounding this and other board connections. These seals provide extra protection against water and dust intrusion.

    • Bend the connector slightly away from the logic board to prevent it from accidentally making contact with the socket and providing power to the phone during your repair.

  3. ycOPoUnmEuOGtRXs
    ycOPoUnmEuOGtRXs
    AiuRYCepIGVGVEUA
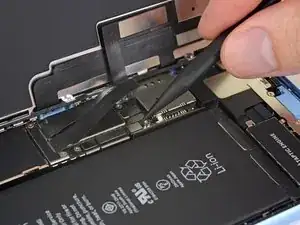
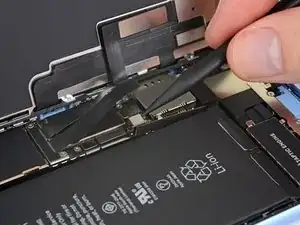
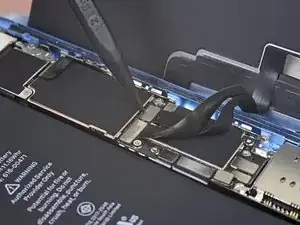
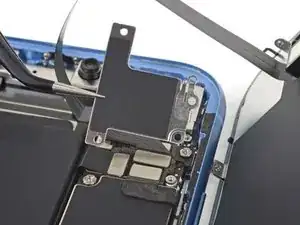
    • Remove the two 1.2 mm Y000 screws securing the display connector bracket.

    • Remove the bracket.

    What if the screw is damaged and you can’t get one out?

    Kashawn Benjamin -

  4. CFAlA4IEWSGKiQBn
    CFAlA4IEWSGKiQBn
    NAhKByGJ4iRqHGvE
    • Use the tip of a spudger to pry up and disconnect the digitizer cable.

    • To re-attach press connectors like this one, carefully align and press down on one side until it clicks into place, then repeat on the other side. Do not press down on the middle. If the connector is misaligned, the pins can bend, causing permanent damage.

    • If any part of your screen doesn't respond to touch after your repair, disconnect the battery and then re-seat this connector, making sure it clicks fully into place and that there's no dust or other obstruction in the socket.

  5. EF5KUKKN1562jycp
    EF5KUKKN1562jycp
    hqHtSbHNDEqk2pPD
    • Use the tip of a spudger to disconnect the display cable connector.

    The new display cable isn’t snapping in but I was just able to snap in the old one. Did I break the new one somehow?

    Andrew Pierson -

    Same it is really frustrating, just keeps slipping up and its bound to get damaged

    Daniel Maldonado -

  6. erV5SYvpSFqRXnWJ
    erV5SYvpSFqRXnWJ
    C5NmtarPVEAnBWBm
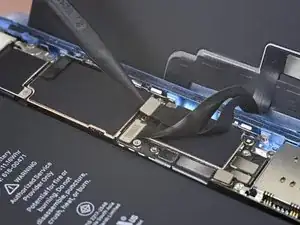
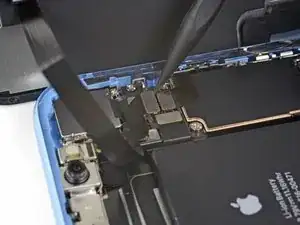
    • Remove the five screws securing the logic board connector bracket to the rear case:

    • One 1.3 mm Phillips #000 screw

    • One 1.5 mm Phillips #000 screw

    • Three 1.2 mm Y000 screws

    • Remove the bracket.

    • Be careful not to lose the smaller bracket clipped onto the edge. It's secured with a small clip and is easy to accidentally knock off of the larger bracket.

    Phillips screw 1.3 mm on last step is not working. The small clipped bracket has been damaged. This screw perhaps should be the first, before 1.2 Y000. - To be confirmed by others.

    Dmitri -

    I’m not sure it makes much if any difference, but we went ahead and swapped the order for you guys. Thanks for your comments!

    Jeff Suovanen -

    I just repaired another XR, and you are right! It doesn’t make any differnerce in the order these screws come out. I still damaged this fragile piece. As I work on more of these, I’ll figure out a way to remove this screw without damaging the clip. For now everyone, just use extra caution when removing the 1.3mm phillips screw! Thanks Jeff

    fabianowens -

    I’ve now done at least 6 of these so far and I have fairly consistent good results by taking the 2 Philips head screws out first, then doing the Y screws.

    Stow -

    Is this piece important for the repair if broken? I have broken it on a home repair. What is it used for? Is it a grounding connection or is it completely unimportant. More information needed please

    Squishy Horses -

    I’m wondering that too. Is this piece important?

    Phillip Gross -

    My clip broke too! on iphone XR. Any word on necessity?

    Beth Buer -

    I can confirm that taking out the 1.3 mm screw first then the 1.5 mm screw works the best. If done correctly, you should be able to to remove the rest of the screws and pull the panel off with the clip still attached to the panel. For reassembly, start with the 1.5 mm screw then the 1.3 mm screw.

    Carlos Oulman -

    I don’t remove the small screw at all. I just slide out the metal cover plate and slide back in to reassemble.

    Kyaw-Zin Win -

    this is what i have done as well. Care is still needed to avoid damaging this part. However, it is seemingly far less prone to damage or loss and thus less risky for this repair process.

    Justin Parsons -

    I too broke this shield. In looking over this problem I believe it’s best to loosen, but not remove, either screw first then the other. To be clear, loosen the red or yellow screw but only just to break it free, then the second screw. Then remove both and the others and the shield should remain in one piece. I put it back with the broken part (on the red screw) and made sure the two are in contact so there’s conductivity as these shields serve a purpose other than just holding in connectors. My phone works fine with this fix.

    pgrobin -

    Is this small bracket important if broken??

    Phillip Gross -

    Mine is broken

    Easy Repair -

    Mine is broken and my apple pay doesn’t work. Something to do with NFC antenna this little clip??

    Marcos Fernández -

    I'm guessing so. I replaced a screen on a phone I bought from a friend. I noticed this bracket was broken when I disassembled the phone but didn't think much of it. When I reassembled it my NFC also does not work. Bummer. A lot of people in these comments have asked if it is crucial that this bracket be connected. Can someone from iFixit or other please reply to those comments?

    Larry Jorgenson -

    On the 1.3 mm screw I actually chose not to remove it. I broke it loose then used the tip of the spudger to simply twist the bracket out of the way, with the screw still attached. Then I could remove the larger bracket.

    mpalma -

    Kyaw-Zin is right because the shield contains of two tin parts. But there is another option:

    1. Unscrew the yellow and orange screws first.

    2. Lift the shield gently that it can turn about 20° anticlockwise.

    3. Open the red screw and let the shield turn with it the first degrees.

    Daniel Brehm -

    The first time I did this repair, I didn’t see the comments ahead of time and broke the bracket, even removing the 1.3mm screws first. The second time I did the repair, I was prepared and being extra careful, but the simple act of turning the 1.3mm screw head was enough to break it. If I ever have to do this repair again, I’ll just leave the screw in and try to slide the plate out with the screw (and bracket, hopefully) still in tact, as per Kyaw-Zin Win.

    Debbie Thompson -

    None of the screw driver bits I got fits the 1.3mm and 1.5mm screws. How do I remove them?

    Jonatious Joseph Jawahar -

    Same issue as above. The bits provided in the kit do not work with the 1.3mm and 1.5mm screws

    Graham Hammell -

    Further to above comment about bit not working. Had to go and purchase another PH000 from Home Depot and that worked

    Graham Hammell -

    I’ve broken that little bracket attached to the red screw. Is it important and can I get a replacement????? Thanks all

    steve.arfa -

    Broken the clip. Is this important??

    kyledrumtutor -

    Yikes, broke mine too. Oh god. Think perhaps the delicate 1.3mm should come out first when everything else is secure...

    Ronald -

    Don't remove the 1.3 Phillips screw! Twisting this screw will break the smaller bracket that is clipped to the larger. Remove all the other screws. Block the smaller bracket from moving as you gently slide the larger bracket horizontally toward the battery until free. The smaller bracket can stay in place while the screen is replaced. When reassembling, support the small bracket by backing with a spudger or similar tool.

    doug68242 -

    I just broke the smaller bracket also :( I didn´t notice these comments until now :(

    It looks like part of the antenna for NFC, as all except NFC works on my iPhone now.

    It should be repairable using some wire wrap wire, either twisted around the two screws that connected that part of the bracket (or soldered in place). I will try and report back if it works.

    Richard Croyle -

    Success!! I managed to re-construct the small arm of the bracket by screwing the 1.3mm screw back in with some 0.3mm enamel wire soldered into what was left of the small bracket arm on the screw, then the other end of the enamel wire I wrapped under the 1.5 wire screw's head (enamel exposed to bare metal), then screwed both screws down. also I lifted up the small metal arm with a screw driver (to make sure it reconnects with the display grounding square) ..and NFC worked again (slightly different antenna pattern mind (need to place cards slightly higher up the rear of the phone). Anyway works again :)

    Richard Croyle -

  7. ZKgyTMB3J2eBa6Se
    ZKgyTMB3J2eBa6Se
    RGEOVxym6PmnJXjF
    • Use the tip of a spudger to pry the front sensor assembly connector up from its socket.

    During testing, make sure your proximity sensor is not on upside down, as it’s easy to connect upside down. Your phone will boot loop if it’s on incorrectly.

    Tristan England -

  8. GIZLarh6sZTr4iYM

    unclear if this is where screen removal ends

    Daniel Maldonado -

    I had the same question, but the answer is yes. Steps 21-30 are removing parts from the original screen that need to be reattached onto the new screen. You are no longer working inside the frame, but on the back of the screen itself.

    amclean78 -

    I apologize for missing these comments initially, but yes that’s correct, the screen is removed now and the rest of the guide goes on to other parts, either in the phone or on the back of the screen. Good luck with the repair!

    Adam O'Camb -

    The alternate method of removing the battery should be highlighted as a standard option. There is so much more work and potential to damage the parts than if you left them in place and carefully with plenty of heat remove the battery. I so wish I had seen this before!

    Martin Kappeyne -

Conclusion

To reassemble your device, follow these instructions in reverse order.

Adam O'Camb

Member since: 11/04/15

195421 Reputation

0 comments