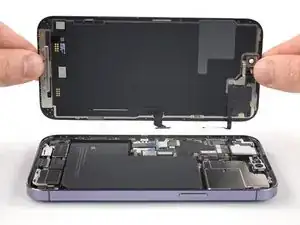
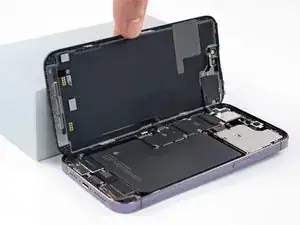
Introduction

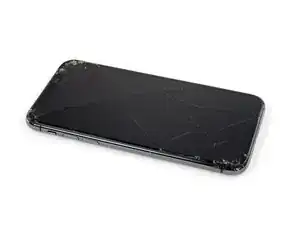
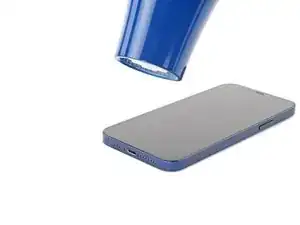
If your iPhone 14 Pro Max screen is cracked, not responding to touch, or not showing a picture when your phone is powered on, use this guide to restore your iPhone to working order with a new screen, a.k.a. display assembly.

This guide was created using the A2894 (international) model. If you're fixing a different iPhone 14 model, there may be some visual discrepancies, but the procedure should be the same.

For your safety, discharge the battery below 25% before disassembling your device. This reduces the risk of fire if the battery is accidentally damaged during the repair. If your battery is swollen, take appropriate precautions.

Note: True Tone and auto brightness functionality are disabled after a screen replacement, even when using an original Apple screen. Face ID is also disabled unless the iPhone runs iOS 15.2 or newer.

You’ll need replacement adhesive to reattach the screen when reassembling the device. Your device will function normally, but will most likely lose its IP (Ingress Protection) rating.

  1. rCRKRYigHPsuWS6n
    rCRKRYigHPsuWS6n
    hdLNAEBSdBRZCwXp
    • Power off your iPhone before beginning disassembly.

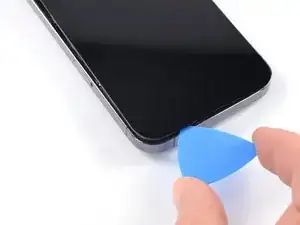
    • Remove the two 6.8 mm-long pentalobe P2 screws at the bottom edge of the iPhone.

  2. 6UPwoloGBO4tmVoS
    6UPwoloGBO4tmVoS
    BmSYPJmOy6dbHipF
    3EOdQPAGOmiuhoKU
    • If inserted too far, an opening pick can damage your device. Follow this step to mark your pick and prevent damage.

    • Measure 3 mm from the tip and mark the opening pick with a permanent marker.

    • You can also mark the other corners of the pick with different measurements.

    • Alternatively, tape a coin to a pick 3 mm from the tip.

    Got to step 2 and realized the fix kit doesn't include an opening pick! Looks like a guitar pick, and I have those lying around. Is that expected? Looks like the pick is used in many steps below. There's a little blue crowbar that isn't mentioned in the instructions. Perhaps that replaces the opening pick?

    Sloan Looney -

    Hi! I can't see which guide you were using when writing this comment. Can you reply here with which guide and fix kit you used?

    Clay Eickemeyer -

    I see you posted this in Meta. I hope it's resolved soon! In the meantime, a guitar pick may work well enough for your repair.

    Clay Eickemeyer -

    what fix kit?

    Meow Purr -

    My fix kit didn't include an opening pick either

    WILLIAM HARRIS -

    Make sure you check inside the black boxes after emptying them. My pick was stuck inside one of the boxes.

    AndyF -

    My AliExpress refurbished screen came with a pick that has a coin-like circle that pops out, so no modification was necessary

    Gijs Leegwater -

  3. RBgamJMGU2UPExlo
    RBgamJMGU2UPExlo
    qxcWuMnbwYIDR2TR
    iKLJlVGZJuORnrMt
    • If your iPhone has a cracked screen, keep further breakage contained and prevent bodily harm during your repair by taping over the glass.

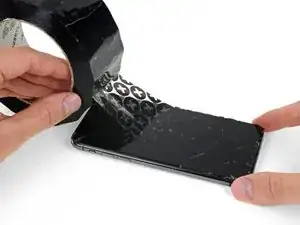
    • Lay overlapping strips of clear packing tape over the iPhone's screen until the whole face is covered.

    • Wear safety glasses to protect your eyes from any glass shaken free during the repair.

    • If you can't get the suction cup to stick in the next few steps, fold a strong piece of tape (such as duct tape) into a handle and lift the screen with that instead.

    • If all else fails, you can superglue the suction cup to the screen.

  4. Ow53O3DhdUBf22XB
    Ow53O3DhdUBf22XB
    5X3rmnkYgrohJuuT
    3d51Tp62nATHHitm
    • The next three steps demonstrate the Anti-Clamp, a tool we designed to make the opening procedure easier. If you aren't using the Anti-Clamp, skip down three steps for an alternate method.

    • For complete instructions on how to use the Anti-Clamp, check out this guide.

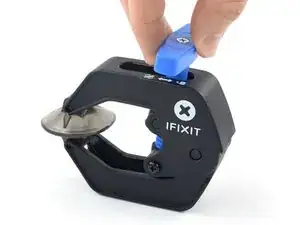
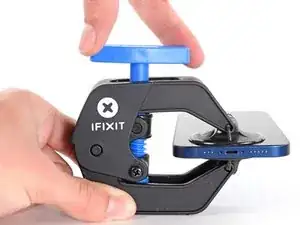
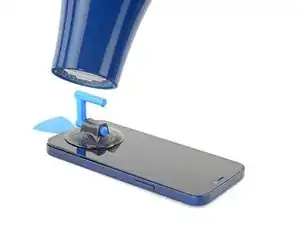
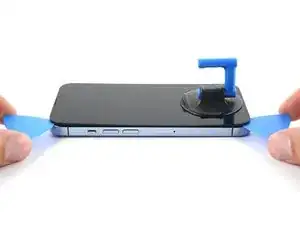
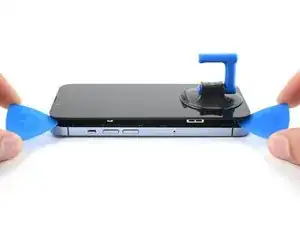
    • Pull the blue handle backwards to unlock the Anti-Clamp's arms.

    • Slide the arms over either the left or right edge of your iPhone.

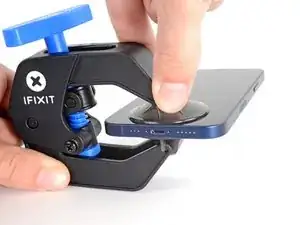
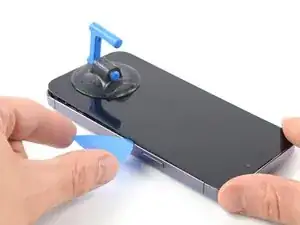
    • Position the suction cups near the bottom edge of the iPhone—one on the front, and one on the back.

    • Squeeze the cups together to apply suction to the desired area.

    • If you find that the surface of your iPhone is too slippery for the Anti-Clamp to hold onto, you can use tape to create a grippier surface.

  5. t6vYnHLW6kfLuj6N
    t6vYnHLW6kfLuj6N
    AsWLG6knFMtYyGTT
    fL4IeNB3xWL2muDK
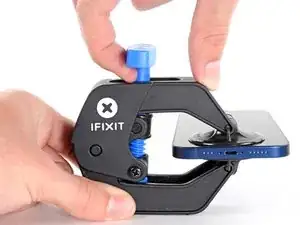
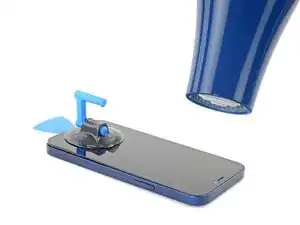
    • Pull the blue handle forwards to lock the arms.

    • Turn the handle clockwise 360 degrees or until the cups start to stretch.

    • Make sure the suction cups remain aligned with each other. If they begin to slip out of alignment, loosen the suction cups slightly and realign the arms.

  6. U5lHHOGBZmXtdKHX
    U5lHHOGBZmXtdKHX
    mjVrkifW3racEnqs
    lh236NeZSOf1LU4P
    • Support your iPhone on something sturdy such as a hardcover book so it rests hands-free and parallel to the ground; this makes it easier to work with in the following steps.

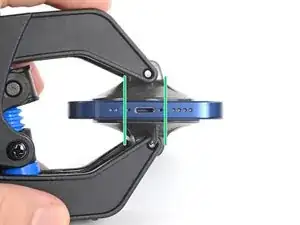
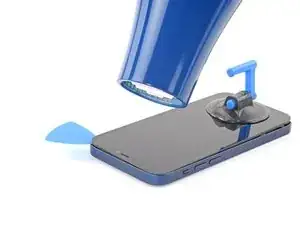
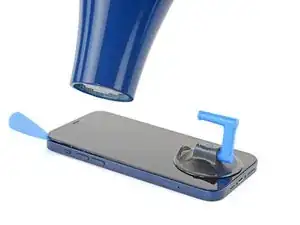
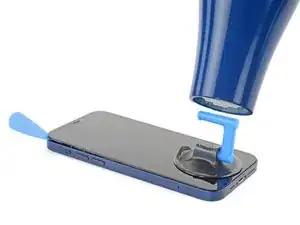
    • Use a hair dryer to heat along the bottom edge of the iPhone. The screen should feel slightly too hot to touch.

    • For complete instructions on how to use a hair dryer, check out this guide.

    • Wait one minute to give the adhesive a chance to release and present an opening gap.

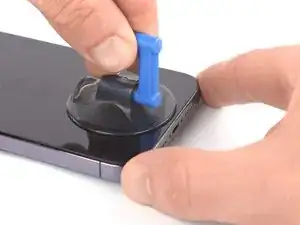
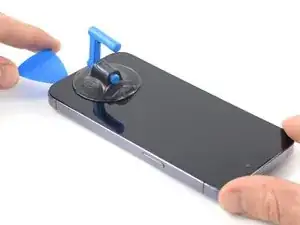
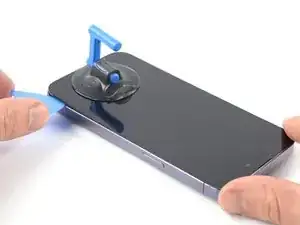
    • Insert an opening pick under the screen's plastic bezel when the Anti-Clamp creates a large enough gap.

    • If the Anti-Clamp doesn't create a sufficient gap, apply more heat to the area and rotate the handle a quarter turn.

    • Don't crank more than a quarter turn at a time, and wait one minute between turns. Let the Anti-Clamp and time do the work for you.

    • Skip the next two steps.

  7. J2QGAJVmVkG2NdJJ
    • If you're using a suction handle, follow the next two steps to loosen the screen.

    • Use a hair dryer or a heat gun to heat the bottom edge of the iPhone for 90 seconds or until the screen is slightly too hot to touch.

    • Never leave your hair dryer in one spot for an extended period of time.

  8. TmffVUKSLuGDi1M1
    TmffVUKSLuGDi1M1
    EseIvPOTvrdrjXXq
    1mspXVlycThv4xTJ
    • Apply a suction handle to the bottom edge of the screen, while avoiding the very edge of the glass.

    • Pull up on the suction cup with firm, constant pressure to create a slight gap between the screen and the frame.

    • Insert an opening pick into the gap under the screen's plastic bezel.

    • The adhesive holding the screen in place is very strong; creating this initial gap takes a significant amount of force. If you're having a hard time opening a gap, apply more heat, and gently rock the screen up and down to weaken the adhesive until you create enough of a gap to insert your opening pick.

  9. bqVUqBrlYQOJNHhB
    bqVUqBrlYQOJNHhB
    nEe5PQrOnYQkCN1H
    • Use a hair dryer to heat the right edge of the iPhone (the edge with the power button) for 90 seconds or until the screen is slightly too hot to touch.

  10. yYVmboqx6bAkWqfF
    yYVmboqx6bAkWqfF
    h3Agot3XiSGZuy63
    sHSG3ifW3YabWHx2
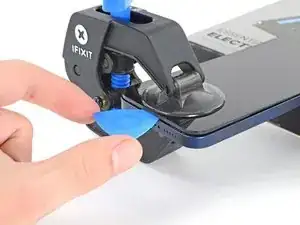
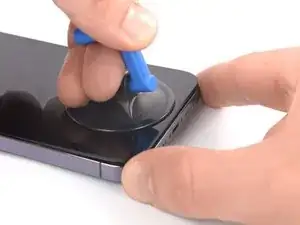
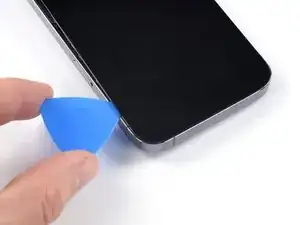
    • Slide the opening pick around the bottom right corner of the iPhone to separate its adhesive.

    • Continue sliding up the right edge of the iPhone until you reach the top right corner.

    • Don't insert your pick more than 3 mm, as you may damage internal components.

    • Leave the pick in the top right corner before continuing.

  11. sjoVkPTPYcxCYgQt
    • Use a hair dryer to heat the top edge of the iPhone for 90 seconds or until the screen is slightly too hot to touch.

  12. hdnLyZAimfwjo6Ap
    hdnLyZAimfwjo6Ap
    HsJUfH2c2Ed1Hn6r
    OPJKFQ3Iv15T5qdg
    • Insert your pick underneath the top right edge of the phone. Slide it around the top-right corner and half way across the top edge stopping right before the earpiece speaker cut-out.

    • Don't insert your pick more than 3 mm, as you may damage the top sensors.

  13. eKiKNQocayARgYDq
    eKiKNQocayARgYDq
    FPB6KDaaHUHnvM5Z
    • Use a hair dryer to heat the left edge of the iPhone for 90 seconds or until the screen is slightly too hot to touch.

  14. WuQMCyl35XXuXAmM
    • There are delicate cables along the left edge of your iPhone. Don't insert your pick here, as you may damage the cables.

    what do you do if you accidentally damage these?

    goatbnm -

    You will need to replace the entire module connected via the damaged ribbon cable, or worse, buying an entirely new screen.

    MagoSaronno -

  15. WZvIeP43jJSIUCHT
    WZvIeP43jJSIUCHT
    SLasW1UGIrYnKwkf
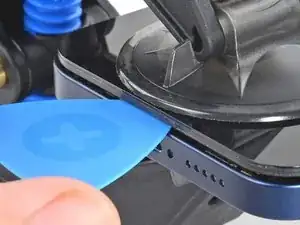
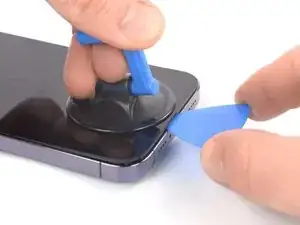
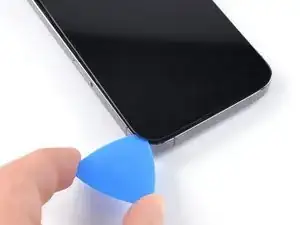
    • Insert a second opening pick in the bottom left corner of the iPhone.

    • Twist both picks simultaneously until the left edge clips release.

    • Apply the twisting force gradually.

    • If you're having trouble separating the adhesive, reheat the left edge.

  16. nyYxDdmLVWQgQnSQ
    nyYxDdmLVWQgQnSQ
    KRKPMXyh62eMuCUt
    53QiocHwUeHAYbNH
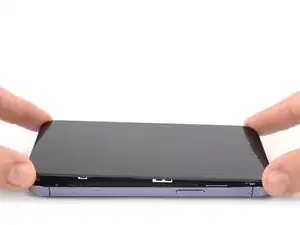
    • Rotate your iPhone so the right edge faces you.

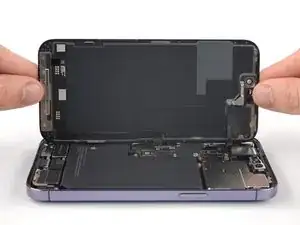
    • Open your iPhone by swinging the screen up from the right side, like the front cover of a book.

    • Lean the screen against something to keep it propped up while you're working on the phone.

    • If you don't have anything at hand to lean the screen against, your suction handle can do the trick.

    • During reassembly, lay the screen in position, align the clips along the top edge, and carefully press the top edge into place before snapping the rest of the screen down. If it doesn't click easily into place, check the condition of the clips around the perimeter of the screen and make sure they aren't bent.

  17. 4WpIV4iDOISHdkTh
    4WpIV4iDOISHdkTh
    FRRxkSqfLloH3tUg
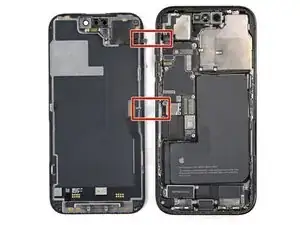
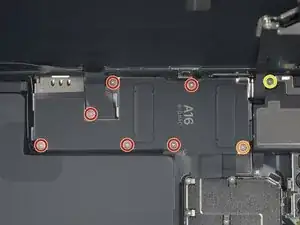
    • Use a Y000 screwdriver to remove the eight screws securing the battery connector cover:

    • Six 1.3 mm-long screws

    • One 1.6 mm-long screw

    • One 1.9 mm-long screw

    • Throughout this repair, keep track of each screw and make sure it goes back exactly where it came from to avoid damaging your iPhone.

    • During reassembly, this is a good point to power on your iPhone and test all functions before you seal the screen in place. Be sure to power your iPhone back down completely before you continue working.

  18. jqXxuttiLkELBPBj
    jqXxuttiLkELBPBj
    eEoawZ5UuGAF41lO
    D21UuMrPavH5kKyB
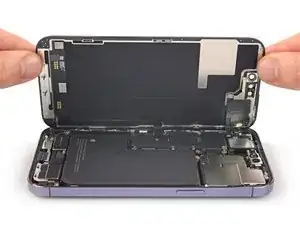
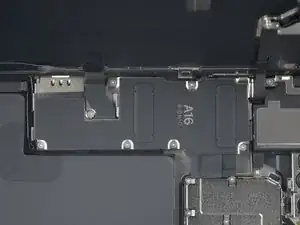
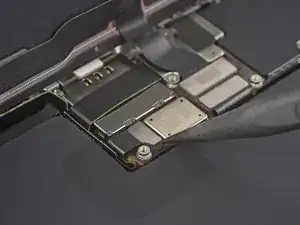
    • Grasp the connector cover with a pair of tweezers and slide it downwards to clear the flex cables.

    • Remove the connector cover.

  19. KFcT25LjooKpTT5V
    KFcT25LjooKpTT5V
    QFhFfgYEJWdskJcr
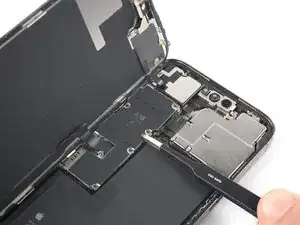
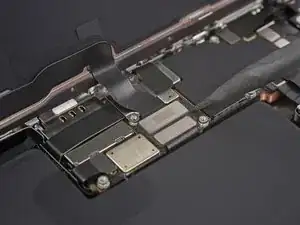
    • Use the pointed end of a spudger to disconnect the battery cable by prying the connector straight up from its socket.

    • Try not to damage the black silicone seal surrounding this and other board connections. These seals provide extra protection against water and dust intrusion.

    • Bend the connector slightly away from the logic board to prevent it from accidentally making contact with the socket and providing power to the phone during your repair.

  20. lUGMhUPQ2N3BPGSf
    lUGMhUPQ2N3BPGSf
    2eCfSpnThmxIg61Y
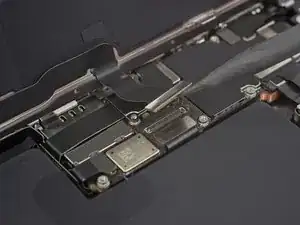
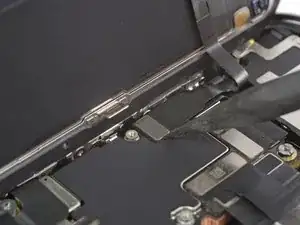
    • Use the pointed end of a spudger to disconnect the first display cable by prying the connector straight up from its socket.

    • To re-attach press connectors like this one, carefully align and press down on one side until it clicks into place, then repeat on the other side. Do not press down on the middle. If the connector is misaligned, the pins can bend, causing permanent damage.

  21. CVnAWP5oSNCARx6I
    CVnAWP5oSNCARx6I
    aaBMI6GNvlUf2hl4
    • Use the pointed end of a spudger to disconnect the second display cable by prying the connector straight up from its socket.

  22. wcjZNwRGEBiwhBlk
    wcjZNwRGEBiwhBlk
    quoUNrADAsS3CHVT
    • Remove the screen.

    • Apply new adhesive where it's necessary after cleaning the relevant areas with isopropyl alcohol (>90%).

    • During reassembly, pause here if you wish to replace the screen adhesives.

  23. QQA4skKApgJhSgfk
    • The remaining steps demonstrate how to transfer the front sensor assembly to a new screen. If your replacement screen comes with the assembly pre-installed, skip these steps.

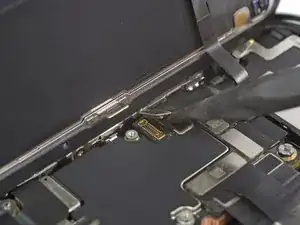
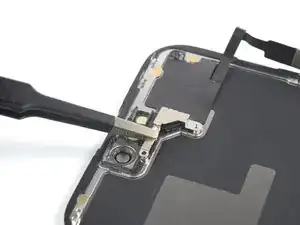
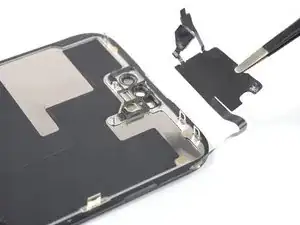
    • Use a PH000 screwdriver to remove the two 1.4 mm-long screws securing the sensor assembly bracket.

  24. CPqacxHMXjoBAYUM
    CPqacxHMXjoBAYUM
    43hMwHwWMHeWrZPi
    • Use tweezers, or your fingers, to remove the front sensor assembly bracket.

  25. wiFTMUZLrsWsNNgf
    • Heat an iOpener and apply it to the top edge of the screen for two minutes.

    • A hair dryer, heat gun, or hot plate may also be used, but be careful not to overheat the phone—the display is susceptible to heat damage.

  26. c6uGAOryJbKZFNT3
    c6uGAOryJbKZFNT3
    1EHvSWCM1m52kDuI
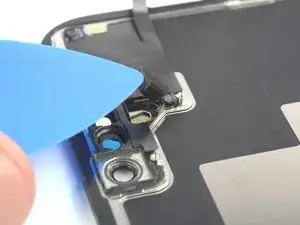
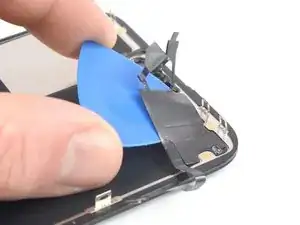
    • Insert an opening pick between the proximity sensor and its recess on the screen.

    • Pry up with the pick to separate the proximity sensor from the screen.

  27. qQENZZSpaMEtRRMB
    qQENZZSpaMEtRRMB
    HPEZvaNAYNFCqdiK
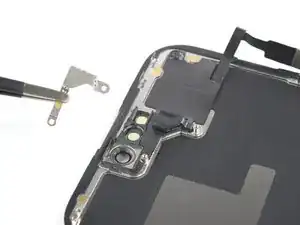
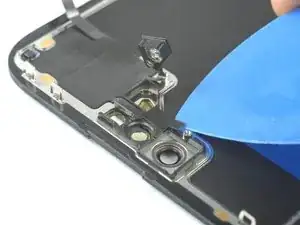
    • Insert an opening pick between the ambient light sensor and its recess on the screen.

    • Pry up with the pick to separate the ambient light sensor from the screen.

  28. X25WbboNaWrrQQMS
    X25WbboNaWrrQQMS
    p6womeqGW6x5qC5Y
    qlkO1AiwrqqZ4rb5
    • At this point, the adhesive may have cooled down. If so, apply a heated iOpener to the assembly for one minute before continuing.

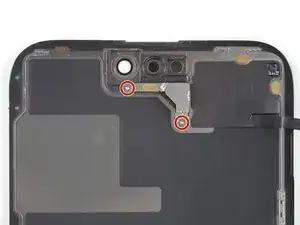
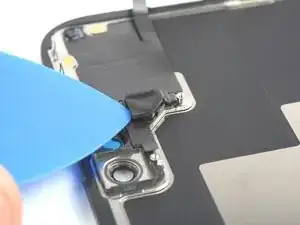
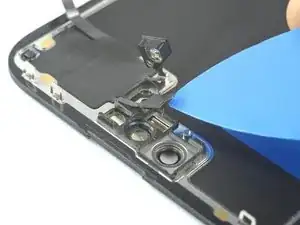
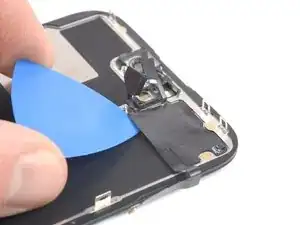
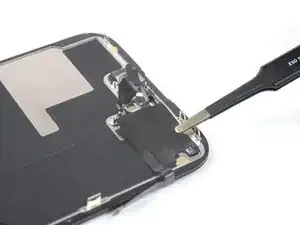
    • Insert an opening pick under the left side of the front sensor assembly.

    • Slide the pick under the assembly to separate it from the frame.

  29. RFAKXAlYxJFFWYNF
    RFAKXAlYxJFFWYNF
    wjrr3Gq43eNYnOxg
    • Remove the front sensor assembly.

    • When transferring the assembly to a new screen, follow these instructions:

    • Connect the sensors to their slots in the frame to help align the main section of the assembly.

    • Use Tesa tape to re-adhere any sections of the assembly that are no longer sticky.

Conclusion

If possible, turn on your device and test your repair before installing new adhesive and resealing.

To reassemble your device, follow these instructions in reverse order.

The best way to secure the new screen is to apply a sheet of custom-cut double-sided tape to the frame and place the screen back in its original position.

Take your e-waste to an R2 or e-Stewards certified recycler.

Repair didn’t go as planned? Try some basic troubleshooting, or ask our Answers community for help.

Dominik Schnabelrauch

Member since: 23/11/16

201162 Reputation

9 comments

What should I do if in the center and where is the eye of the central chamber, under pressure, my fingers click?

Very annoying, on 2 iPhone such clicks, that is, then disappear... thanks

pro style -

Thanks for this detailed guide on how to disassemble my phone screen. I was just checking some Celebrity Heights and all of a sudden my screen went black. I tried hard reset and all different things but it was the screen. I bought on eBay a new screen and used your guide to replace it and luckily everything went smoothly. Thanks again.

Briansmith1 -

Why would I pay 399 for a stupid kit and do it myself and apple is $20 cheaper and they ll replace it with limited warranty. Wtf yall smoking.

Jimmy g -

Then go through Apple

Alec -

Just replaced the iPhone 14 Pro MAX, How do I get rid of the screen error message that the screen is not an authentic device?

Blake2005 -

you don't. Unless you have a display programmer but I don't think they exist for 14's yet.

Sean -

you can not, unless you separate the module on your old screen, soldering it on to the new screen, which requires some proper tools and skill. or you can just ignore the message.

Tamarind -

Has anyone else had issues with the Proximity sensor not working correctly after the repair? It seems every 14 PM display we've done, the prox always has issues working consistently afterwards. Tried many different tools/alcohol/ pry methods but no matter what it still doesn't work properly. By working properly I mean it'll go black when covered(while on a call), but sometimes it takes a minute or two to come back after uncovering it. Or it'll go black (on a call) without even covering it. Seems in and out. Thought it'd be a alignment issue but even after re-seating it it still has issues.

Sean -

Does anyone else have an issue with the phone restarting without a command? I damaged the proximity sensor and I'm waiting for a new one, but that's after I noticed smoke. The phone turns on and works normally, but restarts every few minutes or so, do I have to replace the whole mother board now?

eli -