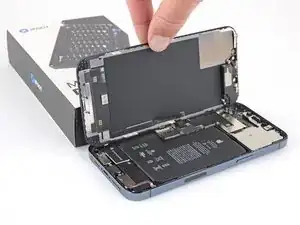
Introduction

Use this guide to remove and replace the rear cameras in the iPhone 12 Pro Max. All the camera modules are replaced as a single unit.

  1. RRIWGZ5FSXAZ4nY5
    • Caution: Before you begin, discharge your iPhone battery below 25%. A charged lithium-ion battery can catch fire and/or explode if accidentally punctured.

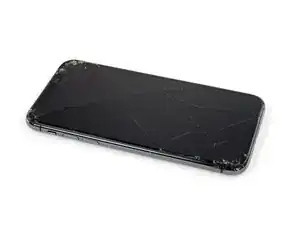
    • Power off your iPhone before beginning disassembly.

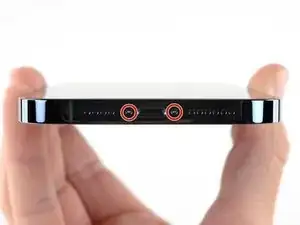
    • Remove the two 6.7 mm-long pentalobe P2 screws at the bottom edge of the iPhone.

    • Opening the iPhone's display will compromise its waterproof seals. Have replacement seals ready before you proceed past this step, or take care to avoid liquid exposure if you reassemble your iPhone without replacing the seals.

  2. 6UPwoloGBO4tmVoS
    6UPwoloGBO4tmVoS
    BmSYPJmOy6dbHipF
    3EOdQPAGOmiuhoKU
    • If inserted too far, an opening pick can damage your device. Follow this step to mark your pick and prevent damage.

    • Measure 3 mm from the tip and mark the opening pick with a permanent marker.

    • You can also mark the other corners of the pick with different measurements.

    • Alternatively, tape a coin to a pick 3 mm from the tip.

    Got to step 2 and realized the fix kit doesn't include an opening pick! Looks like a guitar pick, and I have those lying around. Is that expected? Looks like the pick is used in many steps below. There's a little blue crowbar that isn't mentioned in the instructions. Perhaps that replaces the opening pick?

    Sloan Looney -

    Hi! I can't see which guide you were using when writing this comment. Can you reply here with which guide and fix kit you used?

    Clay Eickemeyer -

    I see you posted this in Meta. I hope it's resolved soon! In the meantime, a guitar pick may work well enough for your repair.

    Clay Eickemeyer -

    what fix kit?

    Meow Purr -

    My fix kit didn't include an opening pick either

    WILLIAM HARRIS -

    Make sure you check inside the black boxes after emptying them. My pick was stuck inside one of the boxes.

    AndyF -

    My AliExpress refurbished screen came with a pick that has a coin-like circle that pops out, so no modification was necessary

    Gijs Leegwater -

  3. sj1JL5FXTOPJTKW6
    sj1JL5FXTOPJTKW6
    JZ1IB34IWhEhCleT
    nvBxvpe4Qwjx4V3b
    • If your iPhone has a cracked screen, keep further breakage contained and prevent bodily harm during your repair by taping over the glass.

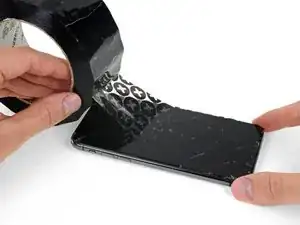
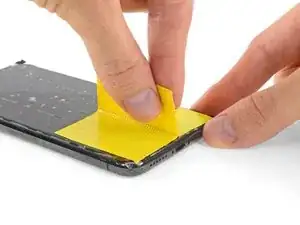
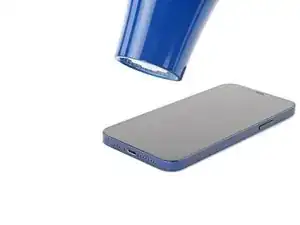
    • Lay overlapping strips of clear packing tape over the iPhone's screen until the whole face is covered.

    • Wear safety glasses to protect your eyes from any glass shaken free during the repair.

    • If you can't get the suction cup to stick in the next few steps, fold a strong piece of tape (such as duct tape) into a handle and lift the screen with that instead.

    • If all else fails, you can superglue the suction cup to the screen.

  4. Os3qg4HWs3DHZUbC
    Os3qg4HWs3DHZUbC
    yqjOTChYKYjBppHS
    UD2Rb4ZkLp1dR2lA
    • The next three steps demonstrate the Anti-Clamp, a tool we designed to make the opening procedure easier. If you aren't using the Anti-Clamp, skip down three steps for an alternate method.

    • For complete instructions on how to use the Anti-Clamp, check out this guide.

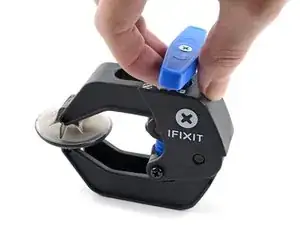
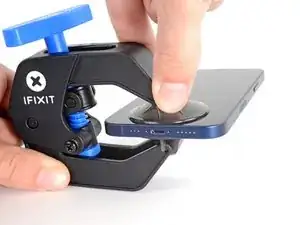
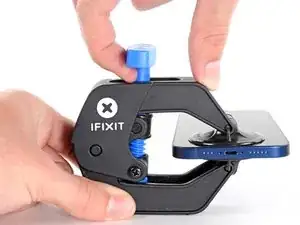
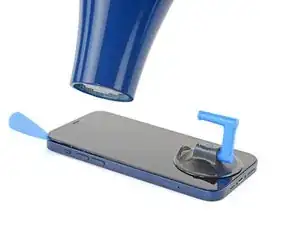
    • Pull the blue handle backwards to unlock the Anti-Clamp's arms.

    • Slide the arms over either the left or right edge of your iPhone.

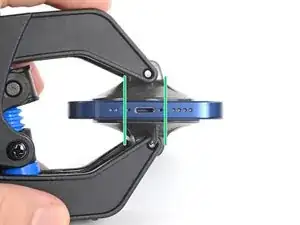
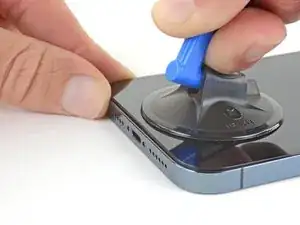
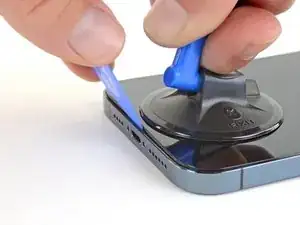
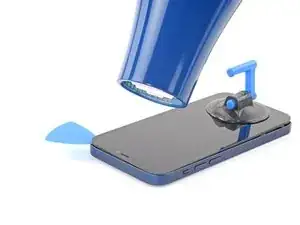
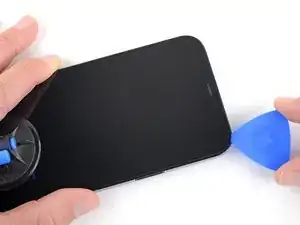
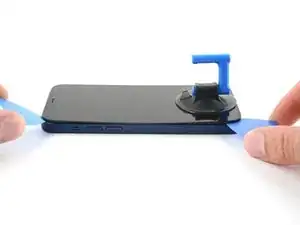
    • Position the suction cups near the bottom edge of the iPhone—one on the front, and one on the back.

    • Squeeze the cups together to apply suction to the desired area.

    • If you find that the surface of your iPhone is too slippery for the Anti-Clamp to hold onto, you can use tape to create a grippier surface.

  5. fKWyS5SKExy1YSmZ
    fKWyS5SKExy1YSmZ
    vSFovZklo42HTcYs
    ZbwB6NDqACXGOyFS
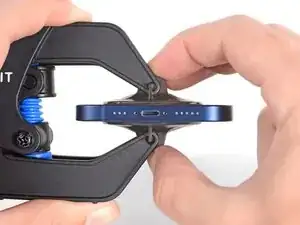
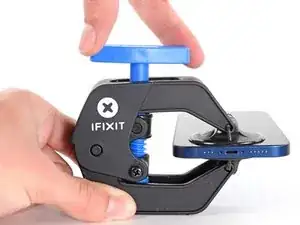
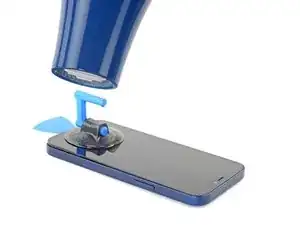
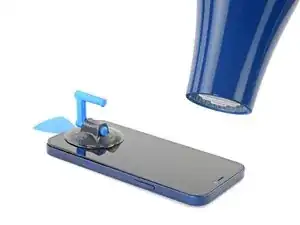
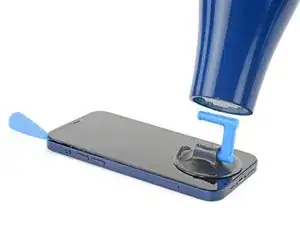
    • Pull the blue handle forwards to lock the arms.

    • Turn the handle clockwise 360 degrees or until the cups start to stretch.

    • Make sure the suction cups remain aligned with each other. If they begin to slip out of alignment, loosen the suction cups slightly and realign the arms.

  6. qQCMxyD32Oy5uiFo
    qQCMxyD32Oy5uiFo
    BFmPKROjmPAojS1Y
    LwgRJAMiAE2MXffV
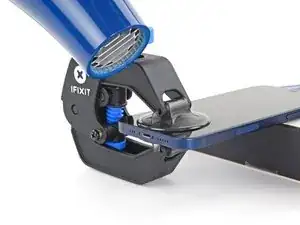
    • Support your iPhone on something sturdy such as a hardcover book so it rests hands-free and parallel to the ground; this makes it easier to work with in the following steps.

    • Use a hair dryer to heat along the bottom edge of the iPhone. The screen should feel slightly too hot to touch.

    • For complete instructions on how to use a hair dryer, check out this guide.

    • Wait one minute to give the adhesive a chance to release and present an opening gap.

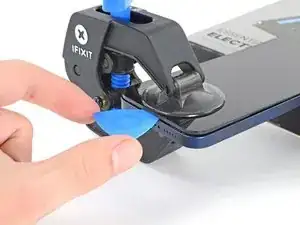
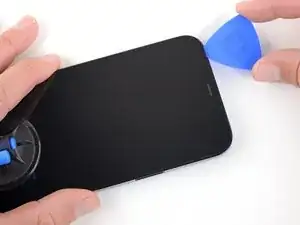
    • Insert an opening pick under the screen's plastic bezel when the Anti-Clamp creates a large enough gap.

    • If the Anti-Clamp doesn't create a sufficient gap, apply more heat to the area and rotate the handle a quarter turn.

    • Don't crank more than a quarter turn at a time, and wait one minute between turns. Let the Anti-Clamp and time do the work for you.

    • Skip the next three steps.

  7. XN5h5dQGnnYTnZCh
    • Use a hair dryer or a heat gun to heat the bottom edge of the iPhone for 90 seconds or until the screen is slightly too hot to touch.

    • Never leave your hair dryer in one spot for an extended period of time.

    wenn man die Frontkamera nicht tauscht sondern nur anhebt und reinigt, funktioniert Face ID dann noch?

    dominic327i -

    Wenn du beim Aus- und Einbau alles richtig machst, dürfte dabei nichts passieren.

    Fabian Neidhardt -

  8. IVnCerPqepugKsWo
    IVnCerPqepugKsWo
    HpkuSSsZsjRYBLlA
    • If you're using a single suction handle, apply it to the bottom edge of the phone, while avoiding the very edge of the glass.

  9. okm4XxVvlropeCW3
    okm4XxVvlropeCW3
    j4NRadxUTnlrb12H
    UPjfVZJyETXVsOTW
    • Pull up on the suction cup with firm, constant pressure to create a slight gap between the screen and the frame.

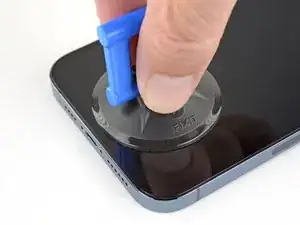
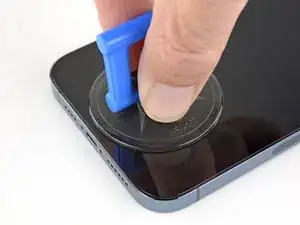
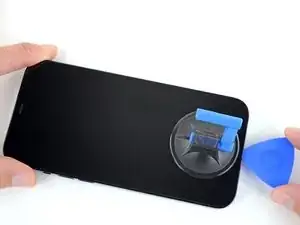
    • Insert an opening pick into the gap under the screen's plastic bezel.

    • The watertight adhesive holding the screen in place is very strong; creating this initial gap takes a significant amount of force. If you're having a hard time opening a gap, apply more heat, and gently rock the screen up and down to weaken the adhesive until you create enough of a gap to insert your tool.

    Be very careful on this step to insert the pick as vertically as possible!!! I ended up separating the glass from the outer frame on this step and destroying the screen. Not a cheap mistake to make!

    L E -

  10. pqGtQHIvWPbhgDll
    pqGtQHIvWPbhgDll
    CfXIb65n4Zot5PfN
    • Use a hair dryer to heat the right edge of the iPhone (the edge with the power button) for 90 seconds or until the screen is slightly too hot to touch.

  11. KIDlFJekEKhTPWbB
    KIDlFJekEKhTPWbB
    1xbHSGiYti6rS1t3
    v2huARdUJOTROElE
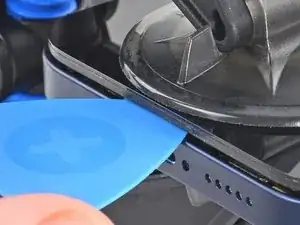
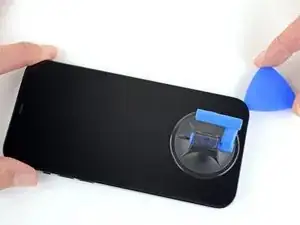
    • Slide the opening pick around the bottom right corner of the iPhone to separate its adhesive.

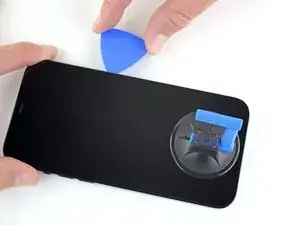
    • Continue sliding up the right edge of the iPhone until you reach the top right corner.

    • Don't insert your pick more than 3 mm, as you may damage internal components.

    • Leave the pick in the top right corner before continuing.

  12. GQxluiQi1EanQyna
    • Use a hair dryer to heat the top edge of the iPhone for 90 seconds or until the screen is slightly too hot to touch.

  13. eboZajldSQjkaaSF
    eboZajldSQjkaaSF
    NmCMH6QOy2AHCZOD
    tDsVKMshO2SC4ohs
    • Slide the opening pick around the top right corner of the iPhone to separate the top adhesive.

    • Don't insert your pick more than 3 mm, as you may damage the top sensors.

    • Leave the pick in the top left corner before continuing.

  14. 3SBVr4sPUjWyxkmC
    3SBVr4sPUjWyxkmC
    hOeRUTqhdPXMswus
    • Use a hair dryer to heat the left edge of the iPhone for 90 seconds or until the screen is slightly too hot to touch.

  15. rFUuHYiEbXg32OXp
    • There are delicate cables along the left edge of your iPhone. Don't insert your pick here, as you may damage the cables.

  16. OksOQ6HrdiwnCNOQ
    OksOQ6HrdiwnCNOQ
    PUFekpRkpZL1i6xc
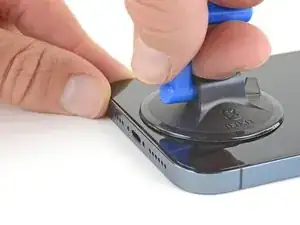
    • Insert a second opening pick in the bottom left corner of the iPhone.

    • Twist both picks simultaneously until the left edge clips release.

    • Apply the twisting force gradually.

    • If you're having trouble separating the adhesive, reheat the left edge.

  17. OvnhYdTPLpxPjlbB
    OvnhYdTPLpxPjlbB
    gpBdotQ2NHtILfOE
    P4hyesRIpH5NFB6q
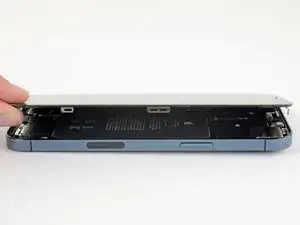
    • Rotate your iPhone so the right edge faces you.

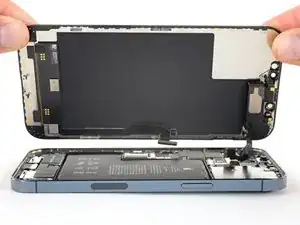
    • Open the iPhone by swinging the display up from the right side, like the front cover of a book.

    • Don't try to fully separate the display yet, as several fragile ribbon cables still connect it to the iPhone's logic board.

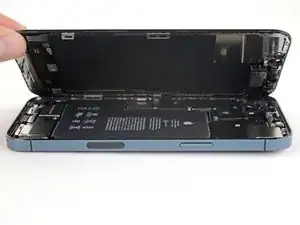
    • Lean the display against something to keep it propped up while you're working on the phone.

    • During reassembly, lay the display in position, align the clips along the top edge, and carefully press the top edge into place before snapping the rest of the display down. If it doesn't click easily into place, check the condition of the clips around the perimeter of the display and make sure they aren't bent.

  18. JPLGNbP3WdNvbGTI
    • Remove four 1.1 mm-long Y000 screws securing the battery and display connector cover.

    • Throughout this repair, keep track of each screw and make sure it goes back exactly where it came from to avoid damaging your iPhone.

    • During reassembly, this is a good point to power on your iPhone and test all functions before you seal the display in place. Be sure to power your iPhone back down completely before you continue working.

  19. ZGmHGT6H3VJBSceO
    • Remove the battery and display connector cover.

  20. pEVHjPJqwQhOEjCa
    pEVHjPJqwQhOEjCa
    glJmaGNiiPJGiFRE
    • Use a spudger or a clean fingernail to pry the battery connector up from its socket on the logic board.

    • Try not to damage the black silicone seal surrounding this and other board connections. These seals provide extra protection against water and dust intrusion.

    • Bend the connector slightly away from the logic board to prevent it from accidentally making contact with the socket and providing power to the phone during your repair.

  21. H2jSZxvbTZkNIyMa
    H2jSZxvbTZkNIyMa
    d4xG6CpWGJfYKBBa
    • Use a spudger or a fingernail to disconnect the display cable connector.

    • To re-attach press connectors like this one, carefully align and press down on one side until it clicks into place, then repeat on the other side. Do not press down on the middle. If the connector is misaligned, the pins can bend, causing permanent damage.

  22. woSwIQYro42iHyZ1
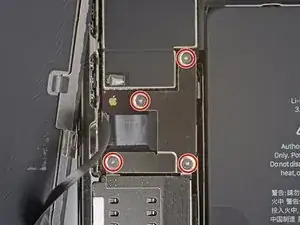
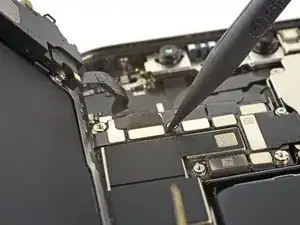
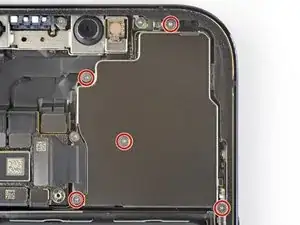
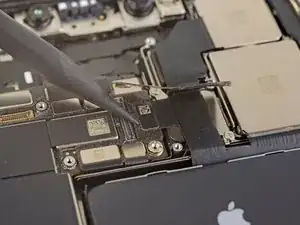
    • Use a Y000 driver to remove the four 1.1 mm-long screws securing the front sensor connector cover.

  23. 4qeCDn1t6j6ZlwFN
    4qeCDn1t6j6ZlwFN
    Db3cSmZJVS3XjYBN
    4NKnqO4UAABsyEHc
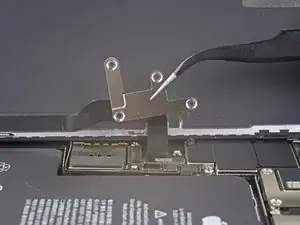
    • Swing the cover up from the left until the small clip on the right unhooks.

    • Remove the cover.

    • During reassembly, insert the clip on the right edge into its slot first, then hinge the rest of the cover into place.

  24. BnkTNuHTeERcb24v
    BnkTNuHTeERcb24v
    MJZmAHG6UW3hqJAR
    • Use a spudger or a fingernail to disconnect the front sensor assembly cable connector.

    when lifting up the front sensor assembly cable connector, you should use the flat end of the spudger. Using the pointed end as shown in the picture runs the risk of damaging components on the board and/or the cable connector itself.

    Carter Taylor -

  25. A6bqsvj4qrkEiEwC
  26. A2JL6D2fKAxNe3CN
    • Use a Y000 driver to remove the five 1.5 mm screws securing the rear-facing camera cover.

    There are five screws to be removed here. All five are circled in the pic but the description only states four.

    Chris -

  27. HiTfTgTVdnEwPYI4
    HiTfTgTVdnEwPYI4
    iUTFwNLIGWGhKLQg
    1UY4XPP4LL1V2Bod
    • Lift the camera cover from the edge closest to the logic board, and remove it.

    • To reinstall the camera cover, first insert the tab on the outside edge into its slot in the phone frame. Then hinge the cover closed.

  28. rko5EhtFaJ64nqdr
    rko5EhtFaJ64nqdr
    NhuPbknlkQqGXJvG
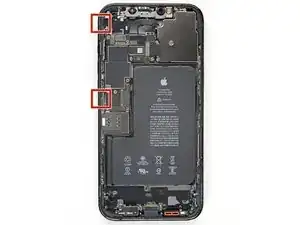
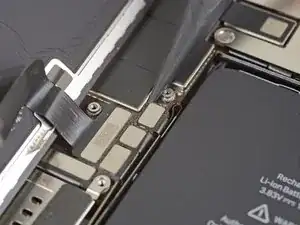
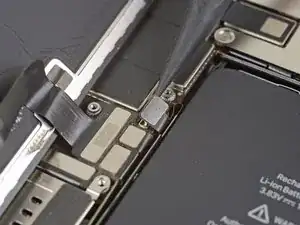
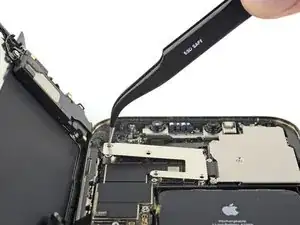
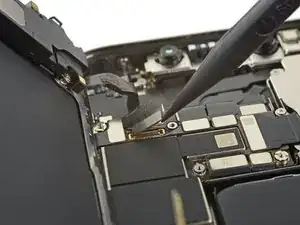
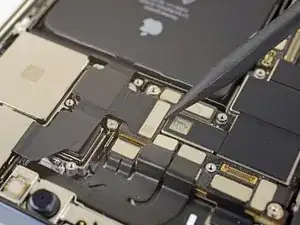
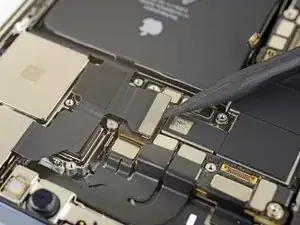
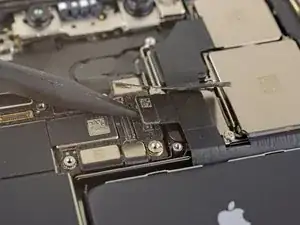
    • Use a spudger or a fingernail to disconnect the first camera cable connector by prying it straight up from its socket.

    غيرت كاميرا جهازي ويظهر لي شعار ان الكاميرا غير اصليه

    عمر الشمراني -

  29. pnfdNyU4ErGuBpOc
    pnfdNyU4ErGuBpOc
    JIOLOwmMT63YoDyT
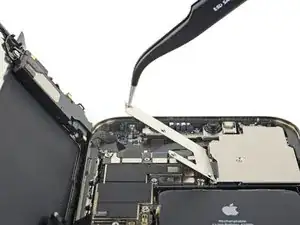
    • Use a spudger or a fingernail to disconnect the second camera cable connector by prying it straight up from its socket.

  30. mNCXSVhPRjXQonnx
    mNCXSVhPRjXQonnx
    pcrDGOpHpMs5oXq4
    b6w3lujOHAWVjYQw
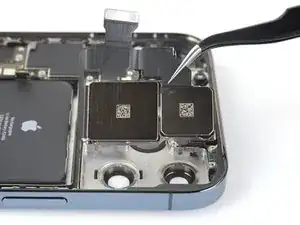
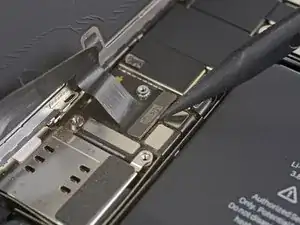
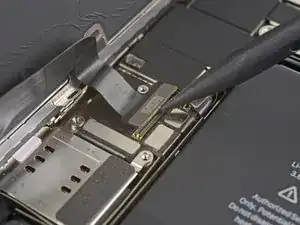
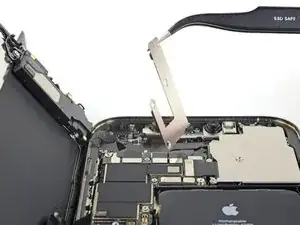
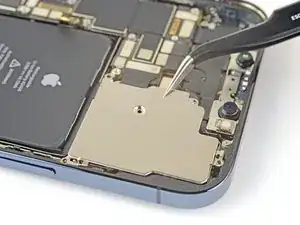
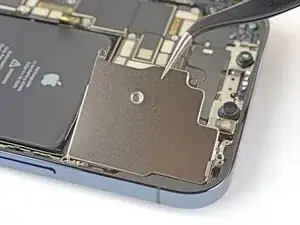
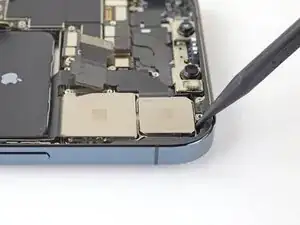
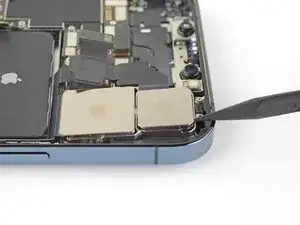
    • Use the point of a spudger to lift the camera assembly out of the iPhone.

    • Remove the rear-facing cameras.

    Bullshit! Don’t bother because Apple locked down the iPhone 12 Pro Max rear camera. It’s not possible to replace it. Do so and you’ll either get a warning that it’s a third party camera OR it just won’t work

    Spamme Menot -

    You will get the notification but the camera will work. If yours doesn't work either you have a bad camera or you did something wrong. Ive done dozens of these replacements with no issues other than the aftermarket camera notification in the settings. It does NOT affect the camera!

    Gregg Stanley -

Conclusion

Compare your new replacement part to the original part—you may need to transfer remaining components or remove adhesive backings from the new part before installing.

To reassemble your device, follow the above steps in reverse order.

Take your e-waste to an R2 or e-Stewards certified recycler.

Repair didn’t go as planned? Try some basic troubleshooting, or ask our iPhone 12 Pro Max Answers community for help.

Adam O'Camb

Member since: 11/04/15

195421 Reputation

7 comments

Hi! Good and informative walk through, do you know of a way to program the new camera so that is will work as the original one?

MrSir -

I am having issues with image focusing after replacing the back camera for this model. The camera is able to focus on wide angles but not on 1x zoom or higher. We have reset the device and ensured it is fully up to date and the issue has persisted. My conclusion is that the camera is faulty and I will need a new replacement camera. Anything else I might be missing?

Keegen Payne -

This guide should start by saying that an iPhone 12 camera repair or replacement can NOT be made without access to a proprietary Apple tool which is only available to technicians authorized by the company. The issue was confirmed by an Apple training guide, which informs technicians that they will need to run Apple’s proprietary, cloud-linked System Configuration app in order to carry out camera repairs or replacements.

In short, this prevents DIY repairs at home, as well as those by third-party companies who do not have access to the online software tool …

Marc Templer -

So the repair guide is great. However you should not buy the camera from ifixit. You need to go to https://selfservicerepair.com/ and buy the camera there. You can get all the tools and anything you need from ifixit but you need to order the part from the apple selfservicerepair and enter your serial number. Then follow this guide and contact them through your order details to initiate the calibration. The process requires you to contact the service rep and have them connect to your phone and lead you through the calibration. Worked like a charm and wasn't that hard of a repair. Thanks ifixit for all of the info!

Alex Dantas -

Would this fix a buzzing noise coming from the camera?

David Zamora -

I just need to clean dust off the telephoto lens. Is this the only way?

Francisco Otero -

Hat sehr gut funktioniert, dank der Anleitung.

Patrick Herbst -