Introduction

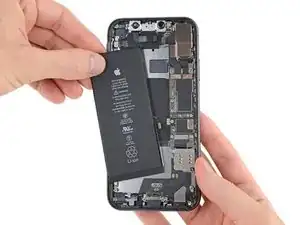
iPhone batteries degrade with use—over time, they lose their ability to hold a full charge. Apple's batteries are rated to hold 80% of their capacity for up to 500 charge cycles, which lasts roughly 18-24 months for most users. When your battery's chemistry is degraded, it may also cause your iPhone to run more slowly. Use this guide to replace your battery and restore your iPhone 11 to full performance.

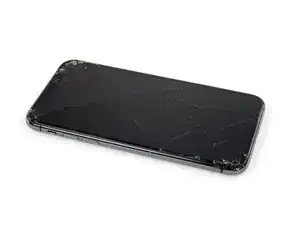
If your battery is swollen, take appropriate precautions.

Note: After the repair, your iPhone may display a warning about the “genuineness” of the battery, even when using original Apple parts. If your iPhone functions normally, you can safely ignore the warning.

For optimal performance, after completing this guide, calibrate your newly installed battery: Charge it to 100% and keep charging it for at least two more hours. Then use your iPhone until it shuts off due to low battery. Finally, charge it uninterrupted to 100%.

You'll need replacement adhesive in order to complete this repair.

  1. T2yIKTYtWTOpeGir
    T2yIKTYtWTOpeGir
    1BRQlG3vB6hGYvKS
    • Before you begin, discharge your iPhone battery below 25%. A charged lithium-ion battery can catch fire and/or explode if accidentally punctured.

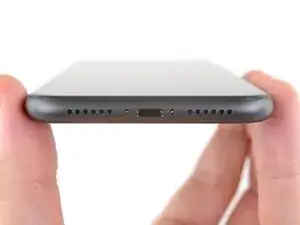
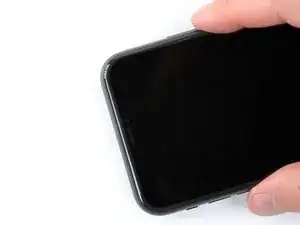
    • Power off your iPhone before beginning disassembly.

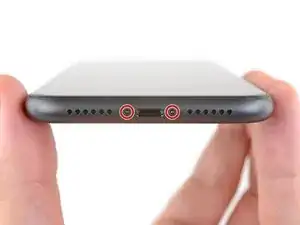
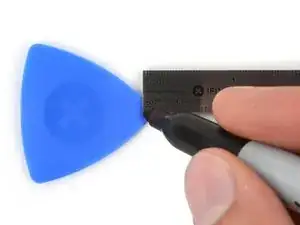
    • Remove the two 6.7 mm-long pentalobe screws at the bottom edge of the iPhone.

    • Opening the iPhone's display will compromise its waterproof seals. Have replacement seals ready before you proceed past this step, or take care to avoid liquid exposure if you reassemble your iPhone without replacing the seals.

    the right screws wouldn’t come off

    Yusef San Inocencio -

    ok one came of but my right wont come of either!!!!

    Aisa Jawara -

    Hello guys, I still haven't found away to power off the iphone without using the screen. Cheers!

    danielaguirre93 -

    You can try this.

    Quickly Press and release the volume up button.

    then Quickly Press and release the volume down button.

    then press and hold the power button and wait until it turns off.

    worked for me :D

    Benóný Egilson -

    Where does one get replacement seals? Is this the same as the display assembly adhesive?

    Brian Baker -

    not of the screwdrivers i have seem to be able to turn the screws

    Aisa Jawara -

  2. 6UPwoloGBO4tmVoS
    6UPwoloGBO4tmVoS
    BmSYPJmOy6dbHipF
    3EOdQPAGOmiuhoKU
    • If inserted too far, an opening pick can damage your device. Follow this step to mark your pick and prevent damage.

    • Measure 3 mm from the tip and mark the opening pick with a permanent marker.

    • You can also mark the other corners of the pick with different measurements.

    • Alternatively, tape a coin to a pick 3 mm from the tip.

  3. FLq6W2khWOq4uAQr
    FLq6W2khWOq4uAQr
    2XIfBVvS5Ty5QtZF
    4Df24ZLS6kBFTyVU
    • If your iPhone has a cracked screen, keep further breakage contained and prevent bodily harm during your repair by taping over the glass.

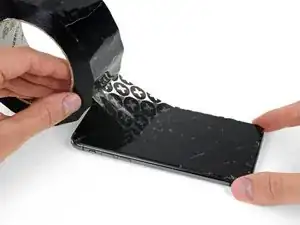
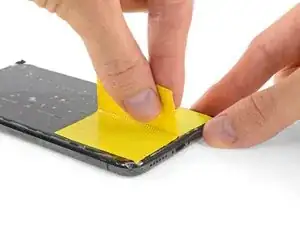
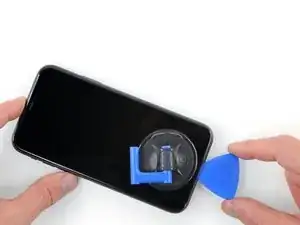
    • Lay overlapping strips of clear packing tape over the iPhone's screen until the whole face is covered.

    • Wear safety glasses to protect your eyes from any glass shaken free during the repair.

    • If you can't get the suction cup to stick in the next few steps, fold a strong piece of tape (such as duct tape) into a handle and lift the screen with that instead.

    • If all else fails, you can superglue the suction cup to the screen.

  4. 4fhdeZSxwgTn4VgI
    4fhdeZSxwgTn4VgI
    BxknskOQsXXo6dog
    NEQnchvrYpEJPYKS
    • The next three steps demonstrate the Anti-Clamp, a tool we designed to make the opening procedure easier. If you aren't using the Anti-Clamp, skip down three steps for an alternate method.

    • For complete instructions on how to use the Anti-Clamp, check out this guide.

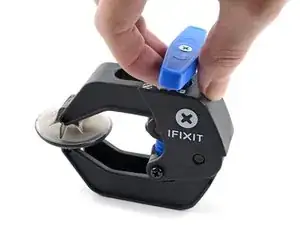
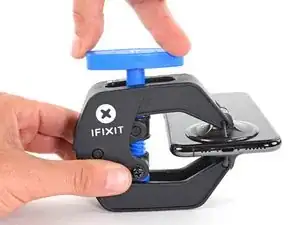
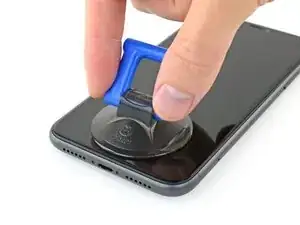
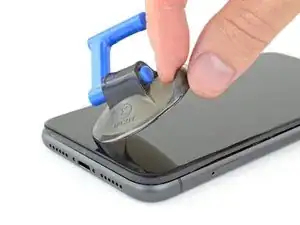
    • Pull the blue handle backwards to unlock the Anti-Clamp's arms.

    • Slide the arms over either the left or right edge of your iPhone.

    • Position the suction cups near the bottom edge of the iPhone—one on the top, and one on the bottom.

    • Squeeze the cups together to apply suction to the desired area.

    • If you find that the surface of your iPhone is too slippery for the Anti-Clamp to hold onto, you can use tape to create a grippier surface.

  5. DtDpThOATcyQb4yT
    DtDpThOATcyQb4yT
    MAGI2JXwXnS5LvCO
    NgpQQ6M1sP5xBcXQ
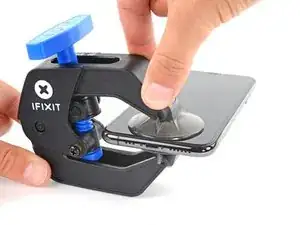
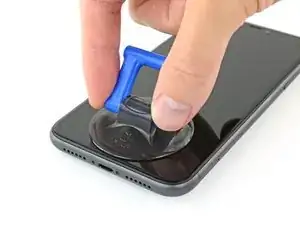
    • Pull the blue handle forward to lock the arms.

    • Turn the handle clockwise 360 degrees or until the cups start to stretch.

    • Make sure the suction cups remain aligned with each other. If they begin to slip out of alignment, loosen the suction cups slightly and realign the arms.

  6. oRZ6AXaleqoRTKND
    oRZ6AXaleqoRTKND
    bDhAC4ImHIc3XQdf
    HTQodvWRCjulrPCR
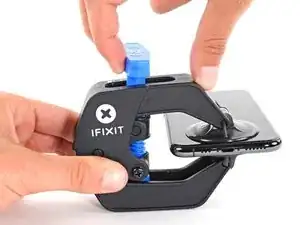
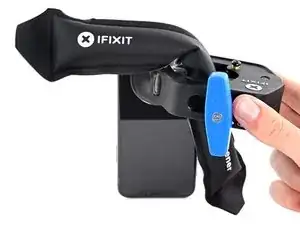
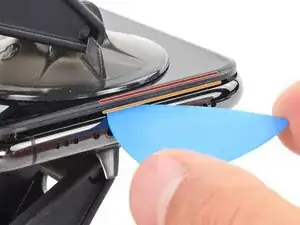
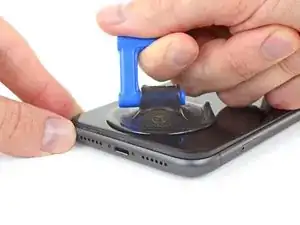
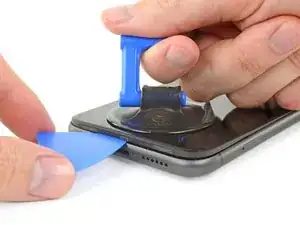
    • Heat an iOpener and thread it through the arms of the Anti-Clamp.

    • You can also use a hair dryer, heat gun, or hot plate—but extreme heat can damage the display and/or internal battery, so proceed with care.

    • Fold the iOpener so it lays on the bottom edge of the iPhone.

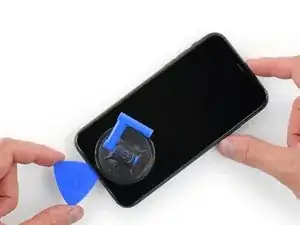
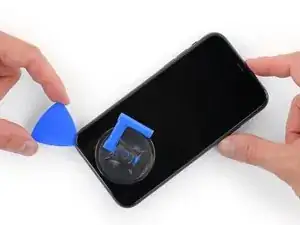
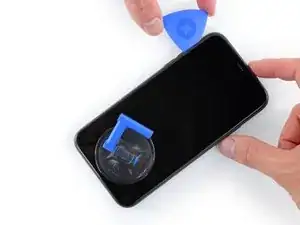
    • Wait one minute to give the adhesive a chance to release and present an opening gap.

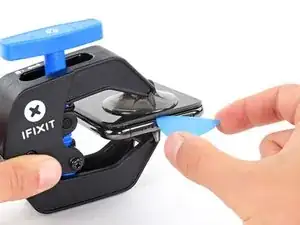
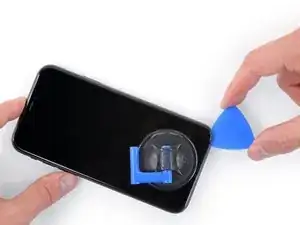
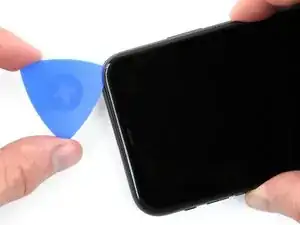
    • Insert an opening pick into the gap under the screen and the plastic bezel, not the screen itself.

    • If the Anti-Clamp doesn't create a sufficient gap, apply more heat to the area and rotate the handle a quarter turn.

    • Don't crank more than a quarter turn at a time, and wait one minute between turns. Let the Anti-Clamp and time do the work for you.

    • Skip the next three steps.

  7. yQbwAmoITNyEmrSn
    • Heating the lower edge of the iPhone helps soften the adhesive securing the display, making it easier to open.

    • Use a hairdryer or heat gun or prepare an iOpener and apply it to the lower edge of the iPhone for about a minute.

  8. aJCRTiaUBHVMoAUV
    aJCRTiaUBHVMoAUV
    YhJejcEpMhlQpvWX
    • If you're using a single suction handle, apply it to the bottom edge of the phone, while avoiding the curved portion of the glass.

  9. MKShqPOGkjD2vOPp
    MKShqPOGkjD2vOPp
    dJknkSwVsVBaZabR
    XgeYpSK2b4NpndCh
    • Pull up on the suction cup with firm, constant pressure to create a slight gap between the front panel and rear case.

    • Insert an opening pick into the gap under the screen and the plastic bezelnot the screen itself.

    • The watertight adhesive holding the display in place is very strong; creating this initial gap takes a significant amount of force. If you're having a hard time opening a gap, apply more heat, and gently rock the screen up and down to weaken the adhesive until you create enough of a gap to insert your tool.

    This turned out to be the most difficult part for me. My old ifixit suction cup didn't suck hard enough to generate enough force to pry the display from the case. I ended up applying heat at least a dozen times, and I had to pull up on the suction cup forcefully over and over and over while repositioning it several times. I finally had success inserting my pick into the tiny gap after 30 or so rapid tugs on the suction cup.

    matthew r -

    I pulled the screen by accident instead of the bottom layer, now what?

    Alvaro -

    I have the same question

    Konstantinos Solakoglou -

  10. BiTGA23MOOmtexSG
    BiTGA23MOOmtexSG
    l5NWMTOshIlqjNtG
    IfJRwFLPwsBL4klh
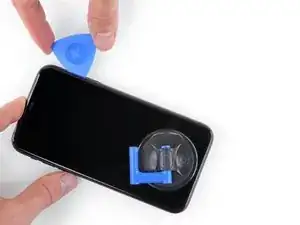
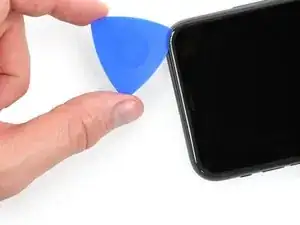
    • Slide the opening pick around the lower left corner and up the left edge of the iPhone, slicing through the adhesive holding the display in place.

    • Don't insert your pick more than 3 mm, as you may damage internal components.

  11. FCPAxbSlJhdAIRLG
    • There are delicate cables along the right edge of your iPhone. Don't insert your pick here, as you may damage the cables.

  12. K5iUxKTkELONJBVf
    K5iUxKTkELONJBVf
    ZhlLOMfaksHRxZJV
    yy5WtAu2UqSpCUTX
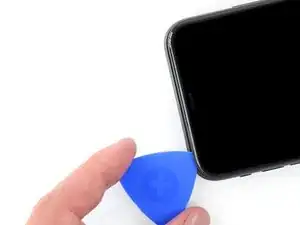
    • Re-insert your pick at the bottom edge of the iPhone, and slide it up the right side to continue separating the adhesive.

    • Don't insert your pick more than 3 mm, as you may damage the display cables.

    Instructions are confusing as the last step says not to insert at certain points, while this says to slide all the way up the right side - is it that sliding is ok but inserting isn't (whatever that might mean) or just not more than 3mm?

    Peter Hill -

    Just slide slightly and the display will rise without problems on all iPhone models, sometimes if I have long nails I even insert a fingernail and lift the display.

    Tonynox -

  13. J1ZVUrqQ61e4NOZ1
    J1ZVUrqQ61e4NOZ1
    HsxeMCkPLyCeHKpI
    tegZUpHyY4wGd2Ww
    • The top edge of the display is secured with both glue and clips.

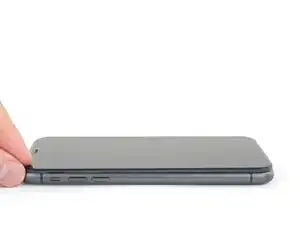
    • Gently pull the right edge of the display down slightly (in the direction of the Lightning port).

    • Insert your pick into the top-right corner of the phone.

  14. 5mKceYJffKEaQo4L
    5mKceYJffKEaQo4L
    kQQD2XkOMWjrOjMu
    • Continue pulling the display down (toward the Lightning port) as needed in order to make a gap large enough for the pick.

    • Slide the pick to the top left corner and cut any remaining adhesive securing the display.

    • Don't insert your pick more than 3 mm, as you may damage the Face ID sensor array.

  15. 24nVgAyDKPTICLhV
    • Pull the small nub on the suction cup to detach it from the front panel.

  16. IDOegN1rKCFFJMBF
    IDOegN1rKCFFJMBF
    QcgYHgKIt6XMTsnK
    xVdpJyR6i213HsJ2
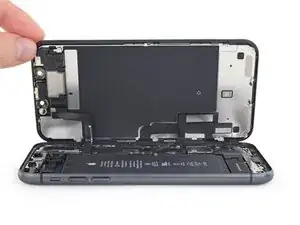
    • Open the iPhone by swinging the display up from the left side, like the back cover of a book.

    • Don't try to fully separate the display yet, as several fragile ribbon cables still connect it to the iPhone's logic board.

    • Prop the display up against something sturdy.

    • During reassembly, lay the display in position, align the clips along the top edge, and carefully press the top edge into place before snapping the rest of the display down. If it doesn't click easily into place, check the condition of the clips around the perimeter of the display and make sure they aren't bent.

  17. KxoYscx1ItVaLely
    KxoYscx1ItVaLely
    ZA5AX6xqq3r5qUNN
    • To access the screws in the following step, tilt the display by slightly lifting its lower edge.

    • Be careful not to strain or tear the display cables.

  18. fPaVWtYy3NJ53YvD
    fPaVWtYy3NJ53YvD
    jFRf1tI5V4hicZKU
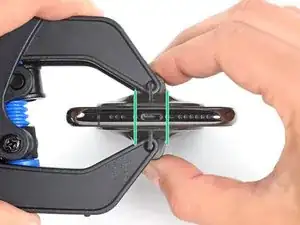
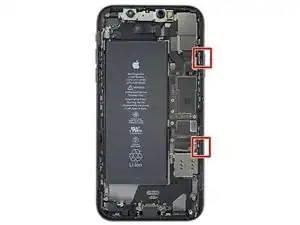
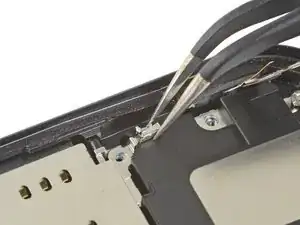
    • Use a Y000 driver to remove the three 1.1 mm-long screws securing the battery connector bracket.

    • Throughout this repair, keep track of each screw and make sure it goes back exactly where it came from.

    • During reassembly, this is a good point to power on your iPhone and test all functions before you seal the display in place. Be sure to power your iPhone back down completely before you continue working.

    During reassembly, I had to connect my phone to the charger before it would power up.

    Austin Culberson -

    Die Schrauben sind wahnsinnig kurz, tatsächlich winzig klein. Nach dem Herausdrehen könnte es im ersten Moment so aussehen, als habe man die Schrauben ausgebohrt anstatt herauszudrehen, sie sind jedoch sehr schnell gelöst und liegen dann entweder im Gehäuse oder sind neben dem Gehäuse herausgefallen. In jedem Fall sollten sie nie auf den Boden fallen, da sie dann kaum mehr auffindbar wären.

    Bernd Sonneck -

  19. HKBUYhWeIUlYLqdG
    • Remove the bracket.

  20. XN1PHiCYxtERqDgF
    XN1PHiCYxtERqDgF
    XKgOIM6e2mmR1ecq
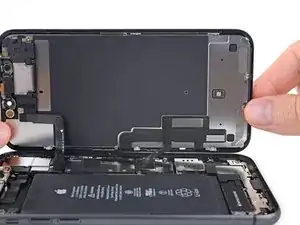
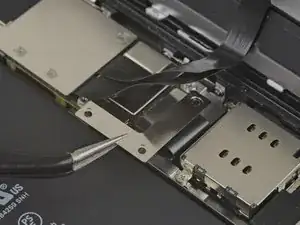
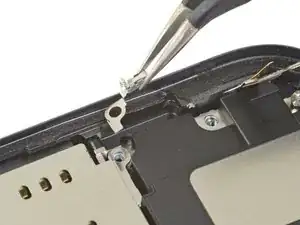
    • Use a spudger or a clean fingernail to pry the battery connector up from its socket on the logic board.

    • Try not to damage the black silicone seal surrounding this and other board connections. These seals provide extra protection against water and dust intrusion.

    • Bend the connector slightly away from the logic board to prevent it from accidentally contacting the socket.

  21. kMZitLQGk2hTRk6G
    kMZitLQGk2hTRk6G
    Cdvg2fNT2Lf21uEE
    • Use a Y000 driver to remove the five 1.1 mm screws securing the logic board cover bracket.

    Die Schrauben sind wahnsinnig kurz, tatsächlich winzig klein. Nach dem Herausdrehen könnte es im ersten Moment so aussehen, als habe man die Schrauben ausgebohrt anstatt herauszudrehen, sie sind jedoch sehr schnell gelöst und liegen dann entweder im Gehäuse oder sind neben dem Gehäuse herausgefallen. In jedem Fall sollten sie nie auf den Boden fallen, da sie dann kaum mehr auffindbar wären.

    Bernd Sonneck -

  22. hwCpiXUDeKoMTWEh
    • Remove the bracket.

  23. IFoKtCq1UVwNZXJv
    IFoKtCq1UVwNZXJv
    FRZEdrhrUWadPZFT
    iT2xWjWSHH5EdMbq
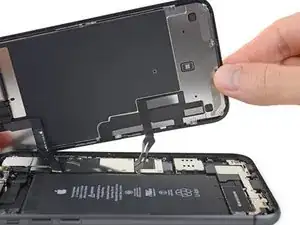
    • Use a spudger or a fingernail to disconnect the LCD panel cable connector.

    • Disconnect the digitizer connector next to it.

    Be mindful when reconnecting LCD panel connector and digitizer connector. It’s looks very similar. These 2 ribbon connectors a slightly different.

    Pay attention.

    Josmaknolavic -

    내 아이폰이 디스플레이 분리 단계를 거친 후, 전원이 들어오지 않습니다. 층전기를 꽂아도 배터리에 미세한 전기 반응이 느껴지지 않고, 탭틱 엔진도 작동하지 않게 되었습니다. cpu 온도는 여전히 뜨껍습니다. 내 마더보드가 디스플레이 분리 후 갑자기 고장난건가요?

    Protoncal -

    Hast Du das Problem gelöst?

    Bernd Sonneck -

  24. FXVmdXMPZpEU2F5j
    FXVmdXMPZpEU2F5j
    BxKUHpGvITeIEOQL
    • Use the point of a spudger or a fingernail to disconnect the front panel sensor assembly connector.

  25. VoZNhVF2Va3NVwit

    After this step its probably a good idea to test the new screen (you dont have to plug in the front camera assembly)

    Richard Kraus -

    Not a technician, so correct me if I'm wrong: I think that it's at this step of reassembly (before you reattach the screen) that you apply waterproof glue, if you have it.

    Athanasius Pernath -

  26. yZRBM6ZtRaGNF4jK
    yZRBM6ZtRaGNF4jK
    SMjp1TlAuqKnIFVl
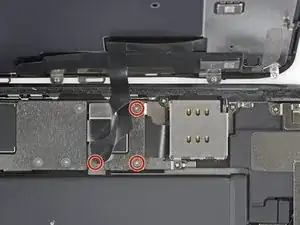
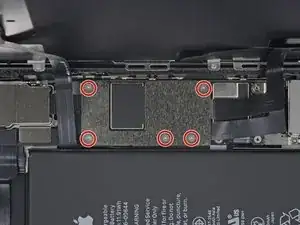
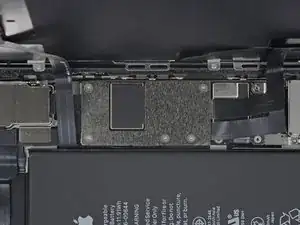
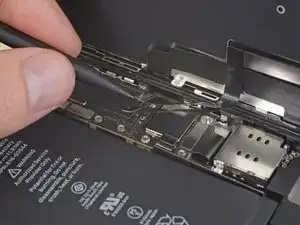
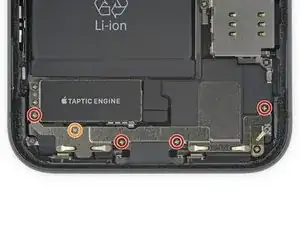
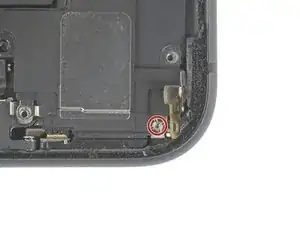
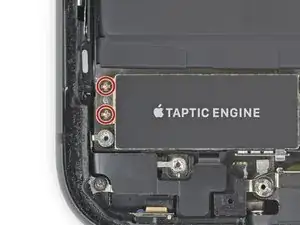
    • Using a Phillips driver, remove the five screws securing the bracket below the Taptic engine and speaker:

    • Four 1.6 mm screws

    • One 1.3 mm screw

    The top right screw (1.6 mm marked red) is actually different from the other three 1.6mm screws as it's thread is slightly thicker.

    Florian -

    yep same experience here

    Kai Mcpherson -

    Yes, same here. The guide should be updated.

    Maximilien Tirard -

  27. ydEhP2JTEbDrBPuv
    • Remove the lower bracket.

  28. KP6DPRmDF32jHKV3
    KP6DPRmDF32jHKV3
    QtBrI2gwDmpWimgT
    USvJnpNQOEYyZfDD
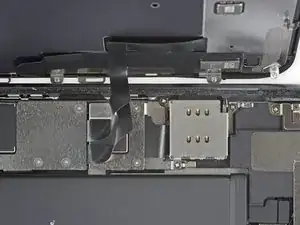
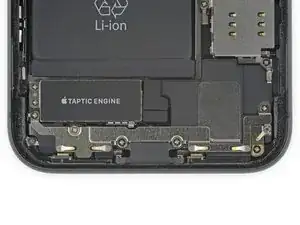
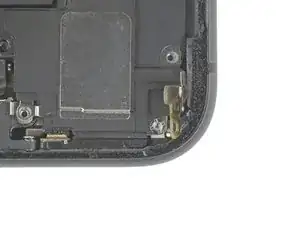
    • Use tweezers to lift and remove the black tape and rubber pad covering the Taptic Engine connector.

    • Use a little heat from a hair dryer or iOpener to make the tape easier to peel up and re-adhere later.

  29. iFAnZMX3QqYc2s1G
    iFAnZMX3QqYc2s1G
    LjNFDjKuFbktSKDW
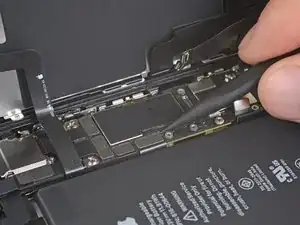
    • Remove the five screws securing the speaker and brackets:

    • One 1.9 mm Phillips screw

    • One 2.3 mm Phillips screw

    • One 3.1 mm standoff screw

    • Two 1.6 mm Phillips screws

    In my experience, the two green screws are not interchangeable

    PJ McConnell -

    the two green srews are not equally thic

    TheDi TV -

    Wtf? I buy a repair kit and it doesn’t have all the screwdrivers I need?

    JMD -

    The repair kit does not have bits for all the screws

    marios -

    The battery kit includes the bit for the standoff screw marked in yellow.

    marc -

    The green screw for the ground clip is longer than the second green screw. Keep the ground clip with that screw

    marc -

  30. UMXLsP2ehkjhqWNp
    UMXLsP2ehkjhqWNp
    tVXWOPwMGRxBun1Z
    • Remove the small grounding clip on the top right corner of the speaker.

    Salut comment je peux trouver cette pièce ?

    kenyfaya973 -

  31. MucviRMLO6q6abSl
    • Remove the Taptic Engine connector cover.

  32. gMFHLgaaLCUeRIns
    gMFHLgaaLCUeRIns
    mriX6Zgd54t4bXVM
    HCleOVgeM5iMRmyD
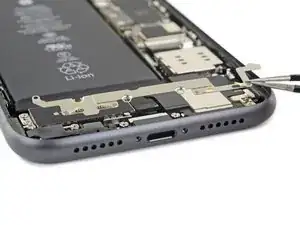
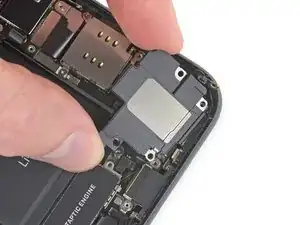
    • Lift and push aside the small board covering the remaining speaker screw in the bottom right corner of the iPhone.

    • Remove the 2.4 mm standoff screw underneath.

    Use the standoff bit that should be in the box with the battery and adhesive.

    marc -

  33. OOh3JmxasPZLaFua
    OOh3JmxasPZLaFua
    FMONch21PkoDoDYI
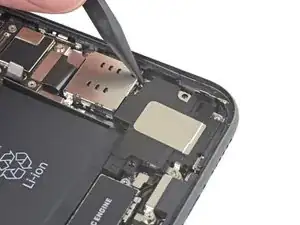
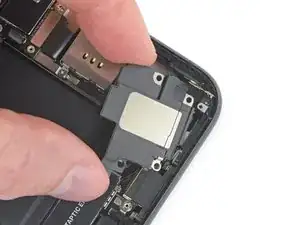
    • Insert a spudger under the top edge of the speaker, near the edge of the iPhone's case.

    • Gently pry up and lift the top edge of the speaker.

  34. nYei2bKBFNBP1F6D
    nYei2bKBFNBP1F6D
    yPC5MfiamNdJN6q6
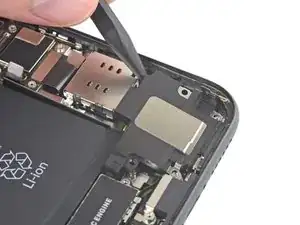
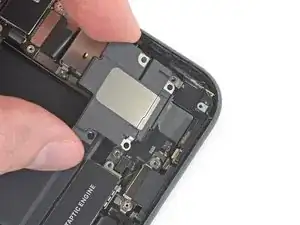
    • Hold the speaker by its side edges and rock it side-to-side, separating the adhesive securing it to the bottom edge of the iPhone.

    • Pull the speaker away from the bottom edge of the iPhone until the adhesive gasket separates.
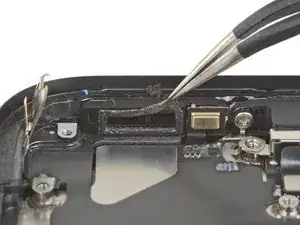
  35. 2jASMaPDajnTHWZ4
    2jASMaPDajnTHWZ4
    GuXANUuxA4IOiAJw
    • Remove the speaker.

    • Optionally, to help protect against water and dust intrusion, replace the speaker's adhesive gasket during reassembly:

    • Peel away any remaining adhesive with tweezers.

    • Prep the area underneath by cleaning it with a bit of isopropyl alcohol and a lint-free cloth or coffee filter so that the gasket adheres properly.

    • Install a new gasket onto the speaker, and then install the speaker.

    It seems that a bracket which held a screw to the charging port is holding the part to the phone even though adhesive and all screws are removed, not sure why but I can't remove the speaker. I had this same problem with another bracket of the speaker which held a screw but ripped it off the lower speaker part as i couldn't get it unattached from the screw port. All screws and adhesive were removed, I don't understand what is wrong

    Daniel Frey -

    do you sell the speaker's adhesive gasket replacement?

    thuan nguyen -

    Do you sell the speaker adhesive? It's unfortunate to have gotten this far and feel ill prepared to replace something that seems very important. You guys should have included it or indicated it as a highly recommended option.

    stevenalias -

    Im Reparatur-Kit ist keine Ersatzdichtung für den Lautsprecher enthalten! 😢

    Bernd Sonneck -

  36. qlRWPLXawBKFS5dB
    qlRWPLXawBKFS5dB
    nkLsBgsTaYgQUuql
    • Use a Phillips driver to remove the two 1.8 mm screws securing the Taptic Engine.

  37. FFfoN11G2IvFm1SE
    FFfoN11G2IvFm1SE
    lxySHKjWpO1stjsb
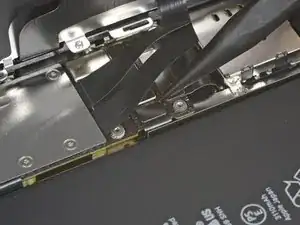
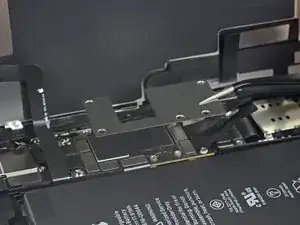
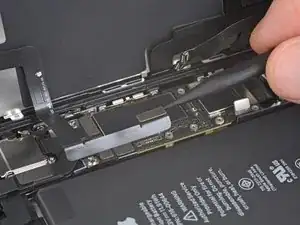
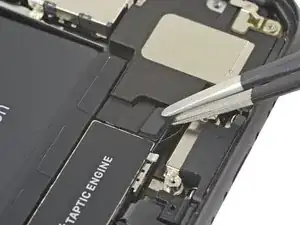
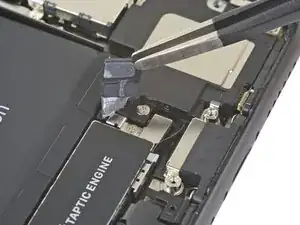
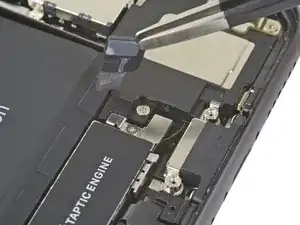
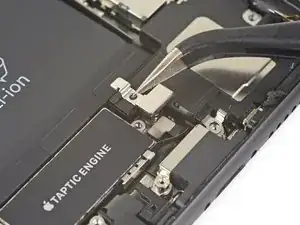
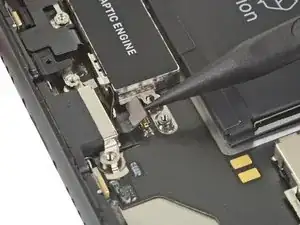
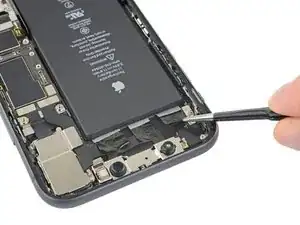
    • Use a spudger to disconnect the Taptic Engine flex cable by prying it straight up from its socket.

  38. EdBhNsZVVPSwpNQa
    • Remove the Taptic Engine.

  39. SYJ3VZt1c2uZSaUb
    • Six pieces of stretch-release adhesive hold the battery in place—three near the top edge, and three near the bottom.

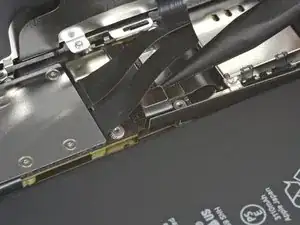
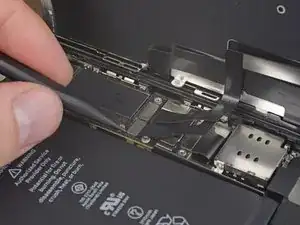
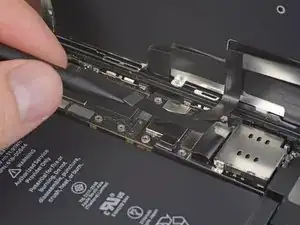
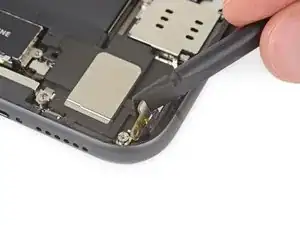
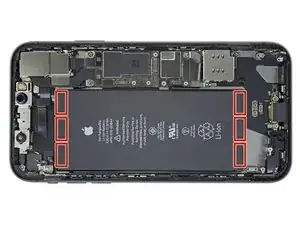
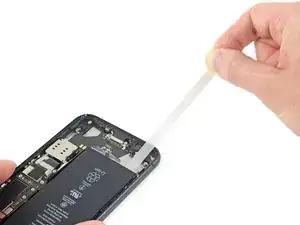
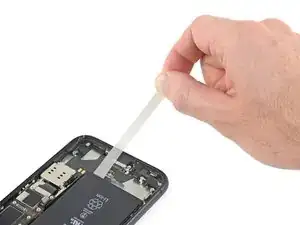
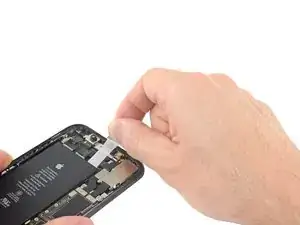
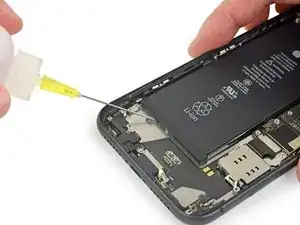
    • Each piece of adhesive has a black pull-tab at one end, which is lightly adhered and folded onto the top of the battery.

  40. cVL2yG1hSvbRKrdI
    cVL2yG1hSvbRKrdI
    HBXCke2W2bwWAqTE
    UaxLNHsSJKBxcym1
    • Peel back the three battery adhesive pull tabs from the bottom edge of the battery.

    • Be careful not to jab the battery with any sharp tools—a punctured battery may leak dangerous chemicals or catch fire.

  41. 1yQPXxJHVotDtilY
    • In the following steps, you'll pull each tab to slowly stretch out the adhesive underneath the battery. The adhesive releases as it stretches.

    • If the strips break, don't panic! Keep reading for some additional steps for removing broken strips.

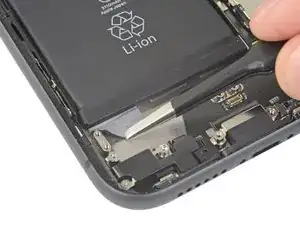
    • To increase your odds of success:

    • Don't press down on the battery. Hold the iPhone firmly by its sides.

    • Keep the strips flat and unwrinkled as you pull.

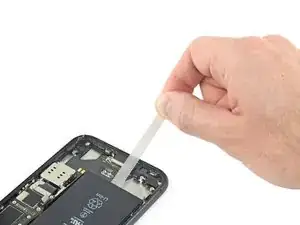
    • Pull very slowly, giving the strip time to stretch and separate. It takes around 30 seconds of stretching to remove each strip.

    • Pull at a low angle so the strip doesn't snag along the bottom edge of the battery.

    • If a strip does break off underneath the battery and cannot be retrieved, move on to the other strips and then continue with the additional steps below.

  42. oC6W6xyAZGqW1wrp
    oC6W6xyAZGqW1wrp
    Ckw1ywjK1vCONU3u
    AeyMMadhtqTDmwn5
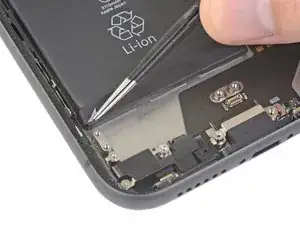
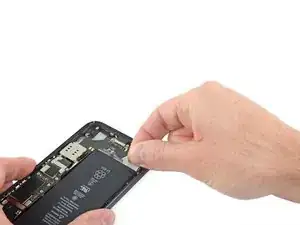
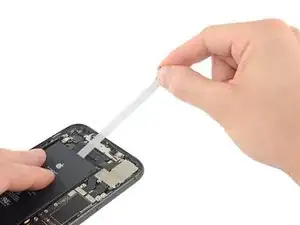
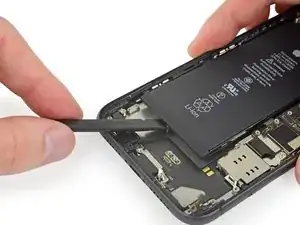
    • Slowly pull one battery adhesive tab away from the battery, towards the bottom of the iPhone.

    • Pull steadily, maintaining constant tension on the strip until it slips out from between the battery and the rear case.

    • The strip will stretch to many times its original length. Continue pulling and re-grab the strip near the battery if necessary.

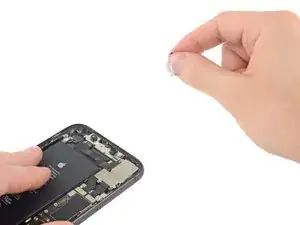
    • If the battery adhesive tabs break during the removal process, use your fingers or tweezers to retrieve the remaining length of adhesive, and continue pulling.

    • If any of the adhesive strips break underneath the battery and cannot be retrieved, try to remove the other strips, and then proceed as instructed below.

  43. ovYoPTO6DmLNJNVV
    ovYoPTO6DmLNJNVV
    UdoyP3Dqg2fUa4vQ
    AeR21NEtMNZ4B3KS
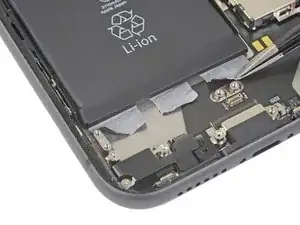
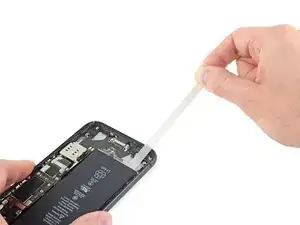
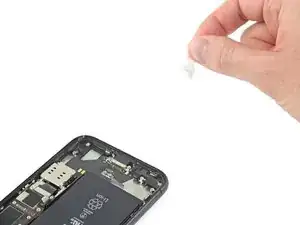
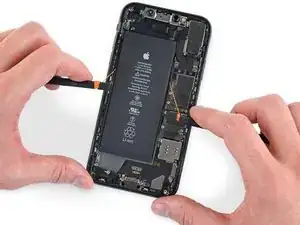
    • Repeat the above steps to remove the other two adhesive strips near the bottom edge of the iPhone.

  44. h1N5sXIZjgHWCcKF
    h1N5sXIZjgHWCcKF
    YCtrryhhUDabXH6L
    WVOqOK5tspQwUVBk
    • Peel back the three battery adhesive tabs from the top edge of the battery.

    • Don't touch the Face ID sensor modules near the top of the iPhone.

  45. pkG41EEpSAqsQ6DT
    pkG41EEpSAqsQ6DT
    wEMSWpJjBNS6bJ3j
    xvOdnbumn2GYntN1
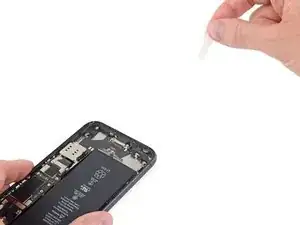
    • Pull the top adhesive strips out one at a time, using the same method you've used to pull the bottom strips.

    • Be sure to hold onto the battery as you remove the final strip, or it may fling out of the iPhone unexpectedly.

    • If you removed all of the adhesive strips successfully, skip the next step.

    • If any of the adhesive strips broke off underneath the battery and could not be retrieved, continue with the next step below.

  46. eabpDZVyIgREbyWE
    eabpDZVyIgREbyWE
    LBZpoohGhc3BRumF
    • If any of the adhesive strips broke off and the battery remains stuck to the rear case, remove it by adding a few drops of isopropyl alcohol (90% or greater) underneath the battery near the stuck strip(s).

    • After about a minute, gently lift the battery.

    • The battery should come free with minimal force. If not, add a little more isopropyl alcohol and try again. Do not bend or puncture the battery.

    This is a very good tip, it is hard to remove all the adhesive without breaking one of them, but the alcohol is very helpful.

    gustaudio -

  47. A6H332ddarffeOAU
    A6H332ddarffeOAU
    YsPK5CkbKGNZ1dYb
    nuwPSpmxKMcLNkn1
    • If your battery is stuck and an appropriate liquid solvent is not available, prepare an iOpener or use a hair dryer to heat the rear case directly behind the battery.

    • Heat the iPhone until the rear case is slightly too hot to comfortably touch, but no more.

    • Flip the iPhone back over and thread a strong piece of string (such as dental floss or a length of thin guitar string) underneath the battery.

    • Wear gloves to protect your fingers, or wrap each end of the string around a tool.

    • Pull the string from side to side in a sawing motion to separate the adhesive. This can take some time since the adhesive is slow to deform, but with patience it will come free. Do not deform or damage the battery.

    • Start from the top or bottom edge of the battery, and pull toward the middle. Don't pull the string through the middle third of the battery, or you may damage the ribbon cables or the wireless charging coil directly underneath.
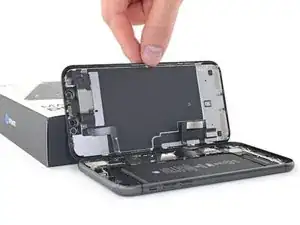
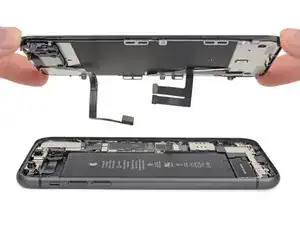
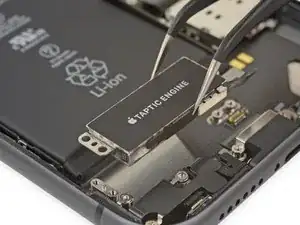
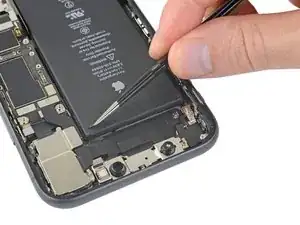
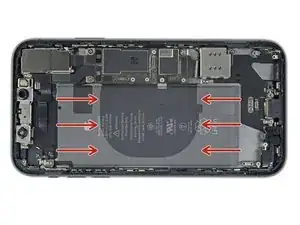
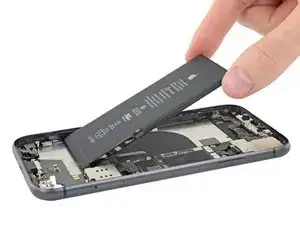
    • If you choose to use pry tools to lift the battery out of the iPhone, use extreme caution or you may damage the ribbon cables or the wireless charging coil directly underneath the battery.

  48. OmkyTr5KQNAUH5i2
    • Remove the battery.

    • Reinstall the Taptic Engine and speaker before installing a new battery. This helps keep the battery aligned correctly during installation.

    • Before you adhere the replacement battery, temporarily reconnect the battery connector to the motherboard socket. This ensures that the battery is properly aligned in its recess.

    • Adhere the battery, disconnect it, and continue reassembling your device.

    • If your new battery doesn’t have adhesive preinstalled, refer to this guide to replace the adhesive strips.

    • Perform a force restart after reassembly. This can prevent several issues and simplify troubleshooting.

Conclusion

Compare your new replacement part to the original part—you may need to transfer remaining components or remove adhesive backings from the new part before installing.

To reassemble your device, follow the above steps in reverse order.

Take your e-waste to an R2 or e-Stewards certified recycler.

Repair didn’t go as planned? Try some basic troubleshooting, or ask our iPhone 11 Answers community for help.

Jeff Suovanen

Member since: 06/08/13

427153 Reputation

17 comments

Also, it would be nice to have a step by step of how to reprogram the new battery to bypass the “non-genuine warning”

Olamide Olayinka -

I have been looking for a solution for this! Seems the only way is to remove the BMS board from the original battery. Requires soldering.

Mohammad Ali -

Yea. There's a step by step guide on how to do just that here

Joseftech -

Apple specifically does this to prevent 3rd parties from repairing their products. A Simple google search would have yielded this.

Brian Kennally -

"A simple google search would have yielded this" 🤓🤓🤓

Freddy Jackson -

Anyone figure out a way to hide the badge on the settings icon?

Elon Gated -

La guida consiglia di rimuovere molte parti, in realtà basta solo rimuovere lo schermo ed acquistare una batteria già assemblata.

Io personalmente o impiegato 45 minuti andando molto lento e molto attento alle mie operazioni.

mario giorno -

When opening up a phone, why doesn't ifixit recommend to use a static electricity grounding wrist band since such charge can damage phone electronics if not grounded? (Apple technicians use such).

How come ifixit does not give advice after a battery change how to reprogramme the phone to its full functioning capability since some are lost when a battery is replaced? (Apple technicians include this service in a battery change).

What are the statistics on after market batteries not performing as good as OEM parts and what are statistics where such after market batteries harm the phone? All batteries are made in China but Apple endorsed battery makers are required to adhere to strict standards.

L D -

Just noticed on the video at 6:02-6:03 the screw is being screwed into the wrong hole on the speaker and at the wrong stage

Also keeping the black rubber pad cover the tactic engine connector should be mentioned earlier in the video

Apart from that - great video

Ian -

Thanks for this guide! I successfully replaced/upgraded my wife's battery. She'd had this phone for 2+ years and it was time. Replaced it with one of the increased capacity batteries available on Amazon. Removing the old and installing the new battery was easier than I thought it would be. Opening the dang thing was the hardest part.

matthew r -

Successfully completed using this guide. Thanks Jeff

Tim H -

Die Anleitung ist, wie immer bei IFIXIT, super verständlich! Ich bin jedoch nur bis Schritt 25 gefolgt und habe die haptic engine und den Lautsprecher nicht ausgebaut. Das Akku ließ sich auch so mit etwas Geschick und den richtigen Werkzeug (z.B. einer guten Pinzette für die Klebestreifen) und etwas Isopropanol aus einer Spritze (100%) gut lösen. Eine alte EC-Karte o.ä., um vorsichtig (!) von oben unter den Akku zu kommen kann helfen (das Akku nicht stark verbiegen!). Ab hier wieder zusammengebaut - und voila! Einiges an Arbeit erspart. Einziger Nachteil: die unteren Klebestreifen am Akku reißen leicht, da man diese wegen der haptic engine nicht flach herausziehen kann. Aber mit ein paar Tropfen Isopropanol kein Problem und Fehler beim Zusammenbau werden evtl. vermieden, da weniger Schritte beim Aus- und Einbau notwendig sind. Ich hoffe, der Tip hilft dem ein oder anderen, die Reparatur zu vereinfachen. Würde mich freuen. Ist übrigens nicht mein erster Akkuwechsel :-)

Uwe Schmitt -

Your tutorial help me a lot thanks for your contribution !

Rémi Lefebvre -

If anyone wonder you can actually change you battery without removing taptic engine and the speaker

Rémi Lefebvre -

Hat jemand Erfahrungen mit Akkus welche eine grössere Kapazität aufweisen als die originale? Halten die wirklich länger, bzw wie ist die Qualität der Zellen? Gibt es da Erfahrungswerte?

Softstarter -

Moin, ich habe die Ladebuchse meines iphone 11 gewechselt weil es zuvor nicht geladen hat. Nun Läd es Trotzdem nicht mehr. Woran kann das liegen?

Ferhat -

Hallo, ich gebe hiermit ein Update zu meinen ersten Kommentar. Ich habe einen Nagelneuen Ladeadapter gekauft und der hat nicht Funktioniert. Daraufhin habe ich Ladebuchse und sogar das Akku ausgetauscht und es hat trotzdem nicht funktioniert. Dann habe ich mir einen anderen Kabel bestellt. Statt USB-C auf Lightning "was nicht Funktioniert hat" benutze ich "USB auf Lightning was nun funktioniert" Ich habe den alten Akku auch wieder eingebaut uns es funktioniert einwandfrei :D Hat jemand einen reim hier drauf warum es der USB-C Anschluss auf Lightning nicht Funktioniert?

Ferhat -