Introduction

Follow this guide to replace the display assembly on a 2020 Intel iMac 27" Retina 5K.

Some photos in this guide are from a different model and may contain slight visual discrepancies, but they won't affect the guide procedure.

Removing the display on the 2020 iMac Intel 27" Retina 5K Display requires cutting adhesive with a specialized iMac opening tool. After you've completed your repair, you'll need to follow our display adhesive guide to scrape off the old adhesive and replace it with new double-sided adhesive strips.

Before beginning any work on your iMac: Unplug the computer and press and hold the power button for ten seconds to discharge the power supply's capacitors.

Be very careful not to touch the capacitor leads or any exposed solder joints on the back of the power supply.

This procedure involves removing the faulty/broken display, as well as transferring the display data cable and thermal sensor to a new display.

  1. osHwwTsVGOoGRyLD
  2. FkIZHINdYQaFYLVW
    FkIZHINdYQaFYLVW
    SaBSMhWoyPaOMStr
    b1vsQZmYLT5uGp1K
    • Starting on the left of the display, near the power button, insert the iMac Opening Tool into the gap between the glass panel and the rear case.

    • The hub on the iMac Opening Tool will keep you from pushing the wheel in too far. If using a different tool, insert it no more than 3/8" (9.5 mm) into the display. You risk severing antenna cables and causing serious damage if you insert the tool too far.

  3. YBXnnZvqvcCXc3Dh
    YBXnnZvqvcCXc3Dh
    LKTY6fnxuTkhOFEZ
    GplU2x5KlWXrhqPW
    • Use the tool like a pizza cutter—roll it along through the gap, and it will cut the foam adhesive through the center.

    • Be sure to always push with the handle behind the cutting wheel. If you pull, the wheel might get pulled out of the handle.

    • Run the tool up along the left side of the display.

  4. SqUGmWPNJAPDStKv
    SqUGmWPNJAPDStKv
    3R6TSjlIyerQQ2AX
    cOQGUrU1ekuPaBed
    • Continue wheeling the tool up around the top left corner.

  5. bfYMgtBPICJ4ROqy
    bfYMgtBPICJ4ROqy
    CXhC5LNJ6jdiHu4w
    • Cut the adhesive along the top left of the display.

  6. QVGwDDiKZB3UZvNN
    QVGwDDiKZB3UZvNN
    iBtbvCLPV2KZgoVd
    • Continue along the top of the display.

    • You may want to run the tool back and forth through what you've already cut a few times, to ensure you get as much of the adhesive separated as possible.

  7. qpQxBHqvRfjvmcID
    qpQxBHqvRfjvmcID
    NNJxPC1uZ4wLkFiT
    ZTZAVaPN1NX5O4ps
    • Push the tool around the top right corner of the display.

  8. BVZmfm5LTcwa1QrC
    BVZmfm5LTcwa1QrC
    qm3gY6CAvA1tKZEU
    • Wheel the tool down along the right side of the display.

  9. oRxMayHO2sLbQc1s
    oRxMayHO2sLbQc1s
    o5OdKdGHEAt4Pty3
    • Finish pushing the opening tool to the bottom of the right side of the display.

    • At this point, you'll want to run the tool back around the entire display, to ensure you cut as much adhesive as possible.

  10. Muy6AIw1J2wEDPvF
    Muy6AIw1J2wEDPvF
    nbPL3P3VBylPcyhZ
    uJQxYDCVYwnx6Qbv
    • While the opening tool did the lion's share of the work, the display will still be slightly adhered to the case. A plastic card will be necessary to free up the last of this adhesive.

    • Set the iMac face-up on a table.

    • Starting from the top right corner of the iMac, insert a plastic card between the display and frame.

    • Be careful not to insert it more than 3/8" (9.5 mm), or you may damage internal components.

  11. NjIxZSSHogTThAMd
    NjIxZSSHogTThAMd
    QRGOYnlsZyP6T5Py
    • Gently twist the plastic card to open the space between the display and frame, and cut any remaining adhesive near the corner.

    • Using too much force will crack the glass. Work carefully, and don't try to create a gap any larger than about 1/4" (6 mm).

  12. jQAyIj6HrrdJJAJk
    jQAyIj6HrrdJJAJk
    xYIoQCXxGkKCZsDe
    uTgLtnrRgljTV3SV
    • Be sure to stop cutting before the iSight camera in this step, or you may damage it.

    • Slide the card toward the center of the display, to cut any remaining adhesive.

  13. 3JgNS4JkPQitgWmT
    3JgNS4JkPQitgWmT
    oZxopX4GBdr2IZND
    • Put the card into the corner again and let it stay there to keep the adhesive from resettling.

  14. CKqSXChbW1Q5J2Mj
    CKqSXChbW1Q5J2Mj
    M3mumpuHF6DuGG5d
    uZeaiM2Ss3Nhp6l1
    • Insert a second card into the gap between the display and frame in the top left corner.

  15. WVS45JD1UFeUkafQ
    WVS45JD1UFeUkafQ
    tpW1SBUu3OVBWWFf
    • Gently twist the card, slightly increasing the space between the display and frame.

    • As with the other side, move slowly to allow the adhesive to break, and be careful not to over-stress the display glass.

  16. FRjlwMRyCnMiL5uI
    FRjlwMRyCnMiL5uI
    Bk1FEUAstoZL5kPG
    AkYFNYjFGlOHPpfP
    • Slide the plastic card toward the center, again stopping just before the iSight camera.

  17. IJOHHiD2GtNNew33
    IJOHHiD2GtNNew33
    mimwcClnvQR6kwT4
    • Insert the card back into the top left corner.

  18. yXXU4PGlmjAVts3U
    yXXU4PGlmjAVts3U
    JwFEwvPQsHIaxQ6C
    JQV5vHS5gLW2hiCT
    • With the cards inserted as shown near the corners, gently twist the cards to increase the gap between display and case.

    • If there are any sections that seem to stick and won't separate, stop twisting and use one of the cards to cut the adhesive in the problem area.

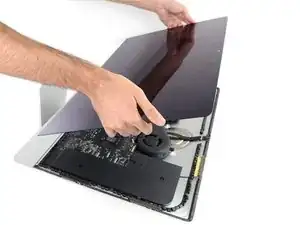
    • Begin to lift the top of the display up from the frame.

    • Only lift the display a few inches—it is still attached to the iMac by data and power cables.

  19. wHjJRVLAFXewfnyp
    wHjJRVLAFXewfnyp
    CpBnbf1FNgAfIZn1
    • While holding the display up with one hand, use the other to unplug the display power cable.

    • Lift the display up enough to have easy access to the connections, but not so much that you stretch the cables and stress their connections (about 8").

    This is not a picture of the 2019 model. On the 2019, the cable is angled and very close to a metal part that looks like it could be a wireless card. This makes it difficult to squeeze in the edges required to release the cable. I was able to unfasten it using my fingernail, doing one side at a time.

    maccentric -

    Same issue. You can't just pull it out. I used a plastic "spudger" to push the clips in. The photo here shows where to press

    https://www.icloud.com/sharedalbum/#B0qG...

    See also my comment in step 20

    Bill4321 -

  20. VdsiAgtUyYorMen1
    VdsiAgtUyYorMen1
    KHHFi452QTQMTeBV
    CsKrEVrGRnpfrDwC
    • Flip up the metal retaining bracket on the display data cable.

    • Disconnect the display data cable.

    • This is a delicate connection that can easily be broken. Be sure to pull the display data cable connector straight out of its socket, toward the top of the iMac.

    on the 2020 model there is also a connector from the camera that is connected ted to the screen.

    Erwin Biermans -

    This isn't the photo of my IMac 27 2019.

    To remove this clip, lift up the plastic tag sticking down & the metal clip will lift too

    https://www.icloud.com/sharedalbum/#B0qG...

    Bill4321 -

  21. eJ1ZlYNHPi6CWHyZ
    eJ1ZlYNHPi6CWHyZ
    iJ1harXteIPLEIKd
    • Lift the display up to a near-vertical position.

    • At this point there is still a strip of adhesive along the bottom of the display that will hold the display to the frame like a hinge. You can loosen this adhesive by working the display up and down a few times.

  22. lACpgXcvlGFyrLvA
    lACpgXcvlGFyrLvA
    ISMvuLCodAhiRMwB
    hpHSWgP6FbSE133b
    • Be very careful not to touch the capacitor leads or any exposed solder joints on the back of the power supply (boxed in red).

    • Grasp the small tab at the end of one of the bottom edge display adhesive strips and pull the adhesive toward the top of the iMac to remove it.

    • Repeat this step with the other adhesive strip and remove it.

    • If either adhesive strip breaks before it's removed, use a plastic card to slice through the remaining adhesive.

  23. k6S2mPdemkHANTQd
    k6S2mPdemkHANTQd
    JZD2kebALoGllJpG
    gAqAXTZm1QxOsqZu
    • Be very careful handling the display—it's big, heavy, and made of glass. The display has fragile edges. Avoid lifting the display by the corners.

    • Lift the display up from the frame and remove it from the iMac. Lay the display face down on a flat, soft surface.

    • It may be necessary to slowly lift from one side, to peel against the remaining adhesive.

    • After the adhesive is cut, it cannot be used to re-seal the display in place. Follow the adhesive replacement guide for your model when your repair is complete to replace the adhesive strips that secure the display to the rear enclosure.

  24. 1OnjVEFYHhSh3W3v
    1OnjVEFYHhSh3W3v
    Ul6QX1JF12NUIyrv
    Oe4ML2vbqXKOZMfT
    • Gently set the display face-down on a sturdy, flat surface. It may be helpful to put it on a towel or cloth to protect it from dirt or debris that can scratch the front glass.

    • Use your fingernail or the pointed tip of a spudger to flip up the retaining flap on the display data connector.

    • Pull the display data cable connector straight out of its socket on the back of the display.

  25. VQ5RFKTLL5UhhMtB
    VQ5RFKTLL5UhhMtB
    baIAvc6LAQAdnAGR
    • If necessary, use an iOpener to heat and soften the adhesive on the two pieces of tape holding the thermal sensor in place.

    • Use tweezers to peel the tape off of the thermal sensor and its cable.

  26. cZmvD5SlQxaATdyt
    cZmvD5SlQxaATdyt
    irxSgttCXmSQD5Ke
    • Slide an opening pick under the thermal sensor to separate it from the display.

    • If the thermal sensor adhesive is stubborn, you may need to apply more heat to soften it.

  27. 5lFiSlnAJTXFAZdT
    5lFiSlnAJTXFAZdT
    x2TsB5bCqmiPHja1
    • Disconnect the thermal sensor from its socket on the back of the display.

    • Remove the thermal sensor and transfer it to your new display assembly.

  28. o3iNQEqaRuuBarsE
    • You may need to transfer additional components from the old panel to the new one. Compare the back of the old display with the replacement display and transfer any missing components.

    • You may have to transfer the foam cushion pieces on the back of the display. Slide an opening pick underneath the foam pieces to separate them from the display, and gently pull them off. You may need some double sided tape to re-attach them to the new display.

Conclusion

Compare your new replacement part to the original part—you may need to transfer remaining components or remove adhesive backings from the new part before installing.

To reassemble your device, follow the above steps in reverse order.

Take your e-waste to an R2 or e-Stewards certified recycler.

Repair didn’t go as planned? Check out our Answers community for troubleshooting help.

Sam Omiotek

Member since: 25/02/19

72005 Reputation

2 comments

Anybody know where I can get a display Assembly?

Macrepair SF -

This isn't a 2020 iMac as there is no HD and the screen has a built in camera attached to the Motherboard
Kyle Leighton -