Introduction

This guide will help you replace the SD board.

  1. sQYsHCwlim2WOs5y
    sQYsHCwlim2WOs5y
    wHiunt5LEPRI6Df1
    olRVCyJ2KOMrOshW
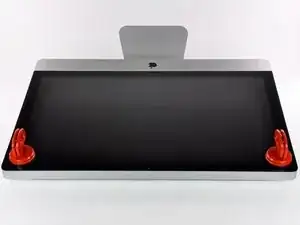
    • Stick a heavy-duty suction cup near each of the two top corners of the glass panel.

    • To attach the suction cups, first position the suction cup with the movable handle parallel to the face of the glass panel (as indicated in the second picture).

    • While lightly holding the suction cup against the glass, raise the movable handle until it is parallel with the other handle (as indicated by the third picture).

    • If your suction cups refuse to stick, try cleaning both the glass panel and the suction cup with a damp soft, lint-free cloth. (Dampen with distilled water, and if needed, an equal ratio of distilled water and white vinegar for best results.)

    • Do not use the suction cups to carry the display glass because if one of them fails to stick, you could drop the screen and break it.

    • The original iMac box makes a good place to store the glass panel. Otherwise, a padded horizontal surface, like a towel on a desk, will do nicely.

    You can easily lift the glass panel off the magnets with only your fingernails (or something thin like a credit card or a guitar pick). No need to buy suction cups you will only use once.

    Nick Caron -

    Yes, you don't need the specific suction cups to remove the display cover - it's held on by magnets, and if you start at the center by the iSight you can work out to the edges and remove it. I had an iPhone screen suction cup around and it helped with balancing the screen when you pull it out fully, but by no ways is it required.

    jtowner -

    Great guide and pretty straight forward the only thing that took me ages and I didn't manage to undo were the power btn cable (step 28) and the thermal sensor (step 25) Seemed like they were glued on! Very difficult to remove and obviously conscious so I didn't break anything!

    Eddie -

    Thanks!!! Worked excellently.

    I used a plunger (clean first ;-) to get the screen off, and http://exirion.net/ssdfanctrl/ for fan control.

    Then, i did not take out the whole display and left it in the hinges on the bottom side and held it up with two small cardboard boxes. Easy enough to disconnect the hdd then.

    I replaced with an ssd, put that into a ssd enclosure. Had to drill an extra hole in it to fasten the pins that hold it in place.

    Used Carbon Copy Cloner to make an image from the old hdd, with the sad connected via usb. Checked it of it booted via System Preferences > Startup Disk. It worked so the took the imac apart and replaced the disk. Booted, everything was working as always, only faster!

    Frank303 -

    I'm replacing my optical drive too. what exactly needs to be plugged into the SSD? I don't have the kit - as I am not sure one is required if I buy something like this: http://www.amazon.com/gp/product/B0056OB...

    Can you please advise? Can I do it with this piece, or do I need to get the entire bracket kit?

    Allen Borza -

    My display data cable forks, with a smaller section going up near the camera board. Where it forks, it is attached to the aluminum plate that attaches around the cpu board. I haven't seen any images that look similar, and I'm stumped at how to remove this second section of the cable. 2010 i7 build to order

    Awolf -

    Agree with the other comments here. Despite buying suction cups, not sure they were necessary as the screen removed very easily. A sat nav suction cup would do the job fine.

    Stuart Bloomfield -

    I can confirm that it is possible to remove the front glass using fingernails rather than suction cups. It isn’t easy, but if you try you should be able to pry off the glass.

    I did this twice: once at the beginning of the procedure and once again at the end, when I realized that a big pice of lint was trapped under the glass.

    gordonhamachi -

    Don’t use suction cups. totally unnecessary. screen pops off with fingernails.

    Kieran Hobbs -

    The reason for caution about suction cups tends to be making sure you don’t apply uneven pressure on the edges of the glass and crack it in the process of removal. I do agree however that some pretty small suction cups would do fine. These suction cups can be had at your local princess auto (Harbor freight) for a few bucks and are useful elsewhere as well. if you use your fingernails or other items just try and do it evenly :)

    Abirinder Brar -

    good duct tape or gaffer tape wrapped around your hands makes an excellent glass removal 'tool'. Even clear packing tape works a charm.

    Stu Blair -

    A great first step that minimizes that first gust of dust migration when the glass is lifted is to clean the glass, sides *and the back* before lifting the glass, and then lift SLOWLY. Most of that dust is already trapped inside and pulled up as the screen lifts, but with care you can keep it there (or gently vacuum out with a micro vac…).

    John -

    before starting any of this…there is a device that you can use that comes with the IFixit kit to format and either clone or restore your hard drive to the new drive…it will save you a lot of headaches..it is a SSD enclosure that you can plug into your existing computer …

    Tomr -

    Thanks for the instructions. Before doing this the first time, suggest to everyone, read through at least twice. This is the easiest step, as you’ll soon see. As for removing the glass, USE suction cups, either the ones the sell here, or others. DON’T skimp. Also wear gloves when handling the glass. Don’t take chances.

    ECJohansen -

    Duct tape works too!

    Dani -

  2. XBLBbPNDcxRAYYWS
    XBLBbPNDcxRAYYWS
    xMmDfMTyn4Ac1SkA
    mqbuAnq3Mon1YWiD
    • Gently lift the glass panel perpendicular to the face of the LCD, enough to clear the steel mounting pins attached along the underside of the top edge of the glass panel.

    • Pull the glass panel away from the lower edge of the iMac and carefully set it aside.

    • Don't use the suction cups to carry the glass panel—if either one loses its grip, the panel could fall and break.

    • After setting the glass panel down safely, be sure to release the suction cups, as the suction force over time can crack the glass.

    • During reinstallation, be sure to meticulously clean the inside of the glass panel and the face of the LCD as any dust or fingerprints trapped inside will be annoyingly visible when the machine is turned on.

    you should do this mac up, because, for me, one of the suction cup failed, and the glass fall into the lcd screen. Now there is a big hole in it...

    Lau -

    do you still have this panel?

    Alpha Dimension -

    Reassembly: After powering on and running for a few minutes, found a large whitish patch on the screen. Persists after powerdown.

    Turned out to be condensation, though it didn't look like it - more like fine white powder rubbed in. Humidity is very high this time of the year. Fix: start airconditioner in a room, leave it running a while, take iMac in, prise open the glass again. Condensation vanishes instantly. Keep it out for a ~15 minutes running infinite loops to get iMac nicely heated up and fans running. Snap glass back.

    ganesh -

    I used a Swiffer dry cloth to get all the dust off the screen while just blowing with my mouth at a steep angle. I know I didn't get every speck, but the screen looks perfect once assembled and lit again. Removing the glass from the screen is pretty easy if you need to re-clean it.

    Jay Gillibrand -

    I used a microfiber cloth instead, which worked well. The same type as yo use to clean eye glasses, but in a larger form factor.

    Daniel -

    The Swiffer idea worked great! I just brush it over the LCD and glass panel lightly, and all dust particles are gone quickly. The screen after boot up looked beautiful. Thanks!

    dtsai2 -

    I strongly recomment to detach the suction cups while working at the rest of the steps. In my case after half an our i heart a crack noise behind me on the table... The vacuum of one of the suction cups braked the glass! maybe there should be a warning in the Repair guide

    shippe -

    I didn't crack the screen, but it popped out of the shims and then popped back in, as if the glass edge is magnetic or has steel in it to connect to magnets. Be careful with this step — it is pretty nerve-wracking, but doable!

    Alex Reynolds -

    You need a big clean surface free, or at least 2 or more free surfaces because the iMac, the glass and the LCD display are quite bulky. You'll also probably need space for a tablet or a laptop to read this guide while you are working. And don't forget room to work on the optical unit and for the tools you are going to use. I covered a large table with a double layer of bubble wrap. In my opinion it's better to put the glass face down to limit powder sticking on the internal surface.

    Roberto Blandino -

    Thanks good advice! I was wondering exactly about the working space issue!

    matteoslataper -

    I am doing this repair now. After successfully lifting off the glass panel (yay!), dust blew out of the lower open edge. So I sprayed a can of air around edges. But a poof of the “air” condensated on the LCD. Does anyone know if I can clean the LCD same as how the glass is cleaned (damp cloth with equal parts white distilled vinegar/distilled water) and if not then how?

    Amy C -

    Hi Amy,

    To clean the LCD panel, I would suggest using a clean microfiber cloth and rubbing alcohol. Distilled water can be used, but avoid regular water, which contains minerals. Make sure the microfiber cloth is absolutely clean and has no hard particles sticking on the surface, which will scratch your LCD when you wipe it.

    Wet the surface with some alcohol and gently wipe with the microfiber cloth. Wipe in one direction.

    Arthur Shi -

    I find that the LCD is not as fragile as we all think. they are very much like any LCD on a tv or monitor. There is no extra glass on the front of a monitor. Not the 23 HP Pro Displays I have anyway. I know this because I punctured one moving my video wall. so I took it apart to know how its put together. I will say, there are several 'lens’ like sheets and a reflective (silver} sheets that are the same size as the panel. and a 1/8”piece of acrylic, all behind the LCD panel. Take care with them and clean as you would your monitor.

    My suggestion is to stand the iMac up after the panel is secured back into the body of the iMac and clean while its vertical. took me 3 attempts before I realized that while laying flat the surface is large and collects dust with mind blowing speed.

    Stu Blair -

    If the LCD glass is badly cracked and broken you need to be extra careful removing as the sharp shard of broken glass can scratch/harm the underlying screen as they may “fall in or onto” the screen below.

    I found that strategically putting sheets of 8x11 paper(s) under the sharpest, largest broken sections help protect the underlying screen. A vacuum was also helpful removing some of the small glass shards.

    Mark Hilliard -

    Be advised: I did a perfect replacement of the hard drive, temperature sensor to the SSD, LCD screwed in, glass cleaned. I went to put back the final glass, I set the bottom edge in place and as I slowly moved to have the magnets take hold, they pulled the screen out of my gingerly held fingers, and smacked into place……cracking the glass! Ugh! So, on this last step, hold tight as you put the glass back in slowly. It will cost you about 40-50 bucks for a new glass (mine is on it’s way).

    R R MOOS -

    Yikes... that sucks. thanks for sharing this information. I took everyone's advice and removed and placed this back very very carefully.

    iSeeU ChilinHomie -

    Don't trust the suction cups after you remove the screen cover. Used both hands to hold this piece carefully!

    iSeeU ChilinHomie -

    As far as the last point of step 2 goes, I would add to the parts list a can of compressed air to get rid of all the dust on the screen frame and the interior body once the lcd is off). When the magnets clip back in dust will shower down onto the lcd and glass if you do not clean the frame well. It will not matter how much you clean the LCD and inside of the glass panel.

    stillsuit -

  3. wh3OBjUKDTyE5PJg
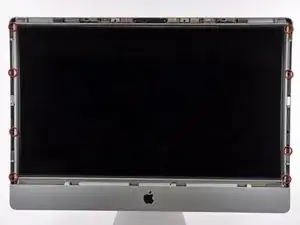
    • Remove the eight T10 Torx screws securing the LCD to the outer case.

    • Be careful not to touch the display as the oil from your fingers may leave a residue that can be difficult to remove.

    • If necessary, peel the EMI gaskets located near the top center edge of the display assembly.

    The screws on the top (left-top, and right-top) are slightly longer than the other six screws.

    henryhsu -

    All screws were exactly the same for me.

    Michael Grace -

    There were only eight screws holding the lcd in place on the sides 4X4

    Barry Gilmore -

  4. ttXfmAnrGKNluJUB
    ttXfmAnrGKNluJUB
    PgqvYSmQiJhaoS2d
    SOdO2xXXeUPLdPcJ
    • Carefully lay the iMac stand-side down on a flat surface.

    • Due to tight tolerances, you will have to use a thin hooked tool to lift the display out of the outer case. As seen in the first picture, we made one out of a bent paperclip. A pair of angled tweezers can also work well.

    • Use a thin hooked tool to lift one side of the top edge of the display by its steel outer frame.

    • After lifting the top edge of the display on one side, hold it out of the outer case while you use a hooked tool to lift the other side.

    • Raise and hold the display high enough to access the cables.

    • Do not lift the top edge of the display out of the outer case too far, as several short ribbon cables still connect the two components.

    I followed the procedure in the Apple Technician Guide and it was a lot easier. Stand the iMac upright on the stand (as per normal operation) and then carefully tilt the top of the unit towards you while holding the top of the LCD. The LCD just falls forward into you hands. It is also then easier to disconnect the cables.

    iandh -

    This procedure can be VERY dangerous. Why? Because there is the possibility of a gravity disaster if you lose control of the screen and it falls before you disconnect the interface cables. I know. It happened to me. After studying the Apple directions I came to the conclusion that I would need both hands on releasing a couple go the cables and decided to tape off the screen in the open position - which I did very carefully and securely. What I did not account for was the tape not adhering. Needless to say when it came loose the screen fell and ruined the connector sockets (and my computer). This could also happen just trying to hold the screen with one hand while spudging the connectors apart with the other as well. SO. LAY THE iMAC DOWN! DO **N O T** GIVE GRAVITY THE CHANCE TO RUIN YOUR DAY like it did mine!

    Gary Kimes -

    The right side was much more stuck in place then the left

    John -

    It’s the fourth time I follow this guide, power supply, gpu and dual hd operations carried successfully and I feel and works munch more relaxed with the iMac laying horizontal on his back. I’m lifting the screen with two hooks at the same time, no torsion on the frame makes munch easier to lift it.

    Then I put in the corners two pieces (two short pencils do the job) of about 3 1/2”, 9 cm, to maintain lifted the screen while disconnecting the ribbons.

    Now the GPU I’ve changed in 2017 has lasted less than three years and here I am to change it again.

    Cesar Martin -

    After disconnecting the first ribbon you can lift the screen more than 5”, enough to access the other ribbons easily.

    Cesar Martin -

    As others have posted here, Do NOT let gravity assist you. Put the iMac on it’s back when doing the remaining steps. Also, use some type of hook to assist you in terms of lifting out the display assembly. Expect some resistance, since it does weigh a few pounds. Also, as you’ll see in the next step, you can help yourself by using something to brace it at each corner to keep it lifted. Some have suggested chop sticks, bic pens, etc. Use something approx. 4-5” in length. That will give enough clearance, and not put strain on the cables.

    ECJohansen -

    To spare a paperclip, I had better to use a good needlenose plier, catch the iron frame just near the corner, and hook up.

    Stefano Vignato -

    Used plastic spudgers as levers, one pointed to start in the corner, then two flat, working across gently. When I got to the middle and pried a bit, the top lifted all the way across, allowing access to the cable in the next step. I decided against doing this with the unit standing vertically.

    Dave Winn -

  5. gOrFxvCeMbW4EiHr
    • Disconnect the vertical sync cable in the upper left corner of the screen. Use the tip of a spudger to push on the connector's side tabs and gently walk it out of its socket.

    After disconnecting the VSync cable, I was able to keep the screen wedged apart by 8" which gave me enough working room to extract and replaced the hard drive without having to remove Step 6 - 8. This resulted in a faster change out of the hard drive.

    ITSupportGuy -

    Amen brother! These are great guides, but could be improved with tips to simplify some processes. I just did the same as you, and it was quick and easy, with less chance to damage cable connections.

    Hobowan Kenobi -

    thank you for the tip. faster swap-out and less risky. cheers

    Eric -

    Totally agree. I did exactly the same. Less chance for mistakes having to do and then undo steps 6-8 and faster and easier. The whole process was shockingly simple. Sad I waited so long.

    JLTX -

    After disconnecting the first cable, I was getting ready to disconnect the second cable when I realized that the amount of opening necessary to get to the second cable, is also sufficient to get to the hard drive, so why go the extra steps. I used a wedge I had close by to very carefully keep the screen up, to enable removing the hard drive with both hands. If you are replacing the hard drive, skip to Step 11.

    Bret -

    I did this and supported the LCD with two chopsticks. Jumped right to step 11. Power supply replaced; no fuss. Great suggestion. Thanks.

    Mahlon Gumbs -

    I did this and I agree. I don’t know about the alternative (doing steps 6-8) because this is my first time doing this but it was definitely quick and “safer” than disconnecting a bunch of cables (the Vsync cable alone was scary bc it feels so fragile). Only downside is you have to replace the HDD while holding a heavy panel with one hand. That being said, there was more than enough room to get around.

    This quicker method also came in handy when I had to open it up again right after closing it because I forgot to install a piece 😂🤦🏻‍♂️

    adam -

    Once I put the tip of a very small flat-head screwdriver on the other side of the spudger tip, the connector popped out.

    Alex Reynolds -

    This is the answer :-) After 10 mins of faffing about on my own I read the manual (this) and this tip took less than 1 second to get the connector out. Thank you so much, me fellow workers were getting annoyed at my swearing.

    simonf -

    I've managed to break off the fitting in step 6 trying to remove the screen, would anyone know the part to buy or how to fix this?

    jonostainsby -

    It is very hard to detach the connector with the spudger. I tried forcing the connector out with the spudger by pushing on one side and then the other repeatedly. After several times it finally came out. A tool would be useful for this; there must be special plyers for doing this. Fingernails on either side seems most obvious, but maybe there is a downside to this ?

    Daniel -

    Rocking it back and forth with some “outward” pressure on both sides was the key. This was the only connector in this upgrade that gave me a problem.

    Stephen Genusa -

    with some confidence and mechanical inclinations this is the only cable you need to disconnect to replace the hard drive. pointer finger on one side thumb the other, pull up.

    jason kawaja -

    display propped carefully and two spudgers rocking simultaneously worked great for me to get this free.

    THEN still be careful, a small loop of tape held the cable to the back - that has to be gently pulled away to let the screen lift.

    John -

    Hi do you sell new sync cables? The little plastic piece on the end that attaches to the motherboard smashed

    Jonathan -

    Use either a spudger or a small flat head screwdriver to loosen the sides of the connector. Then use small needle nose pliers to disconnect the cable. It’s easier than trying to wedge your hand in there.

    ECJohansen -

    On the 2011 27 Inch Mac I have it doesn’t appear to have the Vertical Sync cable attached to the screen. Is that right?

    rlagden -

    Both of the cables (grey and black) popped out of the plastic connecter. Can someone tell me in which slot each cable is supposed to be pinned in ? Thanks...

    Dom -

    I broke the vsync cable removing it. Any tips on how to replace it? The wire is hair thin and I have trouble stripping even much bigger ones. I don't suppose iFixit sells a replacement?

    SLuke Jones -

  6. Pi2cpjaIVJJYaV4H
    • This step brings your hands close to the exposed rear of the power supply. To avoid a high-voltage shock from the many large capacitors attached to the board, do NOT touch the rear of the power supply.

    • Disconnect the LED backlight driver cable with your hand by pressing the tab down and sliding it towards the bottom of the display.

    Do step 7 first. The cable is much shorter and more fragile, you'll have more space to remove the other cables if that one is removed first. On my mac, the cable in step 7 was glued down and had to be freed up before I could pull the connecter out of its socket.

    maccentric -

    Just skip step 6,7,8 and 9 with this powerful tools: two bic pen holding the frame.

    Look at pictures: https://www.dropbox.com/sh/5jwam38drgcov...

    fabio4 -

    I also used two pens to hold the display panel up and I had to detach only the vertical sync cable from the display on step 5. Much easier!

    Timo Laak -

    Hello Fabio, can you please re-up the picture? It doesnt seem to be online anymore :(

    Thanx a bunch!

    Esteban Garcia -

    Good idea! I used two chopsticks as they are longer. Placed them near the corner and use one of the T10 screw's hole in the side of LCD panel to prop it up. Fit perfectly and very sturdy. This gave me plenty of space to work with the replacement.

    dtsai2 -

    I skipped step 6, 7 and 8 and were using some flip chart pens to put them between the frame and the display to make the work on the hard drive. Works great.

    Rita -

    Thanks for the tip. Works a treat!

    john -

    I don’t get how smite six can be skipped—we’re these steps renumbered at some point? How could you even lift the display if you didn’t remove the screws in step 6?

    Frank Stickney -

    With the help of an assistant, I was able to skip steps 7 - 10 to remove the hard drive. Once you remove the cable you move the forward and up. Have your assistant hold the display and you can easily remove and replace the hard drive.

    babuckman -

  7. arryLkrny6S4AYHj
    arryLkrny6S4AYHj
    2dMZl4aNwpn4RZVj
    • Pull the black tab straight up to disconnect the latch on the display data cable ZIF connector.

    • Do not pull up too hard or you will damage the connector and socket.

    • Continue to pull the black tab up toward the top of the device, to detach the display data cable.

    i mess up my date zif connector is it fixable?

    LUIS -

    me too. All went well expect replace this flat cable which is tricky almost when my view is low and I've got big finger. I broke the cable end connector to motherboard but I don't know if I damaged the connector on motherboard. I'm waiting from Apple service for diagnostic.

    I would suggest on the guide to add a step to explain how sensitive is to replace this cable. iMac should lay on the back and it should have some stuff to maintain the motherboard elevated in order to insert the display port flat cable to the motherboard on a less stressful way.

    strcarlos -

    This image is 100% inaccurate. My mac has a different style connector that needed to be pinched on each side to release the cable.

    Alex Nelson -

    Its not 100% incorrect for him as this was his connector. It was only incorrect for you.

    asthomas -

    Its accurate for my Mid 2011 3.4ghz iMac so it could be different for different iMac model years.

    Chris -

    The ZIF display cable is tricky to get back in. I would suggest that this cable be the first one to be put back during reassembly. You need maximum wiggle room and visibility for this. Push in the display power cable *after* this one.

    ganesh -

    How do you get the ZIF connector back in? Some screenshot or instruction would be very helpful. I cannot get mine back in.

    Brian Bowlin -

    This is really difficult, but essentially it slides in - with no discernible click. A *slight* tug on the lever lets you know its connected. Horrible thing.

    Use the ‘bic pen’ trick and you don’t have to remove this for most things but I had to go ‘back in’ to remove the super drive. I then used the tip next down and removed this connector at the screen also and put this end back in first with no screen in the way.

    Jem Marsh -

    I found the best way for me to reinstall the ZIF cable in was to lay LCD panel on its face and gently peel the black tape on upper part of lcd to expose and remove the connector there. At this point the ribbon cable is free and you can insert the hard to align connector to the board. Set LCD into imac and connect the small push connector next to the ribbon cable on board. It was easier to see and then reconnect the cable to the upper portion of LCD and tape it back over. Reinstall other connectors etc. This way worked best on my 27" iMac as it was much easier.

    thewiseone71 -

    The is a great tip

    Jem Marsh -

    I had to replace the cable due to damage from trying to reinsert it at the logic board and I found it best to re-attach it exactly the way that thewiseone71 describes it above. If you disconnect the part at the top with the tape around it, this goes much easier and there is less of a chance of damaging the port on the logic board where it attaches at the other end. I think some photos of this port, and the way this cable goes back in would be a great addition to this tutorial. Replacing this cable would also make a great tutorial.

    lana.lawrence -

    So like everyone else, I managed to screw this up. Do you remember where you picked up the replacement, or what I should look for specifically when looking for a new one? I looked on amazon, but the label on the one I found doesn’t match what is on mine.

    Thanks!

    Jeff McConnell -

    What would be really helpful to this guide, and this image is the closest I can find in the sequence, is a quick summary of exactly where the diagnostic LEDs are on this model (and what they mean, although the latter is easily googleable). I only mention this as I believe my PSU is goosed as no LEDs are illuminated anywhere, however I can only find references to 2009 and 2010 of the similar MYs which evidently have diagnostic LEDs in a different place, hidden under tape, and I suspect numbered differently. So I can't be 100% certain!

    Mark Whitehead -

    I can see why some people are breaking the connector in step 7. You do initially pull the tab up, perpendicular to the logic board, which unlatches the connector, but then it is finally disconnected by then pulling the tab toward the top of the computer, parallel to the face of the logic board. I found it easier, after disconnecting the sync cable in step 5, to then prop up the bottom of the LCD, in order to better reach the ZIF connector, the LED backlight driver cable and the display power cable.

    randy3833 -

    I messed this bit up too. It says “pull up”. As the iMac laid flat on the table, I pulled towards the ceiling, bending the pins. It should say “pull towards the top of the machine” or something.

    I managed to straighten them out with a tweezer. Looked like a couple of pins were missing at the end, but it looks ok.

    Now I have to figure out what I have done to the temperature controller, the fans blow on full speed all the time here. :)

    Thor Hammer -

    Like others that have commented, this cable is a major PITA. I used both a headlamp to illuminate the area, and the iPhone’s Magnifier app to zoom in. The connector on the motherboard is flat, low profile and characterized by a thin narrow slot. The key to removing the cable is to slide the cable out, (after flipping that bar forward). Re-attaching the cable is the same - carefully sliding the cable into that slot, while keeping that bar pulled backward, until the cable was in place.

    For me, this was the most difficult part of the hard drive replacement. I spent more time on this than anything else.

    ECJohansen -

  8. M1aCZuMPZndRtiE4
    • Use the tip of a spudger to disconnect the display power cable next to the display data cable.

    need more description than “disconnect” here. It took my awhile to figure out that it’s was a “back toward” connector.

    John Oakley -

    Thanks John, would you give a short suggestion on how to help other users to remove such a “back toward” connector to make it clearer?

    Angel -

    I broke 1 of the pins on the logic board side when reconnect. Now my iMac have no display. Not sure how to fix it.

    Need better description here with close-up photos to avoid accident like mine.

    quanghuymt -

    It’s pretty simple, using ifixit IC Extractor/Connector Puller by gripping gently and carefully the tips of the connector and pull straight up towards the HDD. You can also use a spudger and gently very slowly walk it up towards the HDD.

    Chris -

    I missed up the pins on display power cable. They are very very tiny and fragile.

    John Hill -

    Cheat on this one. Loosen the tape on the back of the display. That gives you more slack on the cable. The connector is pretty standard.

    ECJohansen -

    I could not reconnect this cable. How to put back?

    Jagat Limbu -

    Jagat, it’s easier if you lift the other side of the display.

    Olivier Deschamps -

  9. BrXZfUaIwRRTUdE6
    • Carefully pull the display toward the top edge of your iMac and lift it out of the iMac case.

    When I opened up my iMac, I was surprised at how dusty it was inside. You might want to have a vacuum cleaner handy to vacuum up the dust inside the case. Be careful not to vacuum up the screws, though!

    johnhugh -

    do not use a vacuum cleaner, it has ESD!!!!!

    find a vacuum that is for computer use that has no ESD

    Kurt L Nelson -

    FYI...I did this fix, upgraded my mid 2011 27" to a Samsung 850 EVO SSD Hard Drive. Everything went great except for two parts...

    1. When I started up with my install media I got a three beep error and I could not install. I ended up using the CRTL-R at startup and did a network install that downloads an image of the original OS that comes with the system and allows you to install with the correct file.

    2. Hard drive fan was spinning at full speed the whole time. This was annoying to say the least. Another person on this thread commented on this and said that you had to buy a $30 piece of software to fix it, I actually found another one that is free and works quite well (http://exirion.net/ssdfanctrl/).

    zackduchene -

    Just completed the upgrade and put a 1TB SSD in. I have used this software and seems to do a good job. http://www.crystalidea.com/macs-fan-cont...

    adrianh -

    There seems to be a missing step here. All the while one is removing the cables from their sockets it is supposed that the screen which is quite heavy is suspended in mid air… no, you are holding it up with one hand while doing everything single handed while in all honesty it would be nice to have both hands if for nothing else to steady your movements. So. Lets add a step. Lets figure out a solution and use some kind of prop until the screen is removable.

    Gary Kimes -

    ESD = Electrostatic Discharge

    Gary Kimes -

  10. snOWxVAYeqCHdIUU
    • Lay the display face down on a flat, soft surface.

    • If you are replacing the display panel, you will need to transfer additional components from the old panel to the new one. Compare the back of the old display with the replacement display. Note all cables, sensors, and foam cushioning that are missing from the new display.

    • If there is a wire or cable underneath adhesive tape, always pull the tape off first. Do not pull on the cable directly.

    • If the cable is glued to the chassis, use a heated iOpener or a hair dryer to soften the adhesive first. You can then slide an opening pick underneath the cable to loosen it. Never pull on the delicate connectors.

    • Slide an opening pick underneath the foam cushion pieces to separate them from the display, and gently pull them off. You may need some double sided tape to re-attach them to the new display.

  11. yMVNKHFOxG6OPRqJ
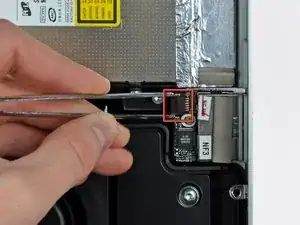
    • Grasp the SD board cable connector with a pair of tweezers and pull it straight away from its socket on the SD board.

  12. ktfyUyIA2BhXoGYw
    • Remove the single T8 Torx screw securing the SD board to the outer case.

  13. RNOyWPfROiLGGr1Y
    • Lift the free end of the SD board to clear the plastic optical drive fan body, then pull it away from the edge of the outer case case to clear the two mounting pins.

Conclusion

To reassemble your device, follow these instructions in reverse order.
Phillip Takahashi

Member since: 22/08/11

86632 Reputation

0 comments