Introduction

Prerequisite-only guide to replace the logic board assembly in an iMac 27" 2017.

  1. HVZOuLlAiUTsB4f1
    • Use a T5 Torx screwdriver to remove the two 4 mm screws securing the AirPort/Bluetooth antenna cables.

    Rather than unscrew the antenna cables, I usually unscrew the screws on the board and slide out the whole AirPort/Bluetooth module, which means I need not keep track of which antenna cable goes where.

    johann beda -

    Fully agree with comment of johann! I did it that way and was glad to not having to deal with the microscopic IPEX "coax" antenna connectors and order of them.

    I'd like to add that after removing the 2 screws, the wifi/bt module is still holding into these 2 holes with 2 metal pieces.

    Before pulling the module out of its socket, one has to slightly lift it away from the mainboard (maybe 1mm, so the metal pieces leave the holes).

    Thomas Waldmann -

    Confirmed. 2 T5 screws, and pull the board straight up out of its socket behind he motherboard. Leave all cables attached.

    ebay -

    Fully agree. It is not only handy for order of cables but especially eliminates risk of damaging the quite delicate IPEX connectors on the broadcomm wifi/bluetooth board when removing and reconnecting later. This happened to me. It is a huge hassle to replace / repair.

    This should be main option!! Wish I read this comment first.

    Starting Genius -

    Does anyone know if this board can be upgraded to Bluetooth 5

    Chris -

  2. qIA5fvOeCOnWH1Vh
    qIA5fvOeCOnWH1Vh
    XXMEBjJLNYXOl3aY
    nmVCPlZOoapjC5D2
    • Use the point of a spudger to disconnect each of the four antenna connectors from the AirPort/Bluetooth card.

    • Note the original positions for each connector when reconnecting the cables. From left to right on the card, the antennas are connected in the following order:

    • Leftmost

    • Top

    • Upper right

    • Lower right

    TIP: Tape all 4 cables first to keep them in the correct position when re-assembling.

    Les Lesaca -

  3. LDGWovmq5iqPhCh5
    LDGWovmq5iqPhCh5
    rcpRC6BN2MsLiAJS
    Oy3WASyxuKZMQQ3p
    • This is a delicate connection that can be easily broken.

    • Flip up the metal retaining bracket on the iSight camera cable.

    • Pull the camera cable connector straight out of its socket, toward the top of the iMac.

  4. PZGoVl3TfEGOINTp
    PZGoVl3TfEGOINTp
    OYq3NjhImKlULFKy
    GsEHxDSgxuouCSCj
    • Use the flat end of a spudger to disconnect the headphone jack cable connector from its socket on the logic board.

    • Gently push the cable out of the way.

  5. Ioj6vLmqt1UTLkBu
    Ioj6vLmqt1UTLkBu
    gBUV2Xy1qEjgOyOT
    lFXqMinhpxQcgWV2
    • Use the tip of a spudger to flip open the retaining flap on the microphone ribbon cable ZIF socket.

    • Be sure you are prying up on the hinged retaining flap, not the socket itself.

    • Use tweezers to gently pull the microphone ribbon cable straight out of its socket.

    Make a 10x macro photo of that connection with a good camera (showing how far the ribbon cable is inserted into the connector) BEFORE opening/pulling and later AFTER reinserting/closing it. Then carefully compare the photos concerning how far the cable is inserted.

    The only mistake I made while fixing my iMac was not to fully reinsert that ribbon cable and thus the mic did not work at first.

    Thomas Waldmann -

  6. piGgRxFUMj33AWDI
    piGgRxFUMj33AWDI
    ieBtZtFwkdn3cTrW
    • Remove the following screws securing the logic board:

    • Two 23.7 mm T8 screws

    • One 20.1 mm T25 spacer screw

    • One 17.6 mm T8 screw

    • One 7.2 mm T8 screw

    • Three 7.1 mm T8 screws

    • One captive T8 screw

    • This screw is beneath a hole in the logic board. If you aren't using an iFixit driver, you may need an extension or a screwdriver with a longer shaft.

    A 3.0 Hex driver worked for the T25 spacer screw.

    johann beda -

    1/8” hex worked, too

    ebay -

    For the T25 I used a regular chisel tip screw driver that was exactly the width between two opposite sides of the Torx star

    The standoff is only screwed in by two or so turns and came out very easily for me

    So you shouldn't have to force it and damage threads

    Eoin -

  7. fJgFkZyHLLZdB1YH
    fJgFkZyHLLZdB1YH
    fHGiChnXJmROP3ek
    Yg2G1MP6Jo3XplDC
    • Pull the hard drive SATA cable and connector through the right hard drive bracket. Move the cable to the right side of the iMac, out of the way of the exhaust port.

    • Don't attempt to completely remove the cable—it can't be removed just yet, but will get in the way of removing the logic board.

    When reassembling one should not "pull it through the right bracket", but rather "pull it through between the right bracket and the case".

    Thomas Waldmann -

  8. KUFY5kVqKEZvTX1t
    • Use a T8 Torx screwdriver to remove the two 5.6 mm screws from the top of the heat sink exhaust duct.

    For the life of me I jut could not get these two screws to go back in neatly

    I had the same issue on both a 2017 and 2019 iMac 5K

    After some thinking I realised the don't do much anyways so I left them out

    No harm was done to either machine

    Eoin -

  9. cGF6KPqP4fUBB4jw
    cGF6KPqP4fUBB4jw
    WdI1VHP2UFCNPGCu
    ZSWNOLBKTDVCVItY
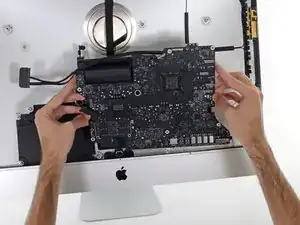
    • When removing and installing the logic board, take care not to damage the delicate microphone ribbon cable at the bottom left of the board.

    • Tilt the logic board slightly forward.

    • Lift the logic board straight up and out of the iMac. Be careful not to snag it on any of the screw posts attached to the inside of the rear case.

  10. u1JfbBecaKwUb6Nd
    u1JfbBecaKwUb6Nd
    NsDLWtU6RtvWJA3w
    • When reassembling your iMac, be very careful to align the exterior I/O ports correctly. The logic board can sit crooked even when secured with all its screws.

    • You can use a USB flashdrive or ethernet cable to ensure the logic board is seated correctly while you screw it in.

    Insbesondere die USB3.1 Port sollten mit einem Stecker belegt werden! Ich habe nur die USB3.0 (A?) Ports mit Steckern belegt und konnte nach dem Zusammenbau alle Port benutzen, aber nicht die USB3.1 (C) Ports. Am besten überall einen Stecker rein.

    Boris Boesler -

    Boris is correct. I reassembled mine usig the USB3.1 ports for alignment and found that my USB-C plugs would not go in. Be sure to use USB-C ports for alignment!!!

    Please update the instructions with this information.

    Erik -

    Confirmed. Used the rightmost USB-C and the leftmost USB-A connector and it aligned perfectly.

    Thomas Waldmann -

Conclusion

To reassemble your device, follow these instructions in reverse order.
Adam O'Camb

Member since: 11/04/15

195421 Reputation

0 comments