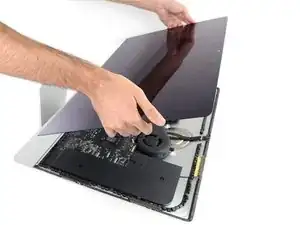
Introduction

Prereq for removing the display.

  1. qvnTkhMj1Khcw1SW

    What’s the point of this? You run the wheel around the outside, and then you lay it down anyway to pull the glass and do the rest. The wedge is not needed.

    ebay -

    I have a story to tell about this teardown. It all went wonderfully well until after I completed the process and attempted to format my new SSD drive only to discovery that the capacity of the drive was 256GB… not the 2TB I was sure I had ordered. iFixit was very supportive and helpful in sending me a new set of sticky tape strips and and RMA to return the SSD and some of the other parts.

    I finally had received my new set of strips and the 2TB SSD…. I figured, piece of cake… I already know how to do this… but I watched the video again and started following the teardown…

    …apparently the new sticky tape strips was way more powerful that the original tape and while using the pizza cutter tool and not advancing much, I proceeded to use one of the iFixit credit card style wedges…. I now have 2 pretty severe cracks on the glass of my display, which as clearly explained by @mayer can only be replaced by an entire display… which runs at about $500. Cosmetically it looks horrible, but it works… for now.

    Erich Hentschel -

  2. KHov5rIJNDb1qRAi
    KHov5rIJNDb1qRAi
    WWstOTxbT6Mg4GMZ
    ea1NVoLORufoKsnn
    • Starting on the left of the display, near the power button, insert the iMac Opening Tool into the gap between the glass panel and the rear case.

    • The hub on the iMac Opening Tool will keep you from pushing the wheel in too far. If using a different tool, insert it no more than 3/8" (9.5 mm) into the display. You risk severing antenna cables and causing serious damage if you insert the tool too far.

    Should you run a hair dryer along the edges first?

    Al Val -

  3. q3CZ1tidMXlcgoIQ
    q3CZ1tidMXlcgoIQ
    rHnjd1yBayLNqTtN
    KTtVR5DtVkPVYd4Y
    • Use the tool like a pizza cutter—roll it along through the gap, and it will cut the foam adhesive through the center.

    • Be sure to always push with the handle behind the cutting wheel. If you pull, the wheel might get pulled out of the handle.

    • Run the tool up along the left side of the display.

  4. DL3Vsl22hJBiEQUC
    DL3Vsl22hJBiEQUC
    I1sSvQIKZKIxUJQP
    ZqrgUXS1FMYYPMSS
    • Continue wheeling the tool up around the top left corner.

  5. uIQeQKO2wRSFOchP
    uIQeQKO2wRSFOchP
    gvmN6noZV1RF3Jja
    • Cut the adhesive along the top left of the display.

  6. ZbtM1gnKNMLvApGO
    ZbtM1gnKNMLvApGO
    xGLHuViOG6iiZRHR
    • Continue along the top of the display.

    • You may want to run the tool back and forth through what you've already cut a few times, to ensure you get as much of the adhesive separated as possible.

  7. PsXMW5CoXDyhXHAM
    PsXMW5CoXDyhXHAM
    JAULK1Cx3kdL1sMN
    vXTTvMMJZXJmbkPC
    • Push the tool around the top right corner of the display.

  8. HdQnP2Gt2blNM1Na
    HdQnP2Gt2blNM1Na
    HtXaMYaxdshMTDgI
    • Wheel the tool down along the right side of the display.

  9. kSSS26DZATfnLk3Q
    kSSS26DZATfnLk3Q
    SyVUroLGO1X5mAkC
    • Finish pushing the opening tool to the bottom of the right side of the display.

    • At this point, you'll want to run the tool back around the entire display, to ensure you cut as much adhesive as possible.

  10. vGGIOBrvwJMnSBdS
    vGGIOBrvwJMnSBdS
    jobdKF3VfjwEEE6o
    kXQQFeUFGZvmMM5y
    • While the opening tool did the lion's share of the work, the display will still be slightly adhered to the case. A plastic card will be necessary to free up the last of this adhesive.

    • Set the iMac face-up on a table.

    • Starting from the top right corner of the iMac, insert a plastic card between the display and frame.

    • Be careful not to insert it more than 3/8" (9.5 mm), or you may damage internal components.

  11. ut5JD6JtjXxJqQML
    ut5JD6JtjXxJqQML
    PAssQDYLvD2G5iO3
    • Gently twist the plastic card to open the space between the display and frame, and cut any remaining adhesive near the corner.

    • Using too much force will crack the glass. Work carefully, and don't try to create a gap any larger than about 1/4" (6 mm).

  12. NNcaKcnyNAISxxiX
    NNcaKcnyNAISxxiX
    j6rG1dfuABOu2dO1
    nJGOGJvmpMQJkiQj
    • Be sure to stop cutting before the iSight camera in this step, or you may damage it.

    • Slide the card toward the center of the display, to cut any remaining adhesive.

  13. YS6FqSpRAiDQG4GQ
    YS6FqSpRAiDQG4GQ
    WqsOKXvG5huAPhKo
    • Put the card into the corner again and let it stay there to keep the adhesive from resettling.

  14. 21PJZCMtdxPdvyWG
    21PJZCMtdxPdvyWG
    21su2lVZdmdMqNFj
    NVhkQUfEdwlSkUcY
    • Insert a second card into the gap between the display and frame in the top left corner.

  15. e3ydZGUAg4tGPxpq
    e3ydZGUAg4tGPxpq
    4asZcENj1YWTTAaQ
    • Gently twist the card, slightly increasing the space between the display and frame.

    • As with the other side, move slowly to allow the adhesive to break, and be careful not to over-stress the display glass.

  16. saNDXDREhnqVr5IH
    saNDXDREhnqVr5IH
    yUMykLfSY4dkyBvj
    35ISowkckhE1MThI
    • Slide the plastic card toward the center, again stopping just before the iSight camera.

  17. Y1GSYcC32e6ll2cv
    Y1GSYcC32e6ll2cv
    swIMklGvuLiQZHEA
    • Insert the card back into the top left corner.

  18. CTHcNsvR2JSpycOK
    CTHcNsvR2JSpycOK
    DkPAlq1IRaSXjP41
    2lBkebhXZXHQfJx5
    • With the cards inserted as shown near the corners, gently twist the cards to increase the gap between display and case.

    • If there are any sections that seem to stick and won't separate, stop twisting and use one of the cards to cut the adhesive in the problem area.

    • Begin to lift the top of the display up from the frame.

    • Only lift the display a few inches—it is still attached to the iMac by data and power cables.

  19. Q2TfC5UwSkEOSikR
    Q2TfC5UwSkEOSikR
    MTrFTqNJOBVdqV4H
    • While holding the display up with one hand, use the other to unplug the display power cable.

    • Lift the display up enough to have easy access to the connections, but not so much that you stretch the cables and stress their connections (about 8").

    Der Stecker muss seitlich wie die meisten anderen Stecker in diesem Modell komprimiert werden, um ihn aus der Buchse auf dem Logicboard zu ziehen. Die Zugrichtung ist parallel zum Logicboard in Richtung Oberkante des iMac. Ziehen ohne seitliches Zusammendrücken der Backen am Stecker könnte den Stecker oder die Buchse beschädigen.

    Ernest Bumblebee -

    These instructions are unclear. They imply the cable can just be pulled out but this step had me stuck for a bit. Searching the webs, I discovered that there are little tabs on either side of the connector. I used my prod tool and poked one side and the connector came out a little. I poked the other side the connector came out without a fight.

    Peter Akey -

    The instruction for this step state this but I was still not expecting two cables. Finally figured out there is a Display Power and a separate Display Data cable.

    wsrb -

  20. PLwxTC26uh2GhoR5
    PLwxTC26uh2GhoR5
    jrJVRXjytJ522PLN
    r2qVa6WfDjnC3vLQ
    • Flip up the metal retaining bracket on the display data cable.

    • Disconnect the display data cable.

    • This is a delicate connection that can easily be broken. Be sure to pull the display data cable connector straight out of its socket, toward the top of the iMac.

  21. OukCaMppueWJwd5o
    OukCaMppueWJwd5o
    EuGUiTLe2sAHCQxO
    • Lift the display up to a near-vertical position.

    • At this point there is still a strip of adhesive along the bottom of the display that will hold the display to the frame like a hinge. You can loosen this adhesive by working the display up and down a few times.

    After rocking the display back and forth a bit, I found it helpful to use my iMac opening tool to gently slide ever so slightly underneath the bottom of the glass to cut the adhesive. This was with the display lowered back into it its normal position. I just worked about 1 millimetre deep at a time and eventually cut through the ~8” adhesive strip at the bottom centre.

    Henry Rose -

    It's possible to skip this step and go to step 24, leaving the display attached. You'll want to open the display just enough to replace the drive, with the machine upright and supported so the display doesn't swivel (I fold up a small pillow and wedge it in there). This way you don't have to worry about damaging the display when removing it, or aligning it when replacing it (which can be difficult to do solo as it's big and heavy).

    Using a T8 with a short handle is helpful here, and make sure it's well magnetized so you don't drop the screws for the hard drive (just leave the other ones in the speakers).

    maccentric -

  22. ObipUvMrOdU6OUwe
    ObipUvMrOdU6OUwe
    dLOfRlONnG5YXXrL
    UjMBTMMcp2AMhUyw
    • Be very careful not to touch the capacitor leads or any exposed solder joints on the back of the power supply (boxed in red).

    • Grasp the small tab at the end of one of the bottom edge display adhesive strips and pull the adhesive toward the top of the iMac to remove it.

    • Repeat this step with the other adhesive strip and remove it.

    • If either adhesive strip breaks before it's removed, use a plastic card to slice through the remaining adhesive.

  23. fTayOtWEDOrUUstD
    fTayOtWEDOrUUstD
    mU65ktCEPdrocgSE
    TAnlppXI4q4GQblK
    • Be very careful handling the display—it's big, heavy, and made of glass. The display has fragile edges. Avoid lifting the display by the corners.

    • Lift the display up from the frame and remove it from the iMac. Lay the display face down on a flat, soft surface.

    • It may be necessary to slowly lift from one side, to peel against the remaining adhesive.

    • After the adhesive is cut, it cannot be used to re-seal the display in place. Follow this guide when your repair is complete to replace the adhesive strips that secure the display to the rear enclosure.

Adam O'Camb

Member since: 11/04/15

195421 Reputation

0 comments