Introduction

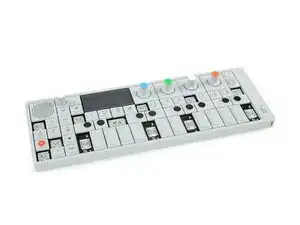
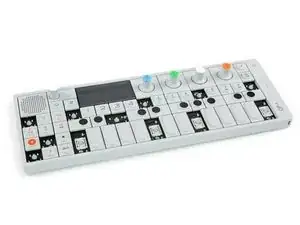
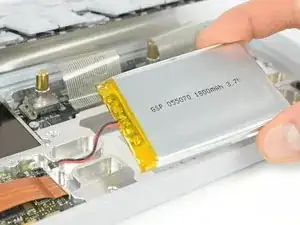
If you cannot take your OP-1 for a walk any more, the batterie needs to be replaced.

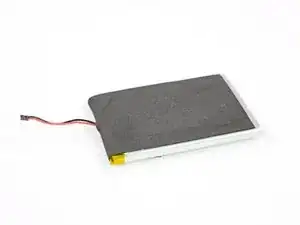
In this case it's a 1800 mAh li-polymer battery at 3.7V (that is 6660 mWh).

  1. 4KVrnvkncFY3G1uY
    4KVrnvkncFY3G1uY
    NJuEOh4s2HOcAtgn
    Qr2UmVFBBDwHquSu
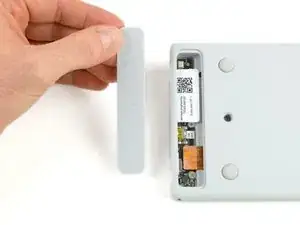
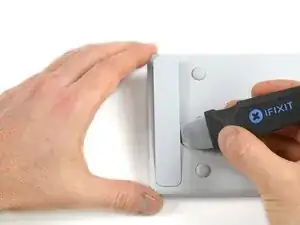
    • Open the back panel by using a Jimmy on the side of the panel. Be careful not to damage the OP-1 coating.

    • Lift the back panel and remove it. The Connector Board is revealed.

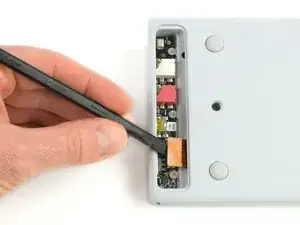
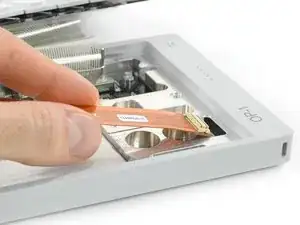
    • Disconnect the flex connector by lifting it up with a spudger.

    I believe the instructions here are sub-optimal - removal of the connector panel in this way will almost certainly damage the paint on the OP1 due to the tight fit of the connector cover board against the chassis.

    There are two better methods to remove the cover:

    - If you have a spare cover (as included, for example, with the iFixit connector board part), carefully screw a self tapping screw into the cover, then use a pair of pliers on the screw to remove the cover.

    - Remove the keyboard as per the iFixit guide below. Once the keyboard is removed, there is a small hole at a 45 degree angle that allows you to access the underside of the connector board cover whilst avoiding the connector board itself. You can see it at the top of the photo above to the right of the connector board.. Use a small object, such as the handle of a small paintbrush, to push out the connector cover from the keyboard side. This will result in clean removal of the connector board cover and allow it to be reused.

    lee -

  2. vxoTLiJxFDPOji5X
    vxoTLiJxFDPOji5X
    ajlj12AYLBNXKv6o
    MSgrKiNeLFhWdEpd
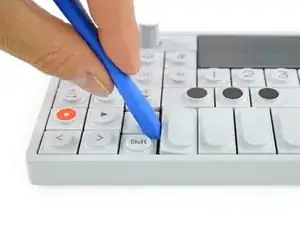
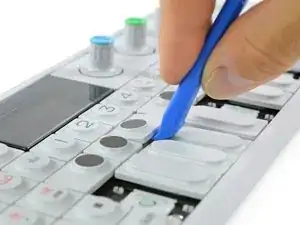
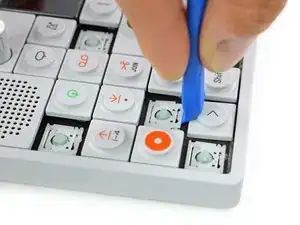
    • To get to the screws beneath the keyboard you need to take some keys off. You can use either an opening tool or an opening pick. The first picture shows how it should look like with all the necessary keys off (12 in total).

    • The four longer keys from the fingerboard are to be handled from the left side to get them off.

    • The eight smaller keys need to be levered from the bottom up.

  3. NKEIk4cFqiaAPIDr
    NKEIk4cFqiaAPIDr
    faMO21YfJAINC3yK
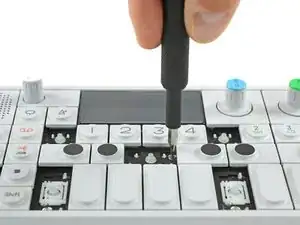
    • The scissor mechanism of the eight small keys are obstructing the underlying screws.

    • By using again an opening tool or opening pick these can be snapped off easily.

    • When reassembling be sure to place them in with the correct side facing upwards.

  4. SLEyuvdxWjnDuCUg
    SLEyuvdxWjnDuCUg
    RCYV1CYSlXFdOVKE
    MpduwLQ5mTtWh4lM
    • Loosen those 12 screws with a Phillips #00 screwdriver.

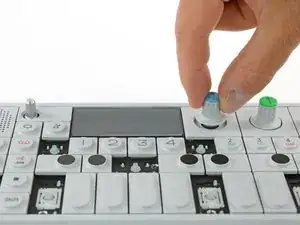
    • Then just pull off the four rotary knobs and the volume knob.

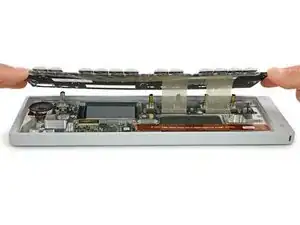
    • Now it is possible to slightly lift the keyboard and set it back.

    Your missing the ribbon decoupling step, unless you skipped it because it’s such a tight squeeze to get back in.

    William “Zoe” FitzGerald -

    The concept of removing the square panels that the knobs sit on was skipped.

    Station 2Station -

  5. gqgRVYoteXuFpUFg
    gqgRVYoteXuFpUFg
    yfiKFyDV4ZU14qdX
    a1xBnqKOEbQOLKUb
    • Carefully pull out the connector cable from the connector board and bend it out of the way.

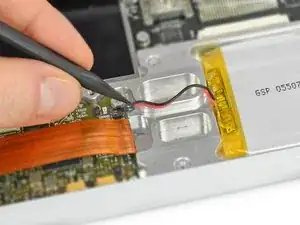
    • Disconnect the battery with a spudger. The connector needs to be lifted up and not being pulled to the side.

    • Now you can pry out the battery which is glued in with double sided adhesive tape.

    Den Stecker der Batterie nicht rausziehen sondern nach oben hinaus hebeln.

    Ichbincool Wow -

    Do not pull out on the battery connector, pull up. or in my case pull the %#*@ thing off and attempt to solder new battery directly to board haha.

    Raleigh Rapier -

Conclusion

To reassemble your device, follow these instructions in reverse order.

Tobias Isakeit

Member since: 31/03/14

116775 Reputation

41 comments

This is great. What type of battery is the replacement?? thanks!

TrustNoShadows -

Hi, thanks for the question. I added another picture and put some information in the introduction.

Tobias Isakeit -

hey, thanks for this! is the battery plug simple JST or do I need to get something specific?

lfsaw -

Yes, a simple JST plug (probably type ACH)

Tobias Isakeit -

Thanks for posting these instructions! I'm having trouble finding a battery that matches the one in the picture (unless I want to buy 1000 of them from Alibaba). Would this work?

http://www.ebay.com/itm/3-7V-1800mAh-Rec...

Dimensions are:

thick:3mm

wide:60mm

length:70mm

Clarke Robinson -

Hi Clarke, the number on the battery tells the dimensions: 055070 = 5×50×70 mm (including the yellow electronics part)
Tobias Isakeit -

Hello Tobias in the photo of the battery you provided, what is that cloth wrapped around the outside?

Chad Bishop -

Hi Chad, the silver stuff ist just the wrapping of the battery. If you mean the yellow foil, this is isolation tape to protect the small controller board of the battery.

Tobias Isakeit -

Hey Chad, it’s not really a cloth but it’s actually a thin sheet of foam with an adhesive backing that’s been stuck to the battery like a sticker. I’m assuming it’s there for protection of the battery and the internal elements surrounding the battery (and I’m guessing it helps to shield it from touching anything that could cause problems electrically as well). ✌️

Lord Shongo -

Hi Tobias, any chance you could provide me with a link to purchase one of those? i cant seem to find anything but chinese dealers on aliexpress. I reside in Berlin, Germany if that any help :)

Dennis -

Hi Dennis. First of all, sorry for the late answer.

The short english version: I don't have any link for you on where to get such a battery. We would very much like to offer a battery in our store.

The longer german version: Wir hatten bereits auch schon bei TE angefragt bezüglich der Batterien, aber leider noch keine Rückmeldung erhalten. Wir würden gerne bei uns im Store eine Ersatzbatterie anbieten. Du kannst gerne auch einfach mal direkt an TE schreiben, damit sie ein Feedback von den Usern direkt erhalten. Vielleicht gibt das noch Mal einen Ruck.

Tobias Isakeit -

Can I replace the battery with more capacity, like 3.7V 3000 mA?

Coop -

Hi Coop, we haven't tried it yet, but I don't see any reason why not. As long as the voltage is the same there should not be any problem.

Maybe you want to check back with TE directly to be safe; this way they are aware that users are looking for replacement batteries, too.

Tobias Isakeit -

I may have found some for sale here: https://www.aliexpress.com/item/tablet-b...

$12 each - but shipping says it could take 60 days... I'll let you guys know how quick I get mine :)

Shawn Ivie -

I bought that and it works great!

Emil -

Hey man, did you try this battery out? Does it work properly? Please let me know I’d like to buy it as well.

hannanhakim -

Does any one know the size of the jst plug?

Jean-Paul Dracolakis -

Hi Jean-Paul, the jst plug is most likely a type ACH plug. You can find the details in the data sheet here: http://jst.de/file/download/588/ach

Tobias Isakeit -

According to TE it is a Molex 0781725006-2P

km2783 -

But after some digging, it looks to be this one, the 2 pin member of the 078172 family:

https://www.digikey.com/product-detail/e...

km2783 -

Thanks for digging deeper, km2783. Connectors is not my field of expertise ;)

Tobias Isakeit -

No problem. I also found a battery that fits perfectly but for now they can only ship to US people:

https://www.sparkfun.com/products/13855

5.6mm thick, it fills the battery area completely (the 4.8mm OEM battery left a little room). A quick “test fit” seems to indicate everything will be good to go. Of course now there is no room if, say, the cell decided to swell… and the wires need to be clipped and the right connector added. But TE can’t ship bare batteries either, and wants $100 plus shipping to replace it.

km2783 -

The pin looks accurate, but which sockets will work for this? Assuming you need to strip the tip of the battery cable, slide it into a socket, crimp and set that crimped socket into the black pin. I cant seem to find a crimper or sockets.

Joshua Rivera -

hi there, i damaged the black pin where the two battery cables are fixed while replacing the battery. does somebody know where i can find a new black pin like this?

Flo Raf -

Where can I find an exact replacement battery. I cant seem to find them anywhere.. Especially with the correct connector.

Mike Arz -

If my battery goes bad will I be able to power my op-1 by plugging it in with a power supply?

Bill Yates -

It’s pretty short-sighted for a company that prides itself on good design to make it so hard to replace something that will inevitably wear out after a few years. Especially on such an expensive product. Don’t think I’ll be buying this after all.

Gabriel Crossan -

Hey any tips on removing the back panel? I’ve already messed up the coating on and cant even get it to budge :(

Turner Carroll -

Hello, I was just curious, will this battery work? I’m just concerned because the description of it says that it outputs 4.2 V at full charge but it is described as a 3.7 v battery, do all batteries like this have an output “range”?

Justin Kinter -

Where can I buy an op-1 battery with the correct black connector? I know what kind of battery it takes but cannot find one with the same black connector required for the battery to terminate. My previous black connector (from the dead battery) broke. Any assistance would be greatly appreciated. Thank you.

Jerehat -

Can I change mini usb charger to type c on the op-1?

Apollo Eleven -

Hi Apollo, that’d be an interesting mod. The mini USB port is soldered onto the connector board. Not sure how to wire a 24-pin USB-C (https://en.wikipedia.org/wiki/USB-C) to the four solder joints of the mini USB on the connector board. You’d have to grab the right outputs on the back of the USB-C and solder them onto the board. Needless to say that this would be purely experimental.

Tobias Isakeit -

Batterie von Akkuking

Akku - Li-Polymer 1800mAh - für COWON D2 2GB D2 4GB D2 8GB D2 Plus 16gb

passt genau. Einfach den Stecker der defekten Batterie nutzen, Kabel trennen, verlöten mit Schrumpfschlauch isolieren oder einen JST ACHL Stecker ist aber wirklich schwer den zu crimpen.

Ichbincool Wow -

Hey, I would like to add a few comments to this guide. First the picture of the back panel is misleading as it shows the tool on the right side which is basically impossible to remove. On the panel, there is a slightly wider groove on one of the short sides where you can easily put a thin plastic spudger to lift it out and avoid scraping the coating off. Secondly, to lift the keyboard you have to do it from the bottom while looking at the OP-1 in its regular position (the top part seems to slide in a groove of its own). Finally I would advice anyone that changes the battery for a new one without the connector to VERY CAREFULLY desolder the cables from the original battery to keep the connector in place as it is very small and could break the connector. Make sure the red and black contacts NEVER touch each other, when you have one desoldered, cover it with an insulated tape. Then you can solder them to the other ends of the new battery, again extremely carefully to avoid any potential explosion. Thanks!

Francois Menes -

What is the size of JST connector? Do you have any suggest store for buying replacement battery?

Massbook -

Maybe the comment from 11/10/17 will answer that for you: Teenage Engineering OP-1 Battery Replacement

Tobias Isakeit -

Ist es möglich genauere Angaben zur benötigten Batterie zu erhalten?

- Länge x Breite x Höhe?

- Kapazität mAH?

- wieviele Volt sollte sie haben?

… Die Einleitung ist nicht sichtbar als fehlen auch genauere Angaben.

Eigentlich toll diese Beschreibung aber schade das die Ersatzbatterie nicht beschrieben ist.

christofwagner -

Where do I buy a battery? That is fairly important

Brian J Siegel -

For everyone looking for components to order in 2021, here is what worked for me:

Battery: https://de.aliexpress.com/item/329567819...

In case you need the plugs, check out Molex Pico EZmate plugs. RS-online order numbers (molex part number) 700-0820 (78171-0002), 7001013 (78172-0002), 7000830 (78172-0410)

To unplug the plug, don’t pull to the side, but lift it up towards you. Instead of trying to crimp the cable.

Hint: You most likely won’t have the crimping tool for those plugs. They are really small. Instead unplug. Cut the cable in the middle and solder your new battery to that.

Andi Sieferlinger -

I ended up soldering a slightly smaller random 3.7 volt battery directly onto the board since my molex connector failed to extract, then the whole bit came apart from the board. it works~

Raleigh Rapier -