Introduction
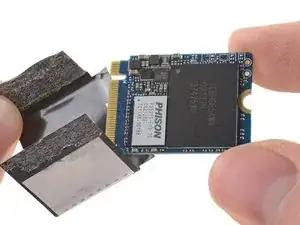
Use this guide to replace or upgrade the SSD in your Steam Deck LCD. The Steam Deck's SSD is a single-sided M.2 2230.
Remember: follow general electrostatic discharge (ESD) safety procedures while repairing your device.
These steps only describe how to physically remove and replace your SSD. You will need additional software tools and procedures to install an OS and get the replacement SSD to function as intended.
Follow Valve's Steam Deck recovery instructions to recover, repair, or re-image your Steam Deck's SSD with SteamOS. For installing Windows, official resources can be found here.
Note: The Steam Deck's buttons, thumbsticks, and touchpads may not register inputs at first after re-imaging the SSD. Use the touchscreen to follow initial SteamOS setup, allowing the device to download updates. Functionality should return once the Steam Deck restarts.
Note: Valve started shipping Steam Decks with refreshed internal designs in early 2023. Your Steam Deck may look different than the one depicted in the photos, but the procedure is the same. Remove the back cover to check what version you have. An original Steam Deck will have a metallic motherboard shield and a fan with square sides, as seen here. A refreshed Steam Deck will have a black motherboard shield and a fan with curved sides, as seen here.
-
-
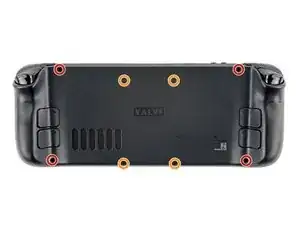
Use a Phillips driver to remove the eight screws securing the back cover:
-
Four coarse thread 9.5 mm-long screws
-
Four fine thread 5.8 mm-long screws
-
-
-
Insert an opening pick into the thin gap between the back cover and the front shell, along the edge of the right grip.
-
Pry up on the back cover to release it from the locking clips.
-
-
-
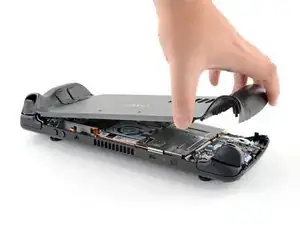
Grip the back cover at the opening you just created and pull it up and away from the device to unclip the long edges.
-
Remove the back cover.
-
-
-
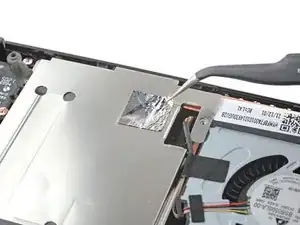
Use a pair of tweezers to remove the piece of foil tape covering the hidden screw on the board shield.
-
-
-
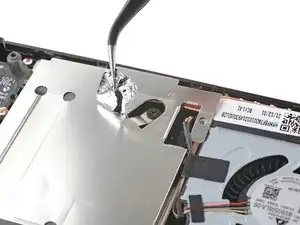
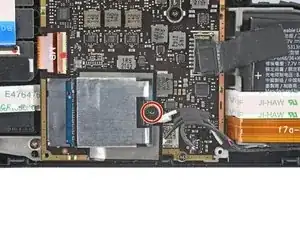
Use a Phillips driver to remove the three screws securing the board shield:
-
One 3.4 mm screw
-
Two 3.7 mm screws
-
-
-
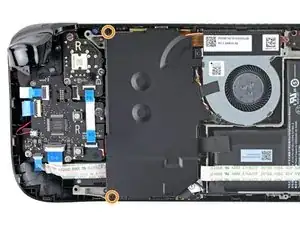
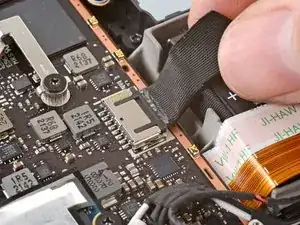
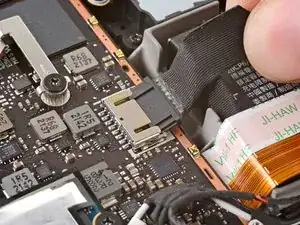
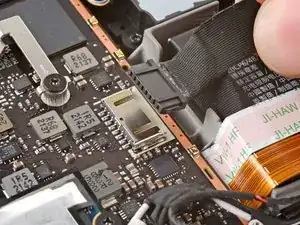
Grip the battery cable by its pull tab and pull it directly away from the motherboard to disconnect it.
-
-
-
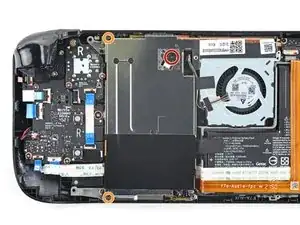
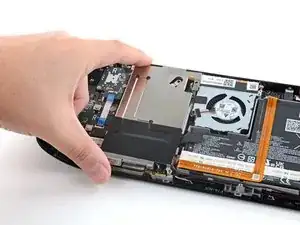
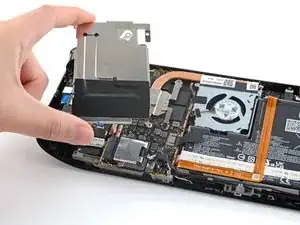
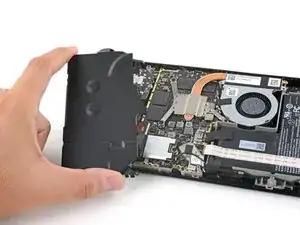
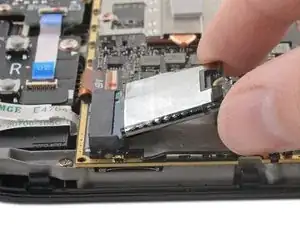
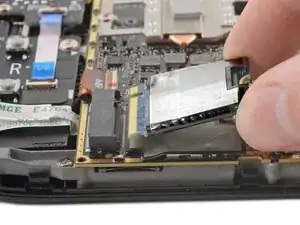
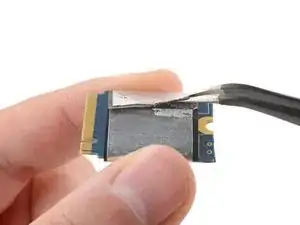
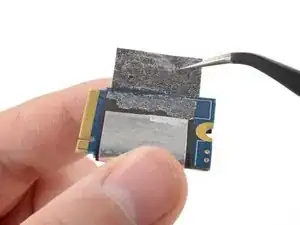
Use a pair of tweezers to slide the shielding off of the SSD.
-
If the shielding feels stuck, use a pair of tweezers to peel off and remove it instead. Take care to keep it in the best condition possible if you want to reuse it.
-
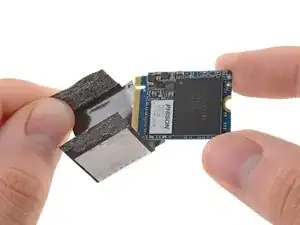
Only the SSD remains.
-


To reassemble your device, follow these instructions in reverse order.
To recover, repair, or re-image your Steam Deck's SSD with SteamOS, follow Valve's Steam Deck recovery instructions.
Take your e-waste to an R2 or e-Stewards certified recycler.
Repair didn’t go as planned? Try some basic troubleshooting, or ask our Steam Deck answers community for help.

54 comments
idk why valve couldn't have just made the m.2 slot a 2230/2242/2260 & 2280 m.2 NVMe SSDs support??/ they could have done it! im hoping someone out there can make a new back shell that includes the nvme. m2 adapter riser cable extender that moves the nvme ssd to the back case somewhere else with more room and to also not only allow for better cooling of the SSD but also allows us to use any size m.2 nvme SSDs like 2230 up to 2280 m.2 size ssds as i have tons of gen3 x4 2280 nvme ssd lying around from all my AMD ryzen machines from my 1800X X370 all way up to X570 and 5700X / 5800X & 5800X3D etc..
adamnfs2 -
I think it has to do with power draw... The Steam Deck isn't designed to cope with a incredibly fast (and power hungry) 2280 drive. I learned this the hard way on my laptop. I changed the drive myself to a 5500MB/s one and I could tell that not only did the SSD run hotter but also the components surrounding the SSD, it completely changed the thermal characteristics of the device. I added this drive to my desktop computer instead and bought a low powered one for the laptop. By having a 2230 drive on the Steam Deck, Valve forces users to choose drives that are typically designed for small and low powered devices.
Dennis -
lol thats a massive first world problem. we dont all have "tons" of m2 drives, ya know a reletively new tech, laying around
sk8r2211 -
and possibly even a m.2 door/cover to allow easier m.2 ssd removal W/O having to disassemble our steam deck! if the battery needs unplugged then a battery "KILLSWITCH" or "BATTERY DISCONNECT" Switch be also added to the decks after market backplate/cover to allow the steam decks battery to be disconnected from the unit with a toggle of a switch? allows for safter disassembly and m.2 SSD replacement with out having to repeatedly disassemble the steam deck....(SSD nand flash memory can fail) if i had the tools and capabilities to do this myself i would/ but i still dont even have my steam deck yet (Q3 July -Sept. 2022 ;( my friend just got his (ordered on same day) so WTF is mine valve!?????
adamnfs2 -
It's already incredibly impressive that the Deck does what it does, at its price point, with its form factor. It'd be even bigger with any other physical features like that.
The unit isn't necessarily designed with modularity in mind, at least not first and foremost. People aren't "supposed" to be replacing these according to Valve; if that were the case then the internals would have to be shifted around quite a bit to ensure that people wouldn't be able to break stuff when they swap drives/etc. Although this is a very easy repair, people will inevitably mess it up. Valve doesn't want to have to replace everyone's devices if they destroy the internals on their own volition.
The fact that the SSD replacement process is this easy, and it doesn't instantly void your warranty, is amazing. Very few companies have this type of policy with hardware of this nature. A handheld device with fully upgrade-able storage to this extent has been neigh unheard of until now.
ralkia -
eh. i guess pwr draw// but adding a 5500mbps nvme sounds like a gen4 pci-e nvme m.2 im sure the steam deck (even thougt it is running AMD's Zen2 (4c/8t ) CPU cores with a small cluster of( i think) 8cus (in the decks APU) but i dont think it has gen4 pci-e support to using an m.2 gen4 speed (4000mps+ (usually gen4 nvme are (1st gen ones like saberent rocket 4(OG model) below specs..
Tech Specs
SKU
SB-ROCKET-NVME4-1TB
Performance
Up to 5,000 Seq. Read /&/ 4,400 MB/s Seq.Write (yeah this one would not work) but I do have some low power (2280) m.2 nvme gen3 ssds that came from older laptops!
**(Steam Deck cant do these speed cuz pci-e gen4 isnt even supported(not implemented in the apus I/O :( Not even in any laptop APU (except new Ryzen 6000 series with RDNA2 RX 680m igp with (12CU's) (& up to 8c/16t zen3)& does have Pci-e gen4 i think) I wish valve would have used this APU / SoC instead ( this steam deck would have been a much more capable Unit) & i would have paid up to $1000($ or 999) with a 2280 m2
adamnfs2 -
GPD WinMax 2