Introduction

Before attempting this guide complete the CD Tray Removal Guide.

  1. 1QUEXsgwCqGeXaZb
    1QUEXsgwCqGeXaZb
    jBwkSKolEFrkbHNC
    • Using a Phillips head screwdriver remove six screws from the bottom of the console.

    • The six screws are marked.

  2. xAuxiDYbtnmDPNqo
    • Remove the two screws that attach the Genesis' connector to the rest of the console.

    • The two screws are marked in the diagram.

  3. 5HbR6uHvQnFvPjIS
    • Slide the lock tab to the left to separate the halves of the console.

  4. KGWciKcXIaHrCOUR
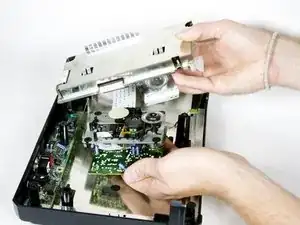
    • Lift from the left side to remove the top of the case.

  5. O4SBeWvDWucwsx2B
    • Using the spudger, pry the cover off of the Genesis attachment.

  6. oyZDYGSOyFfKe5fg
    • Lift the top of the case to remove the cover.

  7. OuEFoWFH2leyub1e
    • Remove the faceplate by pulling it up, then out.

  8. 2VLNtIytSMwf12Ya
    2VLNtIytSMwf12Ya
    Tr1BrlpU1kN3GZOP
    • Remove metal plate by unscrewing the three screws with the Phillips head screwdriver and then lifting the plate.

    • The three screws are shown on the diagram.

  9. 6r6t2PnUX4aHCejm
    6r6t2PnUX4aHCejm
    D3rlSEoXxitg6QRn
    • Remove the two screws from the plastic bar.

    • The two screws are shown pictured.

  10. WmY2jLowcPQRxFZU
    WmY2jLowcPQRxFZU
    KjRFwaQMrGGipyFQ
    • To remove the CD tray

    • Remove the four screws with the Phillips head screwdriver.

  11. 3FkEFFfO5NIXIIYB
    • Carefully unplug the wire connected to optical reader.

  12. UHipEZuDUXFWSm1s
    UHipEZuDUXFWSm1s
    jZNK2RhB2CvhONbX
    • Remove the four screws on the underside of the CD tray with a small Phillips head screwdriver.

    • The four screws are highlighted on the diagram.

    • The four springs below the circuit board are attached to the screws, so be careful not to lose them when you remove the screws.

  13. dOswDFrvKLPPGQhk
    • Carefully remove the CD tray from circuit board.

  14. yjKvrVPl52tsrWZX
    yjKvrVPl52tsrWZX
    lTUBpsINPdxU5lYi
    6lXqBRnSDXGgVX5n
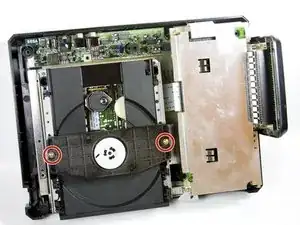
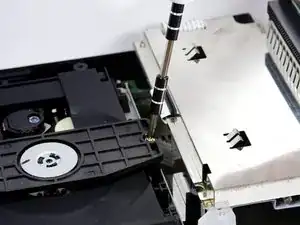
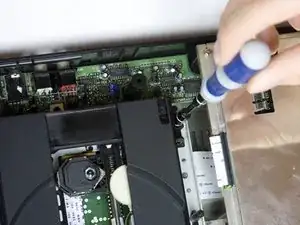
    • Remove the two bronze screws from the metal plate with a medium Phillips head screwdriver.

    • The screws are marked on the diagram.

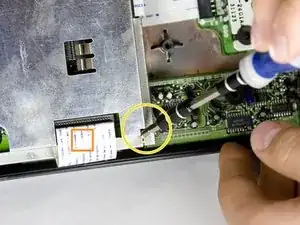
    • Carefully lift the metal plate up to expose the motherboard.

    • There is a wire strip running through the metal plate that is soldered to motherboard and power supply board. The plate cannot be completely removed. Do NOT force plate upwards. All the ribbon cables can be safely unplugged by simply pulling them out of their slots.

    The yellow circles in this diagram are incorrect. There are 3 screws on the main board assembly. 2 on the left and one correctly indicated on the bottom right. The top right yellow circle does not belong.

    myersni06 -

  15. jkcV5UdWjUuOVMRp
    jkcV5UdWjUuOVMRp
    Xp1upw22laPT1N5y
    • Carefully lift off the metal plate, the motherboard, and the CD tray circuit board. Then, flip each piece over, as pictured.

  16. BekfhK2xKmNojoyd
    BekfhK2xKmNojoyd
    NMvKKwSQQGmVBKj5
    vIRbhWD6nJaMMAIM
    • Remove the two screws from the power supply using a medium Phillips head screwdriver.

    • The two screws are marked on the diagram.

  17. 2YFQ4CKBNXfIcKug
    • Remove the power supply unit from the console by lifting the unit up.

  18. bjfsI2kkQhDQJ2iF
    • This is what the motherboard unit will look like once removed.

Conclusion

To reassemble your device, follow these instructions in reverse order.

Ryan Kotzebue

Member since: 07/10/10

271 Reputation

0 comments