Introduction
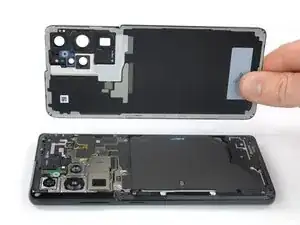
Use this guide to replace the back cover on your Samsung Galaxy S21 Ultra.
Before you begin, refer to the Samsung Self-Repair document for safety information.
Note: Retaining water resistance after the repair will depend on how well you reapply the adhesive, but your device will lose its IP (Ingress Protection) rating.
Tools
Parts
-
-
Prepare an iOpener and apply it to the back cover for at least three minutes to loosen the adhesive underneath.
-
-
-
Secure a suction handle to the bottom edge of the back cover, as close to the edge as possible.
-
Lift the back cover with the suction handle to create a small gap between the back cover and the frame.
-
Insert an opening pick into the gap you created.
-
Slide the opening pick to the bottom left corner to slice the adhesive.
-
Leave the opening pick in place to prevent the adhesive from resealing.
-
-
-
Insert a second opening pick at the bottom edge of your phone.
-
Slide the opening pick to the bottom right corner to slice the adhesive.
-
Leave the opening picks in place to prevent the adhesive from resealing.
-
-
-
Insert a third opening pick at the bottom right corner of your phone.
-
Slide the opening pick along the right edge of your phone to slice the adhesive.
-
Leave the opening pick in the top right corner to prevent the adhesive from resealing.
-
-
-
Insert a fourth opening pick underneath the top right corner of your phone.
-
Slide the opening pick along the top edge to slice the adhesive.
-
Leave the opening pick in the top left corner to prevent the adhesive from resealing.
-
-
-
Insert a fifth opening pick underneath the top left corner.
-
Slide the opening pick along the left edge of the back cover to slice the remaining adhesive.
-
-
-
Remove the back cover.
-
This is a good point to power on your phone and test all functions before sealing it up. Be sure to power your phone back down completely before you continue working.
-
Remove any adhesive chunks with a pair of tweezers or your fingers. Apply heat if you're having trouble separating the adhesive.
-
If you're using Samsung custom-cut adhesives, follow this guide.
-
If you're using double-sided tape, follow this guide.
-
Compare your new replacement part to the original part—be sure to transfer remaining components and remove adhesive backings from the new part before installing.
To reassemble your device, follow the instructions in reverse order and perform the opposite actions, e.g., "reattach" instead of "removing." Skip steps that use heating and prying, and pay close attention to the 📌 bullets as you work through the steps.
After you've completed the repair, download the Samsung Members App from the Galaxy Store or the Play Store, and follow the Samsung Self-Repair document (beginning page 9) to make sure your device is fully functional.
Take your e-waste to an R2 or e-Stewards certified recycler.
Repair didn’t go as planned? Try some basic troubleshooting, or ask our Answers community for help.
2 comments
Why would the adhesive only provide water resistance but not ingress protection? Is it inferior to OEM?
Is replacing the glass over the cameras a similar process, or can that be done without removing the back plate?


I have had no luck with the iOpener so far after heating it for 30 seconds. At what temperature does the glue become loose? I noticed that the iOpener heated up the back of the phone to up to 110F (43 C).
Imtiaz Chowdhury -
Hi Imtiaz,
if you're struggling to get the adhesive loose enough you can try to reapply the iOpener several times or try using a hair dryer or heat gun instead. In terms of temperature, I'm afraid I can't give you an exact number for when it's high enough for the adhesive to loosen, as that varies by manufacturer and model.
Dominik Schnabelrauch -