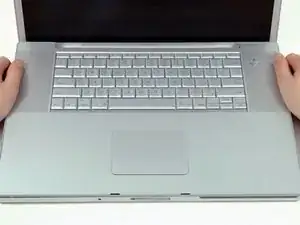
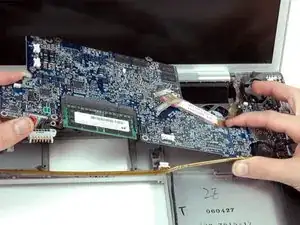
Introduction

Replacing the metal bottom case.

  1. inpTqi3kC2oEILvL
    • Use your fingers to push both battery release tabs away from the battery and lift the battery out of the computer.

    Before upgrading to a larger HD, you'll want to "clone" your original HD using the donation-ware program "Carbon Copy Cloner" (http://www.bombich.com/). Put the new HD in an external case; clone the original; test the clone (by starting up with it), then take apart the MacBook to put the new HD in the MacBook, and the original in the external case for use as a backup, etc. (You can't just drag the contents of the original HD to the new HD, and expect it to work; not since the days of OS 9 and before.)

    amiller770 -

    Can I put more than two gigabytes of RAM in?

    Noah Nsangou -

    mine has 2g*2=4 gb ram in. you should be fine

    on mac forum it suggested to put 4gb and a 2gb in a1261.

    david -

    I made the mistake of wanting to do a clean install of OS and start fresh after installing a SSD. Now I can't install most browsers on OSX Leopard. Does anyone know what is the most current version of OS I can put on this system? (disk or download) Can I get to Snow or Lion?

    2006 17" MackBook Pro Model#A1151

    2.16 GHz Intel Core Duo

    Memory: Two 1GB 667 MHz

    Hard Drive: Corsair Force GS: SSD 128GB

    scannon -

    You can install OS X 10.7 LION and no later version. Although LION runs ok with 2GB RAM it does help to get 1GB + 2GB = 3GB. Even if you install 2 X 4GB you will only utilize 3GB. Installing a SSD seems to make no difference since the SATA bus is only 1.5GB/s. A good 5400rpm disk is good enough. I even run BootCamp and Windows 7. Works fine. Not fast but fine. My A1212 refuses to die :-)

    asle -

    There seems to be some discrepancy about whether or not installing a SSD will help. See Phil's earlier comment from October 2015: there, *he* claims that having an SSD increases the load times significantly, (even though -- of course -- 1.5Gbps is not ideal)...

    His quotation, (re-)cited integrally:

    Just replaced my old HD with a Corsair Force LX SSD (which is SATA 1-3 compatible as required by this model) with success now my old 'outdated' laptop has super fast loading times and is postively flying faster than the speed of 'sound'. Thanks for the guide. Only problem I faced was replacing the top panel which after a few minutes of panic realised the rubber mounted Mic next to the left speaker had risen up when I had removed the top panel so after carefully pushing it back into place the panel fitted back how it should, so beware of this possible problem.

    Phil - 10/07/2015

    at0gjm -

    Bonjour j'ai besoin de cette bactérie que dois-je faire ?

    basile kouamé YAO -

  2. HsUpwplSeoYxfAZT
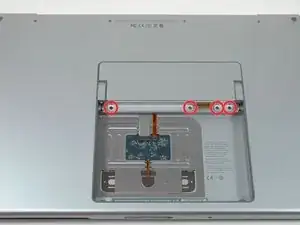
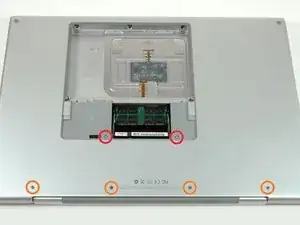
    • Remove the four identical Phillips 3.4 mm screws from the memory door. These screws have 4 mm diameter heads rather than the 3 mm heads on the body screws.

  3. 1k2Wi6HlKV5VrdgH
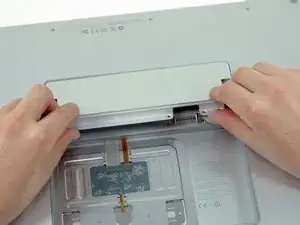
    • Lift the memory door up enough to get a grip on it, and slide it toward you, pulling it away from the casing.

  4. WKwoXwvApSbynKjr
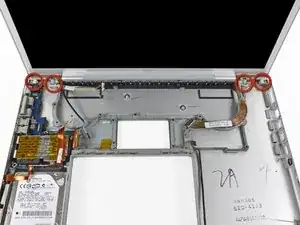
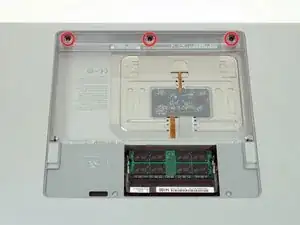
    • Remove the three Phillips screws in the battery compartment near the latch. Apple was nice enough to tilt these screws at a slight angle to make them easier to remove. On the A1261 these screws have 4 mm diameter heads rather than the 3 mm heads on the body screws.

    One of the screws here wouldn't bite going back in. I'm 100% certain it's the same screw that came out of it but it wouldn't bite going back, neither would any of the other two in this section in that particular hole.

    Damon B -

    To Damon - possibly the thread on the bottom of the upper case is obstructed.

    I found that I needed to fight the latch magnet with the right-most screw in the photo. The screw was pulled away from the hole so a magnetized screwdriver was not enough to place it. I needed tweezers to hold the screw in place until it bit.

    Yishai Sered -

    No, these screws won’t bite going back in — struggled for an hour. Lost hope of success.

    Case screw holes perfectly lined-up, neatly closed body, screw threads/head are fine (Apple quality screws), perfect screwdriver.

    The left one is in, other two simply will not bite whatsoever. Slightly irritating eventually turned to madly infuriating. I have a similar, earlier model and that was smooth to replace these exact, slightly angled screws (so I have experience).

    Q: Are the centre and right-hand screws absolutely essential — or can I give up and leave them out?

    (By the time you read this, that’s what I’ll have done)(out of sheer frustration)

    Steve Arkwright -

  5. YAspW4EEkCJRDsKl
    • Remove the following six screws:

    • Two 14.5 mm T6 Torx screws on either side of the RAM slot.

    • Four 3.4 mm Phillips screws along the hinge.

    Note for re-assembly: For the hinge use the longest four Phillips screws.

    R L -

    The Philips screws in Step 5 are longer than the other Philips screws. Would be better if the instructions differentiated them. Otherwise it is possible to use the wrong screws in Step 7 when reassembling.

    Alex -

    These instructions are actually wrong. The 14.5 mm screws are for along the hinge, the 2 on either side of the RAM slot are about 10 mm.

    Andrew Patterson -

  6. 23e4TihsxnA3YS1D
    • Remove the four 3.4 mm Phillips screws on the port side of the computer.

    When reassembling, please be careful not to screw into the wrong spot. I accidentally screwed into the DVI port and it was hard to remove the screw after that. I had to disassemble the whole thing again, only to find that I couldn't remove the screw from within as it was encased. After much scraping and prodding with a sewing needle, I was able to get that screw out. Phew!

    isotope434 -

  7. Dq4YYMmEB13YHvA2
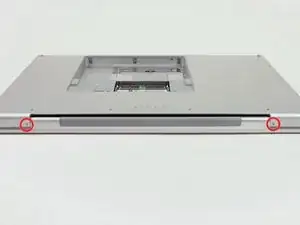
    • Rotate the computer 90 degrees and remove the two Phillips screws from the rear of the computer.

    Screw on the right is shorter

    mikefal -

    What are these two screws called?

    ian -

  8. rrRpmdNyglq1mYXy
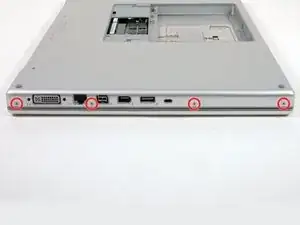
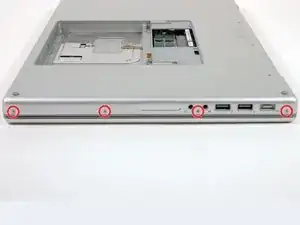
    • Rotate the computer 90 degrees again and remove the four Phillips screws from the side of the computer.

  9. VlILCxOuvQBBOu6Z
    • Do not yank the upper case off quickly. The case is attached to the logic board via a ribbon cable.

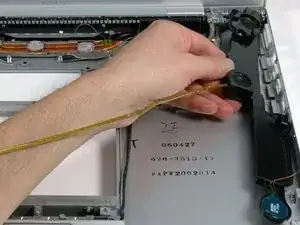
    • Lift up the back of the case and work your fingers along the sides, freeing the case as you go. Once you have freed the sides, you may need to rock the case up and down to free the front of the upper case.

    WOW this step is very hard!!! its a serious suction cup..

    nya -

    Once the upper case is free...Carefully tilt the upper case from the front towards the screen as their is a ribbon cable directly beneath the keyboard and trackpad that will need to be removed in the next step.

    Troy -

    Be very careful not to bend the screw tabs on the top case the perimeter screws attach to. Bending them causes them to quickly fatigue and potentially break off. When reassembling the top case, be sure the tabs are all *inside* the case before reseating it. If you get resistance, pull the case back up, check the tabs and reseat the top case again.

    Sheldon Carpenter -

  10. CKcJBnPVxu3JFxFu
    • Disconnect the trackpad and keyboard ribbon cable from the logic board.

    • Remove the upper case.

    Disconnecting this cable is optional, if instead you tip up the top case ~75 degrees, propping it up with something non-metalic (wedged in or by the battery compartment). Unplugging a connector from the main circuit board always carries slight additional risk.

    amiller770 -

    It's not really necessary to disconnect the trackboard/keyboard ribbon cable. You can simply lean the upper case against the LCD.

    Russ Greene -

    how reconnect this cable?

    anatole -

    I did this with and without step 10 (removing the upper case with detached cable). Removing the cable is risk, putting it back on was not so easy. But then, leaning the keyboard part against the LCD while replacing the hard drive is also risky.

    tobybaier -

    After having successfully removed/reattached the ribbon cable several times while trying to revive this computer for back-up use the securing/release tabs on the connector broke. The connector then will not hold the cable properly and connecting fails. Tried various methods of propping the cable in the connector to get full contact but eventually all efforts failed, too. Result: essentially a dead motherboard as no replacement for the connector seems available. Sadly, not worth the extra effort to try further repairs.

    Steve colton -

  11. QlXCcNIpuZqHukhE
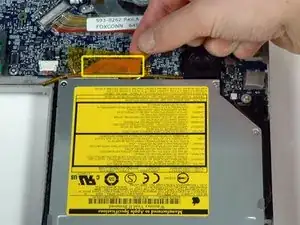
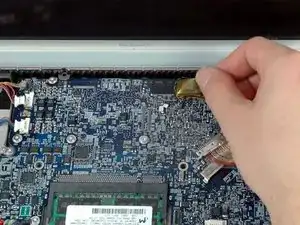
    • Disconnect the orange SuperDrive ribbon cable from the logic board, removing tape as necessary.

  12. EsSdToCfMMtRBtXH
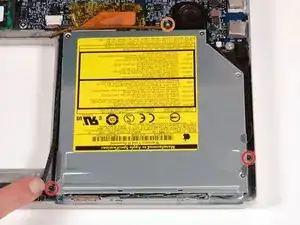
    • Remove the following three screws:

    • Two black 4 mm T6 Torx screws on either side of the SuperDrive.

    • One 8.7 mm silver (black in some models) T6 Torx screw at the back of the drive near the speaker.

  13. C1feAyGBLmmkjk4C
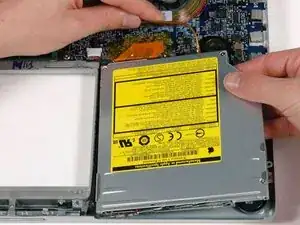
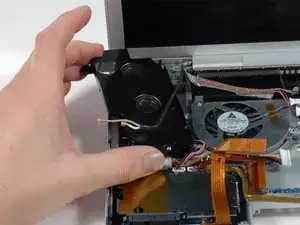
    • Use one hand to pull back the speaker cable and use your other hand to lift the optical drive up and out of the computer.

    • If you have a CD or any other object jammed in your optical drive, we have an optical drive repair guide.

  14. XSXWyvOaHfZiiNF1
    XSXWyvOaHfZiiNF1
    p5voEdlr5KEuPD5e
    Bbnbr6kI4FWmI5Qc
    • Disconnect the ten indicated connectors from the logic board.

    • The connectors have different positions for the four MacBook Pro revisions covered by this guide, and their locations are highlighted in the three pictures on this step.

    this being one step seems daunting to a first-timer... also, my board looks a little different (macbook pro 17" core 2 duo)

    zeroasterisk1 -

    Also - no thermal sensor (step 15) on my macbook pro 17" core 2 duo

    zeroasterisk1 -

    The logic board screws can strip very easily. I had 3 do so using a brand new T6 hand screwdriver.

    I was able to get them out eventually by pushing a T7 very hard into the grooves and essentially rocking the screw. What I mean is, just trying to get it to make that crack sound that the screw came loose. Pushing hard down and trying to twist just a little, and repeat. Eventually they all cracked loose and came out.

    Good luck and be careful. My MBP is able to play Hulu videos now without overheating and stuttering!

    Joe Mattiello -

    How to disconnect the connectors? Slide the metal one on the upper left corner out (to the left) with your fingernails or spudger. Pop the black plastic ones out by gently wedging the spudge under from the wire side. Slide the other plastic connectors out with fingernails on each corner in the direction of the wires.

    rgwc -

    Quote from zeroasterisk1:

    Also - no thermal sensor (step 15) on my MacBook Pro 17" core 2 duo

    Same with mine - no sensor.

    rgwc -

    A1261 also does not have the thermal sensor cable. Also, did anyone else notice the unused socket to the right of the RAM?

    sudowork -

    The most difficult step was to figure out how to disconnect the black plastic connectors without damaging them. I think you should put more information and add pictures for this step.

    I tried with one and damaged it. :-(

    So I stopped trying with the other until I know how to do it.

    Pirooz Chehrenegar -

  15. JHDXHjx1XMgWAKAC
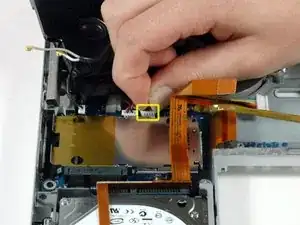
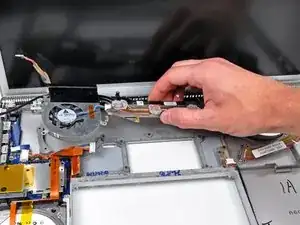
    • Rotate the large display data cable to the left and disconnect the small right thermal sensor cable beneath.

    • If you have the A1261 model, the right thermal sensor cable is located in between the right fan connector and display data cable.

    My Model A1212 did not have a thermal sensor cable connected.

    James Rybolt -

  16. AtLkDFKLkdb6qRpb
    • Remove the single black 4 mm T6 Torx screw securing the clear plastic shield over the right ambient light sensor.

    • Lift the clear plastic shield off the right ambient light sensor.

  17. Kh6mjTOEMG25OlWY
    • Peel up the orange Kapton tape securing the left thermal sensor cable to the logic board.

    • If you have a MacBook Pro 17" Model A1229, this is the middle thermal sensor.

  18. BhLVwnQbXMxqnVuG
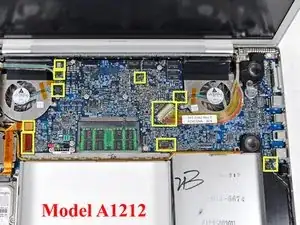
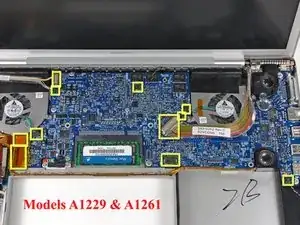
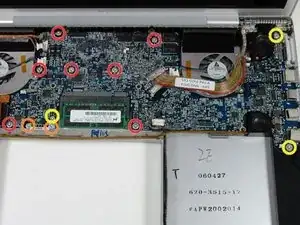
    • Remove the following twelve screws:

    • Seven 6.5 mm T6 Torx screws.

    • Two shanked 7.6 mm T6 Torx screws securing the battery connector to the lower case.

    • Three 7.8 mm T6 Torx screws.

  19. 3esUnyTLRVT5L4uQ
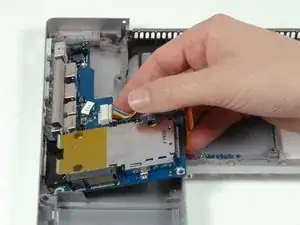
    • Lift up the left side of the logic board and disconnect the multi-colored power connector from the bottom of the board.

    Re-assembling the motherboard was quite complicated, because several pieces must fit before it is in position. I did it by putting the right speaker first, then the right side of the motherboard, making sure none of the cables got caught and then with some difficulty connected the board with this cable.

    Javier Lillo -

  20. ewPIhdkM5vKMPSTL
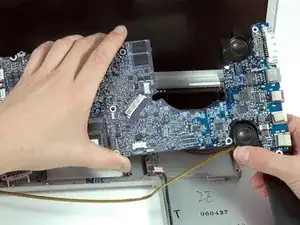
    • Grasp the logic board at the left side and at the thin section near the right fan, and rotate the logic board out of the lower case.

  21. hcvdUxVgsFPMehtn
    • If the right speaker assembly remains attached to the logic board, hold the logic board with one hand and slide the speaker up slightly to free it from the logic board.

    • To properly reassemble your MacBook Pro, you'll have to clean off and replace the thermal compound from the three chips on the underside of the logic board. Use our Applying Thermal Paste Guide to prepare the processor and heat sink surfaces.

  22. ex5b156oUHJYKwC4
    ex5b156oUHJYKwC4
    sKhBkj25llWjYrH4
    CIC1nQcUKHovtRC5
    • Disconnect the two antenna cables attached to the AirPort Extreme card.

    • The cable with the gray shielding attaches to the left side connector, while the cable with the white shielding attaches to the right side.

    • If you have a MacBook Pro 17" Model A1229, there are three antenna cables attached to the AirPort Extreme card instead of two.

    • If you have a MacBook Pro 17” Model A1261 the cable with the black shielding attaches to the left side of the connector, while the cable with blue shielding attaches to the right side. The gray cable isunattached and the end covered.

    My airport card actually has three connections. Looking at it from the front of the computer, they are black on the left, gray in the center, and blue on the right.

    LeeMahn -

    Quote from LeeMahn:

    My airport card actually has three connections. Looking at it from the front of the computer, they are black on the left, gray in the center, and blue on the right.

    Mine too. They pop off with a spudge wedged under from the wire side.

    rgwc -

  23. gI1VgZlEvTvoBioY
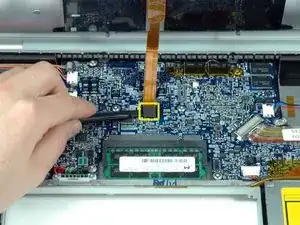
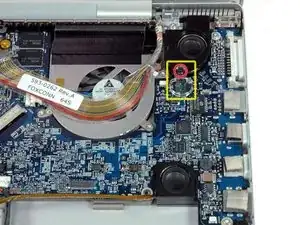
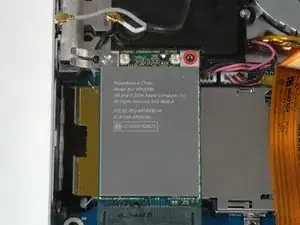
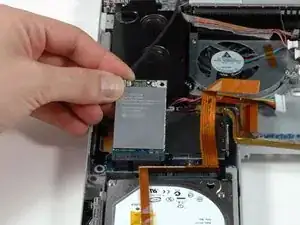
    • Remove the single black 4 mm T6 Torx screw from the top right corner of the AirPort Extreme card.

  24. TRHgpnYSwM5VWlLB
    • Lift the AirPort Extreme card up and slide it out of its connector.

  25. dDKbLf3hWpBs4jLy
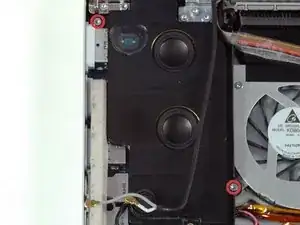
    • Remove the two 7.8 mm silver T6 Torx screws from the top left and bottom right corners of the left speaker assembly.

    • The magnet in the MagSafe connector may pull the upper screw towards it after the screw has been freed.

    My computer has the speaker assembly over the top of the fan assembly, where the screw is attached. Kaptan tape over airport wires run just above the screw.

    LeeMahn -

  26. bGZq6KERRhfX4XWn
    • Lift up on the left speaker assembly and rotate it slightly. It is not possible to entirely remove the speaker yet, as it is still connected to the left I/O board beneath.

  27. LnfiVqCtHY3FTSyM
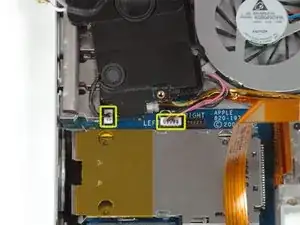
    • Disconnect the right speaker from the left I/O board. Make sure to pull on the top section of the white connector, not the cable itself.

  28. aecyBteHkBt2akpD
    • Lift the right speaker assembly out of the computer.

  29. KPqCZPKrljHoKyWC
    • If tape is attaching the attenda cable bundle to the left speaker assembly remove it.

    • Disconnect the two cables attaching the left speaker assembly to the left I/O board.

  30. n2ZKedJWDpbre1Te
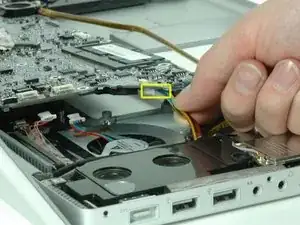
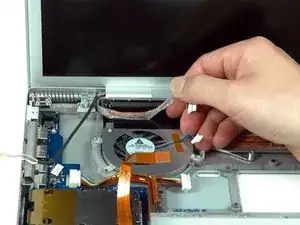
    • Peel up the iSight and inverter cables which are attached with a mild adhesive above the left fan.

  31. xIhPTFQZZX1xRhFM
    • Remove the five 7.8 mm T6 Torx screws securing the fans to the lower case.

    fron the ten two screws are longer... did not note which one :|

    JoeLimome -

    I actually did screw back with success the longer two screws as the middle screw of the inner group of three screws on each side

    JoeLimome -

    Quote from JoeLimome:

    I actually did screw back with success the longer two screws as the middle screw of the inner group of three screws on each side

    Strike that: there are the two inner most screws on each side. and only them will fit these holes

    JoeLimome -

    8 total torx

    Paul G -

    visible two under a pad on the right

    Paul G -

  32. AqRJ2ajtLDgPoEyA
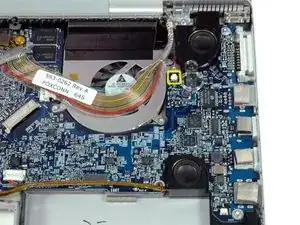
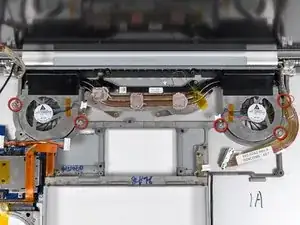
    • Lift the heat sink and attached fans out of the computer.

    • If you are replacing the heat sink, be sure to transfer the attached thermal sensor to your new heat sink.

    • If you need to mount the heat sink back into the laptop, we have a thermal paste guide that makes replacing the thermal compound easy.

    • Now is a good time to lean the fans back and clean out any dust bunnies from the grill. Also clean any dried thermal paste from the heat sink contact pads.

    While you have the fan assembly out, flip up each fan and clean any dust bunnies out from the grills by brushing and then blowing them out with sharp breaths. It appears that the only way to thoroughly clean out the dust from the fan grills is to disassemble the parts down to this step!

    rgwc -

  33. gNZJOKiENkHKZJUK
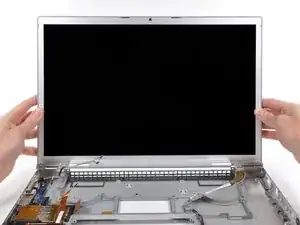
    • Remove the ten silver T6 Torx screws securing the display (five on each side). On the right a 9.6 mm screw secures the display data cable, also on the left the screw closest to the inside is 9.6 mm. The others are 7.8 mm.

    • Don't forget to replace the hinge end caps when reinstalling the display assembly. The end caps are side specific, so be sure that the posts are facing towards the lower case.

  34. UvZPQ223KfSUgHaT
    • Grasp the display assembly on both sides and lift it up and out of the computer.

  35. DIC3mqctKqhg452y
    • Lift the Bluetooth assembly out of its slot on the left side of the hard drive.

  36. OYB51RwmvGLaN2TI
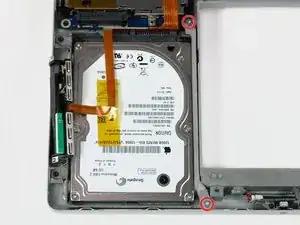
    • Remove the two silver T6 Torx screws securing the gray metal retaining bracket to the right side of the hard drive.

    • Lift the gray metal retaining bracket out of the computer.

    Check the alignment of the semi-circular cuts of the retaining bracket on the new lower case. Though mine was aligned in the old case, it wasn't aligned with the new one. I had to widen the cuts with a Dremel tool. Also, I had to cut a notch in the bracket at its upper corner to accommodate the higher lip of the frame in the new lower case, and I ground down the bracket a bit near the lower screw.

    rgwc -

    It would be very helpful to have some extra steps here showing me what to do if I have accidentally pulled the ribbon cable out of the Bluetooth unit. It appears to be inaccessible. Is there some way to reattach it without destruction?

    Ann Burgess -

  37. CRPrNXPRpZgx5Dt1
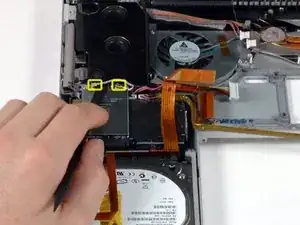
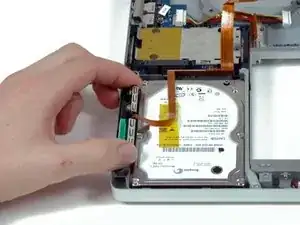
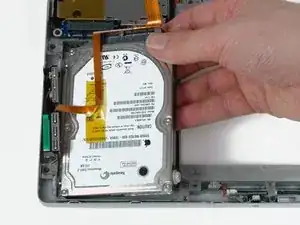
    • Lift the hard drive up from the right side and remove it from the computer. The Bluetooth assembly and orange ribbon cable are still attached to the hard drive and will come out with the hard drive.

  38. EB5hRIU6b2JyqMoa
    • Remove the four black 4 mm T6 Torx screws securing the left I/O board to the lower case.

    The instructions say 5.. but I only see 4 screws. And the picture shows only 4.

    LeeMahn -

    Same experience as LeeMahn: only four black screws here, as shown in the picture, despite the text says five screws.

    JoeLimome -

    Quote from JoeLimome:

    Same experience as LeeMahn: only four black screws here, as shown in the picture, despite the text says five screws.

    Mine too.

    rgwc -

  39. linVmWXeSy22IekR
    • Lift up the right side of the left I/O board and slide it out of the computer.

  40. SYjPTQEWwGJlFURI
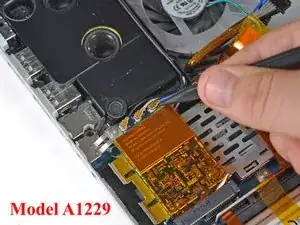
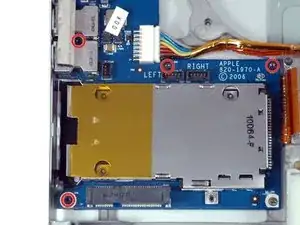
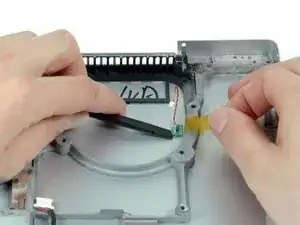
    • Peel up the orange tape covering the right thermal sensor.

    • Use a spudger or your fingernail to pry the right thermal sensor off the lower case.

    • If you have a MacBook Pro 17" Model A1229 or A1261, repeat this process with the left thermal sensor. Note the locations are different, the right one is next to the inside fan screw receptacle. The left is on a line with the inside screw receptacle but 20 mm forward of it.

  41. 56wSoGsTcVlhLNCN
    • Lower case remains.

Conclusion

To reassemble your device, follow these instructions in reverse order.

iRobot

Member since: 25/09/09

0 Reputation

0 comments