Introduction
Use this guide to replace a worn-out battery. If your battery is swollen, take extra precautions.
Tools
Parts
-
-
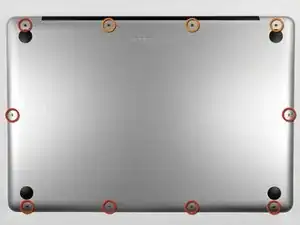
Remove the following ten screws securing the lower case to the upper case:
-
Three 13.5 mm (14.1 mm) Phillips screws.
-
Seven 3 mm Phillips screws.
-
-
-
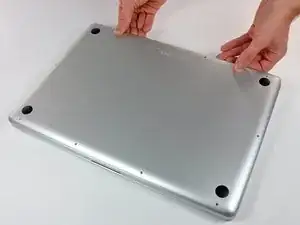
Using both hands, lift the lower case near the vent to pop it off two clips securing it to the upper case.
-
Remove the lower case and set it aside.
-
-
-
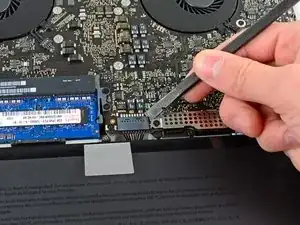
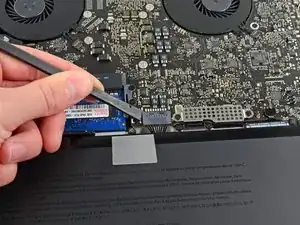
Use the edge of a spudger to pry the battery connector upwards from its socket on the logic board.
-
-
-
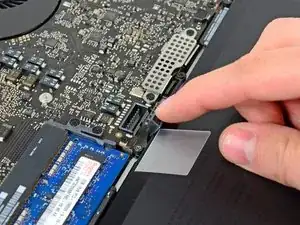
Bend the battery cable slightly away from its socket on the logic board so it does not accidentally connect itself while you work.
-
-
-
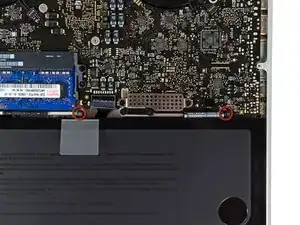
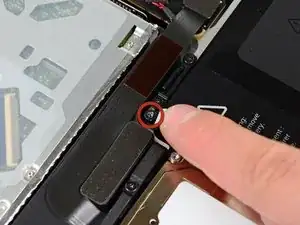
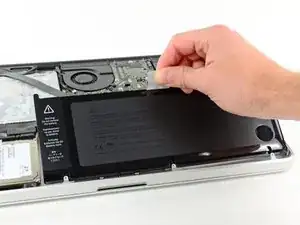
Carefully peel the battery warning label rounded end (the one without glue) off the upper case between the battery and the optical drive to reveal an additional Tri-point screw.
-
Remove the last 7.4 mm Y0 Tri-point screw securing the battery to the upper case.
-
-
-
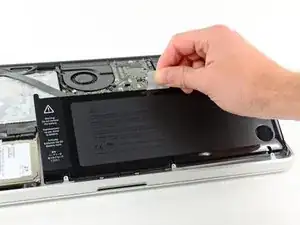
Use the attached plastic pull tab to remove the battery from the upper case.
-
Charge it to 100%, and then keep charging it for at least 2 more hours. Next, unplug and use it normally to drain the battery. When you see the low battery warning, save your work, and keep your laptop on until it goes to sleep due to low battery. Wait at least 5 hours, then charge your laptop uninterrupted to 100%.
-
If you notice any unusual behavior or problems after installing your new battery, you may need to reset your MacBook's SMC.
-
Compare your new replacement part to the original part—you may need to transfer remaining components or remove adhesive backings from the new part before installing.
To reassemble your device, follow the above steps in reverse order.
If you notice any unusual behavior or problems after installing your new battery, you may need to reset your MacBook Pro's SMC.
Take your e-waste to an R2 or e-Stewards certified recycler.
Repair didn’t go as planned? Check out our Answers community for troubleshooting help.
37 comments
MAJOR WARNING: this will probably NOT WORK. Sure, you can replace the battery easily enough. But there are MANY reports of Mac OS X not recognizing the new battery, no matter what you do. In my case I've had to put the old, swollen battery back. When I try to use the new one, it installs and connects perfectly, but Mac OS X spends all its time trying to find the battery. The laptop is practically useless because the system resources are consumed with trying to find the battery that it cannot see. Word to the wise—think 3 times before you try this.
sabat -
It sounds like you purchased a faulty or poorly made battery. There are many out there ranging from $25 to over $100. You definitely get what you pay for when it comes to laptop batteries - and it is always a bit of a crapshoot with anything that is not OEM. The Egoway on Amazon worked well for me. About $75 - has good reviews and comes with a 1.5yr warranty.
Works as it should. No problems with the new battery. The only thing which is different is, that in my MacBook Pro mid 2012 are Phillipps #000 and Y0 Tri Wing screws instead the above listet.
After replacing the battery with one from here a few weeks ago, it now says condition: replace now. battery wont last as it's supposed
Step 1 (technically step 9 - replacing the base plate) Apparently one of my screws was a micron or two smaller than the others. This screw belongs to the hole above the optical drive, which is also apparently a couple of microns smaller than the others. It took seven attempts to figure which screw had originally been in that hole; all the other screws were too large, but fitted perfectly everywhere else.
Bizarre much?
Will -
It might be a matter of how the screws are driven in, and not that they're slightly different sizes. When I reassembled my MacBook, a couple of the screws, including the one over the optical drive you mention, were hard to drive in and jutted up a little bit instead of sitting entirely flush. Swapping screws didn't help. The solution was to unscrew them and drive them in at a bit of an angle - perpendicular to the slightly curved surface of the back plate where the screw holes were, instead of fully vertical with respect to the ground the Macbook is sitting on. Doing it that way, the screws were easier to drive in and they all ended up flush in their holes. Didn't matter which screws they were. (I swapped a few around just to check after reading this.)
Andrew Janke -
I had no such screw issues. Either there are differences in manufacturing lots or I just got incredibly lucky during reassembly!
xtophr -