Introduction
The heat sink helps keep the processor cool and happy.
-
-
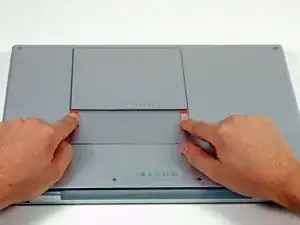
Use your fingers to push both battery release tabs away from the battery, and lift the battery out of the computer.
-
-
-
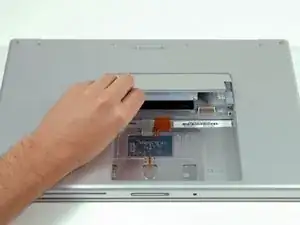
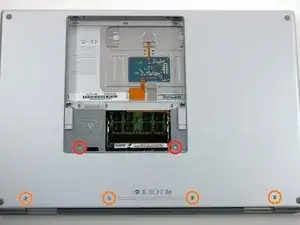
Lift the memory door up enough to get a grip on it, and slide it toward you, pulling it away from the casing.
-
-
-
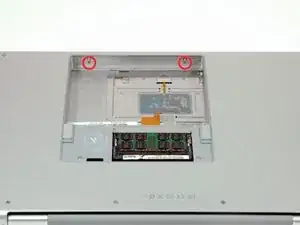
Remove the following 6 screws:
-
Two 10 mm T6 Torx screws on either side of the RAM slot.
-
Four 14.5 mm Phillips screws along the hinge.
-
-
-
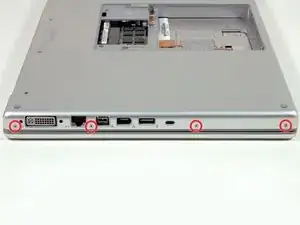
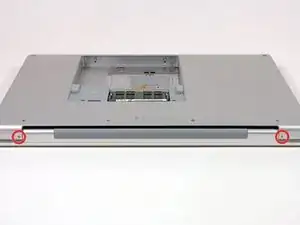
Rotate the computer 90 degrees and remove the two 3.2 mm Phillips screws from the rear of the computer.
-
-
-
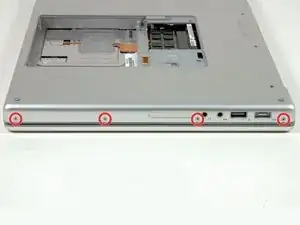
Rotate the computer 90 degrees again and remove the four 3.2 mm Phillips screws from the side of the computer.
-
-
-
Lift up at the rear of the case and work your fingers along the sides, freeing the case as you go. Once you have freed the sides, you may need to rock the case up and down to free the front of the upper case (there are some hidden plastic clips that need to be clicked off).
-
-
-
Disconnect the trackpad and keyboard ribbon cable from the logic board, removing tape as necessary.
-
Remove the upper case.
-
-
-
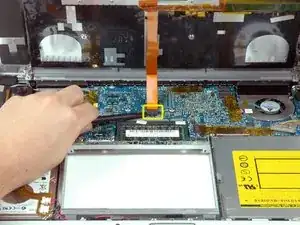
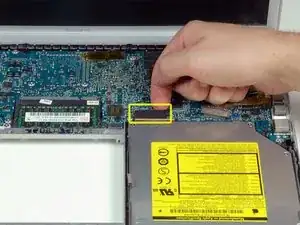
Disconnect the orange SuperDrive ribbon cable from the logic board, removing tape as necessary.
-
-
-
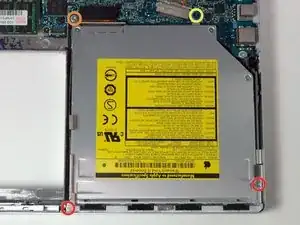
Remove the following 4 screws:
-
Two 3.3 mm silver Phillips screws on either side of the SuperDrive.
-
One 4.7 mm silver T6 Torx screw from the top left corner of the drive
-
One 6.2 mm black Phillips screw at the top right corner of the drive.
-
-
-
Disconnect the iSight and display data cables from the logic board by sliding the cables out of their connectors, removing tape as necessary.
-
-
-
Disconnect the eight indicated connectors by placing a spudger beneath each cable and lifting up.
-
-
-
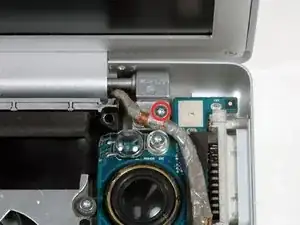
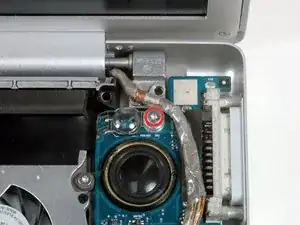
Remove the silver T6 Torx screw securing the ground loop in the display data cable to the casing.
-
-
-
Remove the single T6 Torx screw securing the clear plastic shield over the right ambient light sensor.
-
Lift the clear plastic shield off the right ambient light sensor.
-
-
-
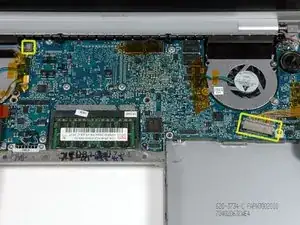
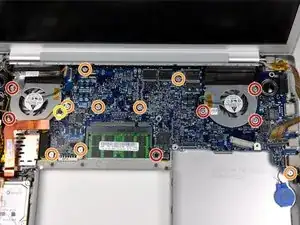
Remove the following 15 screws:
-
One 4.4 mm black Phillips screw to the right of the ram slot.
-
Eight 4.7 mm silver T6 Torx screws securing the logic board to the lower case.
-
One 6.2 mm black T6 Torx screw on the right side of the left fan.
-
Five 9.4 mm silver T6 Torx screws securing the left and right fans.
-
-
-
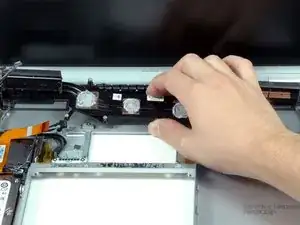
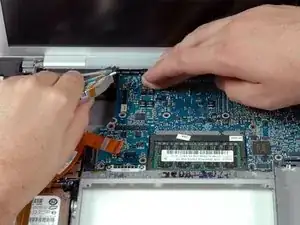
Hold the logic board down with one hand and use your other hand to lift the left fan up from its housing. There is a piece of black tape securing the fan to the heat sink. Carefully peel this tape up from the heat sink as you lift the fan up.
-
Place the fan above the Airport card. It is not necessary to remove the fan from the computer entirely.
-
-
-
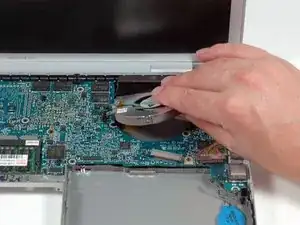
Lift the right fan up and carefully peel up the tape securing the fan to the heat sink as you go.
-
Remove the right fan from the computer.
-
-
-
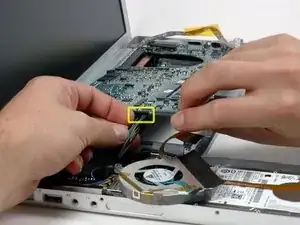
Lift up the left side of the logic board and disconnect the gray and black power cable from the bottom of the board.
-
-
-
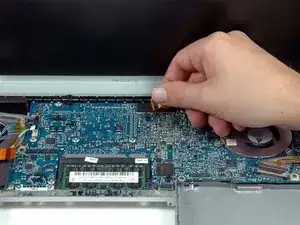
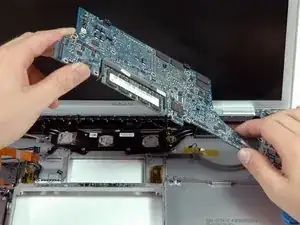
Grasp the logic board at the left side and at the thin section, and rotate the logic board out of the lower case.
-
-
-
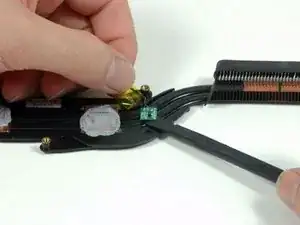
Peel back the orange Kapton tape covering the left thermal sensor.
-
Use a spudger to pry the left thermal sensor off the heat sink.
-
Heat sink remains.
-


To reassemble your device, follow these instructions in reverse order.

3 comments
As usual, ifixit nails it. I just got done replacing the thermal paste on my MBP A1211. This beast had been unable to deal with any video for more than two minutes without sputtering and failing, the fans were screaming and it was so %#*@ hot. One benefit of doing the teardown was cleaning out the mass amount of crud in the fans which obviously was a big problem. Anyhow, the most difficult part of this process was getting the tape off of the left fan, other than that, piece of cake and it fired right up, can't even hear the fans and I'm ten minutes into a full screen movie and no issues. Whoo hooo!!!!
Oh yes, the egg carton for the screws was perfect. I labeled 8 bins for the steps with screw removal as follows (multiple step numbers means they were combined in one egg bin; for step 20 I made three bins separated by color):
2,4
5
6,7,8
12
17,18
20 - orange
20 - green
20 - red, yellow
chdorr -
This tutorial is pure gold. With very little money for thermal paste and a pressured air can (i already had the necessary tools), i freed my computer from tons of dirt and hairballs which clogged either both fans and the heat sink. I renewed the thermal paste as well. All in all it took me two hours to do so. My MacBook Pro runs now twenty(!) degrees Celsius cooler than before, cooling fans fire up rarely and all is quiet inside the casing. Performance is just like it was when the computer was new. Before the cleaning and thermal paste renewal, performance was very poor with system crashes, freezed programs and a heated casing you could barely touch. But now it's like i had a new computer again.
Thanks again!
Hola Tengo un Mac Book Pro 5.1- 15" Unibody de mediados del 2008 de Batería extraible.
Los ventiladores no paran a pesar de que esta muy limpio y excepto de polvo,Ahora pienso en la pasta térmica para sustituirla pero me falta información y guía para movilizar la Placa lógica y poder ver el disipador de calor y cambiar la pasta térmica.Mi pregunta es, hay fotos como de otros modelos para poder seguir los pasos ,Gracia espero puedan ayudarme.Ok
mb190108 -
Years ago, I had to return/replace this type of a battery several times because of erratic behavior in the laptop. Suddenly I had one that lasted for 5 years before not taking any charge anymore. So, I'm going to order a new one hopefully without having to restart the return charade BECAUSE:
I observed that the battery's CONTACTs are unreliably INTERMITTENT. So far, it helped for a while moving it in and out in order to chafe the contacts' surfaces against each other.
moise -