Introduction

Use this guide to replace the lower case on your Late 2020 MacBook Air (M1), or to remove it for further repair.

  1. VPEGroiLj2rq1TsX
    • Before starting this procedure, you should disable your Mac's Auto Boot feature. Auto Boot powers on your Mac when you open the lid, and may be accidentally triggered during disassembly. Use this guide to disable Auto Boot.

    • If your MacBook is running Big Sur v11.1 or later, disabling Auto Boot may not work. You can proceed normally, but make sure to disconnect the battery as soon as you're inside.

    • Completely power off and unplug your MacBook before you start. Close the display and flip the entire laptop upside-down.

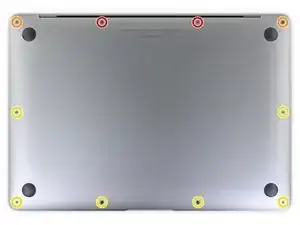
    • Use a P5 driver to remove the following screws:

    • Two 7.9 mm screws

    • Two 7.3 mm screws

    • Six 2.6 mm screws

    • Throughout this repair, keep track of each screw and make sure it goes back exactly where it came from to avoid damaging your MacBook.

    ESD safe mat, plugged into ground, with a wrist strap, also grounded, are the best best to protect the logic board.

    Robin Ray -

    Re-Assembly Tip: Before putting the screws back in, snap the lower case on and test to make sure the MacBook powers up. When I first re-assembled, I became very nervous I did something wrong because it would not power on. It turns out I just needed to plug the laptop into a power source for it to power up (despite having a good charge before disassembly). It was the perfect way to test the new USB-C ports!

    Austin -

    Big points to this one, especially for mentioning needing to plug the laptop in. The bottom case needs to be screwed in and laptop needs to be plugged in before it will boot.

    Bayden Yazalina -

    Wiha 4PL driver for these screws.

    Greg Worrel -

    Printing out all the images from this Ifixit guide prior to starting and using duct tape help me keep track of screws.

    raju midjdeya -

  2. JM2r2fTloLj1HGHv
    JM2r2fTloLj1HGHv
    qWKL1OR1c1CmZJKh
    qfGXhnWu5SInbUHj
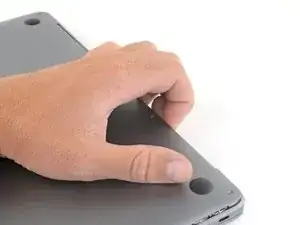
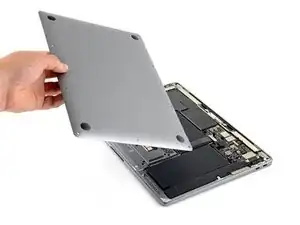
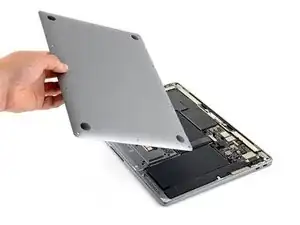
    • Wedge your fingers between the display and the lower case and pull upward to pop off the lower case.

    • Remove the lower case.

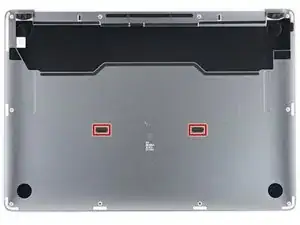
    • To reinstall the lower case:

    • Set it in place and press firmly to engage the two hidden clips underneath. You should feel and hear them snap into place.

    Los tornillos se ruedan fácilmente :(

    Mishelle Cerón -

Conclusion

Compare your new replacement part to the original part—you may need to transfer remaining components or remove adhesive backings from the new part before installing.

To reassemble your device, follow the above steps in reverse order.

Take your e-waste to an R2 or e-Stewards certified recycler.

Repair didn’t go as planned? Check out our Answers community for troubleshooting help.
Carsten Frauenheim

Member since: 10/03/20

110978 Reputation

0 comments