Introduction
Use this guide to replace a faulty battery in your MacBook Air 13" Early 2015.
Note: If there is a thin plastic film on your replacement battery, do not attempt to remove it. It is glued on and protects the battery pack while it is inside the MacBook.
-
-
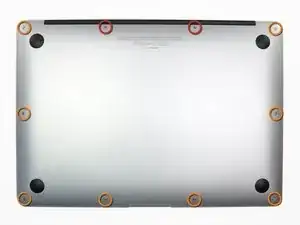
Use a P5 Pentalobe driver to remove ten screws securing the lower case, of the following lengths:
-
Two 9 mm screws
-
Eight 2.6 mm screws
-
-
-
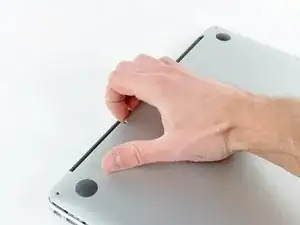
Wedge your fingers between the display and the lower case and pull upward to pop the lower case off the Air.
-
Remove the lower case and set it aside.
-
-
-
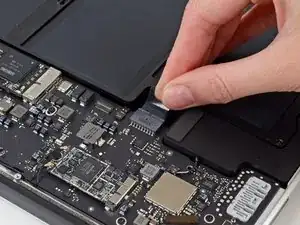
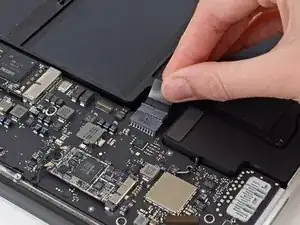
Grab the clear plastic pull tab attached to the battery connector and pull it parallel to the board toward the front edge of the Air.
-
-
-
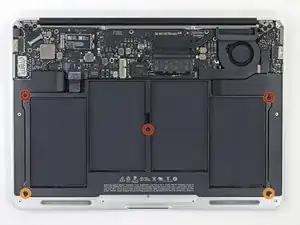
Remove the following five screws securing the battery to the upper case:
-
Three 6.9 mm T5 Torx screws
-
Two 3.0 mm T5 Torx screws
-
-
-
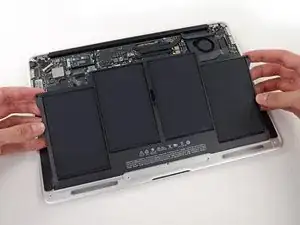
Lift the battery from its edge nearest the logic board and remove it from the upper case.
-
Charge it to 100%, and then keep charging it for at least 2 more hours. Then, unplug and use it normally to drain the battery. When you see the low battery warning, save your work, and keep your laptop on until it goes to sleep due to low battery. Wait at least 5 hours, then charge your laptop uninterrupted to 100%.
-
If you notice any unusual behavior or problems after installing your new battery, you may need to reset your MacBook's SMC.
-

To reassemble your device, follow these instructions in reverse order.

58 comments
Do I have to allow the battery to completely discharge and then recharge after replacement? One site said that was appropriate way to do it.
Yes, for best results you should calibrate your battery by draining it completely and then charging it uninterrupted to 100%. Once it hits 100%, leave it plugged in for a couple more hours. Then drain it again until it shuts off automatically (make sure it doesn't go to sleep). After that, charge it up and use it normally.
But thats a myth … if I’m not wrong, only nickel battery can be calibrated, the os-systems of theses days take care of it, like with all smartphones nowadays.
@mrgrdn You might be thinking of memory effect. Calibration is still very much a thing and quite important, particularly on a new battery. Here’s some reading if you are curious!
Génial pour la livraison et pour ce tuto… j’ai un mac tout neuf ! Et un grand merci pour les bonbons :-)
I would appreciate more detailed instructions for re-assembling the laptop. I had two major questions and some minor ones.
Major questions:
1) There is a barcode sticker on my new battery. Is it safe to leave the sticker on the battery, or should I remove it?
This question is important to me because I am under the impression that Lithium batteries are slightly dangerous, yet the sticker was not easily removed when I tried to scratch it off.
2) It was tricky to close the battery attachment tab after placing the new battery in the computer. For the re-assembly of the computer, would it be okay to do step 3, then 5, and then 4?
Minor questions:
1) My laptop is quite dirty inside. What can I use to clean it?
2) Where do I recycle my old battery?
Also, I was missing a screw from my laptop case. I think it would be nice if the installation kit had come with some extra screws.
Thanks so much for your guide! I enjoyed using it!
-Ginny
Hi Virginia,
1. Don’t worry about the little sticker, this little guy could contain the serial number of the battery and be useful for a warranty exchange!
2. This is not the ideal method but if you can just do it that way there is no real problem with that. Just be more than careful when manipuling the battery.
Minor
1. Some air duster & isopropyl alcohol. Always discharge any electricity in the macbook before using air duster and alcohol. And the golden rule, don’t ever take some alcohol on the circuit of the macbook. This could lead to damage if not correctly removed.
2. Apple Store or Bestbuy. You should call your city hall to get better information!
Have a great day!
Pulling the fan cable out was terrifying but you actually just pull on the cable itself. No way to get any leverage at the connector to dislodge it. Did come out easily but like I said, scared me!
allison -