Introduction

If your Switch Pro Controller’s D-Pad is being overly sensitive and causing accidental directional presses, this is the guide for you to follow!

  1. hFQsgopP3GXwMKki
    hFQsgopP3GXwMKki
    S5Y1HGZsMBBk6oOZ
    DjLpr5bjnObQkdcj
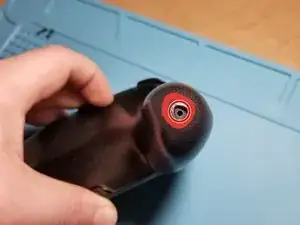
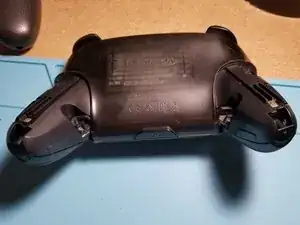
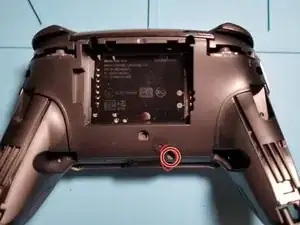
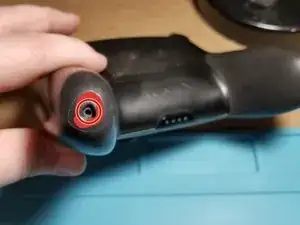
    • The left and right grip screws are held in place with one J00 screw each. After the screw is removed, the grip slides straight off.

    My ifixit J00 bit didn’t fit mine. J000 was closer, but PH0 (Philips) was the best fit.

    daprice -

  2. IhEtuJDxBIcJDo2Q
    IhEtuJDxBIcJDo2Q
    3sVZLWjE2CH1nrmf
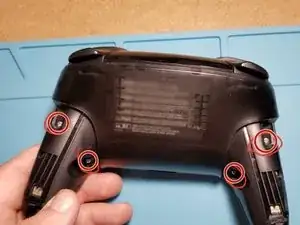
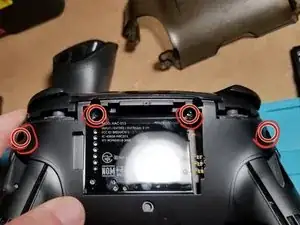
    • Remove the four J00 screws holding the back plate in place.

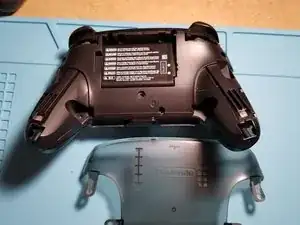
    • Once they are removed, the back plate will just lift off with little to no force.

  3. TuosHoDELYVJpmQs
    TuosHoDELYVJpmQs
    lU4kRbEhDZcNfrYm
    WnrJAwHQNxl3CCMC
    • The battery is super easy to remove! Thanks, Nintendo! Also, it's the same battery as what powers a 3DS (they're even interchangeable!) Neat!

    • Remove an additional J00 screw.

    • Remove an additional four J00 screws. The two in the battery bay are very easy to miss!

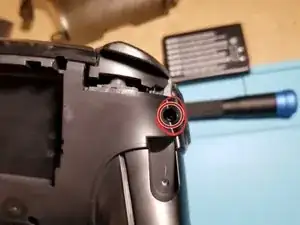
    • A closeup of the edge screws (also very easy to miss!).

    the ifixit tools is too fat to remove the screw in the battery bay ….

    Stan Lee -

    Same issue as other comment, the bits recommended are much too short to reach the ones in the battery bay.

    Retrotude -

  4. VGEIfHjTjPgfuIeP
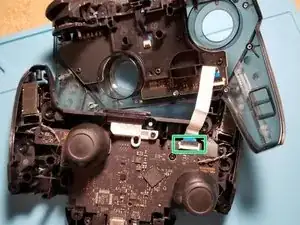
    • Use a pry tool or your fingernail to gently pull the two halves of the controller apart. Beware of the ribbon cable connecting the two boards!

    • This is a ZIF connector. The black tab on the connector pops straight up, allowing you to gently pull the cable straight out of the lock. I removed the cable from the board with the control sticks.

  5. lBauMN5XsJ21DjwU
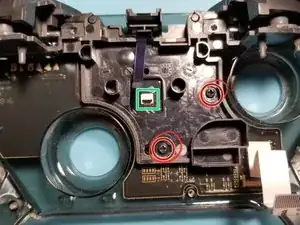
    • Disconnect the ribbon cable that connects the plate to the controller board.

    • Afterward, remove two black J00 screws holding the plate onto the PCB.

  6. BfDa1UDOVpvnfk3K
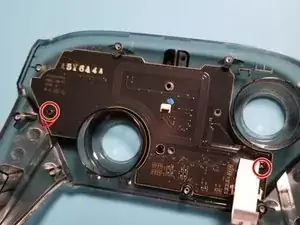
    • Remove two more black J00 screws holding the board in place.

    • Reassembly tip: be very careful with the right screw, as it can crimp the ribbon cable if you're not careful!

  7. q1CDJWNjHJYBnbqc
    q1CDJWNjHJYBnbqc
    VxbH5QRNAiGkGK2V
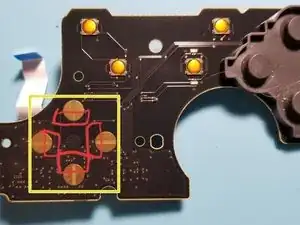
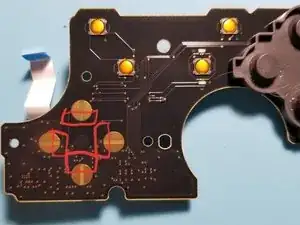
    • Voila! Here are the D-Pad touch sensors. I have outlined the area you want to cover in red.

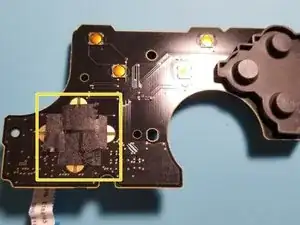
    • Using tape (I recommend black electrical tape, but others have said it works with clear scotch or packing tape, just be aware it may pull up after a while and cause buttons to stick!), cover the highlighted areas. This really cuts down on accidental button presses.

    • After some testing, I applied the tape to the top and bottom touch connectors. This resulted in the smoothest operation with fewest accidental button presses. Always be sure to test (and make sure you like how it feels!) before you complete reassembly.

Conclusion

To reassemble your (expensive) controller, simply follow these instructions in reverse order.

Hopefully, this guide was simple and easy to follow - just as the actual fix is. For my controller, it's night and day as far as sensitivity is concerned!

Have a great day and happy fixing!

Robbie Kincaid

Member since: 24/04/19

547 Reputation

13 comments

Thanks!! I got a bit confused on the 2nd ribbon cable because I wasn’t sure if it was a latch like the first but it worked out. Also reassembling the ribbon cables was a bit difficult and I wasn’t exactly sure how much I had to “plug” them in before closing the latch but I figured it out, thank you! Controller works wonderfully now.

Logan Henry -

Glad to hear it! Thank you for your comment!

Robbie Kincaid -

Any issues using kapton tape instead of electrical tape?

Mirleis -

Not to my knowledge (I don’t have any on hand to test with though). May be worth a shot!

Robbie Kincaid -

It should be noted that the official iFixit kit is recommended for the back screw removal (especially the ones at 11 and 1 o clock by the battery compartment) or you should have a screwdriver that is skinny enough to get it straight on. I barely got it with the iFixit kit and maybe left them a little bit loose because of that. Otherwise, this guide is very good for disassembling and cleaning.

Peter Fischbach -

Definitely! I swear by the official iFixit kit! I didn’t think I could get to those screws at first!
Robbie Kincaid -

This tutorial should be part of the complet tear down. I followed the instructions to clean up some soda residue under the D-Pad.

Removing one of the grip took some times. The sticky substance was also under there. I pry and pull really hard and it work.

Beside that everything went well :)

If I do it again I might put back the larger ZIF connector sooner, it was tricky smooshing both side and trying to slide the connector in.

Joanie -

I had to fight the ZIF connector as well! Glad to hear it went well for you, though!

Robbie Kincaid -

looking for a fix to the opposite problem. The DPad on mine sometimes wont read repeated inputs on down and left when i do them in quick succession. For example when I play Tertris 99 or navigate through a Fire Emblem Map. I almost exclusively use the DPad to navigate menus so it gets annoying when it wont read left or down. Any pointers help! Thanks!

Edwin -

I haven’t heard of this issue, honestly. My first troubleshooting step would be to disassemble up to the part where I apply the tape to the connectors, then see about cleaning them (VERY gently!) with some 99% alcohol and a microfiber cloth to see if there may be some dirt or impurities in there!

Robbie Kincaid -

How do I reinsert the (almost tiny) tab connecting the second ribbon cable? If I can’t get it on, could I just tape the ribbon cable on?

Samuel Cox -

@robbies7897 Great job ! I was a bit confused while translating your guide to French by some phrase / photos, it was not very clear to me what was supposed to be done (e.g. on step 5, I'm not sure what is the shoulder board vs the plate) + you should have used iFixit markers instead of placing them on the original image, so I added two tags on this guide to help enhance this guide. No offense, your guide is already very helpful, I would just love to have it even more polished. Since I don't have this controller, I can't help unfortunately. I also took the liberty to remove reference to "guys" for a more inclusive guide.

Benoit74 -

Oh cool, thank you for the help! No offense taken!

Robbie Kincaid -