Introduction

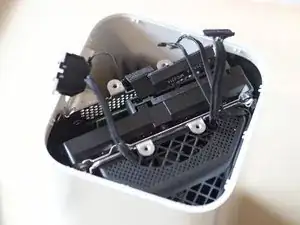
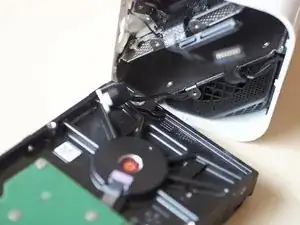
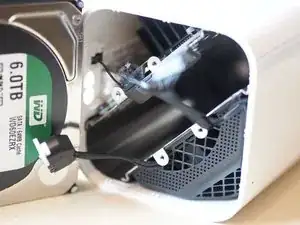
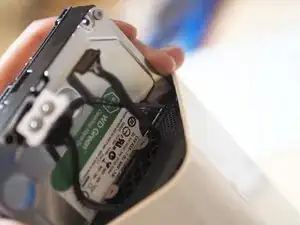
Outgrown your Time Capsule? This guide describes how to swap the hard drive in a Time Capsule A1470 from the original 2TB Seagate drive to a 6TB WD Green.

  1. eMor5kdBXtcSUcHd
    • Warning Risk of Electric Shock: Unplug the Time Capsule and disconnect the power cable and all other cables before you begin. Be aware that internal capacitors can retain a dangerous charge.

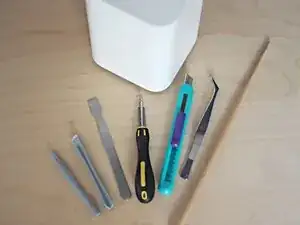
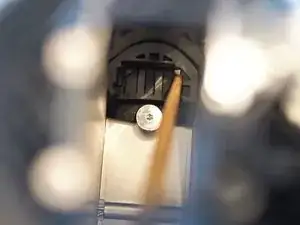
    • Tools used: Metal and plastic spudgers, Torx T8 screwdriver and tweezers (optional). The thin wooden chopstick shown on the right is for poking around inside the far end of the device, so it needs to be longer than the height of the Time Capsule.

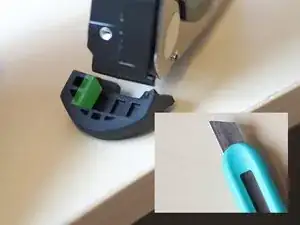
    • You'll also need a scalpel, or small sharp craft knife, And a Airport time capsule

    Poindexter point: the # of retention lugs on the base goes to ‘11’… which is ‘more than 10’ but less than 12. The back of the unit has only 2, not 3 like the other3 sides. Facing the unit, upside down, with the light/dot in the upper left corner, it is best to access via the right side back 2/3s of the unti where there is the most space and free room. If you are facing the unit, upside down, this would be at the2 & 3 o’clock position, fighter pilot wise…

    ference janos -

  2. 6qFPXcxjAXXNwBST
    6qFPXcxjAXXNwBST
    u5wpXobEJ5DyN4BQ
    CYLOIvOcAtjd4uCj
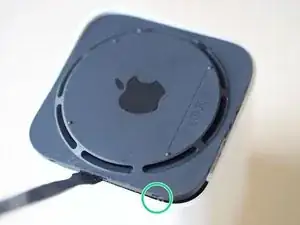
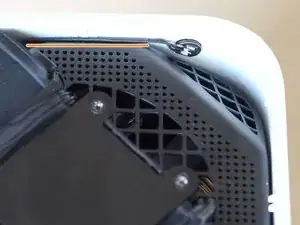
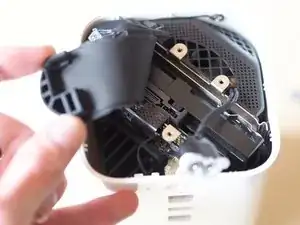
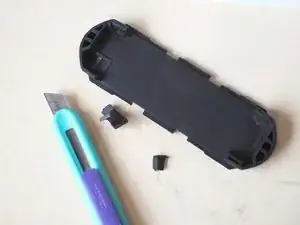
    • The base is held in place by eleven plastic retention lugs evenly spaced around the inside perimeter; three sides have three lugs and the side nearest the accessory ports has two lugs.

    • Slide a thin strong spudger between the base and the body (not too far in) to gently prise the edge of the base up, while trying not to mark or dent the soft plastic.

    • There are cables routed "too close for comfort" to the lugs at the front and back of the unit - so starting at the left or right side seems a safer bet.

    • Once one side is unclipped, things get a touch easier - work gradually around the perimeter gently levering with the spudger until the base eventually pops off with a sound like a warranty vaporising.

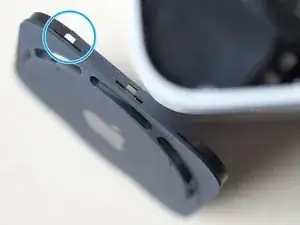
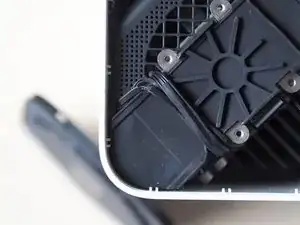
    • Careful, as the white plastic casing may flex alarmingly, and the black plastic is quite thin in places - you can see a damaged loop here.

    I just did the hard drive swap. Here are a few tips about this step.

    I used a plastic spudger, a box cutter knife and some strips of an old plastic card (old credit card). The sharp, pointy tip of the box cutter can help get you started to find a gap between the base and the white plastic. Then once you have a gap, you can twist the box cutter blade a bit to wedge in the spudger to create a bigger gap. Now there is space to insert a few strips of the plastic card around the gaps to keep the gaps open as you work around the rest of the base.

    Definitely start from the two sides of the base (rather than the front or back), there are no wires there to damage.

    Ken Cheung -

    Thanks to Ken Cheung for his helpful comment. I broke a plastic spudger trying to open up the base, so a metal spudger is definitely best. Take care to insert the spudger so as to avoid the plastic tabs halfway along each side of the base and have your bits of credit card or plastic spudger ready to insert once the side is opened out enough.

    David Small -

    My A1470 (EMC 2635) only has 11 tabs: there isn’t one where the AC connector enters

    Piers Goodhew -

    I broke 4 of the 8 loops taking the base off carefully (or so I thought). I used iFixit's opening picks to keep the tabs from reseating after I freed them. I found them very helpful.

    Nuru -

    Start from the POWER CONNECTOR - this is where there are no clips.

    Dani -

  3. MmyWHlMPc2BYBO1j
    MmyWHlMPc2BYBO1j
    NGs2pYIX2I41RKfy
    2feQdlcbuDdSMZaN
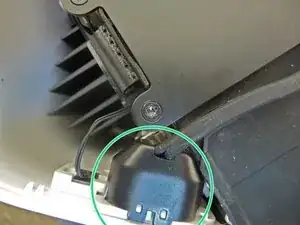
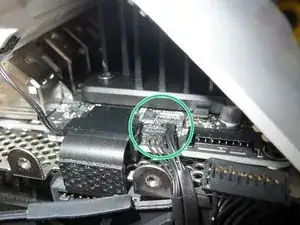
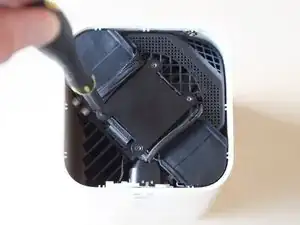
    • A top metal plate, power cable, and three delicate looking cables guard the entrance to the cave hard drive bay.

    • The power cable with socket attached lifts away easily.

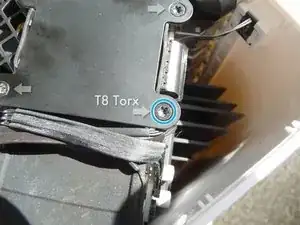
    • Removing four T8 Torx screws releases the plate. Use a T8 screwdriver, as it is difficult to gain purchase on the screws with an L-key and risks rounding them.

    • Once the four screws are removed, the metal plate simply lifts away.

    Word of warning, so in the process of removing the power socket, I also pulled the two small cables out of their connector on the PCB. These are the cables in the first photo above just to the left of the circled power socket. These two cables are for the Hard Rest button on the back of the Time Capsule. I was able to get them back into the connector on the PCB with tweezers.

    SO be sure to move them to the side when pulling the power socket out.

    Andrew Taylor -

    En la posición de la fotografía, el conector del reset hay que deslizarlo hacia abajo para poder soltarlo. Después el conector de alimentación eléctrica hay que deslizarlo suavemente hacia arriba para soltarlo.

    Luis -

    I had to insert a knife between the black and silver tabs to get them to separate.

    joehuber -

    For me, the metal plate did not "simply lift away". It was stuck to the rubber underneath and I had to pry it off.

    Nuru -

    @nuru9 same here, had to pry the plate off the rubber

    Sam -

    I removed the reset switch assembly from the case along with the power connector instead of disconnecting it from the PCB

    Sanjay Mehta -

  4. u1HcLIVmlybymJ2R
    u1HcLIVmlybymJ2R
    5i3EIw3NJDXNaPYd
    ATUuNtDTQvSnnQXU
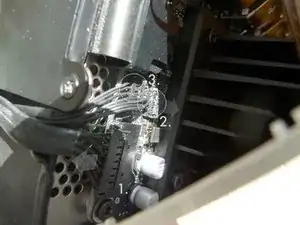
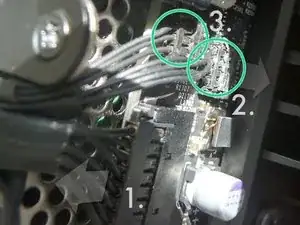
    • Disconnect three thin delicate cables from the PCB. The largest cable ① comes away without too much trouble. There are small clips on either side of the connector. Use a small flathead screwdriver or flathead plastic spudger to push in the clips on the sides of the connector and slide it gently in a same plane as the PCB.

    • The two smaller connectors ② & ③ do not disconnect like the first - despite appearances, they pull directly away from the PCB (credit Feanor - thank you - see references in conclusion).

    • Place a small plastic spudger at the top of the two connectors, behind the wires and, pull gently forwards - click, off pops each connector.

    My connectors, for 2 & 3, did not pull directly away from the PCB. I tried that and it broke one pin on #2. On my model, they were designed to slide along the PCB.

    Hal Vaughan -

    I broke connector 2, looks like it is just temperature sensor

    mmanzur2005 -

    [|My cable 3 was very tightly attached to one of its pins and despite my gentle prying, the pin broke off and remains in the cord cap. Any suggestions for rectifying this problem? pin missing here:] http://spydell.net/TimeCapsuleGuts/3rdPi... [|cord cap showing pin still in it:] http://spydell.net/TimeCapsuleGuts/cordC...

    rspydell -

    I have the same problem with the connector and the tiny connectors came out of the connector the one in picture two the pin are still connected but the wires came off. so what would it cost to fix and the airport works as a router at this time.. since I stop at this point.. not sure since those wires can’t be connected since the hd failed at this time

    gary in so cal

    Gary Hidalgo -

    I recommend as a novice don’t try it and if you’re blind stop!! have the proper tools first

    Gary Hidalgo -

    I think connectors 2 & 3 unplug relatively easily; one needs to carefully use a pointed (not sharp) tool. try to wedge-in the edge of the tool right between the circuit board and the cables (of the 3- or 4-cabled connector), then just try to use the tool as a lever to pop the connector off the plastic plug.

    NO need to use brute force - ONLY gentle moves are required :)

    Vasileios -

    What to do when connectors 2+3

    broke? It is easy to replace the pin connectors?

    baur.ma -

    Connectors 2&3 are definitely delicate. They do unclip towards the direction of the bottom/base of the Time Capsule. I was successful with unclipping them using an improvised tool. I had the top of a cat food tin (one of those with a pull tab and then the entire top of the tin comes off) and I cut a long straight piece of this somewhat soft metal with a pair of scissors. With this long , narrow but still soft metal piece, I was able to gently get behind each of connectors 2&3 and gently twisted my metal strip to pop the connectors off.

    Worked like a charm.

    Ken Cheung -

    Think of connectors 2 and 3 as being similar to DIP ICs in sockets: you gently pry the edges middle up from the PCB, as opposed to how Connect 1 pulls away from the PCB like it was an edge connector.

    Michael Tardiff -

    Connectors 2 and 3 (and also the reset connector) can be very easily detached with a needle! Yes, ordinary, usual, common needle! Never try to detach the connectors by pulling the wires or transfer the power via the wires. Not working. Damage imminent. Put the needle tip just behind the wires - try to find that tiny micro slit betwen the connector head and the board - and slightly push out (use the needle like a lever). The connectors pop out as a charm.

    Lojza -

    @Lojza: The needle thing did the trick!! Thx a lot

    danielleers -

    Definitely agree with the use of a needle - that completely worked for me

    Jamie -

    Connector 3 popped out — just the wires. Now what? Is it doomed?

    Anthony Whitford -

    Lojza’s comment is the most useful - works exactly as described. Getting them back will be interesting however!

    Ian Baker -

    Lojza’s comment led me the right way. Instead of a needle, however, I used the sharp ends of the tweezers that came with the Essential Toolkit.

    Uwe Aranas -

    Very small flat blade screwdriver under the edge of the connector with wires worked for me. Just needed a very gentle twist or wiggle. Suggest removing 3 before 2

    Adrian Berry -

    Weiß jemand wo man die beiden kleineren Verbinder ② und ③ bekommen kann? Das Stecker- Gehäuse würde reichen! Die Leitungen sind noch OK (… wie gerade angeschlagen), und die PCB- Seite auch…

    Sascha Reichert -

    Remove the 3rd connector from the box and not the circuit board. That’s easier.

    Knut Stenmark -

    I pulled the wires out of connector 3, but noticed it only connects to the factory-reset button. So I’ve decided to put off trying to really fix it until I absolutely need to factory reset it.

    Justin Leavens -

    I carefully prised these 2 & 3 and they came of relatively easily. Unfortunately there was one pin stuck in #2 so I guess my unit is going in the trash! ?

    Brian Karl -

    Seguí indicaciones y comentarios sin éxito, con muy poca fuerza para no romper nada. Con aguja, con herramienta de una lata de comida pero sin éxito. Usé unas pinzas con fuerza suave en todas direcciones buscando entender. En mi caso, el conector 2 mueve, solo los cables, paralalelo a la placa madre y salen uno a uno con su terminador. En el conector 3, diferente, sale perpendicular a la placa madre y juntos en la pieza de plastico del conector. Son diferentes. Funcionó y no rompio nada! / I followed the manual and comments, with a needle, with a tool from a food tin, but no success at all. Then, I used tweezers, with gentle force, in all directions, seeking to understand. In my case, connector 2 moves, only the cables, parallel to the motherboard and they come out one by one with a u-terminator. In connector 3, different, it comes out perpendicular to the motherboard and together in the plastic part of the connector. They are different. (I have photos, but I can´t post)

    Luis -

    I broke one Time Capsule trying to remove connectors 2 and 3. I was impatient and broke connector 3.

    Later, I bought a new-old-stock Time Capsule and I used Lojza’s method with the needle. That worked. Be patient with the needle to find the tiny slit between connector and board to pry the connect off.

    Alex Velasco -

    I used scissors to trim one of my normal-sized spudgers to be a “slim edition”. I wouldn’t recommend using a metal tool - probably more likely to damage something.

    Tech Medic -

    @Lojza: Needle operation went well.

    Once you realize that the connector can be removed vertically from the PCB, the rest is easy.

    The connector came off easily by inserting the needle between the board and the connector and gently moving the needle away from the board.

    稲田正 -

    I used the tweezer blade behind the wires to pry the connectors out. Slow and gentle, worked fine.

    joehuber -

    Same for me, using a needle nosed tweezer

    John van de Loo -

  5. EvY56SWwSDSGZdSn
    EvY56SWwSDSGZdSn
    PVULGKrRUbI5SVy1
    NmFDspd2qC3OJgxk
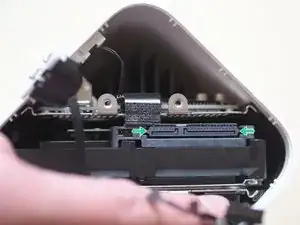
    • A rubber pad lifts grudgingly to reveal the hard drive beneath. Still can't extract it though - there's the combined drive SATA & power connector to ease off first.

    • The SATA connector has a couple of lugs at either end - ease each up gently with the corner of a plastic spudger or tweezers and move the connector clear of the drive.

    I had to cut the rubber pad, too. Using a 6TB WD Red.

    Jan Andreas Knudsen -

    Connector 2 with 4-pin is for fan, over time it gets louder so you can leave it disconnected - time capsule works ok without it

    Michal Hudek -

    after getting all the cables disconnected, I recommend using some tape to gently hold them back out of the way of the drive area - will make future fiddling with the drive & rubber feet much easier & safer for the cables.

    Tech Medic -

    Anyone know where to get a Sata replacement? Like an idiot, I didn’t notice that when I was putting the HDD back in that the sata plastic head slipped inside so the plastic clips broke and now the HDD won’t be set and recognized. Not a HUGE loss for me, so I barely use the Time Capsule stuff anymore given iCloud sync, but it’d be nice to fix it. And I had just been telling myself “this is all going perfectly! This fan is not going to force me to replace the entire thing!” Cue sad sound.

    Josh Rhoades -

  6. gvOkSQscUBvDKHvK
    gvOkSQscUBvDKHvK
    qegraKkOSvIvNDHB
    CFNGKxwEMAlVG4EI
    • Pull the drive out - it's a fairly tight fit. At the bottom of the hole are two rubber segments where the drive is usually seated. Unfortunately these are custom shaped to match the original hard drive shape exactly - and won't seat the new replacement drive going in which has a chunkier profile.

    • The two rubber segments have to come out for trimming, and then placed back inside which is all quite fiddly but doable using a long thin wooden implement, such as a chopstick, to fish them out, and then prod them back into place.

    • Confirm that the trimmed segments are both located back in the correct position at the bottom of the drive bay before proceeding.

    Note that if the replacement drive is a Seagate server-rated drive (e.g. IronWolf, or Exos), the form-factor *is* a direct match for the original OEM drive. As a result, no trimming of the rubber vibration dampeners is necessary.

    latimer -

    I just wanted to get the hard drive OUT because I was throwing my Time Capsule away. I no longer used it. I didn't wanna put up with all the fiddling around so I just used a metal cutting Bosch band saw and simply sawed the entire Apple device in half and then I used an acetylene torch on what was left of the hard drive to melt it into a 5,000° molten puddle.

    I don’t think data theives will be able to get anything off that drive of mine!

    Pileits -

    I found having a *long* pair of needlenose pliers to be indispensable when dealing with the rubber feet at the bottom. Being able to grab them & reposition was way better than working with a chopstick. Further, you can use the pliers to grab the drive at durable spot for pulling & pushing

    Tech Medic -

    I fiddled around for way too long (an hour or more) with fitting the two rubber segments. In the end, I just cut away square around the round parts at the front of the hard drive (which end up at the top of the case), and pretty much everything which sits on top of the drive. I then attached them to the hard drive with electrical tape, carefully slid the entire assembly in, and everything fits snugly.

    Kiezpro -

    I took Latimer’s advice and used a 4TB IronWolf drive. The rubber feet from the original drive (2 TB Baracuda) it it perfectly without any trimming. The rubber feet came out with the old drive so I placed them on the new Ironwolf before insertion and carefully slide the whole assembly back down into the enclosure. I used a slow steady rocking motion to ease it back in and the rubber feet went into place at the bottom without any extra fidgeting. From a physical replacement PoV I’d highly recommend the IronWolf, and I have high hopes for it operationally too, but it’s too early to tell about that yet.

    joehuber -

    I bought today a 4TB IronWolf PRO (ST4000NE001) drive. Unfortunately it doesn’t fit. By the end, I will buy WD Red 4TB (little less noise and power consumption, 5 years warranty).

    Daniele -

    For the rubber feet, I found using a very long set of long nose pliers to place the rubber feet back in (and they stay in courtesy of a screw at the bottom) to work incredibly well - took about 30 seconds.

    craigslorach -

    That was totally a nightmare. In the end I flattened one of the two rubber things and gave up trying to go for a tight fit.

    Hugues Talbot -

  7. kE1aivDr2lpRp2Uc
    kE1aivDr2lpRp2Uc
    NlEToMuyS5qsKShD
    mRpFxwrsgBNExqN1
    • Slide the new drive into place, making sure no cables get caught up on the way in. Ensure the drive is seated properly in the newly trimmed rubber segments, and not sitting proud of the enclosure.

    • Reattach the drive SATA/Power connector.

    • The top rubber pad also requires trimming bits off to accommodate the 6TB replacement drive.

    • Replace rubber pad.

    6 TB this is maximum size support?

    Ilia Bagaev -

    I saw that on Mac Rumors someone replaced it with an 8TB drive.

    Andy Milne -

    I replaced the drive with a Seagate Barracuda 4TB. With this drive, there was no need to trim any of the rubber bumpers (top or bottom) at all.

    Ken Cheung -

    I can hereby confirm, that my Time Capsule (A1470) managed to handle the 8TB drive, which I put into it yesterday. 8TB WD RED is now in place, silently and happily backing up all the MacBooks we have in our family. On the practical side, everything went well, no issue with cutting the rubber bumpers.

    Lojza -

    Hi did you need to format the disk first of all?

    Andrew Crawford -

    I’ve updated my TC to 4TB Segate Barracuda https://amzn.to/2RFLCNK without any problems. New disk was ~30% thinner than old one and fits perfectly without any cut work.

    Vladimir -

    I upgraded to an 8TB Barracuda which was a perfect fit - no trimming. When I got it connected, I bench tested it and in the airport utility it said the drive needed service. I took it back apart, connected it to a Mac, use the disk utility to format the disk (Extended, Journaled, GUID Partition Table) , copied the APConfig and APSwap partitions (1.07GB each) from the old drive, used the rest for the “Data” partition. The APConfig partition has a single key file on it. This time it worked. So, for whatever reason an unformatted drive didn’t work for me. Seems to be working just fine with the 8TB drive!

    ekobres -

    I went with an SSD drive. I’m using my Time Capsule only for streaming content to Infuse on Apple TV. Capacity was not the issue for me. That clunky and noisy hard drive has been annoying me since day one. Finally I bought a Sandisk Ultra SSD drive and I just replaced internal drive with that. Writing, reading and streaming speeds and most importantly first response times are way better even though TC only supports SATA II. Time Capsule is now a real NAS device for me. Fast and silent. I’m just gonna sold that Seagate HDD.

    Eth Tolga -

    Did you have to buy any mounting brackets for the ssd?

    arsenalblue16 -

    As others have stated, and as indicated in the comments for Step 6: If the replacement drive is a Seagate server-rated drive (e.g. IronWolf, or Exos), the form-factor *is* a direct match for the original OEM drive. As a result, no trimming of the rubber vibration dampeners is necessary.

    That being said, I love @Eth Tolga’s approach of using an SSD. This would lead to MUCH quieter operation!

    latimer -

    Using liquid soap to lubricate rubber feet outer surface, offer the possibility to pre assemble the 2 bottom feet on HDD and push it inside its slot very easily. Seagate 4TB IronWolf model fits perfectly the original top and bottom rubber feet.

    filippo freschi -

    I liked this idea & tried it but had trouble getting the feet to stay on the drive all the way down. Maybe I needed different soap or some sticky stuff to keep them adhered. I gave that up, trimmed the feet a little better, placed in bottom & this time had success.

    Tech Medic -

    I have an 8 TB HDD in my iMac, so I wanted something bigger in the Time Capsule. I installed a 12 TB Seagate hard disk (Seagate ST12000NM001G HDD 3.5″ 12TB SATA 3.0 7200RPM Enterprise Hard Drive). I had to trim the two top rubber segments to fit the disk. It is working fine and Time Capsule did the initial Time Machine back-up of nearly 5 TB of my data which took about four days to complete. So far so good.

    Alex Velasco -

  8. GxbsucxIK5Pr6GPi
    GxbsucxIK5Pr6GPi
    uUCaiZwilnASA2QY
    • The two delicate cable connectors are reconnected to the PCB by offering them into place then gently pressing them back onto their respective connections with the aforementioned wooden implement. To avoid the lower cable getting in the way, re-attach the upper connector first & then the lower connector.

    • The largest of the three connectors slides back into its socket without trouble.

    • Offer the power cable and socket back into its holder on the inside of the case.

    • Reattach the metal plate using the four screws removed earlier with the Torx T8 screwdriver.

    • Finally, clip the black plastic base back on to close the unit up - and it's time to test...

    • Launch Airport Utility to check the disk is recognised OK, and erase it if necessary.

    Replaced a dead 2TB Seagate Barracuda with a 4 TB Barracuda. The base of the new drive was slightly smaller than the old one, so the rubber didn’t require any surgery. I took someone’s advice not to completely assemble it without testing. I’m glad I did, it had an overheating error. The larger of the two small connectors was not fully seated. I did need to erase the new drive, as expected, but everything is sweet now. The base is held on by 11 retention lugs on my machine, not 12 as stated in your instructions. There is no lug above the power connector.

    Jerry Stoebe -

    I did the same as you, but despite having erased the drive several times I still only get 2TB as free capacity, even though I installed a 4TB. Did you format it before installing it?

    Mattias Lindström -

    Neue 4TB eingebaut. Das ganze Gerät war danach tot. 2x gestartet, alles nochmal aus und eingebaut. Irgendwann fuhr es doch hoch, Platte formatiert und fertig! Diese Platte habe ich neu eingebaut: WD Blue 4TB Interne Festplatte (8,9 cm (3,5 Zoll)), SATA 6 Gb/s BULK WD40EZRZ

    Donfiluzzo -

    Neue Seagate BarraCuda 8 TB HDD ST8000DMZ04 eingebaut - hat exakt die selben Abmessungen wie die ursprüngliche 2TB Seagate darin. Die größte Schwierigkeit war das Wiederanbringen der beiden kleinen Kabelverbinder. Und das passgenaue Aufsetzen der widerspenstigen Gummiabdeckung. Die Time Capsule ist nun deutlich leiser, nach dem ersten Löschen der Platte im Airport Dienstprogramm fragte mein Mac lediglich: „Die Identität der Backup-Festplatte hat sich geändert. Wollen Sie diese Festplatte verwenden?“

    Thomas Kemmer -

    You can click “ja” a good idea was to format the drive prior to put it back into the time capsule , once in there , reformat it (quick erase) and it shall work

    oliviermolody -

    changed my defective seagate 3tb from 2014 to Seagate ironwolf 4tb, à slight trimming of the top piece was necessary.

    to pop the bottom i was pretty successful using a guitar pick, and removing cable was quite easy with a small twizzer, carefull being close enough to the connectors and don’t force on the cable themselves.

    taking out the harddrive was tricky, balance it left to righ and pick the box horizontally helped getting the drive out 2cm to get a grip and remove the whole drive.

    If you use a seagate leave the Bottom left and right rubber in place and apply a bit of force to make sure the drive is in and doesn’t stick out.

    to reapply the top rubber start with the left side , the right side has more space and it’s easier this way.

    to reconnect the cable use a spurger to press the cables back into place .

    having a strong light source like a headlamp will be helpful for this !, did it with my maglight in my mouth . You need 2 hands , one for the twizzer positioning the cable the other for the spurger to push.

    oliviermolody -

    Is there an upper limit to the capacity to the hard drive I should use…8 TB? . 12 TB? Also is it wise to use an enterprise grade drive?

    Thanks,

    Renny

    zzzdoc -

    @Mattias Lindström partition table must be set to GPT, otherwise MBR/APM formatted devices’ size is limited to 2TB

    Simone -

    At step N-1, I suggest connecting to power and ethernet and testing BEFORE snapping the black baseplate back on. Best to make sure that all the cables got properly reconnected and the new HD is working first.

    mrdrc -

    I recommend also marking the top of the small connectors with an ink dot - at least the small three-wire one. Turn it over accidentally like I did and wonder why it won’t seat.

    Malcolm Ting -

    4 TB IronWolf drive was recognized by Airport Utility, erased and immediately worked fine as a 4 TB Time Machine backup disk.

    joehuber -

    I followed this guide today and it was so helpful and I am pleased to say identify a hdd with bad sectors and prove the capsule was still good, had also pushed the reset button too hard which went into the casing last week but after some playing around managed to fix that too so grateful for the guide/photos and user comments which helped me enormously, thank everyone very happy, just need to order a new disk and install it??

    Paul Wright -

    Is it still worth replacing a flaky drive in a minitower 802.11ac Time Capsule if the goal is to have 4 usable EN ports and a network-facing Time Machine host, and if so, what’s currently the largest logical drive available for this purpose?

    Jim Robertson -

    What kind of problems surface because of that "flakiness" exactly?

    As for drive capacity, as long as it is a 3.5 inches SATA drive, any size should work.

    Nekoniaow -

    Did as joehuber and it went all fine : )

    Grob -

    Didn't upgrade the drive but used these instructions to open up the device and clean the fan.

    There are two spring loaded screws which hold the assembly to the case. These are visible after you remove the drive. Getting them back is a little tricky.

    Sanjay Mehta -

    The original 3TB drive died unexpected without any warning.

    Opening was a bit challenging but with the right tools (from ifixit 😉) manageable.

    I bought a new WD Red Plus 4TB on Amazon. The red Series has better specs regards temperature, on-off cycles.

    The rubber needed some minor cutting to fit the new drive.

    Tips: be careful with the connector cables, avoid sharp tools when disassembling and assembling.

    A test before closing the lid is highly recommended.

    AirPort App recognized the new drive, formatting was the only task required. The quick format is sufficient and take only seconds.

    Done.

    Tom Wu -

    Remember to check the light at the front before reconnecting the baseplate. It's mounted in a hole in the front and can come out of position by the the tool used for opening. It happened to me, but was an easy fix.

    helge -

    Replaced my dead 3Tb drive with an 8Tb Seagate Ironwolf. First backup currently running, so looks ok. Biggest problems were the 2 tiny connectors (not a good combination with my old eyes :-) ). Thx!

    John van de Loo -

    Instructions helpful for replacing 3T with 10T (HGST enterprise grade). (no carving of bumpers required)

    Is there any way to "fsck" a time-capsule drive in situ? (one could do it by disconnecting it, and attaching it as a usb disk, of course, but that's a lot of trouble)

    Is there any sort of testing or burn-in one can do before using the drive for data?

    gtp -

Cascade

Member since: 10/04/16

2499 Reputation

141 comments

Considering the pain of pulling the base off the device, I'd recommend testing the new drive before putting that back on. I had an old Mac Mini with the same design, and it was an absolute pain to upgrade the RAM and HDD for the same reasons. Nothing like realizing that the SATA port isn't _quite_ seated right after reassembling the whole thing... O_O

David Rogers -

Absolutely — as soon as you have the cables hooked up to the drive and board again, you can just plug the power cable into the jack even before re-seating it, check the drive out and then finish with the plate, power jack and base.

Geoffrey Wiseman -

Thank you for this step-by-step lesson. Apart from a skinned finger joint and playing hide and seek with a mounting screw, my 2TB Airport Time Capsule now has a 5TB Seagate drive that fit perfectly into the rubber mounting blocks. Those pesky micro connectors are not designed to be fitted by fat old Western fingers. And yes, having fiddled with Macs of yore, I too have leart it pays to test a drive in situ before reassembling.

chrislewis1 -

I put in a WD Green 3 TB disk(WD30EZRX), everything came apart and went together fine, but when I started it back up, still have the same issue of "internal disk needs repair". Any ideas on what the problem might be?

C K -

"Launch Airport Utility to check the disk is recognised OK, and erase it if necessary." Try repeating that last step in Airport Utility - your TimeCapsule may need to erase the disk itself before use.

Cascade -

When I go to airport utility, no disk is recognized. I've tried restarting and resetting the time capsule. If I go to the disks tab, the partitions list is just blank.

C K -
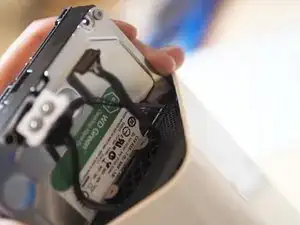
hi all if i dont have WD green wath you recomend?

Dionisie Vasilache -

Thanks for this guide, I change 2 TB to 4 TB WD Green, and all is work perfect Now!!!

Dionisie Vasilache -

Hi guys! I want to know is it possible to put there the SSD drive to upgrade the speed read/write?! Is anybody do something?!

Stan -

No point really. Remember that it is a NAS drive constrained by your network not forgetting the substantial price difference.

peterritchie186 -

I'm wondering if it is the best to use an SSD in a Time Capsule. Wouldn't all of that writing shorten the life of the memory cells? For a back-up source, I'd be concerned about having it die on me just when I need it and since you can't really get access to the status of the memory cell health while in the Time Capsule, you'll never know when it is going to die.

Also, I see a Danger warning for this repair. At which step should I be careful about doing the repair? I know all, but just would like to know at what stage and what elements should I be careful not to touch.

SkipR -

I just did this procedure... The old 3TB drive had failed. Thanks for the instructions.

One comment. If you use Seagate NAS drives then you don't need to modify the rubber pads as indicated in step 6. So a simpler replacement, with no mods.

Thanks again.

philgrocks -

Used a Seagate IronWolf NAS, still had to trim the pads — so maybe don’t worry about which drive to buy (or if you’re doing it in person, just bring the pads and see if you can find a drive that fits them well.

Trimming the pads isn’t THAT much of a pain in the grand scheme of this project anyhow. I was much more worried about possibly snapping a cable.

Geoffrey Wiseman -

Dear Philgrocks,

do you mean Seagate NAS drives as the Seagate 10TB IronWolf Pro 7200RPM SATA 6Gb/s 256MB Cache 3.5-Inch NAS Hard Disk Drive (ST10000NE0004) that is available on Amazon?

Will this drive fit inside without need to modify the rubber pads?

Thanks for a kind answer.

Giorgio Piras -

Just replaced a failed 2TB with a HGST Deskstar NAS 3.5-Inch 6TB 7200RPM SATA III from Amazon. Lower rubber pads required no modification, top rubber pad needed minor trimming. After booting it back up Airport Utility still said 'internal disk needs repair' so I did a quick erase as suggested and it works great now! Thanks for the instructions!

proud2beod -

Can someone please be specific about what HD was originally in the Time Capsule? I'm kind of surprised it's not in the notes, not in the photos, nothing. I'd rather get the same/similar drive so I don't have to modify the rubber supports. I'd also like to be able to order the replacement ahead of time before opening the enclosure. Thanks.

Richard Forester -

The introduction says it's a 2TB Seagate drive. I don't know what the original drive is in the 3TB Time Capsule, but see philgrocks and chrislewis1's comments posted above for a couple of replacement suggestions. This Time Capsule design A1470 has been available for several years, so it is possible that the internal drive used may vary over this period. The one removed from mine was a Seagate Barracuda 2000GB, Model ST2000DM001.

Cascade -

I used this guide to replace the old noisy fan. Not really easy but thanks to this guide I made it. Thanks

gedenis -

Worked great no problem other than I broke one of the holes on the base while removing it but it reassembled with no problems. Hard to see all the small bits for an older guy might want to get a magnifying lens or similar.

Martin Zardecki -

I recently bought a WD40E31X (4TB SSHD) disk and thought if it is a good idea to install it on the TC 2013 (2TB originally) or better use it as an external disk using a USB3 box.

https://www.amazon.com/Blue-SSHD-Desktop...

Cristian Contreras -

Just replaced original Seagate Barracuda 2000GB with WD Blue 4TB. Replacement was straightforward other than trimming rubber drive holders to fit. Did a quick erase of drive and an upgrade of the Time Capsule software. Time Machine saw new drive right off and have the backup running!

Thanks....

Mike Kosche -

used the seagate NAS 8 TB on sale from Amazon. Directions were perfect; reformatted and up and running; time around 1.5 hours because my trimming wasn't good enough the first time and the drive didn't sit down far enough for the metal plate/torx screws to go on nicely; slight re-do but everything worked great. PS. Pair of long nosed pliers worked well to remove and re-place the rubber pads at the bottom of the cavity for the hard drive.

Alex Abler -

Confirmed it works fine with Seagate Barracuda 4TB ST4000DM005. Didn't need to trim rubber since it was replacing original Seagate Barracuda 2TB (same profile). Thanks.

dadioh -

Thanks a lot for the guide. I managed to replace the HDD by a WD Blue 6 TB drive WD60EZRZ. Has been working fine so far.

Christoph Hollwich -

Thanks for good instructions; just replaced a failing drive with a Seagate ST8000NM0055 (8TB).

One hint for step four: the three cables are routed together across the top of the drive. Gently pulling them apart and away from the rubber pad on the top of the drive makes them a little easier to get off the PCB.

Bradley Dilger -

Hi Bradley, have you had any trouble with the drive as it has 512 emulation and not native 4K? Thinking of buying the same HDD as you. Thanks, Andrew.

Andrew Veary -

Hello and congrats for the guide. However while trying to remove the drive I accidentally pulled the small cables and bent their insertion points in shown in step 4 point 2. Does anyone have an idea if they relate to the disk or the router part? in case they relate to the disk could I still use it as a router in case the connections are damaged?

Thank you

mla -

I have exactly the same issue: two smaller connectors are so small and I broke it !

---> Good news, the TC look working fine without ... Any people know the usage ?

clarennequentin -

Why a GREEN? >>> Green is not suitable for 24/7 operation.

WD RED is for a NAS enclosure, like the time capsule.

Benefits of RED (8TB):

High speed (serial 180 MB / s) for the hard disk to 5,400 rev / min

Low power consumption

Moderate noise levels

Optimized for 24×7 in NAS systems

bowers.matthew -

Could you tell me if you tried a WD red and if everything is fine? Thanks!

Jeremy -

Thanks for instructions, replaced the drive with a 6TB Toshiba TOSHIBA X300 HDWE160 7200 rpm, 128MB buffer. Looks fine.

Evren Er -

Does anyone know the exact specs of the 2 small connectors? Are they JST connectors?

Aurelien -

I just installed a WD Red Pro 6TB in my 2013 TC. The old drive just went away, could not access it. After I removed it I tried to access it using a drive doc connected to my iMac with USB, and it could be seen, but when I tried to reformat with secure erase it had errors.

When I started the TC, the Air Port util said it was possibly overheating, and the fan came on full blast. I checked my cables, and re-seated the larger of the three cables. When I powered it up again I still had the error message, but the fan did not come on. I was able to format the disk, and I quit out of the Air Port util, and restarted the AP util, and everything was normal. I am now backing my iMac and MacBook Pro. Our household also has another iMac and Mac Book which I will back up tomorrow. I used the 6TB WD Red Pro only because I had one "on the shelf", but it is a very good disk that hopefully will last a long time. Been on 7 hours and running cool. At the prices, why fool with anything else?

Eric -

I just successfully finished the replacement of the 3TB Baracuda drive by a 4TB WD red drive. I initially tried it with my own old Tools, but failed in steps 3/4. I then bought your tool box and due to the better tools (namely the blue plastic parts) I could remove the old drive. In order to put the newly trimmed rubber segments in place I set them in place on the new drive and used OKS 1110 Multi-Silicone Grease to coat the outer parts of the rubber segments. This made it possible to insert the drive and the rubber segments much more easily into the cave.

Thanks for the good description. Full points for the author.

Albrecht Däweritz -

Thank you so much for the instructions! I just successfully finished the replacement with (Seagate ST10000NE0004 Iron Wolf Pro 10TB Internal Hard) and I can confirm everything works just fine.

https://www.amazon.de/gp/product/B01M4FU...

Note: Both rubber pads inside will still need to be slightly trimmed as written in "Step 6".

Daniel Brown -

I just destroyed my time capsule trying to do step 4 getting wires 2 and 3 off. I think mine had become fused to the board because mine is as old as possible since I got mine when first released. BE CAREFUL if you try to do this to a model that has been in place for a long time.

Mike Schinkel -

Interesting but unnecessary. Just buy a standard USB 3 2.5” drive and connect it via USB to the capsule. Won’t look really fancy - but devices like a TimeCapsule are normally placed out of direct sight. The advantage is, that you can easily replace the external drive and extend it with a better model from time to time without risk of damage and within no time. External 2.5” drives are available with drives up to 4 TB and do not need external power source. So you would have the internal memory + external memory. It’s that simple ;-)

Gumba Mumba -

I work for Apple, specifically in the Wireless multimedia department, and while your advice is sound, and advice I frequently give to customers with Time Capsules who ask about fixing the drive.

However, it is preferable to have a drive with an external power supply because the USB port on the back of the unit does not draw a lot of power.

You can actaully get a powerd USB hub, attach it, and add up to six USB drives.

Norman Taylor -

Ah… And do not waste money on SSDs. You won’t have any advantage. Wireless is slow, USB is a bit faster but not comparable to SATA interface (regardless if SATA I, II or III - okay, if you have connection via USB 3, that SATA I and II will be slower). WIFI brings up to 1 GBit / s under ideal circumstances. USB 3 will bring up to 5 GBit / s - but has some latency and overhead. SATA III will bring 6 GBit/s. It doesn’t matter if you put a SSD into the case or not - it’s just waste of money and reliability. The TimeCapsule is not a NAS - it’s intended for use as backup device. Use a enterprise grade hard drive for backup /archiving. It may be a bit slow compared to NAS drives or SSDs, but for TimeCapsule it is fast enough and - more important - extremely reliable.

Gumba Mumba -

I can install 10TB or 8TB hdd ?

Ilia Bagaev -

I had no problem with 6 TB drive, installed in August and still working great, but I have no idea if there is a size limit. Apple only sells 2 TB and 3 TB versions, but since 6 TB has worked, even larger drives may work, you just have to try and see. Be careful with the cables, they are very delicate.

Eric -

Installed a 6GB Seagate NAS drive to replace the 3GB Seagate Barracuda that was in there. This is like my fourth 3GB Barracuda to die on me, thanks, Seagate. I didn’t even know that’s what was in this Time Capsule, or I would have expected this hard drive death sooner.

Was hoping that by getting the Seagate NAS, I wouldn’t have to trim the rubber, but I had to trim it quite a bit anyway. The cables are super-finicky — delicate, with not a lot of extra slack, and I had to do it twice because I didn't trim enough the first time. Still, all went well, nothing broke in a serious way during the replacement, and the drive is recognized.

If Apple would update these with newer hardware, mesh networking and higher capacity drives, I’d probably just have bought another one, but I couldn’t handle spending $500 for out-of-date hardware, so I ended up doing this instead.

I am waiting for first backup to complete. Thanks for the solid replacement guide.

Geoffrey Wiseman -

This guide was great — I successfully upgraded my hard drive (6TB WD Green) and replaced the fan due to continuous warnings about over heating. The fan replacement required removal of the entire unit from the white enclosure and with some careful examination it is clear how this all comes apart and fits together… would be good to have a guide that walks through all the steps involved in doing a fan replacement since that seems to be a common problem. I am now happily using my new 6TB, cool (due to new fan) device.

Larry Henry -

Superb info

i stripped mine down

cleaned fan of all dust

oiled fan spindle

all working 100%

Harry -

Just performed an upgrade with a WD 8TB red NAS drive, cleaned and lubricated the fan, after initial power up, it saw no drive, unplugged it, tapped it a few times on the metal plate , and off it went, now erasing the drive with the Airport Utility, 4 times the space, !&&* yeah.

Thomas -

This worked a treat for me. The small connectors were well tricky but my TimeMachine is now back to backing up. An $85 repair all sorted. Thanks.

Glenn Powell -

Hi everyone, for those who had the hard drive died on you before the upgrade, did the time capsule have any warnings or it just died out of a sudden?

Michael Ambious -

I have had three different time capsules and two of them have had drive failures. One is very old, and has had two drive failures, and the other one, the tall version, has had one drive failure. Each drive failure happened with no warning.

However, it is very unlikely that you will have a drive failure on your time capsule at the same time your drive on the Mac you are backing up will fail, so I would not worry too much.

Over the years, I have had to restore several iMac’s and MacBooks from Time Capsule. Every time I had to do that, the restore went perfectly.

Due to the information being stored on my main iMac, mainly our families photos, but other stuff too, I have two back up resources. Besides a Time Capsule, I have a small 2 TB WD “My Passport for Mac” plugged into my iMac. This is inexpensive, very small and powers from the USB port. “Just in case!”

Having two backups also is helpful if you need to use Time Machine to recover a file that you delete and later find you need, and your TC backup fails.

Eric -

Pulling the base apart

It took me around 2 minutes. I used a blunt knife, put it near the middle and bended careful the white plastic from the base and pushed a cable tie in. Than the 2 lugs left and right from the middle. Around the next line 3 cable ties in and than the third side. The side with the cable sockets as 4th side i left out. Than careful with the knife again opposite side from the cable sockets. Careful pushing the base up. Little help left and right and the base popped easy out. Hope this helps others a bit.

horst.droge -

Thanks very much for the procedure, the notes and all of the hard drive info. I settled on a 4TB WD Red NAS. It’s going through it’s 9 hour erase now. I’m confident it’ll be ready when I wake up tomorrow. If not, I’ll be back.

On the hard drive note, I would have bought an HGST or Hitachi if I had the cash sloshing around but I budget my slush cash for tube amps and guitars and this unit is for my home computer so the WD Red looked to be good enough. If it was my work unit, I would have gone with the HGST or Hitachi.

ference janos -

I replace by 2TB with a Seagate Ironwolf 4TB (ST4000VN008). The rubber mounts (all of them) did not need any trimming at all. The Ironwolf casing is pretty much identical to the original Barracuda.

Ray W -

I successfully installed a Seagate IronWolf 12TB hard drive. I had to shave the rubber mounts, but otherwise all is working well. I previously had a 2TB Time Capsule, but with 2 iMacs and a MacBook Pro, that was no longer cutting it.

rattlerjw -

I just bought a second TC that was upgraded to 4 GB. Is there a way to see what kind of drive was used for replacement?

Yoto Yosiama -

Awesome instructions. I put a WD 6TB NAS drive (WD60EFRX) in as a replacement. Works great.

Thank you.

Dale Horne -

Thanks a lot. Without the instructions I wouldn’t have tried at all, but now I did. Not to upgrade the drive (which I guess I should have, seeing how much effort it was), but to replace the fan, which was going to fail. Apparently it had too much resistance to run well at low speeds, which was compensated by running at full speed for some time every half hour or so, even when the drive was not in use.

In my 2 TB TC, there were some slight differences/things to be aware of when taking out the whole frame. There is a third tiny cable that you need to disconnect before you take out the guts of this thing. It has only two wires (so this is the smallest of them all!) for the reset button. All in all there’s connectors for power, fan, status LED, and reset button. Also, be careful with the ports part; you need to slightly slide them out of and into place (just a few millimeters). Lastly, the 2 screws in the ‘bottom’, holding the contents were T8, not T10 in my case.

Bert Dorhout -

I nearly did it!

I got both connectors 2 + 3 off but on closer inspection one of the silver pins on number 2 came out and I lost it. I don’t know if it will function properly with only 3 of the 4 pins so not sure whether to bother buying a replacement drive. If anyone knows what it does I would be grateful.

Thanks this is a great resource.

Peter -

2TB to 6TB a no brainier upgrade for a small amount of money. I used a 6TB Seagate Iron Wolf which fitted with only a little pearing of the lower rubber mounts. Great instructions, thank you!

peterritchie186 -

Thanks so much for the concise guide. Not only got my Airport Time Capsule working again, but now with an 8Tb upgrade! It will be good to have backups again…..

Todd Killingsworth -

Well done Cascade, now with a 4TB new HDD my Time Capsule is running fine, many thx!

I used a Seagate IronWolf 4 TB internal NAS HDD (SATA, 64 MB Cache, 5900 RPM, SATA 6 Gb/s)

https://www.amazon.de/gp/product/B01LOOJ...

Michael Kirchgaessner -

Thank you for this guide. I very successfully replaced the original 3TB drive (after it failed) with a 4TB Seagate Barracuda HD. I followed the instructions and was extremely careful. Everything went very smoothly and the unit immediately fired up and worked after I reassembled it and plugged it in.

I added a few tips up above with a couple of steps to suggest some easy tools for the trickier parts of the HD replacement.

Ken Cheung -

Just swapped out the 2000GB Seagate Barracuda HDD for a 4TB Seagate Ironwolf HDD. Everything went well and no trimming of the rubber pads was required! The instructions and comments here were invaluable in getting my Time Capsule up and running again! Thanks everyone!

dannyrabbittang -

Awesome, it worked for me, many thanks!

darrenchristie -

This guide is very well written and helped this upgrade go smoothly. I swapped out the stock Seagate 2TB drive for a Seagate 14TB drive, and apart from some X-Acto knife trimming on the rubber top piece before I put it back on, everything reinstalled smoothly and the Airport Utility formatted the drive without incident. Thank you!

davidl3998 -

Ich habe gerade nach dieser Anleitung statt der vorhandenen Seagate Barracuda 2TB eine WD Red 10TB HDD eingebaut und auch diese Größe wird von der TC erkannt und formatiert. Die Gummipuffer sind für diese Platte eher etwas zu weit ausgeschnitten, was aber nicht stört und so musste ich nichts nachschneiden.

Following these instructions I’ve just replaced the original Seagate Barracuda 2TB with a new WD Red 10TB HDD. Even this size is recognized and formatted by the TC. Trimming of the rubber edges was not necessary because this hard disk has a little bit smaller edges, but this works OK anyhow.

Good luck to all of you!

Johannes von Keller -

Successfully installed a WD 6TB Blue. There were two tools that I found very helpful beyond the iFixIt kit that I have. One is called a “seam ripper”. Ask your Mom because I’ll bet she has one in her sewing kit. It was instrumental in removing cable bundles 2 & 3. I also had a long-handled pair of Hemostats aka, “roach clip”. Those were helpful in maneuvering the rubber chocks that fit the bottom of the new drive you are installing.

One last thing, take your time when you’re trimming the rubber chocks top and bottom. Those are the shock absorbers for the hard drive and if they do not perfectly fit the new HD, you will be packing 12 lbs od sausage into a 6lb skin.

I just want to also thank Cascade and the other contributors for all the tips and nuances of this fix.

Lazarus lives to store more data!

pkeenan8 -

Merci pour ce tuto. J’ai installé un Western Digital Red 12 To (WD120EFAX) qui fonctionne parfaitement. Aucun échauffement particulier même pendant une sauvegarde de 2 To de données.

Je n’ai pas eu besoin de retailler les deux coins en caoutchouc du bas le disque étant, à cette extrémité, plus étroit que celui d’origine (un Seagate Barracuda 3 To ST3000DM001). Le disque est malgré cela parfaitement bien maintenu à la base.

Thomas -

I don’t know why no one mentioned this but I went with an SSD drive. I’m using my Time Capsule only for streaming content to Infuse on Apple TV on top of acting as a reliable router of course. Capacity and backup was not the issue for me. That clunky, noisy and slow hard drive has been annoying me since day one. Finally I bought a Sandisk Ultra SSD drive and replaced internal hard drive with it. Writing, reading and streaming speeds and most importantly response times are way better even though TC only supports SATA II. Accessing Time Capsule storage from my Mac is also more reliable. Time Capsule is now a real NAS device for me. Fast and silent. I recommend this anyone who still uses TC. Until Wi-Fi 6 routers become mainstream I’m not planning to retire my TC anytime soon.

Eth Tolga -

Thanks for your explanation! Can you tell me what you did with the 3.5” power cable since the 2.5 “ SSd’s do not use it?

David Seid -

Which SSD did you go with?

[deleted] -

What is today (January 2020) the best 6 or 8 TB HDD to use for this upgrade?

wanagawachipi -

Seagate will fit without any problem and western digital will need trimming of the rubber

oliviermolody -

Will WD60PURZ 5TB HDD work with this machine, if i upgrade it to?.Are there any restrictions in size, type(ssd or hdd), shape or firmware when i upgrade?.Will any 2.5/3.5” drive work?.

verma1986 -

Do you have any recommandations for an internal hard drive who can fit in the Airport ?

Stéphane Berthomet -

apparently all seagate are fitting well (none to minimum trimming of the rubber) I put a 4tb iron wolf as my 3tb died after 7years .

oliviermolody -

Getting the old drive out was a relative piece of cake because of the good instructions and figures. Having fat finger the 2 small connectors are a bit finicky to remove but released fine. Many thanks, Bill

William Macy -

I have this same model Airport. What HDD can I use to replace mine? I have these two options: Seagate 8TB ST8000DM004 or 6TB ST6000DM003. Thanks!

drcemauro -

Both shall be fine , people upgraded up to 10tb

oliviermolody -

Hi! Is it possible to replace the old drive with an SSD drive?

Frank -

Thanks for this. The tips and tricks were very helpful. I popped in a 4TB Barracuda, which as it was thinner dropped in nicely. Only one damaged lug :-). My wife would be impressed that I actually took the time to look at some of the comments. Without them I would most definitely had had problems, particularly with the two smaller connectors.

Philip Shambrook -

I used this guide twice; first to upgrade the internal drive to a Seagate 14TB, and then to replace the internal fan which had seized. Few things feel as good as when you put the unit back together, plug it in to test it and the green light comes on. (Huge sigh of relief)!

davidl3998 -

Thanks for letting us know. I am about to put a 14TB Seagate Ironwolf in mine. Fingers crossed it lights up green like yours!

Elle Adams -

did all this - was great - but when plugged back in the LED no longer lit up. Any idea what connector may have been knocked off/loose? nothing seemed obvious but would dive back in to fix if there were a fix. thank you - m.c.

m.c. von s -

In step 4 it’s the connector labeled #3. If it doesn’t work it won’t affect the performance of the Time Capsule.

firebird -

Hi, the most difficult part was to make room for the new drive in cutting the two rubber pieces properly. Everything is working well et I hope that the Time Capsule will go on providing its service to my satisfaction since there are no ideal replacement products…

Serge Casasus -

Great instruction! I put a 16 TB Seagate Exos X16 in and it worked great! Highly recommended instruction!

kern-kiel -

Very helpful instruction. Now have a 6GB Barracuda. Time machine is up and running. hopefully will be finish with 594 GB backup within the next few days ;-) Thx a lot !

sailho48 -

Vielen Dank für die Anleitung.

Ich würde ganz gerne meinen AirPort Time Capsule A1470 RAID-fähig machen.

Erkennt der A1470 einen “Dual-Bay 2.5” to 3.5” SATA Hard Drive Adapter Enclosure with RAID”?

Dazu würde ich 2x “WD Blue Mobile 2TB HDD 7mm 5400Rpm SATA 6Gb/s serial ATA 128MB cache 6,4cm 2,5Zoll” verbauen wollen.

Danke und VG

Stefan

Stefan H. -

Great and very helpful instructions. I replaced my crashed 3TB drive with a new Segate Barracuda 8TB 3.5” HDD (ST8000DM004). Following the instructions it was an easy plug-and-play. I had to do a Quick Erase of the new disk from within the Time Machine preferences (Apple menu  > System Preferences > Time Machine). Now my MacBook Pro is backing up again :)

Claus

crathje -

I just did this, replacing the original 3TB drive (which was a Barracuda) with the current equivalent Seagate Barracuda 3TB ST3000DM007. Even though the replacement drive was physically a little smaller, it fit the rubber parts perfectly, which made the fix so much easier than having to dig out and modify the internal seating (which I’ve done in the past on a different Time Capsule).

dpwe -

Is it possible with an ssd? And does it make sense?

Jens Heidemeyer -

I don’t see why not but there’s really no benefit to it as the internal controller isn’t optimized for IOPS and you’re limited to network speeds. If you do want to add an SSD I would suggest getting an external drive and plugging it into the USB connections on the back.

firebird -

Try as I did, I simply could not trim the two rubber bumpers from Step 6 to fit. I would put them in place and the drive (Seagate Exos 7E8 8TB Internal Hard Drive–ST8000NM0055) simply would not fit. I would be a bit too tall on one side or the other. The drive would be a bit off center one way or the other so that the SATA cable didn’t line up or the other bumper would not fit. Ultimately, I opted to forgo the bumpers altogether. I understand this may make the drive a bit wobble inside the housing and it may make vibration noise a bit more, but the drive fit without issue once the bumpers were removed.

Uncle Bill -

Thank you so much for doing this. Had an easier time with the 2 small clips than the big one. Definitely try the drive before you put it in. The first Seagate 6TB Ironwolf didn’t work when I tested it out so had to exchange it. Would not have been happy had I installed it and then discovered it didn’t work. One odd thing was that when I tried out the old disk in a different housing it seemed like it was working so not sure what means. Thought that perhaps there might be a power supply issue but so far not. Again thank you.

Robert Enzminger -

Which HDD of 8tb or more works fine on the Time Capsule? I want to change for WD RED 8tb but i don’t want to cut the rubber. I appreciate if you could recommend me one

Jorge -

Great guide - thank you for posting!

When reinstalling the drive, I trimmed the top and bottom rubber pieces for a better fit.

I had issues reconfiguring Time Machine to access the newly formatted disk. Time machine returned a “Please enter Server Password” - solved by going into Airport Utility and changing the Base Station Password.

Malcolm Ting -

Today I upgraded my old 3TB Airport Time Capsule (whose internal disk had died) to 16TB using a Seagate Exos X16 (https://www.amazon.co.uk/gp/product/B07S...). Needed quite a bit of rubber cutting, and connector ‘1’ in step 4 was very reluctant to go back in, but after some fiddling everything has gone back together and the unit is undertaking its first big backup. So no question as to whether the Time Capsule software can recognise a disk this big - it can. Will post on here again if any problems. Good luck!

Rich Godwin -

I have an 8 TB HDD in my iMac, so I wanted something bigger in the Time Capsule. I installed a 12 TB Seagate hard disk (Seagate ST12000NM001G HDD 3.5″ 12TB SATA 3.0 7200RPM Enterprise Hard Drive). I had to trim the two top rubber segments to fit the disk. It is working fine and Time Capsule did the initial Time Machine back-up of nearly 5 TB of my data which took about four days to complete. So far so good.

Alex Velasco -

Thank you to those of you that helped put this together. It was a big help to me. I was able to upgrade to a WD Blue 6TB drive.

David Coburn -

My original disk died a few days ago! So, I upgraded with a Samsung 4tb SSD and worked well. I just used a 2.5” to 3.5” adapter to keep the things firmly and in the right place. Was very easy to follow the instructions.

João Marin -

I just replaced the 3TB in an A1470 with a 10TB Hitachi HGST drive (He filled.) No trimming needed. Runs vibration-free, quiet, and very cool.

hstriepe -

Any advice please re disk suitability, SMR or CMR disk leaning towards CMR being Seagate IronWolf 4TB as have read Time Machine doesn’t play nice with newer SMR disks? Any takers….thanks.

Paul

Paul Wright -

Can a 2.5 drive be used?

Also do i need to use a seagate green for it?

Can i use my Maxtor drive?

Ben Capehart -

Are there capacity limits on the thing? Obviously throughput ones, sure, but I have a spare Samsung SSD collecting dust here… is there any disadvantage? I grasp I won’t get the full bennies of the SSD, but, OTOH, I DO get the bennies of “not having to buy an HDD when I have a perfectly serviceable, NIB drive right here.”

ZenAtWork -

Hello many thanks perfect tutorial on the hardware part , (I’ve bought a new seagate on amazon for 50€ and didn’t even need to cut the rubber edges)

Software wise I’ve struggle a bit to reset the parameters of the time capsule (I’m running an MBP 2018 on Big Sur) has my previous Harddrive was diagnosed as broken by airport utility hence I’ve tried some apple reset procedures before replacing it, and that has pretty mixed things up.

Looking forward to the promised tutorial to swap old school hard drive with an ssd one! As the time capsule is so much better for many reasons than any other NAS options available for time machine backup.

Best

lhad -

I am considering to put a 6TB WD Red Plus WD60EFZX 128MB 3.5" (8.9cm) SATA 6Gb/s into my TimeCapsule. ******Is it compatible or do I need the WD Green? Those are way more expensive.

Bette Rose -

Take photos during the process. After you took all apart, I recommend using pressurized air to clean the dust the device collected over the years.

When using a different hard drive from the one that came with it, have in mind you will have to make adjustments on 3 rubber parts to fit the new hard drive in the same place again.

On the 2 smaller rubber parts, before taking it from its place, take a look at the photo to remember the position they were. Make the adjustments using a scalpel, cutting some edges to make the rubber parts “match” the contour of the new hard drive. When you install back this parts, pay attention the position they were before, fixing it with the 2 TR8 Torx screws. If the hard drive doesn't fit well and stays at the same level as before, it will make harder to close the device at the end.

On the rubber pad, the adjustments are more important because they can't cover the clips on the case or it won't close as it should.

Make sure the LED wire is before the clip or it can be damaged.

Zillo -

After you will the new drive, you will have to use Airport Utility to erase. It will format the drive and prepare to be used in the device. Use the option of Zero Out Data. It takes longer than the quick option but it is safer.

Zillo -

Just completed the swap with a

Western Digital 10TB WD Red Plus NAS Internal Hard Drive HDD - 7200 RPM, SATA 6 Gb/s, CMR, 256 MB Cache, 3.5" - WD101EFBX

and my new iFixit tools and had no problems whatsoever. I did not need to trim the rubber seats for the top of the Time capsule, but did have to trim the rubber bottom gasket.

Also, I used a long set of tweezers rather than the chop stick. However, I am feeling the need for Chinese for lunch!

rscott -

I just replaced the original drive in mine with a Seagate Barracuda ST8000DMZ04 drive and did not need to trim any of the rubber for it to fit.

Randall Wood -

Is it possible to get a 2022 update to this guide? Drives have changed in the past six years, and maybe the ones that would have been good replacements drives in 2016 aren’t the best options today. Thank you.

Edward Havens -

If I needed to, I would put in a 2,5" SSD in a suitable caddy, which mimic a 3,5" enclosure. Example. Because SSD's are silent, draw much less power, and, above all, are more reliable than HDD's these days. Also not as expensive as they used to be. I am perfectly aware that it won't increase the writing speed, but that is certainly not the only advantage with SSD's.

Alix Spqr -

I've read in many, many places that SSDs are not well suited for the enormous number of writes that Time Machine software makes, and that rotating platter hard drives are to be preferred.

Jim Robertson -

What's the largest formatted drive size that I can but inside the Time Capsule?

Jim Robertson -

Thanks for an excellent guide. I was able to replace my HDD of 8 years almost constant running and upgraded from 3TB to 6TB in the process. One thing to note for me was I replaced the original Seagate with another Seagate so I didn't need to trim the two rubber segments.

John Mattinson -

Hi all,

Thanks for the Ifixit community for providing these instructions. Since this was created someone has posted a pretty clear and confident instruction video on YouTube, including some very clear video showing how one can confidently remove all of those connectors. Check it out here:

https://www.youtube.com/watch?v=DkI6OdMU...

Rob

ROBERT ANTHONY PASSARO -

I would probably not have attempted this upgrade without this guide, so thank you.

A word of warning: I don't know how, but somehow it appears I damaged at least one antenna in the process. My 2.4 GHz network became practically unusable. Top download speed dropped to around 1.5 Mbps. I'm not terribly upset about it, as it is past time to upgrade to a WiFi 6 access point, but it is something to be cautious about.

I replaced the drive with a Western Digital 4TB WD Red Plus which I though would fit without cutting up the rubber, but I was wrong, and cutting the rubber pieces to fit was the hardest part. Another thing I don't like about this drive is it makes a very loud sound when parking the heads, and is not all that quiet in operation.

Nuru -

After completing this upgrade, I was not able to initialize the new drive to use as a Time Machine destination from macOS Big Sur (11.6.7). I don't really know why, other than that support for Time Machine over AFP is deprecated and that is what the Time Capsule uses. I was able to initialize the drive by backing up an old El Capitan machine I had to it. After that, Big Sur recognized it.

Nuru -

I'm using Big Sur and have had no problems initializing the drive after installation through the Airport Utility. It's also performing a backup using the Airport Time Capsule with no problems so far. I can even mount the "Data" drive to the desktop and copy files that way with no issues. Don't know what's going on with your system unless there's a problem with your Big Sur installation and it needs to be repaired.

commorancy -

Hey guys! I’m having a little problem with my TC. I have replaced the drive on other capsules in the past, zero problems; and my TC’s original 3TB drive has worked just fine, but it was full and with the possibility of failing without warning I bought a Toshiba N300 6TB 7200 rpm 256mb cache. So, once again, as I’ve previously followed this guide, I did it now on my own TC; after installing the new drive I didn’t close the TC because is better to test it first, so I plugged it in and it obviously asked me to “repair” the disk, I proceeded to erase the disk in “quick erase”, but when my TC booted again and I tried to access the disk it just jammed, Finder showed “Loading” but never got anywhere, couldn’t access it through Airport Utility either; I had to power cycle and it then let me access through Airport Utility, but if I changed any configuration there (wireless name, password, ports, disk name, ANYTHING) when it tried to reboot it jammed again until I power cycle manually.

Ricardo Galezo -

After trying multiple times I tried to erase it to zeroes, it went ok (apparently) but after 14 hours it was the same as previously described, then I just let it sit without trying anything for like 20min., then I tried to access again through Airport Utility and it displayed the “repair disk” message again, but this time it didn’t showed the drive, it was like it wasn’t plugged, so power cycle again, and now it was available but the name was the default “Airport Disk” not the one I previously set.

After all that, the last thing I did was to set the drive security to “Account and Password” (default is base station password) then I power cycled and as soon as it booted I quickly tried to access through Finder and it let me in; right now I’m trying to copy some data just to test the drive and it’s going good, but when that finishes I need to power off the TC to properly accommodate the rubber thingy and seal the device, but I’m worried it will fail again when I plug it in again. Any of you had anything similar?

Ricardo Galezo -

UPDATE: I sealed the TC and when I plugged it again it failed the same way, power cycled several times and it seems that when it starts up the drive spins up, but if not accessed in the first few seconds it stops, so I tried rebooting again but as soon as wireless is up I quickly connect and open the capsule in Finder, if I do it in those few seconds the drive is active (when TC has just started and wifi is up) it lets me access the drive normally, I can read and write with normal speeds, but rebooting is a lottery. I’m really puzzled with this. Next thing I’m going to try and let it sit for a while without accessing at all, to check if it fails and makes me reboot it again.

Ricardo Galezo -

The hard drive inserts into a rather confined space. There's really no fan to cool the drive down, only a heat sink. It's entirely possible that your hard drive is simply getting too hot in that small space. It might be that the hard drive is shutting itself down to prevent overheating and causing problems for the Time Capsule software. I might suggest trying a different drive in the unit, one that is designed to operate at a lower temperature. Temperature issues can most definitely cause erratic problems.

commorancy -

I attempted this repair and everything went swimmingly until I made a mistake near the very end. I wasn't paying close attention when putting the hard drive back into the case and as a result I manged to partially break the ZIF side of the ribbon cable that connects the logic board to the SATA connector on the HDD. The ZIF socket on the logic board is fine, but the ribbon cable isn't salvagable.

I think I already know the answer but I'll ask here anyway -- I'm guessing that this ribbon cable is a completely custom part that can't be replaced by itself?

ficusfactor -

You might be able to buy a non-working Apple Time Capsule someone is selling strictly for parts to get the part you need.

commorancy -

Many thanks for posting this. I’d never tried a disassembly like this before, and the instructions were impeccable. Just sorry it was necessary due to flawed Seagate drive used by Apple in my Time Capsule. Who knows, I may get brave again in future - so long as instruction like this continues to be available.

Paul White -

Replaced original 3TB with a 14TB Seagate IronWolf NAS (ST14000VN0008). Gasket closest to the TC bottom (the entry point) required some minimal trimming in Step #7 because the cross-sectional shape of the new drive was slightly different than the original.

JohnsonE -

Thank you for this. I was able to swap in a used 12TB I got from the "bay" Seagate Exos x14 12TB (ST12000NM0008). Its working great and I have multiple machines queued to backup. Great guide!

Russell Pepin -

Hi I’m having extreme difficulty connecting the small wire number three. I understand this is for the led lights will it be okay to try to use the machine without attaching it does anybody know I’ll be very grateful

jeff smith -

Successfully installed a 6.0TB Seagate IronWolf Pro NAS 3.5-inch SATA 6.0Gb/s 7200RPM Enterprise Class Hard Drive. In steps 6 & 7 bottom (inner) rubber segments/mounts needed trimmed and also the top rubber pad. I mounted the rubber segments to the drive and then slid the drive with rubber segments in, contrary to step 6 instructions. This caused uncertainty that the rubber segments remained positioned correctly. If the drive doesn't go all the way in properly, it will cause problems attaching drive connector, top rubber pad and metal plate. I suggest installing the rubber segments into the bottom of the cave as per instructions. I think I got lucky and things went together ok but there was worry because you cannot see inside. Great instructions, follow them!

kneb139 -

The one thing they don't mention is needing a fair amount of light and a magnifying glass to be able to see everything well. I used an LED headlight for managing the rubber spacers and most of the rest of it. The headlight let me see to position the rubber spacers correctly inside the "cave" and around the round screws before inserting the hard drive. When I inserted the hard drive, I could easily tell when it was situated correctly.

commorancy -

This is the second time using this guide. I even have it bookmarked. I first upgraded to 4TB and now 10TB. One thing that I have managed to do on both occasions is that I disconnected the restart button, and had a lot of trouble getting it back on. This time around a wire snapped off the button board. It was a nailbiter hoping that my soldering would do the trick. I got off lucky this time. I added a drop of CA glue to the tiny solder joints when I finished.

Take it from me: FOLLOW THIS GUIDE CAREFULLY AND DON'T DISCONNECT ANYTHING OTHER THAN WHAT IS SPECIFIED!

Thanks for a well-documented guide! It will remain in my bookmarks!

Metabera -

TC still going strong in 2023. Added a WD 8TB CMR drive WD80EAZZ. Needed to Erase Disk -> Zero Out Data on the drive in Airport Utility before backups worked (Quick Erase didn't help) which took 20 hours. But all good. The WD disk did not need the rubber bumpers trimming at all. Using a watchmakers loupe (10x) helped immensely in safely removing the two small connectors with a small pointed screwdriver between the back of the connector and circuit board.

Jim'll -

Aside from the the fiddly necessity of cutting the the rubber spacers to conform to the new hard drive's differing form factor, the replacement hard drive went in without much of a hitch. Cutting the rubber pieces took the most time and was quite fiddly with cutting, then testing, then cutting again, then testing again.

Step 4's cable disconnect instructions are also confusing. The process would be simpler if the instructions were more clear and described that the two small connectors "pop off" of the circuit board rather than the ambiguous "pull away" wording. It would also be helpful if the instructions had stated to put a small spudger or tweezer behind the connector and pull forward to pop it off. Though, according to one commenter, their unit pulled up rather than popped off. It's possible that some Airport models were designed with differing connectors.

I also connected the hard drive to a Mac and formatted it HFS+ prior to installation to ensure the hard drive functioned.

commorancy -

I'd say this is an easier repair by 2023 standards. It was nice to open up an Apple device again that wasn't extremely cumbersome to reassemble.

In my case the two bottom rubber fittings didn't require any trimming. The top rubber pad did need some trimming.

I went for an 8TB Western Digital Blue HDD.

orun bhuiyan -

Thanks so much for these useful details. It is obviously a very old thread; however, I was glad to come across it as I decided to upgrade an old Airport to a bigger disk. It's definitely a bit fiddly, and good eyesight and light is needed. The tip regarding the small connectors is good and important, I would have probably damaged them not knowing they needed to be lifted forward. Here are a few additional photos if anyone is interested (I took them to get a clearer view of the connectors): https://photos.app.goo.gl/nwsSYapUZJ1LxN...

Christian Woern -

is possible to install ssd hd?

Victor Fernandes -

The original Seagate drive in my TC was 10+ years old and began failing to mount reliably between backups. Replaced with a 12TB without issues, other than the smaller PCB cables, which I approached with trepidation. Thanks to Lojza for the recommendation of using a needle to gently pry them loose. Had to cut the mounting blocks as well. Thanks to all for detailed instructions and for pointing out the potential pitfalls.

Richard Smykla -

Alles nach Anleitung gemacht. Funktioniert auch alles. Bis auf den Lüfter, der läuft seit dem im Dauer Düsen Modus. Mega laut. Was kann ich da machen ???

Thomas Rassloff -

After many years of use, the status lamp went yellow and harddrive fix was needed. I followed the excellent instruction step by step including the tips from community regarding the small connectors. Used a magnifying glass for that operation and iFixit tools. The most fiddly part was disconnecting the base, take it easy with that. I went for a Seagate 6TB Ironwolf NAS 256 MB 7200RPM HDD. Only minor trimming on one side of the rubber pads bottom and top. No pre formatting needed, just change of hard disk in the TC meny.

Works perfect!

Erik Öhman -

I was about to give up on my Time Capsule as I didn’t think the disk could be replaced when I stumbled across this guide. The instructions about removing/reinstalling the delicate cable connectors confused me until I realized they connected from the back side of the connector…I had never seen a connection like that before.I installed a 4 TB WD Red that I had laying around and it’s back up running (and backing up) again! Thanks!

Hoss -