Battle of May Island
The Battle of May Island is the name given to the series of accidents that occurred during Operation E.C.1 in 1918. Named after the Isle of May, a nearby island in the Firth of Forth, it was a disastrous series of accidents amongst Royal Navy ships on their way from Rosyth in Scotland to fleet exercises in the North Sea. On the misty night of 31 January to 1 February 1918, five collisions occurred between eight vessels. Two submarines were lost and three other submarines and a light cruiser were damaged. 104 men died, all of them Royal Navy.
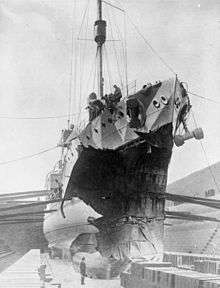 The bow of the drydocked cruiser HMS Fearless after colliding with the submarine K17 | |
| Date | 31 January – 1 February 1918 |
|---|---|
| Location | Waters off the Isle of May |
| Coordinates | |
| Also known as | Operation E.C.1 |
| Type | Naval accident |
| Cause | Weather, ship mechanical failure, human error |
| Participants | |
| Outcome |
|
| Deaths |
|
| Property damage | |
Naming
Although it took place during the First World War it was an entirely accidental tragedy and no enemy forces were present. It was therefore not a Battle and was only referred to as such with black humour.
Operation E.C.1
Around 40 naval vessels left Rosyth on the Firth of Forth, Scotland on the afternoon bound for Scapa Flow in Orkney where the exercise, EC1, involving the entire Grand Fleet would take place the following day.[1]
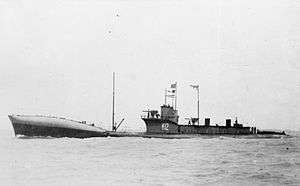
The vessels included the 5th Battle Squadron of three battleships with their destroyer escorts, the 2nd Battlecruiser Squadron of four battlecruisers and their destroyers, two cruisers and two flotillas of K-class submarines each led by a surface warship. The K class submarines were specially designed to operate with a battle fleet. They were large boats for their time, at 339 feet (103 m) long and were powered by steam turbines to allow them to travel at 24 knots on the surface, to keep up with the fleet.
The two flotillas were the 12th Submarine Flotilla, consisting of K3 , K4, K6 and K7, led by Captain Charles Little in the light cruiser HMS Fearless, and the 13th Submarine Flotilla, consisting of K11, K12, K14, K17 and K22, led by Commander Ernest William Leir in the destroyer HMS Ithuriel.[2]
Vice Admiral Beatty had moved the 12th and 13th flotillas of K class submarines in December 1917 from Scapa Flow to Rosyth in order to ensure that they were in a better strategic location from which to undertake operations.
Timeline
At 18:30 hours the vessels weighed anchor, and the entire fleet under the command of Vice Admiral Sir Hugh Evan-Thomas in Courageous steamed in a single line nearly 30 miles (48 km) long. At the head of the line was the Courageous, followed by Ithuriel leading the rest of the 13th Submarine Flotilla. Several miles behind them was the battlecruiser squadron containing HMAS Australia, HMS New Zealand, Indomitable and Inflexible with their destroyers. After these came the 12th Submarine Flotilla and bringing up the rear were three battleships, which were accompanied by a number of screening destroyers. The initial speed was 16 knots, but Evan-Thomas had ordered his forces to increase speed to 22 knots when they passed May Island, which lay just at the entrance to the Forth estuary.
All vessels were ordered to sail astern of each other, 400 yards (370 m) apart. To avoid attracting German U-boats, particularly as one was suspected to be in the area, after dark each vessel showed only a dim blue stern light accompanied by black-out shields that restricted the lights to one compass point either side of the boats' centre line, and they also were all instructed to maintain radio silence.[2]
The night was clear and the seas relatively calm, but the moon had not yet come up. As each group passed the Isle of May at the mouth of the firth, they altered course and increased speed to 20 knots.
At approximately 19:00 hours, Courageous passed May Island and increased speed, just as a low-lying bank of mist settled over the sea. As the 13th Submarine Flotilla passed the island, a pair of lights (possibly minesweeping naval trawlers) were seen approaching the line of submarines. The flotilla altered course sharply to port to avoid them, but the helm of the third-in-line K14 jammed for six minutes and she veered out of line. Both K14 and the boat behind her, K12 turned on their navigation lights. Eventually K14s helm was freed and she tried to return to her position in the line. The next submarine in line, K22, had lost sight of the rest of the flotilla in the mist and veered off the line, with the result that she hit K14 at 19:17 hours, severing the bow and breaching the forward mess deck, where two men were killed. Both stricken submarines stopped and carefully pulled themselves apart whilst the rest of the flotilla, unaware of what had happened, continued out to sea.
K22 radioed in code to the cruiser leading the flotilla to say that she could reach port but that K14 was crippled and sinking.[3]
About fifteen minutes later, the 2nd Battlecruiser Squadron passed the island and the two submarines. The captain of K22 ordered the firing of a red Very light, which ensured three of the four battlecruisers were able to avoid both submarines. However, the battlecruiser Inflexible bringing up the rear struck K22 a glancing blow at 19:43 hours before continuing on her way. The battlecruiser bent the first 30 feet (9.1 m) of the bow of K22 at right angles and wrecked the ballast and fuel tanks. She settled by the bow until only the conning tower showed.
Meanwhile, Leir, captain of Ithuriel, had received and decoded the message about the first collision between the two submarines and turned back to help them. Leir sent an encoded message to the flag officer on HMS Australia at 20:40 hours, warning them of what was happening. "Submarines K-12 and K-22 have been in collision and are holed forward. I am proceeding to their assistance with 13th Submarine Flotilla. Position 18 miles east magnetic from May Island".[4]
This could have made a difference and prevented the loss of at least some of those in the water, except that the primitive technology of the time meant that transmission was delayed until 21:20.[2] The submarines behind Ithuriel turned to follow her, and the flotilla headed back towards the 2nd Battlecruiser Squadron, which then passed through the flotilla. It was only through emergency turns by both groups of vessels that further accidents were narrowly avoided.
As the 13th Flotilla reached the Isle of May, they encountered the outbound 12th Submarine Flotilla. Fearless, the leader of the 12th Flotilla, loomed out of the mist, and upon sighting the 13th flotilla attempted to avoid them by going "hard astern" and sounding the related alarm, but the cruiser was moving too fast to do so and collided with the starboard side of K17 at approximately 20:32 hours.K17 then sank within a few minutes, although most of her crew were able to jump overboard. Fearless launched her boats in a failed attempt to rescue any survivors, but the few found were recovered by one of the other submarines. The bulkheads bow of Fearless had to be shored up to prevent further flooding, but she was not in any danger of sinking and returned to Rosyth at a very slow speed.[5] She was repaired and survived the war.
Upon hearing the sirens raised by Fearless which signalled that she had stopped, K4 also came to a stop, but the trailing boats did not. K3 narrowly missed K4 and then stopped three cables further on, but K6, despite going full astern, could not avoid a collision, ramming the broadside of K4 at 20:36 hours and nearly cutting the latter in half. The seriously damaged K4 sank with all of her crew; while going down, she was hit by K7 at 20:38 hours.
At this point the 5th Battle Squadron of three battleships and their destroyers passed through the area, unaware of what had happened, with some of the destroyers cutting down the survivors of K17 struggling in the water. Only nine of the 56 men originally on board the submarine survived, and one of these died of his injuries shortly afterwards.[6]
Within 75 minutes, the submarines K17 and K4 had been sunk, and K6, K7, K14, K22 and Fearless had been damaged.[7]
K14 was taken in tow by HMS Venetia and reached port.
Aftermath
A total of 104 lives were lost during the "Battle of May Island"; 55 from K4, 47 from K17, and two from K14.
The subsequent hastily-convened Court of Inquiry began on 5 February 1918 and sat for five days. The Court of Inquiry released its final report on 19 February 1918, in which it placed the blame for the incident on Leir and four officers on the K boats.[8] They recommended that Leir be court martialed.[9] The case of negligence against Leir for the loss of K-17 was "not proved". Both the investigation and court martial were kept quiet, with much of the information not released until 1994, by which time all of the participants had died, to avoid embarrassment to the Navy.[10][2]
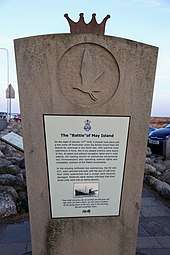
A memorial cairn was erected 84 years later, on 31 January 2002, at Anstruther harbour opposite the Isle of May.[11] The Submariners' Association holds an annual commemorative service to honour the loss of life.[1]
Wrecks
In 2011, surveyors conducting a detailed preparatory survey of the sea floor for the Neart Na Gaoithe offshore wind farm published sonar images of the wrecks of the two submarines, K-4 and K-17 sunk during the accident.[12][2] The site of the two sunken submarines, 100 metres apart and about 50 metres down, has long been known, but the wrecks have now been officially surveyed by divers from the specialist marine consultants EMU.
See also
- Battle of Barking Creek, a 1939 friendly-fire aviation incident
Notes
- Bates 2011
- Winson, Mark (May 2018), "Remembering the Battle of the Isle of May a Century Ago", Ships Monthly: 20–21
- Hutchinson 2001, pp. 64–67
- Nash, pp. 62.
- Nash, pp. 44–45, 50, 52–58, 63–64, 68–69
- Gray 1996, p. 246
- Nash 2009, p. 72
- Nash 2009, pp. 84–87
- Gray, Edwyn (2006). Disasters of the Deep: A Comprehensive Survey of Submarine Accidents & Disasters. Barnsley: Pen and Sword Military. ISBN 9780850529876. Page 95
- Cockburn, Paul (24 March 2018). "HM Submarine K4 & HM Submarine K17 "Battle" Of May Island". Paul Cockburn. Retrieved 30 November 2018.
- "HM Submarine K4 & HM Submarine K17 "Battle" Of May Island". Imperial War Museum. 11 June 2017. Retrieved 30 November 2018.
- Macdonell 2011
References
- Bates, Stephen (29 August 2011). "Divers survey Scottish graveyard of first world war submarine disaster". The Guardian. Retrieved 2 February 2018.CS1 maint: ref=harv (link)
- Gray, Edwyn (1996). Few Survived: A History of Submarine Disasters. Pen and Sword Books. ISBN 9780850524994.CS1 maint: ref=harv (link) - Total pages: 288
- Hutchinson, Robert (2001). Jane's Submarines. War Beneath the Waves from 1776 to the Present Day. Ted Smart. ISBN 9780007653331.CS1 maint: ref=harv (link)
- Macdonell, Hamish (13 August 2011). "Sea search stumbles upon submarines Navy tried to forget". The Times. Retrieved 2 February 2018.CS1 maint: ref=harv (link)
- Nash, N.S. (2009). K Boat Catastrophe: Eight Ships and Five Collisions: The full story of the "Battle" of the Isle of May. Pen and Sword Books. ISBN 9781844159840.CS1 maint: ref=harv (link) - Total pages: 224