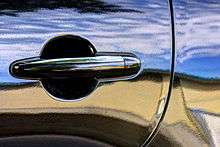
Orange peel (effect)
Orange peel is a certain kind of finish that may develop on painted and cast surfaces, even screen protectors.[1] The texture resembles the surface of the skin of an orange, hence the name "Orange peel". Gloss paint sprayed on a smooth surface (such as the body of a car) should also dry into a smooth surface. However, various factors can cause it to dry into a bumpy surface resembling the texture of an orange peel. The orange peel phenomenon can then be smoothed out with ultra-fine sandpaper, but it can be prevented altogether by changing the painting technique or the materials used. Orange peel is typically the result of improper painting technique, and is caused by the quick evaporation of thinner, incorrect spray gun setup (e.g., low air pressure or incorrect nozzle), spraying the paint at an angle other than perpendicular, or applying excessive paint.

In some situations, such as interior house paint, the orange peel texture is desirable. In this case, a texture paint is generally applied with a spray gun. The texture is then painted over with the appropriate color. When painting walls, orange peel can also develop by using a roller with too little paint or too thick a paint and the surface dries before the texture can level.
Measurement
The instruments used to measure orange peel simulate visual perception. Like our eyes, the instruments optically scan the wavy light/dark pattern. Two types of instruments are available to quantify the texture or waviness of a surface:
Orange peel meter
The orange peel meter uses a laser point light source to illuminate the specimen at a 60° angle and uses a detector to measure the reflected light intensity at the equal but opposite angle. The instrument is rolled across the surface and measures point by point the optical profile of the surface across a defined distance. The instruments analyse the structures according to their size. In order to simulate the human eye's resolution at various distances, the measurement signal is divided into several ranges using mathematical filter functions:
- Wa 0.1 ..... 0.3 mm wavelength
- Wb 0.3 ........ 1 mm wavelength
- Wc 1............ 3 mm wavelength
- Wd 3 ......... 10 mm wavelength
- We 10 ....... 30 mm wavelength
- SW 0.3 ..... 1.2 mm wavelength
- LW 1.2....... 12 mm wavelength
Simplified Measurement Diagram
Structures smaller than 0.1 mm also influence visual perception, therefore the instruments use a CCD camera to measure the diffused light caused by these fine structures. This parameter is referred to as "dullness".
The values of dullness and Wa to We form a "structure spectrum". This allows a detailed analysis of orange peel and its influencing factors, being material or application parameters. Example of a "structure spectrum"
The detailed information of the structure spectrum as well as LW and SW became the basis to correlate to specific scales and to the DOI as described in ASTM E430.
Phase stepped deflectometer
Phase stepped deflectometry (PSD) is a white light optical technique that uses a fringe pattern projected from a high definition screen to capture the reflected image of the pattern using a high definition camera. The sinusoidal waveform acts like a ruler over the surface allowing the relative ordinates of the light source points to be quantified as they are proportional to the spatial phase of the sinusoidal pattern waveform. By using a standard technique known as “phase stepping” accurate measurement of each point across the surface can be made through quantifying the corresponding point per pixel on the camera.
Using the known geometric relationship between the display, the object surface and the camera, light rays reflected from the surface can be spatially modelled to calculate the direction of the normal at each point of the surface thereby allowing the profile at that point to be obtained. By displaying the sinusoidal waveform in both horizontal and vertical directions the surface slopes can be determined in both orthogonal directions.
By differentiating the measurement data the curvature field can be calculated allowing accurate characterisation of a surface profile. To simulate the human eye's resolution at various distances the specific band pass filtering is applied to the curvature data separating the structure data according to size:
- Ka 0.1 ..... 0.3 mm wavelength
- Kb 0.3 ........ 1 mm wavelength
- Kc 1............ 3 mm wavelength
- Kd 3 ......... 10 mm wavelength
- Ke 10 ....... 30 mm wavelength
- Ks 0.3 ..... 1.2 mm wavelength
- Kl 1.2....... 12 mm wavelength
This information is then converted into texture data (waviness) by applying standardised equations. Unlike other slope and curvature measurement methods, PSD is a full-field technique that does not require any mechanical movement of the device nor translation of the sensor or the surface under test; all angular and positioning errors related to this translation are therefore avoided.
References
- KS (spin casting alloy), retrieved 2008-03-15.
External links
- Dupont Performance Coatings - includes photos of orange peel paint