Microstructure
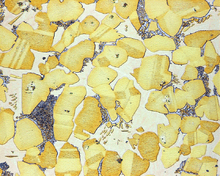
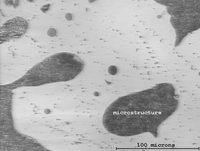
Microstructure is the very small scale structure of a material, defined as the structure of a prepared surface of material as revealed by an optical microscope above 25× magnification.[1] The microstructure of a material (such as metals, polymers, ceramics or composites) can strongly influence physical properties such as strength, toughness, ductility, hardness, corrosion resistance, high/low temperature behaviour or wear resistance. These properties in turn govern the application of these materials in industrial practice.


Microstructure at scales smaller than that can be viewed with optical microscopes is often called nanostructure, while the structure in which individual atoms are arranged is known as crystal structure. The nanostructure of biological specimens is referred to as ultrastructure. A microstructure’s influence on the mechanical and physical properties of a material is primarily governed by the different defects present or absent of the structure. These defects can take many forms but the primary ones are the pores. Even if those pores play a very important role in the definition of the characteristics of a material, so does its composition. In fact, for many materials, different phases can exist at the same time. These phases have different properties and if managed correctly, can prevent the fracture of the material.
Methods
The concept of microstructure is observable in macrostructural features in commonplace objects. Galvanized steel, such as the casing of a lamp post or road divider, exhibits a non-uniformly colored patchwork of interlocking polygons of different shades of grey or silver. Each polygon is a single crystal of zinc adhering to the surface of the steel beneath. Zinc and lead are two common metals which form large crystals (grains) visible to the naked eye. The atoms in each grain are organized into one of seven 3d stacking arrangements or crystal lattices (cubic, tetrahedral, hexagonal, monoclinic, triclinic, rhombohedral and orthorhombic). The direction of alignment of the matrices differ between adjacent crystals, leading to variance in the reflectivity of each presented face of the interlocked grains on the galvanized surface. The average grain size can be controlled by processing conditions and composition, and most alloys consist of much smaller grains not visible to the naked eye. This is to increase the strength of the material (see Hall-Petch Strengthening).
Microstructure Characterizations
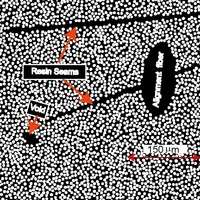
To quantify microstructural features, both morphological and material property must be characterized. Image processing is a robust technique for determination of morphological features such as volume fraction,[2] inclusion morphology,[3] void and crystal orientations. To acquire micrographs, optical as well as electron microscopy are commonly used. To determine material property, Nanoindentation is a robust technique for determination of properties in micron and submicron level for which conventional testing are not feasible. Conventional mechanical testing such as tensile testing or dynamic mechanical analysis (DMA) can only return macroscopic properties without any indication of microstructural properties. However, nanoindentation can be used for determination of local microstructural properties of homogeneous as well as heterogeneous materials.[4] Microstructures can also be characterized using high-order statistical models through which a set of complicated statistical properties are extracted from the images. Then, these properties can be used to produce various other stochastic models.[5][6][7]
Microstructure Generation
Computer-simulated microstructures are generated to replicate the microstructural features of actual microstructures. Such microstructures are referred to as synthetic microstructures. Synthetic microstructures are used to investigate what microstructural feature is important for a given property. To ensure statistical equivalence between generated and actual microstructures, microstructures are modified after generation to match the statistics of an actual microstructure. Such procedure enables generation of theoretically infinite number of computer simulated microstructures that are statistically the same (have the same statistics) but stochastically different (have different configurations).[8][9]

Influence of pores and composition
A pore in a microstructure, unless desired, is a disadvantage for the properties. In fact, in nearly all of the materials, a pore will be the starting point for the rupture of the material. It is the initiation point for the cracks. Furthermore, a pore is usually quite hard to get rid of. Those techniques described later involve a high temperature process. However, even those processes can sometimes make the pore even bigger. Pores with large coordination number (surrounded by many particles) tend to grow during the thermal process. This is caused by the thermal energy being converted to a driving force for the growth of the particles which will induce the growth of the pore as the high coordination number prohibits the growth towards the pore. For many materials, it can be seen from their phase diagram that multiple phases can exist at the same time. Those different phases might exhibit different crystal structure, thus exhibiting different mechanical properties.[11] Furthermore, these different phases also exhibit a different microstructure (grain size, orientation).[12] This can also improve some mechanical properties as crack deflection can occur, thus pushing the ultimate breakdown further as it creates a more tortuous crack path in the coarser microstructure.[13]
Improvement techniques
In some cases, simply changing the way the material is processed can influence the microstructure. An example is the titanium alloy TiAl6V4.[14] Its microstructure and mechanical properties are enhanced using SLM (selective laser melting) which is a 3D printing technique using powder and melting the particles together using high powered laser.[15] Other conventional techniques for improving the microstructure are thermal processes.[16] Those processes rely in the principle that an increase in temperature will induce the reduction or annihilation of pores.[17] Hot isostatic pressing (HIP) is a manufacturing process, used to reduce the porosity of metals and increase the density of many ceramic materials. This improves the material's mechanical properties and workability.[18] The HIP process exposes the desired material to an isostatic gas pressure as well as high temperature in a sealed vessel (high pressure). The gas used during this process is mostly Argon. The gas needs to be chemically inert so that no reaction occurs between it and the sample. The pressure is achieved by simply applying heat to the hermetically sealed vessel. However, some systems also associate gas pumping to the process to achieve the required pressure level. The pressure applied on the materials is equal and comes from all directions (hence the term “isostatic”).[19] When castings are treated with HIP, the simultaneous application of heat and pressure eliminates internal voids and microporosity through a combination of plastic deformation, creep, and diffusion bonding; this process improves fatigue resistance of the component.[20]
See also
- Crystallite
- Abnormal grain growth
- Fractography
- Grain boundary – concept in materials science
- Metallurgy – Domain of materials science that studies the physical and chemical behavior of metals
- Micrography
- Micrograph
References
- Adapted from ASM Metals Handbook, Ninth Edition, v. 9, "Metallography and Microstructures", American Society for Metals, Metals Park, OH, 1985, p. 12.
- https://www.researchgate.net/publication/279771139_Uncorrelated_volume_element_for_stochastic_modeling_of_microstructures_based_on_local_fiber_volume_fraction_variation
- https://www.researchgate.net/publication/305803249_Characterization_synthetic_generation_and_statistical_equivalence_of_composite_microstructures
- https://www.researchgate.net/publication/292208855_Length-scale_dependence_of_variability_in_epoxy_modulus_extracted_from_composite_prepreg
- Tahmasebi, Pejman (2018-02-20). "Accurate modeling and evaluation of microstructures in complex materials". Physical Review E. 97 (2): 023307. doi:10.1103/PhysRevE.97.023307. PMID 29548238.
- Tahmasebi, Pejman (2018). "Nanoscale and multiresolution models for shale samples". Fuel. 217: 218–225. doi:10.1016/j.fuel.2017.12.107.
- Tahmasebi, Pejman; Sahimi, Muhammad (2018-06-29). "A stochastic multiscale algorithm for modeling complex granular materials". Granular Matter. 20 (3). doi:10.1007/s10035-018-0816-z. ISSN 1434-5021.
- https://www.researchgate.net/publication/305803249_Characterization_synthetic_generation_and_statistical_equivalence_of_composite_microstructures
- Tahmasebi, Pejman (2018-02-20). "Accurate modeling and evaluation of microstructures in complex materials". Physical Review E. 97 (2). doi:10.1103/physreve.97.023307. ISSN 2470-0045.
- https://www.researchgate.net/publication/305803249_Characterization_synthetic_generation_and_statistical_equivalence_of_composite_microstructures
- Oberwinkler, B., Modeling the fatigue crack growth behavior of Ti-6Al-4V by considering grain size and stress ratio. Materials Science and Engineering: A 2011, 528 (18), 5983-5992.
- Sieniawski, J.; Ziaja, W.; Kubiak, K.; Motyka, M., Microstructure and mechanical properties of high strength two-phase titanium alloys. Titanium Alloys-Advances in Properties Control 2013, 69-80.
- Nalla, R.; Boyce, B.; Campbell, J.; Peters, J.; Ritchie, R., Influence of microstructure on high-cycle fatigue of Ti-6Al-4V: bimodal vs. lamellar structures. Metallurgical and Materials Transactions A 2002, 33 (13), 899-918.
- Henriques, V. A. R.; Campos, P. P. d.; Cairo, C. A. A.; Bressiani, J. C., Production of titanium alloys for advanced aerospace systems by powder metallurgy. Materials Research 2005, 8 (4), 443-446.
- Kruth, J.-P.; Mercelis, P.; Van Vaerenbergh, J.; Froyen, L.; Rombouts, M., Binding mechanisms in selective laser sintering and selective laser melting. Rapid prototyping journal 2005, 11 (1), 26-36.
- Murr, L.; Quinones, S.; Gaytan, S.; Lopez, M.; Rodela, A.; Martinez, E.; Hernandez, D.; Martinez, E.; Medina, F.; Wicker, R., Microstructure and mechanical behavior of Ti–6Al–4V produced by rapid-layer manufacturing, for biomedical applications. Journal of the mechanical behavior of biomedical materials 2009, 2 (1), 20-32.
- Kasperovich, G.; Hausmann, J., Improvement of fatigue resistance and ductility of TiAl6V4 processed by selective laser melting. Journal of Materials Processing Technology 2015, 220, 202-214.
- Lin, C. Y.; Wirtz, T.; LaMarca, F.; Hollister, S. J., Structural and mechanical evaluations of a topology optimized titanium interbody fusion cage fabricated by selective laser melting process. Journal of Biomedical Materials Research Part A 2007, 83 (2), 272-279.
- Leuders, S.; Thöne, M.; Riemer, A.; Niendorf, T.; Tröster, T.; Richard, H.; Maier, H., On the mechanical behaviour of titanium alloy TiAl6V4 manufactured by selective laser melting: Fatigue resistance and crack growth performance. International Journal of Fatigue 2013, 48, 300-307.
- Larker, H. T.; Larker, R., Hot isostatic pressing. Materials Science and Technology 1991.
