Glossmeter
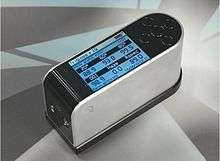
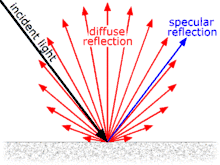
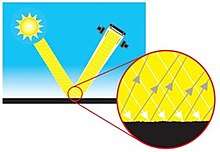
A glossmeter (also gloss meter) is an instrument which is used to measure specular reflection gloss of a surface. Gloss is determined by projecting a beam of light at a fixed intensity and angle onto a surface and measuring the amount of reflected light at an equal but opposite angle.

There are a number of different geometries available for gloss measurement, each being dependent on the type of surface to be measured. For non-metals such as coatings and plastics the amount of reflected light increases with a greater angle of illumination, as some of the light penetrates the surface material and is absorbed into it or diffusely scattered from it depending on its colour. Metals have a much higher reflection and are therefore less angularly dependent.
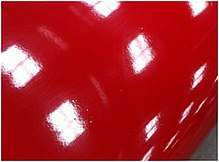
Many international technical standards are available that define the method of use and specifications for different types of glossmeter used on various types of materials including paint, ceramics, paper, metals and plastics. Many industries use glossmeters in their quality control to measure the gloss of products to ensure consistency in their manufacturing processes. The automotive industry is a major user of the glossmeter, with applications extending from the factory floor to the repair shop.
History

Of the many internationally recorded publications relating to gloss measurement, the earliest recorded studies (perceived and instrumental) are attributed to Ingersoll,[1] who in 1914 developed a means to measure the glare of paper. The Ingersoll “Glarimeter”, the earliest known instrument developed for gloss measurement, was based on the principle that light is polarised in specular reflection. The instrument employed incident and viewing angles of 57.5° and used a contrast method to subtract the specular component from the total reflection using a polarising element. Ingersoll successfully applied for and patented this instrument a few years later in 1917.
In 1922 Jones,[2] during his study of gloss of photographic papers using goniophotometry, developed a glossmeter based on his research, which provided closer correlation to gloss ratings assigned by visual evaluation. Jones’ glossmeter used a geometric configuration of 45°/0°/45° whereby the surface was illuminated at 45° and two incident reflective angles measured and compared at 0° (diffuse reflectance) and 45° (diffuse plus specular reflectance). Jones was the first to emphasize the importance of using goniophotometric measurements in studies of gloss.
Early work in 1925 by Pfund[3] led to the development of a variable angle "glossimeter" to measure specular gloss which was later patented in 1932. Pfund's instrument, allowed the angle of measurement to be varied, but maintained the angle of view to the angle of illumination. Reflected light was measured using a pyrometer lamp as a photometer. The ‘glossimeter’ was the first to use black glass standards as a basis for reflectance setting. As the angle was variable this instrument could also be used for the measurement of sheen or specular gloss at near grazing angles.

During this time, growing interest in this field resulted in a number of similar studies by other individuals each having their own method for gloss measurement, most of which published as technical articles in scientific journals of that time. A few of these also resulted in patents.
In 1937 Hunter, as part of a research project for the U.S. National Bureau of Standards, produced a paper on the methods of determining gloss. In this paper he discussed instruments that were available at the time (including the ones mentioned previously) in relation to the classification of six different types of gloss. In this paper Hunter also detailed the general requirements for a standardised glossmeter. Standardisation in gloss measurement was led by Hunter and ASTM (American Society for Testing and Materials) who produced ASTM D523 Standard test method for specular gloss in 1939. This incorporated a method for measuring gloss at a specular angle of 60°. Later editions of the Standard (1951) included methods for measuring at 20° (high gloss) and 85° (matt, or low, gloss). ASTM has a number of other gloss-related standards designed for application in specific industries.
In the paint industry, measurements of specular gloss are made according to International Standard ISO 2813. This standard is equivalent to national standards ASTM D523 (United States), BS 3900, Part 5 (United Kingdom); DIN 67530 (Germany), NFT 30-064 (France), AS 1580 (Australia), JIS Z8741 (Japan).
Construction
A typical glossmeter consists of a fixed mechanical assembly comprising a standardised light source that projects a parallel beam of light onto the test surface to be measured and a filtered detector located to receive the rays reflected from the surface. The ASTM Method states that the illumination should be defined such that the source-detector combination is spectrally corrected to give the CIE luminous efficiency, V(?), with CIE illuminant SC.[4]

A number of instruments are commercially available that conform to the above standards in terms of their measurement geometry. The instruments are calibrated using reference standards that are usually made from highly polished, plane, black glass with a refractive index of 1.567 for the Sodium D line, and these are assigned a gloss value of 100 for each geometry.[5]
Measurement and angle selection

The glossmeter provides a quantifiable way of measuring gloss intensity ensuring consistency of measurement by defining the precise illumination and viewing conditions.[6] The configuration of both illumination source and observation reception angles allows measurement over a small range of the overall reflection angle. The measurement results of a glossmeter are related to the amount of reflected light from a black glass standard with a defined refractive index. The ratio of reflected to incident light for the specimen, compared to the ratio for the gloss standard, is recorded as gloss units (GU).
Measurement angle refers to the angle between the incident light and the perpendicular. Three measurement angles (20°, 60°, and 85°) are specified to cover the majority of industrial coatings applications. The angle is selected based on the anticipated gloss range, as shown in the following table.
| Gloss Range | 60° Value | Notes |
| High Gloss | >70 GU | If measurement exceeds 70 GU, change test setup to 20° |
| Medium Gloss | 10 - 70 GU | |
| Low Gloss | <10 GU | If measurement is less than 10 GU, change test setup to 85° |
For example, if the measurement made at 60° is greater than 70 GU, the measurement angle should be changed to 20° to optimise measurement accuracy. Three types of instruments are available on the market: 60° single angle instruments, a combination of 20° and 60° and one type that combines 20°, 60° and 85°.
Two additional angles are used for other materials. An angle of 45° is specified for the measurement of ceramics, films, textiles and anodised aluminium, whilst 75° is specified for paper and printed materials.
Gloss units
The measurement scale, gloss units (GU), of a glossmeter is a scaling based on a highly polished reference black glass standard with a defined refractive index having a specular reflectance of 100GU at the specified angle.
This standard is used to establish an upper point calibration of 100 with the lower end point established at 0 on a perfectly matte surface. This scaling is suitable for most non-metallic coatings and materials (paints and plastics) as they generally fall within this range. For other materials, highly reflective in appearance (mirrors, plated / raw metal components), higher values can be achieved reaching 2000 Gloss Units. For transparent materials, these values can also be increased due to multiple reflections within the material. For these applications it is common to use percent reflection of incident light rather than gloss units.
Standards
| Standard | 20° | 60° | 85° | 45° | 75° |
| High Gloss | Medium Gloss | Low Gloss | Medium Gloss | Low Gloss | |
| Coatings, plastics and related materials | Ceramics | Paper | |||
| ASTM C346 | X | ||||
| ASTM D523 | X | X | X | ||
| ASTM C584 | X | ||||
| ASTM D2457 | X | X | X | ||
| BS3900 D5 | X | X | X | ||
| DIN 67530 | X | X | X | ||
| DIN EN ISO 2813 | X | X | X | ||
| EN ISO 7668 | X | X | X | X | |
| JI Z 8741 | X | X | X | X | X |
| TAPPI T480 | X | ||||
Calibration
Each glossmeter is set up by the manufacturer to be linear throughout its measuring range by calibrating to a set of master calibration tiles traceable to BAM Federal Institute for Materials Research or similar organisations.
In order to maintain the performance and linearity of the glossmeter it is recommended to use a checking standard tile. This standard tile has assigned gloss unit values for each angle of measurement which are also traceable to National Standards such as BAM Federal Institute for Materials Research. The instrument is calibrated to this checking standard which is commonly referred to as a 'calibration tile' or 'calibration standard'. The interval of checking this calibration is dependent on the frequency of use and the operating conditions of the glossmeter.
It has been seen that standard calibration tiles kept in optimum conditions can become contaminated and change by a few gloss units over a period of years. Standard tiles which are used in working conditions will require regular calibration or checking by the instrument manufacturer or glossmeter calibration specialist.
A period of one year between standard tile recalibration should be regarded as a minimum period. If a calibration standard becomes permanently scratched or damaged at any time it will require immediate recalibration or replacement as the glossmeter may give incorrect readings.
International standards state that it is the tile that is the calibrated and a traceable artefact not the glossmeter. However it is often recommended by manufacturers that the instrument also be checked to verify its operation on a frequency dependent on the operating conditions.
Development

The glossmeter is a useful instrument for measuring the gloss of a surface. However, it is not sensitive to other common effects which reduce appearance quality such as haze and orange peel.
Haze is caused by microscopic surface structure which slightly changes the direction of a reflected light causing a bloom adjacent to the specular (gloss) angle. The surface has less reflective contrast and a shallow milky effect.
Orange peel is caused by an uneven surface formation of large surface structures distorting the reflected light.

Two high gloss surfaces can measure identically with a standard glossmeter but can be visually very different. Instruments are available to quantify orange peel by measuring distinctness of image (DOI) or reflected image quality (RIQ) and haze.
Applications
The glossmeter is adopted by many industries, from paper mills to automotive and is used at each stage of the manufacturing process from goods receipt through to final inspection. Examples include: paints; powder and wood coatings; additives; inks; plastics; automative, glass, and yacht manufacturing; aerospace, polished stone and metal; consumer electronics; and anodised metals.
See also
- Paint sheen – The glossiness of a paint finish
- Visual appearance
- Drawdown card – Tool for assessing opacity and contrast ratio of coatings
References
- Ingersoll, L.R. (1914) A means to measure the glare of paper, Electr. World, 63, 645-647; Ingersoll, R. S. The Glarimeter - An instrument for measuring the gloss of paper, J. Opt. Soc. Am. 5, 213 (1921); Elec. World 63,645 (1914), Elec. World 64, 35 (1915); Paper 27, 18 (Feb. 9, 1921), and U. S. Patent 1225250 (May 8, 1917).
- Jones, L. A. The gloss characteristics of photographic papers, J. Opt. Soc. Am. 6, 140 (1922); see also British J. Photography, p. 216 (April 14, 1922).
- Pfund, A. H. Physical tests of varnishes, Proc. Am. Soc. Testing Materials 25, II, 396 (1925).
- CIE Publication No. 15.2, Colorimetry, Vienna, 1986
- NPL Report Gloss Measurements at NPL, A R Hanson, J A F Taylor, MA Basu, D C Williams, J Zwinkels, W Czepluch, 2000 – See p. 38.
- Hunter, R.S. "Methods of Determining Gloss" NBS Research Paper RP 958