Flexography
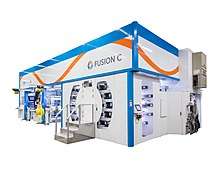
Flexography (often abbreviated to flexo) is a form of printing process which utilizes a flexible relief plate. It is essentially a modern version of letterpress, evolved with high speed rotary functionality, which can be used for printing on almost any type of substrate, including plastic, metallic films, cellophane, and paper. It is widely used for printing on the non-porous substrates required for various types of food packaging (it is also well suited for printing large areas of solid colour).
| Part of a series on the | ||||||||||||||||||||||||||||||||||||||||||||||||||||||
| History of printing | ||||||||||||||||||||||||||||||||||||||||||||||||||||||
|---|---|---|---|---|---|---|---|---|---|---|---|---|---|---|---|---|---|---|---|---|---|---|---|---|---|---|---|---|---|---|---|---|---|---|---|---|---|---|---|---|---|---|---|---|---|---|---|---|---|---|---|---|---|---|
 | ||||||||||||||||||||||||||||||||||||||||||||||||||||||
|
||||||||||||||||||||||||||||||||||||||||||||||||||||||
History
In 1890, the first such patented press was built in Liverpool, England by Bibby, Baron and Sons. The water-based ink smeared easily, leading the device to be known as "Bibby's Folly". In the early 1900s, other European presses using rubber printing plates and aniline oil-based ink were developed. This led to the process being called "aniline printing". By the 1920s, most presses were made in Germany, where the process was called "gummidruck", or rubber printing. In modern-day Germany, it is continued to be called the process "gummidruck".
During the early part of the 20th century, the technique was used extensively in food packaging in the United States. However, in the 1940s, the Food and Drug Administration classified aniline dyes as unsuitable for food packaging. Printing sales plummeted. Individual firms tried using new names for the process, such as "Lustro Printing" and "Transglo Printing", but met with limited success. Even after the Food and Drug Administration approved the aniline process in 1949 using new, safe inks, sales continued to decline as some food manufacturers still refused to consider aniline printing. Worried about the image of the industry, packaging representatives decided the process needed to be renamed.
In 1951 Franklin Moss, then the president of the Mosstype Corporation, conducted a poll among the readers of his journal The Mosstyper to submit new names for the printing process. Over 200 names were submitted, and a subcommittee of the Packaging Institute's Printed Packaging Committee narrowed the selection to three possibilities: "permatone process", "rotopake process", and "flexographic process". Postal ballots from readers of The Mosstyper overwhelmingly chose the last of these, and "flexographic process" was chosen.[1]
Evolution
Originally, flexographic printing was rudimentary in quality. Labels requiring high quality have generally been printed using the offset process until recently. Since 1990,[2] great advances have been made to the quality of flexographic printing presses, printing plates, ink systems and printing inks.
The greatest advances in flexographic printing have been in the area of photopolymer printing plates, including improvements to the plate material and the method of plate creation.
Digital direct to plate systems have seen a good improvement in the industry recently. Companies like DuPont, Kodak and Esko have pioneered the latest technologies, with advances in fast washout and the latest screening technology.
Laser-etched ceramic anilox rolls along with chambered ink systems, have also played a part in the improvement of print quality. Full-color picture printing is now possible, and some of the finer presses available today, in combination with a skilled operator, allow quality that rivals the lithographic process. One ongoing improvement has been the increasing ability to reproduce highlight tonal values, thereby providing a workaround for the very high dot gain associated with flexographic printing.
Process overview
1. Platemaking[3]
The first method of plate development uses light-sensitive polymer. A film negative is placed over the plate, which is exposed to ultra-violet light. The polymer hardens where light passes through the film. The remaining polymer has the consistency of chewed gum. It is washed away in a tank of either water or solvent. Brushes scrub the plate to facilitate the "washout" process. The process can differ depending on whether solid sheets of photopolymer or liquid photopolymer are used, but the principle is still the same. The plate to be washed out is fixed in the orbital washout unit on a sticky base plate. The plate is washed out in a mixture of water and 1% dishwasher soap, at a temperature of approximately 40 °C. The unit is equipped with a dual membrane filter. With this the environmental burdening is kept to an absolute minimum. The membrane unit separates photopolymer from the washout water. After addition of absorb gelatine for example, the photopolymer residue can be disposed of as standard solid waste together with household refuse. The recycled water is re-used without adding any detergent.[4]
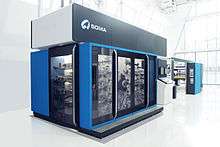
The second method uses a computer-guided laser to etch the image onto the printing plate. Such a direct laser engraving process is called digital platemaking. Companies such as AV Flexologic, Glunz & Jensen, Xeikon, Esko, Kodak, Polymount, Screen and SPGPrints from The Netherlands are market leaders in manufacturing this type of equipment.
The third method is to go through a molding process. The first step is to create a metal plate out of the negative of our initial image through an exposition process (followed by an acid bath). In the early days the metal used was zinc, leading to the name 'zincos'. Later, magnesium was used. This metal plate in relief is then used in the second step to create the mold that could be in bakelite board or even glass or plastic, through a first molding process. Once cooled, this master mold will press the rubber or plastic compound (under both controlled temperature and pressure) through a second molding process to create the printing plate or cliche.
2. Mounting
For every colour to be printed, a plate is made and eventually put on a cylinder which is placed in the printing press. To make a complete picture, regardless of printing on flexible film or corrugated paper, the image transferred from each plate has to register exactly with the images transferred from the other colors. To ensure an accurate picture is made, mounting marks are made on the flexographic plates. These mounting marks can be microdots (down to 0.3 mm) and/or crosses. Special machinery is made for mounting these plates on the printing cylinders to maintain registration. Earle L. Harley invented and patent the Opti-Chek Mounting and Proofing machine enabling the operator to check the registration before going to the press.
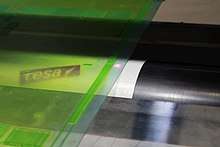
Precision mounting is critical for producing good quality print which is in the register and has a direct impact on minimizing waste. The mounting process needs to deliver the same accurate result each time a job is mounted, consistent accuracy is the target. For simplicity we'll refer to print sleeves throughout this module but you can substitute cylinders if these are used in your operation.
Generally plates are mounted directly onto the print sleeve but for corrugated operations, plates are mounted onto a carrier sheet that is fixed to the print sleeve in the press when required, it is removed and kept in storage between print runs. You'll find out about carriers in the corrugated section of this module.
There are two key areas to achieve effective plate mounting, positioning the plate correctly and achieving a good bond.
Positioning is achieved by correctly lining up register marks that are common to each plate in the set. The skill is to plan carefully exactly where these marks should be. A variety of marks can be used, register crosses and micro dots. A good bond is achieved by means of special mounting tape. Accurate positioning is essential or the images of each colour will not be superimposed correctly, they will be out of register.
Types of registration marks
These are various types of mark used for aligning the plates correctly:
Registration crosses are commonly used but need to be positioned in waste areas as they are easily seen on the print, they can also be used as a guide for aligning the print to a bag or box structure if this is required.
Micro dots as the name suggests are tiny dots on the plate, usually about a quarter of a millimeter across in labels and flexible packaging but 1mm diameter in corrugated. Since they are so small they don't have to be in waste areas as they are not easily seen.
On most mounting machines the dots or crosses on the plates are lined up using magnifying cameras, the higher the magnification the greater the accuracy.
Register crosses are more common in label and corrugated printing where waste and hidden folds are normal, the microdot is common in flexible packaging where waste is kept to a minimum and no un-required marks are to be seen on the packaging (example meat, dairy and hygiene).
The location of registration marks, whether crosses or microdots, is essential to the success of plate mounting. If they are incorrect, mounting can be difficult, time consuming and inaccurate, so they need to be planned carefully. The marks should be positioned symmetrically
Always have a pair positioned in the middle of the plate in line with the sleeve axis. It is also recommended to have two more pairs, one at either end so a simple rotation and check under the cameras confirms the plate has not twisted when it was laid/stuck down.
Register Mark Mounting
The most common form of mounting is register mark - also known as video mounting. When the print is run the register marks should print on top of each other indicating that the plates are correctly aligned. The register marks on the plate are lined up using magnifying cameras.
To align the plates accurately a mounting system using video cameras is required. Each print sleeve is transferred to the mounting system in turn.
Each sleeve is fixed in the mounter by a clamping system and mounting tape is then applied to the sleeve.
The high magnification video cameras (positioned on a precision machined camera beam) are moved into the required position for the plate to be mounted, accurate measurement of this setting is critical. The plate is then adhered to the sleeve using a mounting tape (see item 5) and the complete unit removed from the mounting machine.
The next sleeve is loaded and the plate mounted in position by positioning the register marks on the plate based on the previously fixed camera positions. This ensures that every plate is mounted in the same position and thus the print is in register.
The same principle is applied for multiple plates across the sleeve and so either two cameras per plate are used or two cameras are used which move into the correct position driven by servo motors and camera setting software. To step plates around the sleeve to minimise risk of bounce is done either mechanically using an index disc or by use of stepper motors to drive and lock it in position.
Each plate is mounted on a double sided adhesive tape - there are many types of mounting tape and it is important to use the correct thickness and hardness. Adhesive type also needs to be correct for your mounting process (see Tape Features)
The tape is applied to the sleeve being careful to lay it on without trapping air underneath it (must be flat to sleeve). A small strip of the tape liner is removed to leave the adhesive exposed initially.
The plate is carefully positioned over tape, usually by hand so that the register marks are seen directly below the cameras.
The cameras provide an enlarged visual display indicating whether or not the register marks are correctly positioned in line with crosshair targets. If necessary the plate position is adjusted.
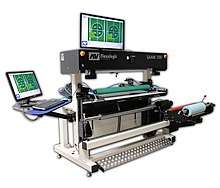
Once the plate is accurately aligned, it's pressed onto the strip of exposed mounting tape. The rest of the tape liner is then removed or a plate support table is moved so that the remainder of the plate can be laid onto the sleeve. This is done with each sleeve in turn so that all the plates register correctly.
Flexo plate mounting equipment includes many options to increase efficiency. These include tables to lay the plate on to make maneuvering the plate into position simpler, lay down (pressure) rollers to eliminate air bubble inclusions, tape application options, plate and tape cutting options and moving cameras, replacing multiple camera mounting systems.[5]
In recent years higher quality demands from customers, shorter and more frequent job runs result in an increasing relative cost of the prepress department.[5]
To counter this, automatic mounting provides up to 10x faster plate mounting than traditional plate mounting, no operator dependency and the highest possible accuracy and consistency down to 5 micron (0.0002 inch) per plate.[5]
3. Printing
A flexographic print is made by creating a positive mirrored master of the required image as a 3D relief in a rubber or polymer material. Flexographic plates can be created with analog and digital platemaking processes. The image areas are raised above the non image areas on the rubber or polymer plate. The ink is transferred from the ink roll which is partially immersed in the ink tank. Then it transfers to the anilox or ceramic roll (or meter roll) whose texture holds a specific amount of ink since it is covered with thousands of small wells or cups that enable it to meter ink to the printing plate in a uniform thickness evenly and quickly (the number of cells per linear inch can vary according to the type of print job and the quality required).[6] To avoid getting a final product with a smudgy or lumpy look, it must be ensured that the amount of ink on the printing plate is not excessive. This is achieved by using a scraper, called a doctor blade. The doctor blade removes excess ink from the anilox roller before inking the printing plate. The substrate is finally sandwiched between the plate and the impression cylinder to transfer the image.[7] The sheet is then fed through a dryer, which allows the inks to dry before the surface is touched again. If a UV-curing ink is used, the sheet does not have to be dried, but the ink is cured by UV rays instead.
Basic parts of the press
- Unwind and infeed section – The roll of stock must be held under control so the web can unwind as needed.
- Printing section – Single color station including the fountain or ink chamber, anilox, plate and impression rolls.
- Drying station – High velocity heated air, specially formulated inks and an after-dryer can be used.
- Outfeed and rewind section – Similar to the unwind segment, keeps web tension controlled.
Operation
Operational overview
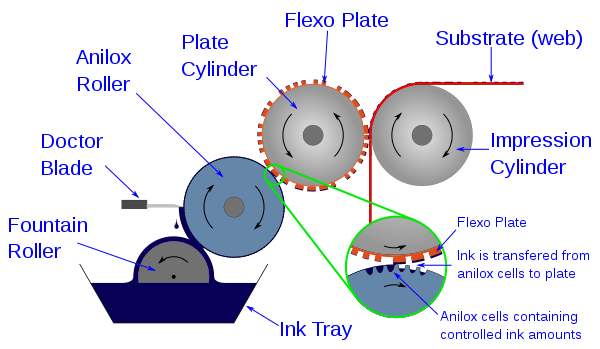
1. Fountain roller
The fountain roller transfers ink located in an ink pan to a second roller, an anilox roller.
In modern flexographic printing, the anilox roll is referred to as a type of meter or metering roller.
2. Anilox roller
The anilox roll is a unique characteristic of flexography. The anilox roller transfers a uniform thickness of ink to a flexible printing plate. The anilox roll has finely engraved cells with a particular ink capacity, viewable with a microscope. These rollers are responsible for transferring inks to the flexible printing plates mounted on the plate cylinders.
3. Doctor blade (optional)
An optional doctor blade scrapes the anilox roll to ensure that the ink to be delivered to the flexible printing plate is only what is contained within the engraved cells. Doctor blades had predominantly been made of steel, but advanced doctor blades are now made of polymer materials with several different types of beveled edges.
4. Plate cylinder
The plate cylinder holds the printing plate, which is made from a soft flexible rubber-like material. Tape, magnets, tension straps and/or ratchets hold the printing plate against the plate cylinder.
5. Impression cylinder
The impression cylinder applies pressure to the plate cylinder where the image is transferred to the image-receiving substrate.
This impression cylinder or "print anvil" is required to apply pressure to the plate cylinder.
Flexographic printing inks
The nature and demands of the printing process and the application of the printed product determine the fundamental properties required of flexographic inks. Measuring the physical properties of inks and understanding how these are affected by the choice of ingredients is a large part of ink technology. Formulation of inks requires a detailed knowledge of the physical and chemical properties of the raw materials composing the inks, and how these ingredients affect or react with each other as well as with the environment. Flexographic printing inks are primarily formulated to remain compatible with the wide variety of substrates used in the process. Each formulation component individually fulfills a special function and the proportion and composition will vary according to the substrate.
There are five types of inks that can be used in flexography:[8]
- solvent-based inks
- water-based inks
- electron beam (EB) curing inks
- ultraviolet (UV) curing inks
- two-part chemically-curing inks (usually based on polyurethane isocyanate reactions) - although these are uncommon at the moment
Water based flexo inks with particle sizes below 5 µm may cause problems when deinking recycled paper.
Ink controls
The ink is controlled in the flexographic printing process by the ink system. The ink system contains an ink pump, anilox roll and either a fountain roll system or doctor blade system. The fountain roll or two-roll system has one roll spinning in an ink pan pressed against the anilox roll to transfer a layer of ink to then be applied to the printing plate. This system is best used for low quality print such as flood coats and block lettering due to its inability to produce a clean wipe of the anilox roll. The doctor blade system can either be an open single blade system or an enclosed dual blade system. The single blade system uses an open ink pan with a roller that is then sheared with one doctor blade to create a uniform layer of ink to be distributed. The remaining ink sheared from the anilox roll will collect in the ink pan to then be pumped back into the system. This system is best used for low to mid quality print work - usually found in corrugated box printing. The dual blade system is an enclosed system that has one doctor blade for doctoring the ink and one containment blade that contains the ink in the chamber and allows ink from the anilox roll back in. Dual blade systems require 2 end seals and adequate chamber pressure in order to maintain the tight seal between the ink chamber and the anilox roll. This system is best used for high quality, intricate print designs, like those found in the label industry.
Presses
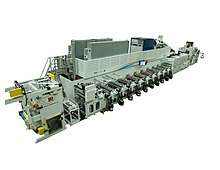
- Stack press
Color stations stack up vertically, which makes it easy to access. This press is able to print on both sides of the substrate.
- Central Impression press
All color stations are located in a circle around the impression cylinder. This press can only print on one side. Advantage: excellent registration.
- In-line press
Color stations are placed horizontally. This press prints on both sides, via a turnbar. Advantage: can print on heavier substrates, such as corrugated boards.
Applications
Flexo has an advantage over lithography in that it can use a wider range of inks, water based rather than oil based inks, and is good at printing on a variety of different materials like plastic, foil, acetate film, brown paper, and other materials used in packaging. Typical products printed using flexography include brown corrugated boxes, flexible packaging including retail and shopping bags, food and hygiene bags and sacks, milk and beverage cartons, flexible plastics, self-adhesive labels, disposable cups and containers, envelopes and wallpaper. In recent years there has also been a move towards laminates, where two or more materials are bonded together to produce new material with different properties than either of the originals. A number of newspapers now eschew the more common offset lithography process in favour of flexo. Flexographic inks, like those used in gravure and unlike those used in lithography, generally have a low viscosity. This enables faster drying and, as a result, faster production, which results in lower costs.
Printing press speeds of up to 750 meters per minute (2000 feet per minute) are achievable now with modern technology high-end printers. Flexo printing is widely used in the converting industry for printing plastic materials for packaging and other end uses. For maximum efficiency, the flexo presses produce large rolls of material that are then slit down to their finished size on slitting machines.
References
- "Trodat Rubber Stamps Online". Department of Paper Engineering, Chemical Engineering, and Imaging, Crest Corporation. Archived from the original on 24 July 2010. Retrieved 31 January 2019.
- Kipphan, Helmut (2001). Handbook of print media: technologies and production methods (Illustrated ed.). Springer. pp. 976–979. ISBN 3-540-67326-1.
- Printers' National Environmental Assistance Center: "Archived copy". Archived from the original on 2016-03-04. Retrieved 2009-01-29.CS1 maint: archived copy as title (link)
- AV Flexologic B.V.: "Archived copy". Archived from the original on 2013-09-08. Retrieved 2015-08-05.CS1 maint: archived copy as title (link)
- "Automatic Flexo Plate Mounting Machine | SAMM 2.0". AV Flexologic. Retrieved 2019-05-07.
- International Paper - Knowledge center - Flexography: https://web.archive.org/web/20100816235813/http://glossary.ippaper.com/default.asp?req=knowledge%2Farticle%2F151
- Johansson, Lundberg & Ryberg (2003) "A guide to graphic print production", John Wiley & Sons Inc., Hoboken, New Jersey.
External links
| Wikimedia Commons has media related to Flexography. |