Copy files from Mac OS 9 to Windows 7?

5

2

Today I fired up a PowerMac 9500 that's been sitting dormant for 10 years, and I want to copy the data files over to my Windows 7 system (NTFS). The Mac is running OS 9 and, after some fiddling around for a while, I am able to copy files over to Windows via FTP.

However, filenames are giving me a fit. Though I can copy a file at a time or select a bunch and copy them, I would like to select entire folders without getting "501 Syntax Error" errors and invalid filename errors on some file tucked in some folder deep in the trees.

I'm using Fetch 4 on the Mac and FileZilla server on the PC. Is there some setting I can use to make this work better, or maybe another method of transfer? Or, am I stuck with the hit and miss tedium of doing this bit by bit?

I am not a Mac or networking wizard, so maybe there's a way to share files that I'm missing. Can I make Win7 way more flexible with filenaming, or is this failing because of an FTP convention?

Edit: Once the old Mac files are on the Windows system, is there a Mac OS 9 emulation solution for Windows? It'd be nice to be able to use the Mac files.

b w

Posted 2010-01-17T02:34:37.620

Reputation: 2 424

Added question about Mac OS 9 emulation on Windows (and emulation tag) since @username helpfully suggested it. Might be useful to others who stumble across this. – b w – 2010-02-11T15:38:09.973

1

I've never really used OS 9, but can you tar all the files up and then upload them? You can then deal with the entire archive in Windows afterwards. Something like MacTar? http://www.strout.net/macsoft/mactar/

– fideli – 2010-01-17T02:46:21.290

@fideli - Windows doesn't like tarballs too much - or at least I haven't had much success with them. – Moshe – 2010-01-17T05:48:19.313

@fideli - perhaps. If i can't get zip/gzip to work, i'll give tar a try. – b w – 2010-01-17T18:50:38.553

Answers

0

Update: added info on SheepShaver to the bottom of this answer.

Okay, there has got to be a better way, but i haven't found it.

What i'm doing is continuing with the ftp approach, but doing it by manually rooting around, dragging the files to NameCleaner set to fix the names (changes invalid chars like / to valid chars like !, etc.), then dragging the files to Fetch 4.

I've tried various zip solutions with no success--various frustrating problems that led me further into the weeds without solving the problem. I also messed around with File Sharing with no success. Followed several online guides on making AppleShare work with Windows systems and it was a bust. Could never get Windows to see the Mac.

So, in the end, just manually futzing around, renaming and moving the files. Thank goodness for NameCleaner.

A note to anyone in a similar situation... It's apparent that sometimes a solution to the problem at hand isn't a solution to the real problem. After all this, i'm toying with just buying a newer used or refurbished Mac to deal with file format issues. Some of the files moved to my Windows system are useless--in the cases where it's a proprietary application format. Sheesh.

Thanks for the suggestions. Upvoting other good answers but accepting this one.

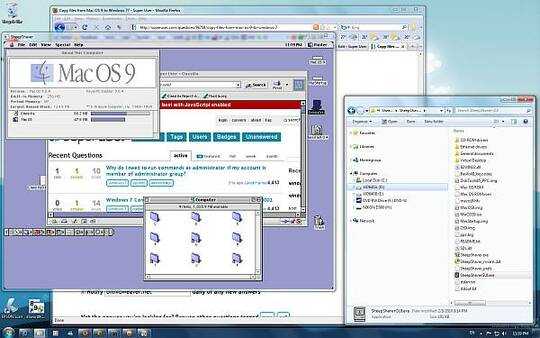
SheepShaver and Basilisk II

So now that i have my old Mac files on Windows, what do i do with them? Some are usable by Windows software, but not all of them. A comment by username below mentioned Basilisk, an open source classic Mac (68xxx) emulator for Windows, Mac OS X, and Linux. The current version is Basilisk II. But what i needed was SheepShaver, a PowerPC-based variant of Basilisk. It takes a lot of fiddling but i now have Mac OS 9.0.4 running on my Windows 7 desktop, with a 1 GB HDD, access to my Windows filesystem, internet access, etc. It's very cool, and i recommend it to anyone with a need or curiosity. To do this legally, you need to get a copy of your Mac's ROM, a disk image of your Mac OS install disk or bootable hard drive, and that's about it. I recommend looking at emaculation.com for downloads and help. The forums there are active and they are quick to help out. Below is a screen shot of my Win 7 64-bit desktop running SheepShaver with Mac OS 9.0.4 PowerPC. Cassilla is a Mozilla variant for classic Macs (which is giving me a "no Javascript" error at SuperUser.com for some reason). If you squint, you can see a "Computer" folder, which is essentially the drives available in "My Computer".

So, to wrap this all up, NameCleaner to make the filenames Windows-friendly, ftp the files from Mac to PC with Fetch, into a directory accessible via SheepShaver Mac OS 9 emulation. Definitely not the simple answer i was looking for, but a much more satisfying one that i wasn't expecting.

SheepShaver Mac OS 9 running on Windows 7 64-bit

b w

Posted 2010-01-17T02:34:37.620

Reputation: 2 424

1You could always install a classic mac emulator, like Basilisk, on your Windows machine. Then you could run your old applications to access your documents. – username – 2010-02-04T19:55:34.897

Another great idea. This looks complicated and time consuming... but maybe worth the investment. If i get anywhere with it i'll add some info here. Thanks. – b w – 2010-02-05T12:59:20.330

As an update, i've been trying to get SheepShaver (follow-on to Basilisk II) running on Windows 7 without success. Will keep trying. www.emaculation.com/doku.php/sheepshaver – b w – 2010-02-08T20:51:37.800

4

Grab a floppy disk, and put the disk in the Mac 3.5" drive... Mac's can write and read Fat16/32... So, you can then just take the disk, and move the contents to the PC.

Or, use Stuffit to compress the files into a ZIP file... And use Winzip (or equivalent) to uncompress it...

Benjamin Schollnick

Posted 2010-01-17T02:34:37.620

Reputation: 4 313

I would alter this and recommend you borrow a new Mac instead of zipping the files. If you burn a CD from the new Mac, it will be readable on a PC – username – 2010-02-03T19:42:42.180

I go with zipping and unzipping, but this will still have issues with unzipping for certain file names. Of course if you have a good Zip program, you could delete the unnecessary files from inside the zip file before you extract them all again. I use 7-Zip for that sort of thing. – None – 2010-01-17T09:44:27.483

1

1) Buy an old CD burner on ebay (approx $10) that uses SCSI (since your old computer does not have USB ports)

2) Connect the vintage CD burner to your old Mac, burn your files to disc

3) Borrow a MacBook running Mac OS X. Insert the CD, copy the files to the desktop

4) Select the files and choose "File > burn items to disc"

Now you have a CD containing all your files that you should be able to use on your Windows machine.

username

Posted 2010-01-17T02:34:37.620

Reputation: 1 178

+1, interesting alternative. I've already got many hours invested in the route i'm going, so i'll try to finish it that way. Conceptually your method sounds good though (except for adding yet another piece of hardware to the junk pile). – b w – 2010-02-04T13:23:46.670

Thanks! I glossed over step 2: you'd need to install burning software on the old Mac before you can burn - tracking down OS 9 software / drivers is not fun. Whether it's worth it depends on the number of files you have. The entire contents of the old Mac's drive will fit on a single CD, so that's nice - but if it's only a few files, FTP or a floppy should work. – username – 2010-02-04T19:48:43.977

0

If you just want to get the files into SheepShaver, and you have enough free space on the old Mac's hard drive for another copy of the files you want to transfer, the easiest way to get all the original file names and resource forks across intact is to use a disk image file:

(Tried it with Mac OS 7.6.1, but 9.x should be similar).

  1. On your old Mac, run Disk Copy. (If your old Mac doesn't have it already, there are old versions on Apple's web site -- in theory any PowerMac running the Classic Mac OS can use Disk_Copy_6.3.3.smi.bin -- but to open the downloaded file you'll need to already have something on your Mac like StuffIt that can decode a MacBinary file)
  2. Go to the "Image" menu and choose "Create New Image..."
  3. In the size drop down choose "Custom...", choose "MB", and enter a size big enough to hold the files you want to copy.
  4. Browse to where you want to save the file, give it a name for the disk file and click OK.
  5. Once Disk Copy is done creating the blank file, it will mount it, and Mac OS will ask you to initialize the disk file. Type in a name for the disk. Click Erase.
  6. Once the disk file has been initialized, an icon for it will show up on your desktop.
  7. Copy files on to the disk image using its disk icon on your desktop (like you would for a regular disk).
  8. Once you've got everything you want to transfer in the disk image, drag the disk icon for it into the trash to unmount the image.
  9. Now you just have to transfer the one disk image file to the Windows machine.
  10. You don't even need to use SheepShaver's "My Computer" feature to bring in the disk image - just add the disk image file to the Volumes list in your SheepShaver GUI, and it will show up as just another disk inside SheepShaver.

rakslice

Posted 2010-01-17T02:34:37.620

Reputation: 2 276