Create a bootable USB drive from a DMG file on Windows

53

36

A Mac machine needs to be reformatted with Lion. I backed up the Lion dmg file when I purchased it via the Mac App Store.

I now need to create a bootable USB drive from the DMG file but I need to be able to do it in Windows, preferring open source or at least free options.

How can I do this?

mindless.panda

Posted 2012-01-27T23:19:12.990

Reputation: 6 642

You can create using power iso on windows. More info read my tutorial on my blog. I hope it will help you to solve your issue. http://www.makarandmane.com/computer/tips-and-tricks/apple-mac-os-x/create-bootable-usb-mac-os-x-installer-from-windows/

– Makarand Mane – 2016-08-01T18:38:20.463

did anyone tried free tool ? http://www.crystalidea.com/dmg-to-iso-converter-convert-dmg-to-iso
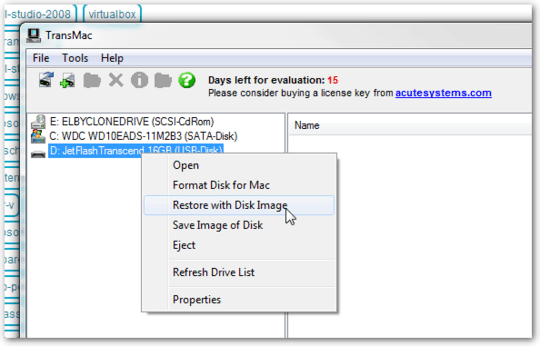
– T.Todua – 2016-08-04T05:48:05.887

You can use transmac to extract it then, all you need to do is make it bootable. http://www.acutesystems.com Its a 30-day trial. I'll try to find a tool to make it bootable.

– Mythrillic – 2012-01-28T01:43:29.680

Answers

61

Use TransMac, which has a 15-day trial period and works flawlessly.

  1. In the left pane, right click the USB Drive and select Format Disk for Mac

  2. In the left pane, right click the USB Drive and select Restore with Disk Image

  3. Point to your .dmg (or choose All Files to select an .iso) file and click Open.

enter image description here

It will take a few minutes depending on size of .dmg and speed of USB drive, but once done you can pop it into your mac, hold down the option key when turning on the mac and choose the USB drive.

Eric B.

Posted 2012-01-27T23:19:12.990

Reputation: 891

1Awesome application, thank you. It helped me to create a Mac Recovery USB. My friend created this Recovery USB and made a DMG file using Disk Utility and sent it to me over internet. Then using TransMac I burned DMG on my USB stick and was able to recover my macbook from failure – Dmitriy – 2014-06-29T18:03:27.480

Is it compatible with El Capitan, etc? – 101 – 2016-09-16T01:45:32.933

@101 Not sure, but I suspect it should be. – Eric B. – 2016-09-16T01:47:38.017

1Also after these steps in TransMac first Format Disk For Mac, then restore disk image – RegencySoftware – 2017-04-13T22:49:08.130

To select boot device on Mac hit power button while holding down the "Option" key. – FreeSoftwareServers – 2018-01-18T06:28:50.997

When I use Yosemite dmg http://188.138.9.93/MAC/Yosemite_10.10.3.dmg it is bootable OK and I can install but when I use El Capitan http://62.138.11.22/MAC/MAC_OS_X_El_Capitan_10.11_latest_Version.dmg it is not bootable - I can not see it in boot menu although TransMac finished job successfully. I do not know where is the problem.

– mikep – 2019-10-01T10:32:41.283

I had to use https://macdaddy.io/install-disk-creator/ which solved my issue

– mikep – 2019-10-01T10:58:58.470

Worked on the spot, thanks! – Chris G – 2019-11-25T16:35:04.900

24

TransMac worked for me, but first you need to partition your USB drive with GPT. It will not work if partitioned as MBR. diskpart on Windows can do this:

diskpart
DISKPART> list disk
(Find the disk number)
DISKPART> select disk 2
Disk 2 is now the selected disk.
DISKPART> clean
DiskPart succeeded in cleaning the disk.
DISKPART> convert gpt
DiskPart successfully converted the selected disk to GPT format.
DISKPART> create partition primary

Kevin Smyth

Posted 2012-01-27T23:19:12.990

Reputation: 381

5I think this should have been included as an edit or comment to Eric B.'s answer. – StockB – 2015-08-24T11:36:25.773

1

This did NOT work for me. I got a prohibition sign when attempting to boot from a USB created through transmac with the GPT. I followed the procedure precisely. I had to use Carbon Copy Cloner to get past that. https://superuser.com/questions/1052037/macbook-pro-does-not-boot-prohibition-screen-does-not-see-hard-drive-blink/1058012#1058012

– stackOverFlew – 2016-03-27T22:00:56.317

1Also after these steps in TransMac first Format Disk For Mac, then restore disk image – RegencySoftware – 2017-04-13T22:49:04.210

Personally, since Mac is so fussy, I'd rather use the tool designed to do this job, aka TransMac can format to GPT vs using DiskPart, but always good to know alternate methods – FreeSoftwareServers – 2018-01-18T06:26:11.763

6

As far as I know, the only way to properly create a bootable Lion disc/disk is to use Disk Utility on a working Mac. However, the other option is to use a Virtualbox VM to run OS X temporarily (scroll down for that info).

On a Mac

The guide from lifehacker:

  1. Download Lion from the Mac App Store. The installer should show up in your Applications folder.

  2. Right-click on the installer and hit "Show Package Contents". Navigate to Contents > SharedSupport and look for a file called "InstallESD.dmg".

  3. Open up Disk Utility and drag the DMG file into the left-hand sidebar. If you're burning it to a DVD, insert your DVD, select the disk image in the sidebar, and hit the "Burn" button. Skip down to the last step to use it.

  4. If you want to burn Lion to a USB flash drive, plug it in and click on it in the left-hand sidebar in Disk Utility. Go to the Partition tab and select "1 Partition" from the dropdown menu. Choose "Mac OS Extended (Journaled) on the left.

  5. Hit the Options button under the partition table and choose "GUID Partition Table". You'll need this to make the drive bootable on a Mac. Hit the Apply button when you're done to format your drive (note: it will erase everything on the drive).

  6. Click on the "Restore" tab, choose the InstallESD.dmg file as the source and your flash drive as the destination. Hit the Apply button and it will create your bootable USB drive.

  7. Reboot into OS X and hold the option key when you hear the startup chime. You can boot into your DVD or flash drive from there.

On a PC

I know this works with Snow Leopard, but I'm not sure about booting Lion in Virtualbox. My suggestion is:

  1. Acquire a Snow Leopard iso image
  2. Use this guide to convert the Lion dmg into an iso

  3. On Virtualbox click "New"

  4. Choose OS as Mac OS X and click on 64bit or 32 bit (depending on your system) Snow Leopard
  5. Choose VDI as storage and click next
  6. Click on Dynamically Allocated space
  7. Give 4096 MB of Ram for optimum performance or you can also give 2048
  8. Once finished click on the Virtual OS you just created and click on settings.
  9. Go to storage and click on the disk below the vdi storage.
  10. Click on the empty disk button on the right side of the window.
  11. Choose the .iso file you converted earlier.
  12. Just click ok and start the Virtual OS

evan.bovie

Posted 2012-01-27T23:19:12.990

Reputation: 2 758