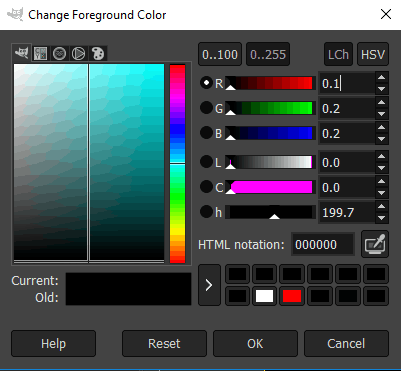
It is not possible to set such a color in GIMP 2.10.
I've just checked it out - although the image precision per se can be far higher than 8 bit, solid colors as set in GIMP context are only used with an 8 bit precision (that is: 256 levels of each color).
Here is what I[ ve done: My first attempt was setting the foreground color programmatically by using the Python console. While the call to pdb.gimp_context_set_foreground can take a triple of floating point numbers, from 0 to 1, if the number is less than 1/256.0, it is rounded to zero.
Then I tried to create the color (1 / 512, 0, 0) on the image itself - which the color picker indicated I succeeded in doing (this will be your way out, so just keep reading), then use the color-picker to add this color as foreground color. On using the color picked in this way to fill an area, again, GIMP had rounded the color down to (0, 0, 0).
So, forgetting about setting the FG color, the way to create a surface with a precision smaller than 1/256 in any component in GIMP 2.10 is using the painting or color tools.
You can do this, and use the color-picker tool to check for success:
- use at least 16bit precision
- fill an image with black;
- Set your foreground color to the lowest possible graylevel (010101 hex color on the color dialog)
- use, for example, the bucket-fill tool and set the opacity to desired level (25% for 1/4 of 1/256 gray, (1/1024 gray)).
- Use the color picker tool to check if you got to the desired level (1/1024 gray will show 0.000076 for each component - while the 8 bit gray #010101 is 0.000304 for each component).
- Convert the image to "16 bit integer precision" back before exporting to .PNG file - I further tested and found out that attempts to save a 32bit FP precision image as a PNG file will result in an 8bit png file (all work above is lost). But if the image on GIMP is 16bit integer, then the PNG export generates a correct 16bit PNG. (Saving as native .xcf file format will preserve the precision, of course)
Some extra notes:
so, if 16bit suffice you, you can use 16bit integer all way along, that way it is easier to check the values under the color picker.
On my initial test, instead of a 25% opacity bucket-fill, I used the Color->Curves tool to reduce the gray level bellow 1/256 - I just filled the image with #010101 gray, clicked to use the curves tool, and dragged the right-handle to midpoint, thus halving all pixel colors on the image. Using the curves tools may be more confortable to you: just paint your images with low gray levels as you would if you would not need the extra levels, and then use this technique to reduce all existing gray levels at once as needed.

1I just tested this and it totally solves the problem - thank you! One refinement for anyone who sees this in the future - the same idea of modulating using the opacity works on the layer that the solid is drawn on if it's isolated. This just saves the trouble of adjusting the geometry for the outline differences between bucket fill and 'fill path.' – Ethan48 – 2019-03-05T14:47:42.793