0. Notes
First, disable Time Machine. Then, make sure you have a backup of your important stuff and don't solely rely on the Time Machine disk. You can break things here.
Also note that you should only do this if you want to have incremental backups again. If you don't care about your previous backups, you can skip this thing and just let Time Machine create a second one.
1. Prerequisites
Anyway: You need the fsaclctl command for the following steps. If you are on Snow Leopard, you can get it from the Leopard install disk. On Leopard, it is included already (skip to the next part).
You can also download a package here or here. Extract it, right-click the EnableACLs.app and select "Show Package Contents". Navigate to Contents/Resources and copy fsaclctl to your Home folder (/Users/<your-username>).
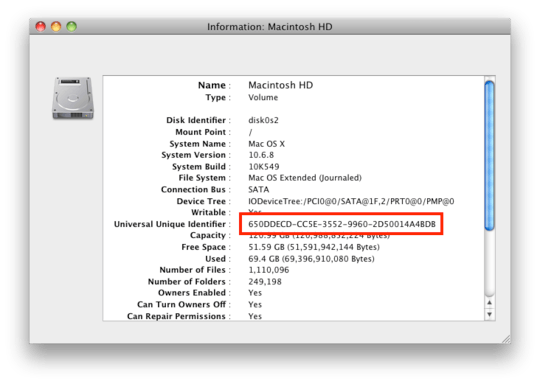
2. Find out your new UUID
Open Disk Utility.app, and select Info on your Mac disk. Here, copy your UUID somewhere else. You will need it later.
3. Check your old UUID
Then, open up a terminal and go to the latest backup on your TM disk:
cd /Volumes/<time-machine>/Backups.backupdb/<your-mac-name>/Latest
Replace time-machine> and <your-mac-name> with the name of your Time Machine Volume and your Mac's name, respectively. Now, let's find out the UUID that's currently stored on your disk:
sudo xattr -pl com.apple.backupd.SnapshotVolumeUUID "Macintosh HD"
Replace this with the actual name of your partition (in my screenshot, it was "Macintosh HD"). As you can see, in my case the UUIDs match. In your case, they won't.
If they do, stop here, something else might be the problem!

4. Replace the UUID on the Time Machine volume
You now need to disable ACL protection on the drive using the fsaclctl command.
sudo fsaclctl -p /Volumes/<time-machine> -d
If you've copied it to your Home folder, use this instead:
sudo /Users/<your-username>/fsaclctl -p /Volumes/<time-machine> -d
Now, this is the critical line. You need to overwrite the old UUID to the one of your current disk (i.e. the one found through Disk Utility). Replace the XXX… with the UUID you copied at the beginning.
sudo xattr -w com.apple.backupd.SnapshotVolumeUUID XXXXXXXX-XXXX-XXXX-XXXX-XXXXXXXXXXXX "Macintosh HD"
So this might look like:
sudo xattr -w com.apple.backupd.SnapshotVolumeUUID 650DDECD-CC5E-3552-9960-2D50014A4BDB "Macintosh HD"
After you're finished, re-enable ACL again:
sudo fsaclctl -p /Volumes/<time-machine> -e
As before, if you've just copied it to your Home folder, do this instead:
sudo /Users/<your-username>/fsaclctl -p /Volumes/<time-machine> -e
Don't forget to re-enable Time Machine and see if it works now. Note that the next backup may take a while, even a couple of hours.
I did a similar procedure once, which became necessary after switching the logic board of my Mac.
This is gathered from:


See also Apple's Mac OS X 10.5: Time Machine performs full backup after a full restore.
– Arjan – 2011-10-04T20:28:23.463