Introduction
Tear-down only. My attempted repairs didn't work.
My wireless keyboard (Seenda WGJP-038 combo) periodically stopped detecting keyboard strokes both on Windows and Ubuntu PC's, although the mouse always worked. The initial work around was to turn the keyboard 'off and on' or just to wait a few minutes to recover. But when the keyboard kept going to sleep every few minutes, a tear-down was carried out to try to locate a fault. In my case, it could not be fixed but a tear-down guide might be useful to others as this keyboard has no external screws, not even hidden ones!
Before attempting a hardware repair make sure the fault is not due to flat batteries or software issues.
-
-
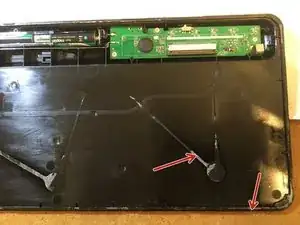
The keyboard had no external screws. It was assembled with tabs and glue around the edge and in the middle. (see glue lines in image, arrowed red). When breaking open glued casings, eye protection should be considered.
-
To open, use a blunt butter knife or similar and ease the top and bottom casings apart at the seam line. Try different places to find the weakest point. Once a small gap is opened, slide in a flat head screw driver at the edge of the gap and twist, to break more glue. Work around the edge until all the glue is broken. (Some clips may break).
-
(There were so many clips that a few broken ones didn't matter, such that the casings clipped back together easily.)
-
The top and bottom casing will still not come fully apart because there are more glue lines to break with the screw driver. The casings could be bent apart enough to insert a flat bladed screw driver to break more glue lines. Once done and the ribbon cable extracted (pull down the locking bar first), the top and bottom casings come apart.
-
The image shows the open casing with the plastic cover over the circuit board removed (about 8 small screws Philips 00). With the removal of another 3 small screws the circuit board can be lifted out for inspection.
-
-
-
Check circuit board for any dry solder joints (re-flow solder with soldering iron if necessary). Maybe also clean switch with switch lubricant. Unfortunately this didn't fix my fault.
-
My final repair attempt, was to heat up the circuit board in a fan oven to heal any invisible microcracks in the solder. I started at 5 mins at 120C and went up in 10C steps, testing after each step. After 160C, the keyboard was working much better, but after 170C it was dead!
-
Hopefully your repair will be more successful.
-
