Introduction

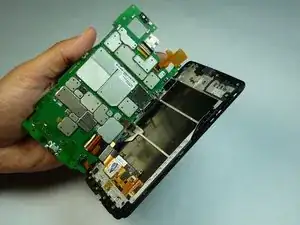
By following this guide you will be able to take the phone apart piece by piece and have access to the motherboard, camera back housing, rear and front cameras, as well as other components that can be fixed if needed.

  1. 1PX2nhItvGRfbDNT
    1PX2nhItvGRfbDNT
    IAsvnRr1NjEboIKt
    • Place the Droid Maxx face up on a soft flat plastic surface with plenty of space to place your tools and small parts of the equipment.

    • Lift the Droid Maxx and turn it in a 90-degree angle to your left while you are holding it by the sides with one hand. Maintain the same position all times unless indicated otherwise in subsequent steps.

  2. PVmxOEektTjsTE5K
    PVmxOEektTjsTE5K
    oLF4j3Vkq3d6yIQV
    YRXRInEktOaNDxCn
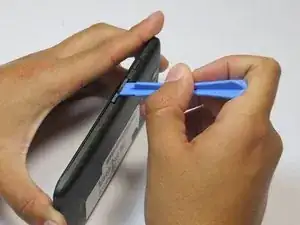
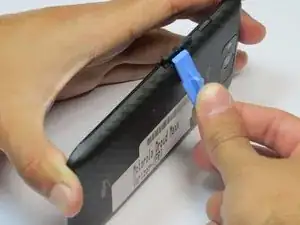
    • Find the volume buttons located towards the center of the Droid Maxx.

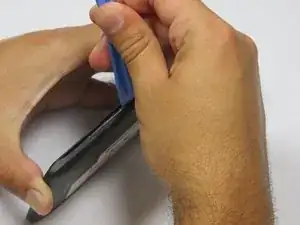
    • With your free hand, take the Spudger and insert it between the upper gap, closest to the screen, of the volume buttons and the Droid Maxx case.

    • Using the flat part of the Spudger’s Tip and pressing firmly against the Droid Maxx case until you hear a “snap” sound

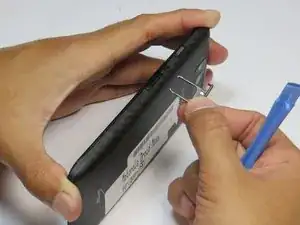
    • With your free hand, remove the buttons carefully with your two fingers and make sure to keep the motion until the piece is completely out of your Droid Maxx. Do not bend or force the part since it also serves as a tray for placing a SIM Card.

  3. NGeAMD5i6EQC66KZ
    NGeAMD5i6EQC66KZ
    e3jQW5UUcPN2a2Cd
    iQVKFeOKT2u6jbVS
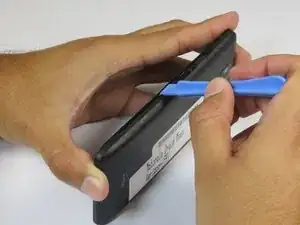
    • Tilt the Droid Maxx towards your right so you can see the edge of the rubber back case and keep this position.

    • Take the Spudger and press the tip against the space between the rubber case and the Droid Maxx frame. Slide the Spudger’s edge along the surface until you hear a “snap” sound.

    • Work your way to the top of the Droid Maxx with the Spudger and use your holding hand’s fingers as support while you remove the upper part of the rubber back case. Rotate the Droid Maxx to facilitate your movement if necessary. Do not go along the bottom to remove the case.

    • Once the top part of the case is separated from the frame, grip the bottom part of the rubber case with your finger and slide the case down to remove it completely.

    • Place the rubber back case in a nearby place where it will not interfere with your arms motion.

    one more picture would be nice to see the top part of the case separated from the frame before you use your fingers to slide the case down to remove it completely. other then that thank you very much was really helpful i wouldn't of figured it out, myself !

    zukcudo -

    Agreed: we really could use an additional picture. You have to pry the case apart at the top before you can slide the back off by moving it towards the bottom.

    Fred Chapman -

    It would be a good idea also to advise people to be very careful of the volume buttons. They are easy to break if a spudger or anything else were allowed to slide across them. Yep… I did that. Lucky for me I had someone quite capable to solder new ones on for me. =o)

    Rongwey -

  4. MetDAatly6gItPAW
    MetDAatly6gItPAW
    ARkE1iIopidS3Iiv
    ETaDmrmNItPwKWSp
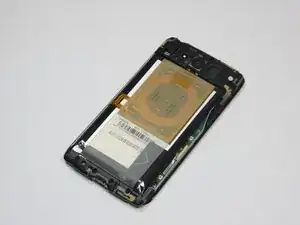
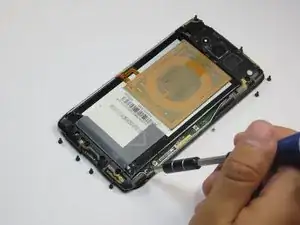
    • Lay the Droid Maxx face down on the plastic surface to start removing the screws.

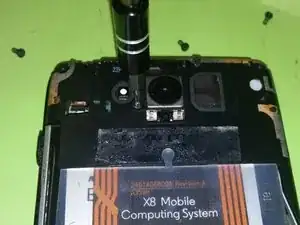
    • Take the Torx T5 Screwdriver and carefully remove all the screws in the Droid Maxx’s motherboard. Note that there is a total of eight (11) black screws spread across the motherboard, four (4) at the top and four (4) at the bottom, and also two (2) silver screws located to the right lower part of the Droid Maxx.

    • There is(1) screw holding the camera housing. Use a T4 screwdriver for this one screw.

    • After removing all the screws, lift hold the Droid Maxx as in step 2

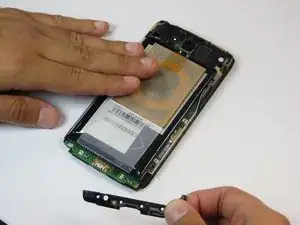
    • Locate two (2) tabs in the camera plastic housing , one (1) at each corner of the Droid Maxx

    • Take the Flathead driver and gently lift both tabs to release the camera housing. Be careful because these plastic tabs are very delicate and can break easily.

    **** The camera housing is held in place with a T3 not a T4!****

    dbmeyer2 -

    Confirmed: the camera housing screw is a T3, not a T4. It's really tiny!

    Fred Chapman -

    Can you please show some pictures of the tabs on either side of the top plate that covers the rear-facing camera? That part is tricky and not at all obvious from the written description.

    Fred Chapman -

    Once you release the tabs of the top plastic housing on either side you can just pry it open. It maybe a bit stuck with adhesive but it comes off without fear of breaking any cables

    Rao Garimella -

  5. uTloDHeMboIFv6Lk
    • Now you are all set! These steps along with images should serve as guide to disassemble your Motorola Droid Maxx in a safe manner. The following guides will indicate how to replace parts of your Droid Maxx such as the camera or battery.

    • Keep in mind that in order to replace any of the aforementioned parts you will be redirected to this general section.

Arturo Wilson

Member since: 07/10/14

329 Reputation

17 comments

Please help identify the WIFI chip location on Droid Maxx XT1080M

Hello,

Could someone help identify which EMI shield covers the WIFI chip on the Motorola Droid Maxx XT1080M board, as seen in the following picture? I need to fix an intermittent WIFI problem (WIFI cannot be enabled.)

Thank you very much,

Eric

Eric Nguyen -

Hi, did you ever figure this out? I am having the same issue.

7039cm -

The t4 doesn't fix the camera housing.

Ronald Strouse -

I need to see the removal and replacement of the cable to attach the new screen assembly to the board.
Dawn Moore -

Hay how are you sir please information help me may cell phone problem cell name Motorola model xt 1080 OK sir but ani problem cell charger detta cebal 4cor cebal palac garod vair balkc negative- read positive + cell phone charger wair OK sir but 2 wair wait and green OK sir may problem may charging Saplae balkc to balkc OK pozitve read to wait and green 3 wair read green wait copal or cell phone off and did OK sir thanks so much please bakc to me datel cell problem send me message may cell phone number 00923008014337 may logging urdo may name is m aslam from Pakistan

muhammadaslamaj -

Good guide, I love your teardowns. But for reassembling: Don't make the same mistake I did. When putting the motherboard *back* against the display, be SURE to fit the buttons into their holes FIRST. I forgot about them, and broke my volume-down button clean off, and damaged my volume-up button, before I realized they weren't fitting. It just seemed to me I didn't have the motherboard aligned right. The buttons are *very* fragile.

Kenneth Ryan -

not very thorough

jld4 -

Did anybody have an issue with the screw next to the camera? I couldn't get it out because the T4 didn't fit, and the T3 is to small. I ended up stripping it after i tried to shave the T4 down enough to fit into it. I still cant seem to get it out and I've tried everything i can think of.

Katie Sears -

How did you get the stripped screw out?

Machenzie Miller -

How did you remove the stripped screw

Machenzie Miller -

Is it possible to identify the internal memory component, and swap it to upgrade from say, 16 GB to a 32, or even 128+? Are they standard computer components that can be changed, and is it possible without highly specialized equipment? I know the theoretical is possible. [I have two of these phones, one is as old as the Maxx model line, a 32g model, its well worn and the screen is damaged. The new one was very cheap but is only a 16GB model and its rather frustrating.

At this point, I may just swap the motherboard component from the old phone over, and basically have the original 32GB phone wrapped in all new case and screen and battery. But if I could then take the 16GB board and attempt a valiant effort to upgrade it beyond 64GB or even 128Gigs; this would be an interesting experiment if viable!

thejustin47 -

I did a screen swap on my phone today. NOTE: The T4 torx driver needed should listed as one of the tools included. You do need a T4 for the camera screw and you may find that not all T4 or T5 screws/drivers will fit properly. Fortunately, I had access to a couple of different screwdriver makes to perform the whole task.

The flat connector for the motherboard to screen is held by a piece of tape - peel that off and then you can pull the connector free, set tape aside for reassembly.. Putting the connector back on the socket required assistance with blunt, fine tweezers. Once reconnected, place the tape back over the connection.

J Rob -

I need help removing the earpiece on the Droid Maxx 2

Shawn -

I can't find it anywhere

Shawn -

I'm already done with this and I'm still ISO the t5 screw on this device..

Lee -

A tutorial on replacing the power (on/off) button woud be a wonderful thing!

Arlie Box -

My droid maxx's screen has gone blank and nothing is showing on screen only it goes vibrates only. What is its problem?

Omer Zafar -