Introduction

Pre-req only

  1. 3L3sao2XKPdpa2sv
    3L3sao2XKPdpa2sv
    DxcSEZT4HFCY6Fp2
    31aAiLUdHil2DFFb
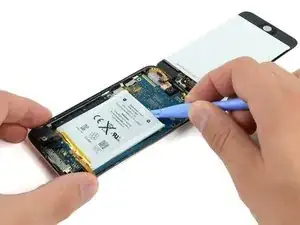
    • With a plastic opening tool, gently pry the iPod's speaker out of its recess in the outer case.

    • Do not try to completely remove the speaker. It is still soldered to the underside of the logic board.

    • Allow the speaker to rest above the battery so that you can proceed with battery installation.

  2. v46m3JPTmdbGjV5f
    v46m3JPTmdbGjV5f
    IYnGlDCMmIdUhkjv
    NUE3DWG6bmTPac23
    • In the next few steps, you will loosen the adhesive from underneath the battery, the logic board, and the frame under the battery. Do this slowly, carefully, and evenly. Take care not to puncture the battery or bend the logic board.

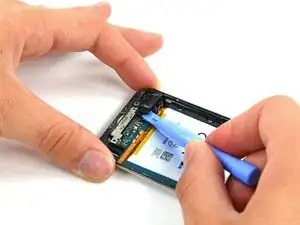
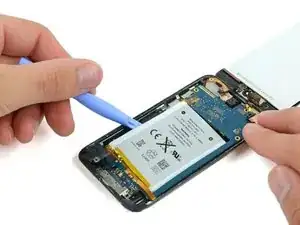
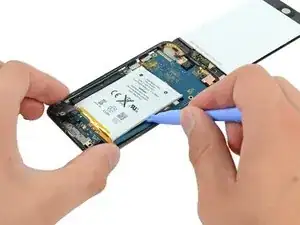
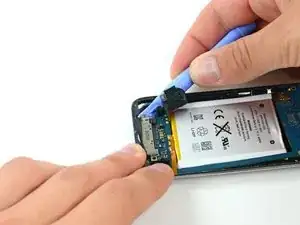
    • Use a plastic opening tool to pry up the adhesive around the three exposed edges of the battery.

    • Do not try to pry the battery out, just start loosening the adhesive.

  3. ZW3VORGCJPRswJLV
    ZW3VORGCJPRswJLV
    JNhpTpTCXdNVx4Oy
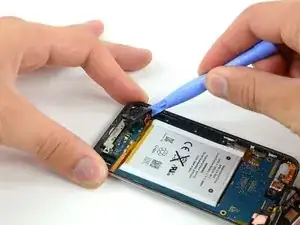
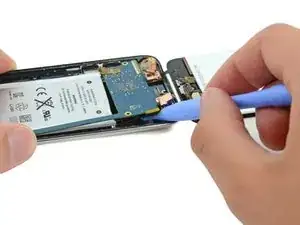
    • After the edges of the battery are loosened, begin prying up the edge of the logic board. Start at the top and work your way down the side of the board.

    • To prevent bending/breaking the logic board, do not try to remove the logic board, yet. The dock connector is still embedded in the frame. Again, you are only trying to loosen more of the adhesive.

  4. XlDmOMXACw1qarcI
    XlDmOMXACw1qarcI
    MEJ5gDpl5PaGARDh
    • With a plastic opening tool, carefully push the dock connector out of its outer case recess. Work each corner evenly until the connector comes free.

    • Since the dock connector is attached to the logic board, pushing it out of the case may cause the logic board to begin to flex. Take extra care not to permanently warp the board.

    This was the hardest step for me. I ended up snapping the mother board at the corner because the adhesive just suddenly released. I wish there were a few more pictures and pointers on how to remove the charging port. Does anyone know a good place to get a cheap 32 GB mother board??

    Damon -

    Existe cola embaixo do conector, por isso, a dificuldade em retirá-lo. Eu aconselho, um pequeno aquecimento com a pistola de calor, na parte traseira da carcaça, antes de tentar a remoção do conector.

    mpcellmendes -

    For Step 17, just slip a length of waxed dental floss under the top left and right corners of the battery, slowly slide down the back of the battery with a sawing motion. All the adhesive will be seperated w/out any risk of bending the board or puncturing the battery. Charging port will now be easily removed.

    carol -

    Well Done! Nice to see extra ideas for Steps as it can make the process much better. Thank u!

    Vicki -

  5. nYSJ2AIVrcDIwXUG
    nYSJ2AIVrcDIwXUG
    fEUeLVeDFNPe4ful
    GtWSoIMnLbUPco24
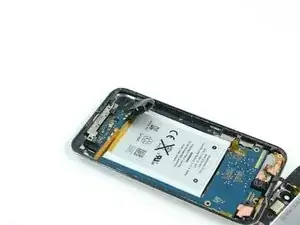
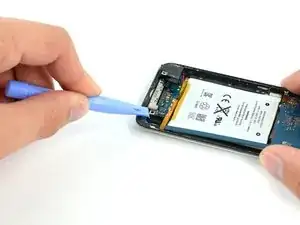
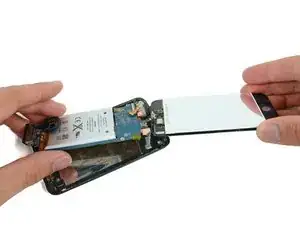
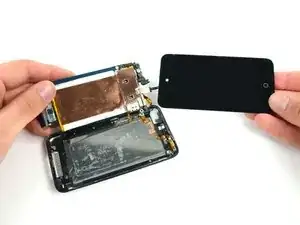
    • Once all of the adhesive is freed from under the logic board/battery assembly, lift the assembly up from the side and carefully rotate it over to access the underside of the battery.

    • The logic board is still attached to the rear case. Do not try to completely separate the assembly, or you will rip this ribbon cable.

    At this step there should be indicated much clearer in BOLD YELLOW RED what ever to turn the logic board instead of removing, since it VERY easily will break the ribbon.

    Fboecom -

Conclusion

To reassemble your device, follow these instructions in reverse order.

Jake Devincenzi

Member since: 18/04/11

117228 Reputation

0 comments