Introduction

Replace a malfunctioning battery to juice up an old iPod Shuffle.

  1. MXuliHGVved1FCAM
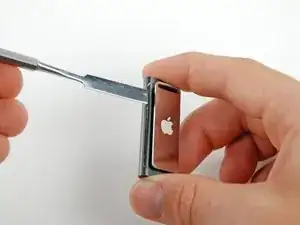
    • Widen the small gap between the front and rear case by inserting a metal spudger into the gap near the top of the iPod.

    • Be careful when using a metal spudger, as you may scratch the outer case.

  2. lSphTNpybkr4OMbs
    lSphTNpybkr4OMbs
    2dUJAdTawiHEOgj1
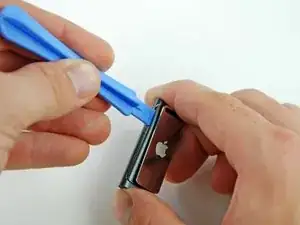
    • Insert an iPod opening tool into the newly widened gap, and pry the rear case up and away from the front case.

  3. cMvrP6XCY6OFeqnu
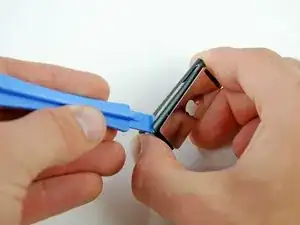
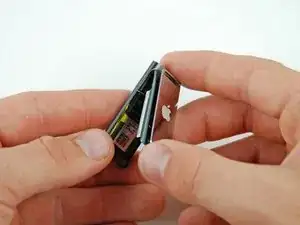
    • Insert the iPod Shuffle opening tool into the gap between the front and rear case on the same side, at the bottom corner of the iPod.

    • Pry the rear case away from the front case.

  4. cVvIGabjVNejxUZM
    • Lift the bottom of the rear case and remove it from the rest of the iPod.

  5. RpCYGGpiiBMpTCxa
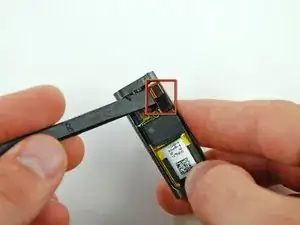
    • Disconnect the headphone jack and shuffle switch connector by prying it off the logic board with a spudger.

  6. u3cbnxGNyeMDHNPX
    • Remove the single Phillips screw securing the logic board to the front case.

  7. OuYG5vZXMUEdMLpV
    • Peel the battery up from the front case with an iPod opening tool.

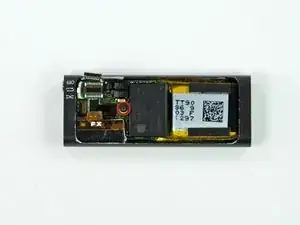
    • Remove the logic board and battery from the iPod.

  8. P1AIHpdAeZMAjPch
    • The battery on the Shuffle is attached via solder pads with small holes that go through the battery ribbon cable and attach to flat pads on the face of the logic board. In the following steps you will heat each solder pad individually while using a spudger to pry it up from the logic board.

    • DO NOT bridge the connection between the solder pads on the board. Shorts have the potential to ruin the logic board.

    • Beware of overheating the board and the cable. Only hold the tip of the iron against the pad long enough to let the solder melt. Excess heat buildup has the potential to ruin the logic board or melt the ribbon cable.

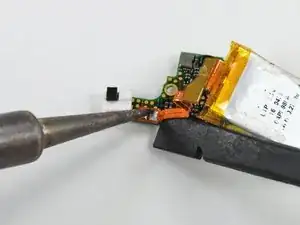
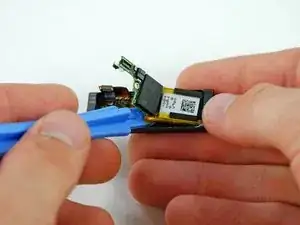
    • Start working from the right side of the battery ribbon cable. Heat the right solder pad while gently prying up from under the ribbon cable to free it from the board.

  9. jpxmtYwA3RC6jHLQ
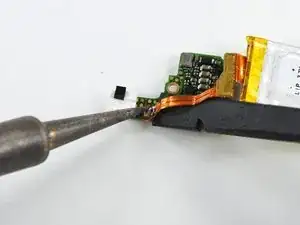
    • Repeat the previous step for the remaining solder pad.

    • Once the two connections have been desoldered, lift the old battery off the logic board.

    • For tips on soldering a new battery to the logic board, follow the repairing soldered connections guide.

Conclusion

To reassemble your device, follow these instructions in reverse order.

Matthew Newsom

Member since: 06/01/10

39452 Reputation

7 comments

IS THIS DONE ANYWHERE IN cHENNAI-mADRAS sOUTH iNDIA PL INFORM.

Kumaraswami Vallur Sundaresan -

Is this done anywhere in Chennai- Madras South India?

Kumaraswami Vallur Sundaresan -

Thanks, it’s very helpful.

taiotp -

Im going to try and replace the battery with a 3rd party battery and was wondering if you knew which side was the positive and negative

Kai Nodera -

Hi where have u got the battery from

Rishii k -

Anyone having any luck finding replacement batteries?

Mike Suchodolski -

I order some from here:

https://www.alibaba.com/product-detail/O...

Worked great, my shuffle has 12 hours of battery life again <3

Arkadiusz Fal -